Table of Contents
Advertisement
Available languages
Available languages
Quick Links
MODEL / MODELO / MODÈLE :
SC1389
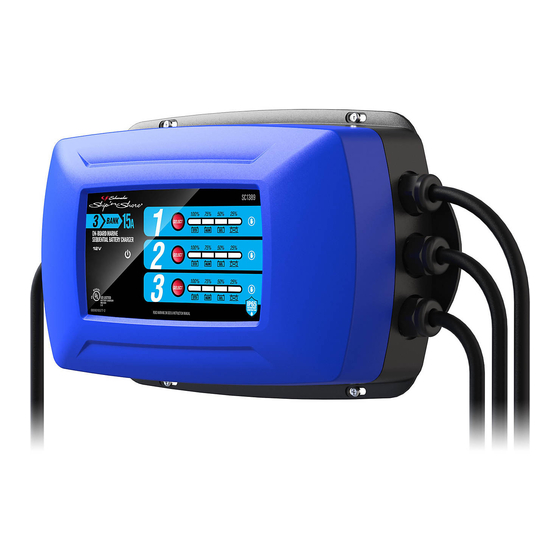
3-Bank Onboard Marine Battery Charger
Cargador de batería de 3 bancos para embarcaciones
Chargeur de batterie marine avec trois sorties de charge
OWNERS MANUAL / MANUAL DEL USUARIO
MANUEL D'UTILISATION
PLEASE SAVE THIS OWNERS MANUAL AND READ BEFORE EACH USE.
This manual will explain how to use the battery charger safely and effectively.
Please read and follow these instructions and precautions carefully.
POR FAVOR CONSERVE ESTE MANUAL DEL USUARIO Y LEALO ANTES
DE CADA USO. En este manual le explica cómo utilizar el cargador de batería
de manera segura y confiable. Por favor, lea y siga las siguientes instrucciones
y precauciones.
GARDER LE MANUEL D'INSTRUCTION ET LISEZ LE AVANT CHAQUE
UTILISATION. Ce manuel explique comment utiliser le chargeur de batterie
d'une façon securitaire et efficace. S'il vous plaît lisez et suivez ces instructions
et precautions.
0099002085E-00
Advertisement
Table of Contents

Related Manuals for Schumacher Electric SC1389


Summary of Contents for Schumacher Electric SC1389
- Page 1 MODEL / MODELO / MODÈLE : SC1389 3-Bank Onboard Marine Battery Charger Cargador de batería de 3 bancos para embarcaciones Chargeur de batterie marine avec trois sorties de charge OWNERS MANUAL / MANUAL DEL USUARIO MANUEL D’UTILISATION PLEASE SAVE THIS OWNERS MANUAL AND READ BEFORE EACH USE.
-
Page 2: Table Of Contents
QUICK INSTRUCTIONS • Connect black ring terminal to negative battery post, and red ring terminal to positive battery post. Plug charger into live AC power outlet. • The Power On and (last used) Battery Type LEDs will light (when used the first time, the factory default setting is AGM). - Page 3 INSTRUCCIONES RÁPIDAS • Conecte la terminal de argolla negra al borne negativo de la batería, y la terminal de argolla roja al borne positivo. Enchufe el cargador en la toma de CA energizada. • Se encenderán los indicadores LED de encendido y último tipo de batería utilizada (cuando use la unidad por primera vez, la configuración de fábrica es AGM).
- Page 4 INSTRUCTIONS CONDENSÉES • Connecter la cosse-anneau noire à la borne négative de l’accumulateur et la cosse-anneau rouge à la borne positive de l’accumulateur. Brancher le chargeur dans une prise d’alimentation c.a. • Les DEL d’alimentation et du dernier accumulateur utilisé s’allumeront (lors de la première utilisation, le réglage d’usine par défaut (AGM) sera activé.
-
Page 5: Important Safety Instructions
1. IMPORTANT SAFETY INSTRUCTIONS SAVE THESE INSTRUCTIONS. 1.1 SAVE THESE INSTRUCTIONS – 1.8 Do not operate charger if it has received This manual contains important safety a sharp blow, been dropped, or otherwise and operating instructions. damaged in any way; take it to a qualified serviceman. -
Page 6: Preparing To Charge
3. PREPARING TO CHARGE 3.1 If necessary to remove battery from battery manufacturer. Do not overfill. For a vehicle to charge, always remove battery without removable cell caps, such grounded terminal from battery first. Make as valve regulated lead acid batteries, sure all accessories in the vehicle are off, carefully follow manufacturer’s recharging so as not to cause an arc. -
Page 7: Dc Wiring Detail
as a template, place the charger in the or other components. Using #10 bolts, selected location and mark each of nuts and lockwashers, mount the charger the four holes with a pencil. In a well with the LEDs facing up on a flat vertical ventilated environment, drill the four holes surface, to allow for ventilation. -
Page 8: Operating Instructions
flash for 3 seconds, and then turn solid. If SOLID RED – The charger has detected no battery type is selected, the “OFF” LED one of the following problems:. will light and the bank will turn off. To check • Aborted charge the battery type setting during charging, •... -
Page 9: Maintenance And Care
1-800-621-5485 For REPAIR OR RETURN, contact Customer Service at 1-800-621-5485. DO NOT SHIP UNIT until you receive a RETURN MERCHANDISE AUTHORIZATION (RMA) number from Customer Service at Schumacher Electric Corporation. • 9 •... -
Page 10: Limited Warranty
Manufacturer does not provide any warranty for any accessories used with this product that are not manufactured by Schumacher Electric Corporation and approved for use with this product. This Limited Warranty is void if the product is misused, subjected to careless handling, repaired, or modified by anyone other than Manufacturer or if this unit is resold through an unauthorized retailer. -
Page 11: Instrucciones Importantes De Seguridad
1. INSTRUCCIONES IMPORTANTES DE SEGURIDAD GUARDE ESTAS INSTRUCCIONES. 1.1 GUARDE ESTAS INSTRUCCIONES – 1.8 No utilice el cargador si el mismo recibió Este manual contiene instrucciones un golpe fuerte, si se cayó o si sufrió operativas y de seguridad de importancia. daños de cualquier otra forma;... -
Page 12: Preparación Para La Carga
2.7 No utilice elementos personales de metal o ciclo profundo). Este cargador no tales como anillos, pulseras, collares y está destinado a suministrar energía relojes al trabajar con una batería de a sistemas eléctricos de baja tensión plomo-ácido. Una batería de plomo- más que en una aplicación de un motor ácido puede producir una corriente de de arranque. -
Page 13: Instrucciones Para La Instalación
• Asegúrese de que el cable de extensión de amperios del cargador de CA, como esté conectado correctamente y en se especifica a continuación: buenas condiciones eléctricas. Longitud del cable (pies) • El tamaño del cable debe ser lo Calibre del cable AWG* suficientemente extenso para el calibre *AWG-American Wire Gauge 6. -
Page 14: Fusibles En Línea
9. FUSIBLES EN LÍNEA Los fusibles en línea, situados cerca de corrientes de alta tensione. Si se funde un los extremos de los cables rojos, protegen fusible, reemplace sólo con un fusible tipo el cargador de sobrecarga de voltaje cuchilla de ATC-30 30A 32V. extremadamente alto, caídas de rayos o 10. -
Page 15: Mantenimiento Y Cuidado
10. Durante la carga, los cuatro son corregidas después de 15 minutos, el indicadores LED verdes parpadean y cargador pasará al siguiente banco en línea luego se iluminan permanentemente, y comenzará la carga. de derecha a izquierda, para indicar el CARGA ANULADA avance de la carga. -
Page 16: Localización Y Solución De Problemas
14. LOCALIZACIÓN Y SOLUCIÓN DE PROBLEMAS PROBLEMA POSIBLE CAUSA SOLUCIÓN La unidad está conectada El voltaje de la batería es La batería podría estar correctamente a la batería, demasiado bajo. defectuosa. Revise la batería y remplácela, si es necesario. pero no carga. El banco está... -
Page 17: Garantía Limitada
El Fabricante no presta garantía por lo accesorios utilizados con este producto que no sean los fabricados por Schumacher Electric Corporation y que no estén aprobados para su uso con este producto. La presente Garantía Limitada será nula si el producto se utiliza en forma errónea, se trata de manera inadecuada, es reparado o modificado... -
Page 18: Consignes De Sécurité Importantes
1. CONSIGNES DE SÉCURITÉ IMPORTANTES CONSERVER CES CONSIGNES. 1.1 CONSERVER CES INSTRUCTIONS – un cordon ou une prise endommagé – Ce manuel contient des instructions remplacer immédiatement. importantes concernant la sécurité et le 1.8 Ne pas faire fonctionner le chargeur s’il a fonctionnement. -
Page 19: Préparation Pour Le Chargement
profonde). Il n’est pas conçu pour des piles sèches qui sont utilisées en alimenter un système électrique à basse électroménager. Ces piles peuvent tension autre que dans une application exploser et causer des blessures et des d’un démarreur. Ne pas utiliser ce dommages matériels. -
Page 20: Directives D'assemblage
6. DIRECTIVES D’ASSEMBLAGE 6.1 Enlever tous les cordons dérouler sur les câbles avant d’utiliser le chargeur de batterie. 7. INSTRUCTIONS DE MONTAGE 7.1 Le chargeur peut être monté en 7.3 En utilisant le chargeur comme modèle, permanence de trois différentes façons : placez-le à... -
Page 21: Fusibles En Ligne
9. FUSIBLES EN LIGNE Les fusibles en ligne, situés près des foudre et les pointes de courant. Si un extrémités des fils rouges, protègent le fusible saute, remplacer uniquement par un chargeur contre les pointes de tension, la fusible de type lame ATC-30 30A 32V. 10. -
Page 22: Maintenance Et Entretien
pourcentage de charge s’allumeront POLARITÉS INVERSÉES pour indiquer l’état de l’accumulateur. Si les polarités sont inversées, la DEL REMARQUE : Si un type clignotera. Lorsque le raccordement d’accumulateur est sélectionné et sera corrigé, la recharge commencera qu’aucun accumulateur n’est raccordé, automatiquement. -
Page 23: Spécifications
13. SPÉCIFICATIONS Entrée ....................120 V CA / 60 Hz, 3,7A Sortie ......................12 V CC@15 A Indice de protection Ingress.....................IP65 14. TABLEAU DE DÉPANNAGE PROBLÈME CAUSE POSSIBLE SOLUTION Les connexions sur La tension de l’accumulateur L’accumulateur pourrait être l’accumulateur sont correctes est trop basse. -
Page 24: Garantie Limitée
PREMIER ACHETEUR DE CE PRODUIT. CETTE GARANTIE LIMITÉE N’EST PAS TRANSFÉRABLES NI CESSIBLES. Schumacher Electric Corporation (le « Fabricant ») garantit ce chargeur de batterie pour un (1) an à compter de la date d’achat au détail contre les défauts de matériaux ou de fabrication qui peuvent se produire dans des conditions normales d’utilisation et de soins. -
Page 25: Warranty Card
ORIGINAL receipt because it will be required for any warranty claims. This warranty is not transferable. Send warranty card only. DO NOT SEND UNIT TO THIS ADDRESS FOR REPAIR. Mail this card to: Schumacher Electric Corporation 801 Business Center Drive Mount Prospect, IL 60056-2179 Name ______________________________________________________________... -
Page 26: Carte De Garantie
éventuelle réclamation au titre de la garantie. Cette garantie n’est pas transférable. Envoyer la carte de garantie seulement. NE PAS ENVOYER L’UNITÉ À CETTE ADRESSE POUR RÉPARATION. Envoyer cette carte à : Schumacher Electric Corporation 801 Business Center Drive Mount Prospect, IL 60056-2179 (É.-U ) Nom _______________________________________________________________...