
Related Manuals for PROEL SDJ SLIMPAR 6

Summary of Contents for PROEL SDJ SLIMPAR 6
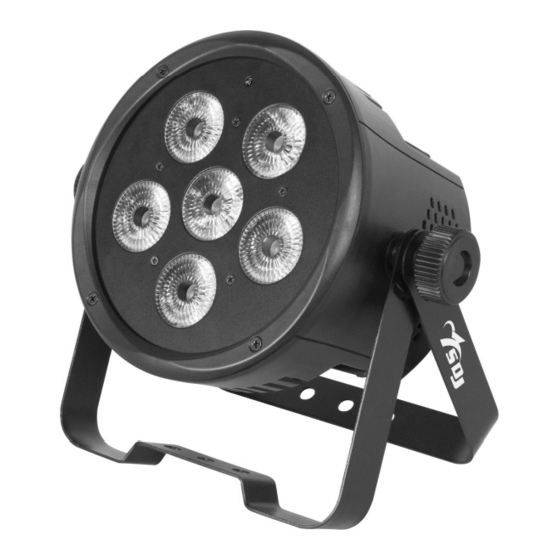
- Page 1 SLIMPAR 6 WIRELESS BATTERY PAR LED RGBW Order code: SG SLIMPAR6BAT MANUALE UTENTE USER MANUAL...
-
Page 2: Table Of Contents
Rev. 01-05/19 INDICE: 1. INTRODUZIONE p. 3 2. ISTRUZIONI DI SICUREZZA p. 4 3. APERTURA CONFEZIONE E CONTROLLO p. 6 4. CARICA DELLA BATTERIA p. 7 5. INSTALLAZIONE ED ACCENSIONE p. 7 6. ISTRUZIONI PER L'USO p. 10 7. MANUTENZIONE p. -
Page 3: Introduzione
PROEL. PROEL si riserva il diritto di apportare senza preavviso cambiamenti e modifiche estetiche, funzionali o di design a ciascun proprio prodotto. -
Page 4: Istruzioni Di Sicurezza
Si prega di contattare un distributore PROEL per ricevere assistenza riguardo qualsiasi dubbio su come attivare l’apparecchiatura in modo sicuro. Rivolgersi ad un tecnico qualificato per qualsiasi operazione di manutenzione non descritta nel presente manuale. - Page 5 Se il cavo di alimentazione esterno di questa apparecchiatura da illuminazione è danneggiato, deve essere sostituito con un cavo speciale, disponibile esclusivamente presso i rivenditori PROEL. Non attivare mai l’apparecchiatura con lenti e/o coperture mancanti o danneggiate. In caso di non utilizzo, si consiglia di scollegare il proiettore dalla rete elettrica.
-
Page 6: Apertura Confezione E Controllo
3. APERTURA DELLA CONFEZIONE E CONTROLLO Aprire con cura la confezione, verificare il contenuto e assicurarsi che tutte le parti siano presenti e siano in buone condizioni. Nel caso in cui alcune parti non siano presenti o siano danneggiate, contattare immediatamente il proprio fornitore e conservare l’imballaggio per la verifica. -
Page 7: Carica Della Batteria
4. CARICA DELLA BATTERIA - Collegare l’apparecchio alla rete elettrica tramite l’apposito cavo di alimentazione a corredo. - DURANTE TUTTO IL PROCESSO DI CARICA DELLA BATTERIA L’APPARECCHIO DEVE ESSERE SPENTO - Il tempo di ricarica standard per un faro con livello della batteria del 5% è di circa 8 ore. - Durante la carica, l'indicatore di riferimento sul display si illumina. - Page 8 5.2 - COLLEGAMENTO ALLA CATENA DMX Il collegamento alla linea DMX può essere effettuato sia tramite il trasmettitore / ricevitore wireless SG AIRBOX (venduto separatamente) o via cavo. COLLEGAMENTO WIRELESS Collegare SG AIRBOX alla consolle DMX impostandolo alla modalità trasmettitore (TX) (pulsante verde premuto).
- Page 9 Per collegare il trasmettitore alla consolle DMX Utilizzare un cavo conforme alle specifiche EIA RS-485: bipolare intrecciato, schermato, 120Ohm di impedenza caratteristica e bassa capacità (SAGITTERSG DMX3 – SG DMX5). Non utilizzare cavo microfonico o altro cavo con caratteristiche diverse da quelle specificate. Le terminazioni devono essere effettuate con connettori maschio / femmina tipo XLR a 3 pin.
- Page 10 6. - ISTRUZIONI PER L'UTILIZZO 6.1 - MAPPA DEL MENU' MENU SUBMENU 1 SUBMENU 2 DESCRIPTION ADDRESS 001 – 512 Impostazione indirizzo DMX SOUND SOUND 1 – SOUND 5 SEN 0 – 9 Modalità sound con sensibilità COLO 01 – 51 SP00 –...
-
Page 11: Manutenzione
Modalità 7 canali Canali Valori Descrizione 000 – 255 Master dimmer 000 - 255 Strobo da lento a veloce 000 - 255 Livello rosso 000 - 255 Livello verde 000 - 255 Livello blu 000 – 255 Livello bianco 000 – 255 Macro colori 6.4 –... -
Page 12: Specifiche Tecniche
8. - SPECIFICHE TECNICHE • Alimentazione: 100-240 VAC, 50/60Hz o con batteria 11,1 VDC • LED: 6x10 W RGBW/FC • Angolo del fascio di luce: 15° • Potenza: • Modalità operative: Auto, Sound, Master/slave, DMX512 • Regolazione elettronica della luminosità 0-100% •... -
Page 13: Introduction
PROEL. PROEL reserves the right to make, without notice, any aesthetical, functional or design changes or modifications in everyone of its products. PROEL doesn't assume any responsibility for the use or application of the products here described. -
Page 14: Safety Instructions
Contact a qualified technician for any maintenance work not described in this manual. Do not modify the fixture or install accessories and upgrade kits that are not the Proel original ones. People involved in the installation and maintenance of the device must:... - Page 15 If the external power cord of this light is damaged, it must be replaced with a special cord exclusively available from Your PROEL dealer. Never operate the equipment with lenses and / or covers missing or damaged.
-
Page 16: Opening And Control
3. - OPENING AND CONTROL Carefully open the package, check the content and make sure that all the parts are present and are in good condition. In cases where some parts are not present or are damaged, immediately contact Your supplier and retain the packaging for verification. WARNING! If the product has been exposed to drastic temperature changes, let the unit turned off until it reaches room temperature because the... -
Page 17: Battery Charge
4. - BATTERY CHARGE - Connect the projector to the mains with the included adapter - DURING THE COMPLETE PROCESS OF BATTERIES CHARGE THE PROJECTOR MUST BE OFF - The standard time for battery charge when the level is 5%, is approximately 8 hours - During the charge, the indicator on the display is lighted For correct use of the battery it is strongly recommended to: Charge the battery at least one time each month... - Page 18 5.2 - CONNECTION TO THE DMX CHAIN The connection to the DMX chain can be done with the transceiver SG AIRBOX (sold separately) or cable. WIRELESS CONNECTION Connect the SG AIRBOX to the DMX console and set it up as transmitter (TX) by pressing down the green button.
-
Page 19: Setup
To connect the transmitter to a DMX console, use a cable conforming to specifications EIA RS-485: pole twisted, shielded, 120Ohm characteristic impedance and low capacity (SAGITTER SG DMX3 – SG DMX5). Do not use microphone cable or other cable with different characteristics than those specified. - Page 20 RELE 0 - 10 Release Wireless connection, push and hold Enter for 10 seconds. UDNH ON/OFF Active/disactive Wireless Software version TEMP xxx °C Temperature value REMO On / Off Switch ON/OFF the IR receiver LINK RE / TR Pairing / Unparing wireless SLAV Set SLAVE mode CHMD...
- Page 21 6.4 – IR REMOTE CONTROLLER By activating the IR receiver in the relative submenu, it is possible to control the projector with the remote controller included With the buttons, after set the projector in MASTER mode with the M/S button, it is possible to activate: - AUTO MODE (AUTO button) and the relative speed (+/- buttons) - SOUND MODE (SOUND button) and the relative speed (+/- buttons)
- Page 22 8. - TECHNICAL SPECIFICATIONS • Power Supply: 100-240 VAC, 50/60Hz or with 11,1 VDC battery • LED: 6x10W RGBW/FC • Beam Angle: 15° • Power: • Operation Mode: Auto, Sound, Master/slave, DMX512 • Electronic Dimming 0-100% • DMX: 1 – 4 – 7 Channels •...