Table of Contents
Advertisement
Available languages
Available languages
Quick Links
Advertisement
Table of Contents

Related Manuals for PROEL PLWIN60C

Summary of Contents for PROEL PLWIN60C
- Page 1 MOBILE STAGE STAND PLWIN60C...
-
Page 2: Table Of Contents
INDICE 1. INTRODUZIONE………………………………………………………………………………... 3 2. DATI TECNICI…………………………………………………………………………………... 3 3. POSIZIONAMENTO DEL SOLLEVATORE………………………………………………….. 4 4. SOLLEVAMENTO………………………………………………………………………………. 5 5. INSERIMENTO E DISINSERIMENTO DEL CARICO………………………………………. 5 6. CHIUSURA E TRASPORTO DEL SOLLEVATORE………………………………………... 6 7. IMPORTANTI MISURE DI SICUREZZA……………………………………………………... 6 8. RESPONSABILITA’…………………………………………………………………………….. 7 9. AVVERTENZE………………………………………………………………………………….. 8 INDEX 1. -
Page 3: Introduzione
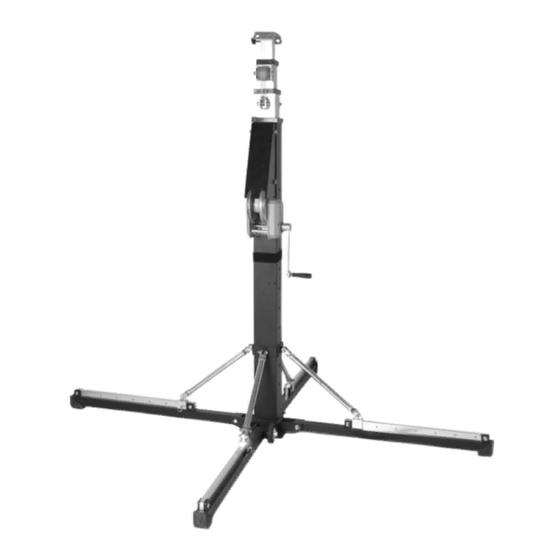
1. INTRODUZIONE Grazie per aver scelto il sollevatore PROEL PLWIN60C Ideale per sollevare apparecchiature luminose, sistemi audio e truss in alluminio 2. DATI TECNICI Ogni PLWIN60C è costituito da: 4 gambe indipendenti regolabili per garantire la massima verticalità su ogni superficie... -
Page 4: Posizionamento Del Sollevatore
3. POSIZIONAMENTO DEL SOLLEVATORE 1. Posizionare il sollevatore in verticale. 2. Assicurarsi che il terreno sia solido e compatto per evitare che i piedi possano affondarvi. La stabilità del sollevatore è di primaria importanza per la sicurezza. 3. Tirare il pin a molla (E) ed aprire i piedi di appoggio fino alla posizione orizzontale. Se l’esatta posizione non è... -
Page 5: Sollevamento
4. SOLLEVAMENTO 1. Rimuovere il pin (J) dalla colonna estraendo la coppiglia (K) 2. Se il sollevatore è fornito con la manovella dell’argano smontata, montarla come segue: rimuovere il tappo rosso dalla manovella (L); rimuovere la vite e la rondella dal pin (M); avvitare la manovella senza applicare forza sul pin, fino allo stop;... -
Page 6: Chiusura E Trasporto Del Sollevatore
6. CHIUSURA E TRASPORTO DEL SOLLEVATORE 1. Eseguire la procedura inversa al sollevamento per abbassare il sollevatore, ricordandosi di inserire sempre il pin (J)e la coppiglia (K) per evitare il movimento della colonna. 2. Eseguire la procedura inversa per la chiusura di piedi. Assicurarsi che in posizione di chiusura i pin a molla (E) siano reinseriti nel rispettivo foro in modo che i piedi siano bloccati in posizione di chiusura. -
Page 7: Responsabilita
10. E’ necessario predisporre pesi di zavorra sulla base della struttura, applicabili anche a mezzo di cavi per evitare il ribaltamento della stessa. Lo schema di carico delle zavorre va valutato in base all’ubicazione della struttura. 11. La struttura deve essere correttamente montata secondo le istruzioni riportate nel presente manuale. 12. -
Page 8: Avvertenze
9. AVVERTENZE E’ esclusiva responsabilità dell’operatore eseguire ogni 5 anni una verifica ad invecchiamento e ad usura, del funzionamento di tutti i meccanismi, affinché essi siano integri. Tale verifica deve essere effettuata presso la casa costruttrice o ente preposto. -
Page 9: Introduction
1. INTRODUCTION Thank you for choosing a light stand system PLWIN60C. It is designed to support lighting fixture, speakers, and aluminium trusses. 2. TECHNICAL DATA All models are equipped with: Independently adjustable support legs ensure vertical positioning on uneven ground. -
Page 10: Positioning The Stand
3. POSITIONING THE STAND 1. Place the stand in the vertical position. 2. Ensure that the ground is strong enough to prevent any sinking of the stand into the ground. The stability of the stand is of prime importance for a secure operation. 3. -
Page 11: Lifting The Masts
4. LIFTING THE MASTS 1. Remove the mast pin (J) from the column extracting the split pin (K). 2. If the stand is supplied with crack (L), which is folding, dismantled, mount the crank as follow: Remove the red cap from the crank (L), Remove the screw and the washer from the pin (M), Screw the crank without applying force on the pin (M) until to reach the stop, Fix the crank, screwing the screw with the washer and the spring washer curved in correct order, on the... -
Page 12: Restoring And Transport The Stand
6. RESTORING AND TRANSPORT THE STAND 1. Reverse the lifting procedure to restore the masts, insert the mast pin (J) in the highest hole to avoid the movement of the masts. remember to insert the split pin (K). 2. Reverse the position the stand procedure to fold up the legs. Make sure that the spring pin (E) are restored to lock the leg-brace slider (G) to the legs (A). -
Page 13: The Responsibility Of The Fault
10. It is necessary to provide some ballasts on the base of the structure. It is possible also apply them by using cables. It is important to prevent roll over of the structure. The diagram of the ballasts must be evaluated according to the location of the structure. -
Page 14: Warning
9. WARNING It is the sole responsibility of the operator to perform a review every five years to aging and wear and verify the operation of all mechanisms, so that they are intact. This verification must be performed by the manufacturer or authorized service center. 1300 1400 1500...