Advertisement
Quick Links
WIRELESS THERMOMETER
Instruction manual
1.Description of parts
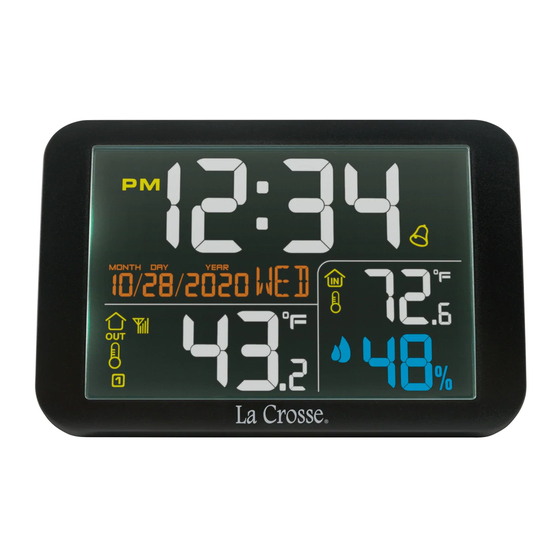
Fig. 1: Receiver front side
A 1
A 2
A 3
A 4
A 5
-1-
A1:
Time/Alarm
A2:
Date
A3:
Outdoor temperature
A 10
A4: Outdoor low power index
A 9
A5: MAX and MIN temperature
A6: Indoor humidity
A7: Indoor temperature
A 8
A 7
A8:
Indoor low power index
A9:
Alarm symbol
A 6
A10:
RCC symbol
Advertisement

Summary of Contents for La Crosse Technology TX151
- Page 1 WIRELESS THERMOMETER Instruction manual 1.Description of parts Fig. 1: Receiver front side Time/Alarm Date Outdoor temperature A 10 A4: Outdoor low power index A5: MAX and MIN temperature A6: Indoor humidity A7: Indoor temperature Indoor low power index Alarm symbol A10: RCC symbol...
- Page 2 Fig. 2: Receiver backside RESET button B1: Buttons Battery door Support 5V micro usb input Hanging hole...
- Page 3 Fig. 3: Transmitter Fig. 3 C1: Wall mounting hole C2: LED index C3: Battery compartment C4: Switch 1-2-3 for channel selection C5: TX button 2. Before you start using it • Please make sure to read the instruction manual carefully. This information will help you to familiarise yourself with your new device, to learn all of its functions and parts, to find out important details about its first use and how to operate it and to get advice in the event of a malfunction.
- Page 4 • We shall not be liable for any damage occurring as a result of non following of these instructions. Likewise,we take no responsibility for any incorrect readings and for any consequences which may result from them. • Please take particular note of the safety advice! •...
- Page 5 • Time date display. • Alarm function. 5. For your safety • This product is exclusively intended for the field of application described above. It should only be used as described within these instructions. • Unauthorized repairs, modifications or changes to the product are prohibited. Caution! Risk of injury: •...
- Page 6 6. Getting started 6.1 Inserting the batteries in the receiver • Place both instruments on a desk with a distance of approximately 1.5 meter. Avoid getting close to possible interference sources (Electronic devices and radio installations). • Remove the protective foil from the display of the receiver. •...
- Page 7 6.2.1 Reception of the outdoor values • The outdoor values of the outdoor transmitter will be transmitted to the receiver. The displays of the outdoor values are flashing "--.-". • On the display of the receiver appear the channel number. •...
- Page 8 • The RCC reception always takes place hourly between 2:00 and 5:00 o'clock in the morning. If the reception is not successfully received until 5:00 o'clock, the next receive operation is again at 2:00 o'clock in the morning. There are four different reception symbols: stays - reception is very good flashing...
-
Page 9: Operation
Please take note of the following: • The recommended distance to any interfering sources like computer monitors or TV sets at least 1.5-2 meters. • Inside ferro-concrete rooms (basements,superstructures),the received signal is naturally weakened. In extreme cases, please place the unit close to a window to improve the reception. •... - Page 10 7.1.2 Setting of the 12 and 24 hours display • In the setting mode you can choose between the 12 - and 24 hour system. • In the 12 HR system AM or PM (after 12 o'clock) appears on the display. 7.2 Setting of the alarm time .
- Page 11 9. Thermometer and hygrometer • If the measure values above the range,then temperature display "HH.H",humidity display "HH%". • If the measure values below the range,then temperature display "LL.L",humidity display "LL%". 9.1 Maximum/Minimum function • Press the MEM button in normal mode. •...
- Page 12 10. Additional outdoor transmitters • For having more than one additional outdoor transmitter select with the 1/2/3 switch in the battery compartment of the outdoor transmitter for each single outdoor transmitter a different channel. The reception of the new transmitter will be transmitted automatically to the receiver. Press and hold the button on the receiver or restart the receiver according to the manual.
-
Page 13: Care And Maintenance
11. Positioning and fixing of receiver and the outdoor transmitter • With the foldable leg at the back of the receiver, the receiver can be placed onto any flat surface or wall mounted at the respective location by the hanging holes at the back of the unit. Avoid the vicinity of any interfering field like computer monitors or TV sets and solid metal objects. -
Page 14: Troubleshooting
13. Troubleshooting Solution ➜ Ensure that the batteries polarity are correct No indication ➜ Change the batteries at the receiver No RCC reception ➜ Press and hold the button for three seconds and start the initialization manually ➜ Wait for attempted reception during the night ➜... - Page 15 FCC Caution: Any Changes or modifications not expressly approved by the party responsible for compliance could void the user's authority to operate the equipment. This device complies with part 15 of the FCC Rules. Operation is subject to the following two conditions: (1) This device may not cause harmful interference, and (2) this device must accept any interference received, including interference that may cause undesired operation.


