Advertisement
Available languages
Available languages
Quick Links
Advertisement

Related Manuals for LENCO DAR-012


Summary of Contents for LENCO DAR-012
- Page 1 Model: DAR-012 USER MANUAL DAB+ FM radio with Bluetooth HANDLEIDING DAB+ FM-radio met Bluetooth BEDIENUNGSANLEITUNG DAB+/FM-Radio mit Bluetooth MODE D’EMPLOI Radio FM DAB+ avec Bluetooth MANUAL DEL USUARIO Radio FM DAB+ con Bluetooth...
-
Page 2: Table Of Contents
Index: English............................3 Nederlands ..........................12 Deutsch ............................ 22 Français ..........................322 Español ............................ 42... -
Page 3: English
English DAR-012 CAUTION: Usage of controls or adjustments or performance of procedures other than those specified herein may result in hazardous radiation exposure. This unit should not be adjusted or repaired by anyone except qualified service personnel. PRECAUTIONS BEFORE USE KEEP THESE INSTRUCTIONS IN MIND: Do not use this device near water. - Page 4 26. The apparatus shall not be exposed to dripping or splashing and make sure that no objects filled with liquids, such as vases, are placed on or near the apparatus. 27. * To completely disconnect the power input, the mains plug of the apparatus shall be disconnected from the mains, as the disconnect device is the mains plug of apparatus.
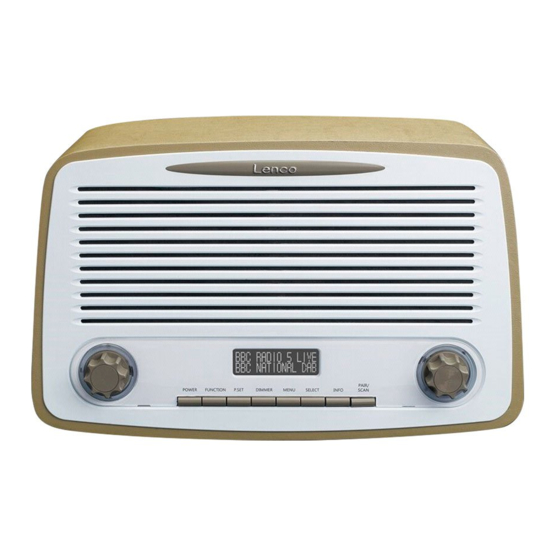
- Page 5 Product Overview Lenco VOLUME TUNING PAIR/ POWER FUNCTION P.SET DIMMER MENU SELECT INFO SCAN AUX IN...
- Page 6 Volume Knob 2. Power Button 3. Function Button 4. Preset Button 5. Dimmer Button 6. Menu/Alarm Button 7. Select/Time Button 8. Info Button 9. Scan/Pair Button 10. LENS 11. LCD Display 12. Tuning/Enter knob 13. AUX IN left 14. AUX IN right 15.
- Page 7 Whe po e o default ode is DAB, p ess fu tio utto to ha ge the fu tio : DAB‐‐‐FM‐‐BT‐‐‐AUX‐‐‐DAB P ess DIMMER utto i sta d o othe odes to ha ge the a klight ight ess: Level Low—Level Middle—Level High. Listening to the FM P ess a d hold SCAN to sea h the adio auto ati all , e e sea h sta t f o 87.5MHZ, Found radio stations will be stored automatically.
- Page 8 Listening to the DAB - P ess the FUNCTION utto u til the displa sho s DAB Mode - P ess a d hold SCAN to sea h adio statio s auto ati all a d the statio s fou d will be stored in a DAB program list.
- Page 9 Bluetooth function P ess the FUNCTION utto u til BT ode is sho o the displa . If the Lenco DAR-012 has never been paired or cannot find the last paired device, the displa ill sho UNCONNECT . This ea s the u it is i sea h ode.
- Page 10 Setting the time Make su e the adio is tu ed off. P ess a d hold the SELECT utto u til Ti e setup is sho o the displa . Tu the TUNING k o u til ou see Set Clo k a d sele t it by p essi g the TUNING k o .
- Page 11 Guarantee Lenco offers service and warranty in accordance with the European law, which means that in case of repairs (both during and after the warranty period) you should contact your local dealer. Important note: It is not possible to send products that need repairs to Lenco directly.
-
Page 12: Nederlands
Nederlands DAR-012 LET OP: Gebruik van bedieningen of afstellingen of uitvoer van procedures anders dan gespecificeerd in deze documentatie kan leiden tot blootstelling aan schadelijke straling. Dit apparaat dient uitsluitend te worden aangepast of gerepareerd door gekwalificeerd onderhoudspersoneel. VOORZORGSMAATREGELEN VOOR GEBRUIK ONTHOUD DE VOLGENDE INSTRUCTIES: Gebruik dit apparaat niet in de buurt van water. - Page 13 22. Gebruik een zacht, droog doekje om het apparaat te reinigen. Gebruik geen oplosmiddelen of op benzine gebaseerde vloeistoffen. U kunt een vochtig doekje met verdund schoonmaakmiddel gebruiken om hardnekkige vlekken te verwijderen. 23. De leverancier is niet verantwoordelijk voor schade of verloren gegevens veroorzaakt door storing, misbruik, modificatie van het apparaat of batterijvervanging.
- Page 14 Productoverzicht Lenco VOLUME TUNING PAIR/ POWER FUNCTION P.SET DIMMER MENU SELECT INFO SCAN AUX IN...
- Page 15 Volumeknop 2. Aan/uit-knop 3. Functietoets 4. Voorkeuzetoets 5. Dimmertoets 6. Menu-/alarmtoets 7. Selectie-/tijdtoets 8. Informatietoets 9. Scan-/paringtoets 10. LENS 11. LCD-scherm 12. Afstem-/enterknop 13. AUX-IN links 14. AUX-IN rechts 15. Batterijcompartiment 16. Back-upbatterij voor de klok (batterijen niet inbegrepen) 17. Uitschuifbare FM-antenne 18.
- Page 16 Wa ee de sta daa d i s hakel odus DAB is, d uk da op de toets FUNCTION o functie te wisselen: DAB‐‐‐FM‐‐BT‐‐‐ ‐‐‐DAB of i a de e odi op de toets DIMMER o de helde heid a het Druk in stand- achtergrondlicht te veranderen: Niveau Laag - Niveau Midden - Niveau Hoog.
- Page 17 OPMERKING: Voor een optimale FM-radio-ontvangst, trek de uitschuifbare FM-antenne volledig uit. Draai het apparaat indien nodig om de ontvangst te verbeteren. Naar DAB luisteren D uk op de toets FUNCTION totdat de displa DAB Mode DAB Modus ee geeft. Houd SCAN i ged ukt o auto atis h aa adiostatio s te zoeke e de gevonden stations zullen worden opgeslagen in een DAB-programmalijst.
- Page 18 D uk op de toets FUNCTION totdat BT ode o dt ee gege e op de display. Als de Lenco DAR-012 noh niet eerder was gepaard of het laatst gepaarde apparaat kan iet o de ge o de , da zal de displa...
- Page 19 Het alarm instellen Co t olee of de adio is uitges hakeld. Houd de toets MENU i ged ukt totdat de ee ga e egi t te k ippe e . D aai de k op TUNING o de u e i te stelle e d uk te e estigi g op de k op TUNING a ee de ge e ste u e tijd is bereikt.
- Page 20 Veelgestelde vragen Probleem Oplossing Geen Stroom Controleer of het systeem verbonden is met een werkend stopcontact. Geen geluid Controleer of het volume niet op het laagste niveau staat. Slechte ontvangst Pas de positie aan van de antenne voor de beste signaalontvangst. Functie werkt niet Als geen van de bovengenoemde oplossingen werken, probeer dan uw radio los te koppelen of de standaard fabriekswaarden te herstellen.
- Page 21 Garantie Lenco biedt service en garantie aan overeenkomstig met de Europese wetgeving. Dit houdt in dat u, in het geval van reparaties (zowel tijdens als na de garantieperiode), uw lokale handelaar moet contacteren. Belangrijke opmerking: Het is niet mogelijk om producten die moeten worden gerepareerd rechtstreeks naar Lenco te sturen.
-
Page 22: Deutsch
Deutsch DAR-012 ACHTUNG: Die zweckentfremdete Bedienung, Benutzung oder Einstellung der Prozeduren kann zu gefährlichen Unfällen durch Strahlen führen. Dieses Gerät darf außer von qualifizierten Fachleuten von niemand anderem repariert oder eingestellt werden. VORSICHTSMASSNAHMEN VOR DER BENUTZUNG BEFOLGEN SIE IMMER FOLGENDE ANWEISUNGEN: Benutzen Sie das Gerät nicht in der Nähe von Wasser. - Page 23 21. Vermeiden Sie es, das Gerät auf Oberflächen aufzustellen, die zu Schwingungen oder Stoß neigen. 22. Verwenden Sie einen trockenen, sauberen Lappen für die Reinigung. Benutzen Sie niemals Lösungsmittel oder Flüssigkeiten auf Ölbasis. Benutzen Sie zum Entfernen hartnäckiger Flecken ein feuchtes Tuch mit mildem Reinigungsmittel. 23.
- Page 24 Produktübersicht Lenco VOLUME TUNING PAIR/ POWER FUNCTION P.SET DIMMER MENU SELECT INFO SCAN AUX IN...
- Page 25 Lautstärkeregler 2. Netzschalter 3. Funktionstaste 4. Speicherplatz-Taste 5. Dimmer-Taste 6. Menü/Wecker-Taste 7. Auswahl/Uhrzeit-Taste 8. Info-Taste 9. Scan/Koppel-Taste 10. Blende 11. LCD-Display 12. Drehknopf Abstimmen/Bestätigung 13. AUX-Eingang links 14. AUX-Eingang rechts 15. Batteriefach 16. Uhrzeit-Sicherungsbatterie (Batterie nicht im Lieferumfang) 17. UKW-Teleskopantenne 18.
- Page 26 Wenn sich das Radio im Standardmodus DAB befinden, dann ist die Reihenfolge der Änderung der Funktion: DAB‐‐‐UKW‐‐Bluetooth‐‐‐ AUX‐‐‐‐‐DAB Drücken Sie im Standby-Modus ode i de a de e Modi die Taste „DIMMER , u Helligkeit der Hintergrundbeleuchtung wie folgt zu ändern: Dunkel—Gemäßigt—Hell.
- Page 27 <Fa to Reset> S ste ei stellu g: D ü ke Sie de D ehk opf „TUNING , u das Ge ät auf Werkseinstellung zurückzusetzen. Nach dem Zurücksetzen befindet sich das Radio wieder im Standardmodus DAB. <SW Version> Anzeige der aktuellen Firmware-Version. HINWEIS: Ziehen Sie für einen optimalen UKW-Empfang die UKW-Teleskopantenne heraus.
- Page 28 Bitte D ü ke Sie die Taste „MENU , u i das DAB-Menü zu wechseln. Drehen Sie nun de D ehk opf „TUNING zu Ei stellu g o : <Manual tune> Manuelle Abstimmung: Kann zur manuellen Suche einer speziellen Frequenz verwendet werden. D ehe Sie de D ehk opf „TUNING , u die gewünschte Frequenz auszuwählen.
- Page 29 Wenn das Lenco DAR-012 noch nie gekoppelt wurde oder das zuletzt gekoppelte Gerät i ht fi de ka , i d auf de Displa „UNCONNECT Ni ht erbunden) angezeigt. Das bedeutet, dass sich das Gerät im Suchmodus befindet. Bitte folgen Sie nachstehender Anleitung, um Ihr Bluetooth-Gerät mit dem Lenco DAR-012 zu koppeln.
- Page 30 Bestätigung de D ehk opf „TUNING , Sie die ge ü s hte Stu de e ei ht ha e . Stelle Sie u die Mi ute du h D ehe des D ehk opfes „TUNING ei . Bestätige Sie diese Ei stellu g e e falls du h D ü...
- Page 31 Reparaturen (sowohl während als auch nach Ablauf der Garantiezeit) sollten Sie deshalb Ihren Einzelhändler kontaktieren. Wichtiger Hinweis: Es ist nicht möglich, Geräte für Reparaturen direkt an Lenco zu schicken. Wichtiger Hinweis: Falls dieses Gerät von einem nicht autorisierten Kundendienst geöffnet oder darauf zugegriffen wird, erlischt die Garantie.
-
Page 32: Français
Français DAR-012 ATTENTION : L utilisatio de o a des ou de glages ou l e utio de p o du es aut es ue eu sp ifi s dans ce manuel peut entraîner une exposition à des rayonnements dangereux. - Page 33 dysfonctionnement, une utilisatio a usi e, u e odifi atio de l appa eil ou u remplacement des piles. 24. N i te o pez pas la o e io lo s ue l appa eil fo ate ou t a sf e des fi hie s. Si o , les données pourraient être endommagées ou perdues.
- Page 34 Présentation du produit Lenco VOLUME TUNING PAIR/ POWER FUNCTION P.SET DIMMER MENU SELECT INFO SCAN AUX IN...
- Page 35 1. Molette de réglage du volume 2. Bouton marche/arrêt 3. Bouton Fonction 4. Bouton Présélection 5. Bouton Variateur 6. Bouton Menu/alarme 7. Bouton Sélection/heure 8. Bouton Info 9. Bouton Recherche/appariement 10. VITRE 11. Afficheur LCD 12. Bouton Syntonisation/entrée 13. ENTRÉE AUX gauche 14.
- Page 36 Quand l'appareil est mis sous tension, le mode par défaut DAB, appuyez sur le bouton « Function » pour changer de fonction : ‐‐‐DAB DAB‐‐‐FM‐‐BT‐‐‐ Appuyez sur le bouton « DIMMER » en mode veille ou dans un autre mode pour modifier la luminosité...
- Page 37 <SW Version> Affiche la version actuelle du micrologiciel REMARQUE : Pour une réception optimale de la radio FM, déployez l a te e t les opi ue FM. Pou a lio e la ualit de eptio , pi ote l appa eil. Écouter la radio DAB Appuyez sur le bouton «...
- Page 38 Appuyez sur le bouton « FUNCTION » jusqu'à ce que « BT mode » (mode BT) s'affiche. Si la radio Lenco DAR-012 n'a jamais été apparié ou ne parvient pas à trouver le dernier appareil apparié, « UNCONNECT » (déconnecté) s'affi he. Cela sig ifie ue l appa eil est en mode de recherche.
- Page 39 Utilisatio de l’ho loge et de l’ala Si la radio est mise hors tension, vous pouvez activer l'éclairage de l'écran pendant uel ues se o des e appu a t su i po te uel outo . Réglage de l'alarme Vérifiez que la radio est éteinte.
- Page 40 « Time setup » R glage de l heu e) s'affiche. Tournez la molette « TUNING » jusqu'à ce que « Set 12/24 hour » (régler le format 12/24 h) s'affiche, puis sélectionnez cela en appuyant sur la molette « TUNING ». Vous pou ez as ule e t e l affi hage de heures en tournant la molette «...
- Page 41 Garantie Lenco propose un service et une garantie conformément à la législation européenne, ce qui sig ifie u e as de esoi de pa atio aussi ie pe da t et ap s la p iode de garantie), vous pouvez contacter votre revendeur le plus proche.
-
Page 42: Español
Español DAR-012 PRECAUCIÓN: El uso de los controles o ajustes o el funcionamiento de los procedimientos excepto a aquellos especificados aquí pueden provocar una exposición peligrosa a la radiación. Esta unidad no debe ajustarse o repararse por ninguna persona salvo personal de servicio cualificado. - Page 43 23. El proveedor no asume ninguna responsabilidad por daños o datos perdidos provocados por un funcionamiento incorrecto, uso incorrecto, modificación del dispositivo o sustitución de la batería. 24. No interrumpa la conexión cuando el dispositivo esté formateando o transfiriendo archivos. En caso contrario, los datos se pueden estropear o perder.
- Page 44 Descripción general del producto Lenco VOLUME TUNING PAIR/ POWER FUNCTION P.SET DIMMER MENU SELECT INFO SCAN AUX IN...
- Page 45 1. Mando de Volumen 2. Botón de encendido 3. Botón de función 4. Botón de Presintonía 5. Botón regulador de brillo 6. Botón de menú/alarma 7. Botón de seleccionar/hora 8. Botón de información 9. Botón de buscar/vincular 10. OBJETIVO 11. Pantalla LCD 12.
- Page 46 odo p edete i ado al e e de lo es DAB, pulse el otó Fu tio pa a a ia la función: DAB‐‐‐FM‐‐BT‐‐‐ ‐‐‐DAB Pulse el otó DIMMER e odo de espe a o e ot os odos pa a a ia el illo de la retroiluminación:...
- Page 47 NOTA: Para conseguir una recepción de radio FM óptima, extienda la antena FM telescópica. Para mejorar la recepción AM, reoriente la unidad. Escuchar la DAB Pulse el otó FUNCTION hasta ue la pa talla uest e DAB Mode Modo DAB . Ma te ga pulsado SCAN pa a us a auto ti a e te las e iso as de adio las que se encuentre se guardarán en una lista de programas DAB.
- Page 48 Función Bluetooth Pulse el otó FUNCTION hasta ue apa ez a BT ode Modo BT e la pa talla. Si nunca se ha vinculado el Lenco DAR-012 o no puede encontrar el último dispositivo i ulado, la pa talla ost a UNCONNECT Des o e tado .
- Page 49 Funcionamiento del reloj y de la alarma Si la radio está apagada, puede encender la luz de la pantalla durante unos segundos pulsando cualquier botón. Ajustar la alarma Asegúrese de que la radio esté apagada. Mantenga pulsado el botón MENU hasta ue el indicador de la hora empiece a parpadear.
- Page 50 Preguntas frecuentes Problema Solución No se enciende Compruebe que el sistema está conectado a una toma de corriente que funcione. No hay sonido Compruebe que el control de volumen no esté en la configuración mínima. Mala recepción Ajuste la posición de la antena para conseguir la mejor recepción de señal.
- Page 51 Garantía Lenco ofrece servicio y garantía en cumplimiento con las leyes de la Unión Europea, lo cual implica que, en caso de que su producto precise ser reparado (tanto durante como después del periodo de garantía), deberá contactar directamente con su distribuidor.