
Related Manuals for Bosch Tronic 3000T ES2.5


Summary of Contents for Bosch Tronic 3000T ES2.5
-
Page 1: Table Of Contents
Tronic 3000T ES 2.5/4/8 CA... Installation Manual and Operating Instructions [18] Manuel d'installation et notice d'utilisation... -
Page 2: Table Of Contents
7.1 Resetting High Limit Switch....14 no risk to people or property. 8 Bosch interior component diagram....15 Additional symbols 9 Bosch Tronic 3000T LIMITED WARRANTY . -
Page 3: Safety Information
Explanation of symbols and safety information ▶ This water heater should be serviced CAUTION: only by qualified service personnel. Contact a service person for examination, repair or adjustment. When using electrical appliances, safety ▶ Failure to inspect the anode rod at precautions to reduce the risk of fire, least once a year could cause the tank electric shock or injury to persons... - Page 4 Explanation of symbols and safety information unusual sound such as air escaping NOTICE: through the pipe as the water begins to flow. There should be no smoking or open flame near the faucet at the ▶ The manufacturer cannot be time it is open.
-
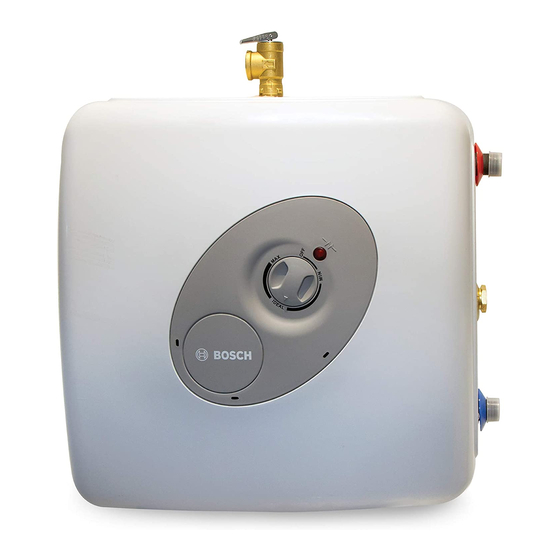
Page 5: Information About The Product
Information about the product Models ES8 (Vertical installation) Information about the product Models overview Models ES2.5 and ES4 Fig. 3 [1] Temperature & pressure relief valve, ¾ NPT male [2] Cold water inlet ½ NPT male [3] Thermostat Fig. 1 [4] Temperature &... -
Page 6: Dimensions
Information about the product Dimensions Models ES2.5 and ES4 (Vertical installation only) 13 ¾” 10 ¾” 13 ½” 6 ¼” 9” 3 ¾” 3 ½” 3 ½” ½ NPT male 2 ½” 2 ½” ES2.5 6720801072-04.1V Fig. 4 Models ES8 (Horizontal installation only) Fig. -
Page 7: Technical Data
Information about the product Models ES8 (Vertical installation only) Fig. 6 Technical data Technical data Units ES 2.5 ES 4 ES 8 Capacity gallons 7.0 (Hor.) / 5.1 (Vert.) Voltage 110/120 for each model Power at 120 VAC Watts 1440 Maximum water pressure Weight (empty) 15.5... -
Page 8: Installation Instructions
Installation instructions ▶ The supplied Temperature and Pressure Relief Valve will Installation instructions need to be installed on top. See location of T&P relief valve in Fig. 4 and Fig. 5. Caution The ES2.5 and ES4 water heaters are designed to be installed under the sink. -
Page 9: Closed System Thermal Expansion
Installation instructions Closed system thermal expansion Electrical connections Periodic discharge of the temperature and pressure relief valve The ES8 model must be hard wired. As per the National Electric or failure of the element gasket may be due to thermal Code the ES8 needs to be wired with 12 GA. -
Page 10: Use
Maintenance Starting and testing CAUTION: CAUTION: Do not attempt to repair this water heater yourself. Call a service person for assistance. Always turn off the power supply DO NOT supply power to water heater until filled with water. to the heater prior to servicing or draining the heater. To fill the heater: Periodic maintenance ▶... -
Page 11: Removing The Heating Element
• high flow applications Descaling the heating element In the event of poor water quality, Bosch recommends Scale deposits can affect the heating capability of the element. consulting a local water treatment professional for water Heavy scale can even cause damage to the element. The treatment options. -
Page 12: Replacement Of Parts
Replacement of parts ▶ Reinstall the element with gasket and make the wire ▶ Ensure that the thermostat temperature sensor is inserted connections. into the well located on the element assembly and secured with black rubber grommet. ▶ Refill tank with water before restoring power. Changing the thermostat ▶... -
Page 13: Troubleshooting
Check water fittings and T & P fitting on top of tank. Remove front cover and inspect heating element gasket. If tank is leaking call Bosch Water Heating for warranty claim if still within warranty period. Check anode rod (see section 6.1 Changing the anode rod). -
Page 14: Resetting High Limit Switch
Troubleshooting Resetting High Limit Switch Occasionally, the high temperature limit shut off device may trip the reset. This occurs when water temperature exceeds 190 °F. The shut off device may also trigger from a power outage or electrical storm. To reach the thermostat: ▶... -
Page 15: Bosch Interior Component Diagram
Bosch interior component diagram Bosch interior component diagram 6720801072-13.1V Fig. 13 Part Description TTNR Model HEATING ELEMENT 1440W 8 738 704 439 0 ES 2.5 / ES 4 HEATING ELEMENT 1440W 8 738 704 440 0 ES 8 WIRED THERMOSTAT 8 738 711 260 0 ES 2.5 / ES 4... -
Page 16: Bosch Tronic 3000T Limited Warranty
The warranty herein is void under the following circumstances: This limited warranty is provided by Bosch Thermotechnology Corp. (“BTC”) and covers Bosch Tronic 3000T heaters Models 1. Failure or malfunction resulting from improper or negligent ES2.5, ES4 and ES8 (hereinafter referred to as “Water operation, accident, abuse, freezing, electrical imbalance Heater”). - Page 17 Bosch Tronic 3000T LIMITED WARRANTY a copy of your original invoice or other proof of purchase and documentation showing the Water Heater Model number, Serial Number, original installation date, place of purchase, and installer’s name. The alleged defective components or parts...
- Page 18 8 Aperçu des composants intérieurs ....32 9 Bosch Tronic 3000T GARANTIE LIMITÉE ..33 Tronic 3000T – 6 720 892 061 2019/02...
-
Page 19: Explication Des Symboles Et Des Consignes De
Explication des symboles et des consignes de sécurité Consignes de sécurité Explication des symboles et des PRUDENCE : consignes de sécurité Explication des symboles Lorsque vous utilisez des appareils élec- Avertissements triques, les consignes de sécurité pour Les mots de signalement des avertissements caractérisent le type et l’importance des conséquences éventuelles si les réduire le risque d'incendie, de choc mesures nécessaires pour éviter le danger ne sont pas respec-... - Page 20 Explication des symboles et des consignes de sécurité ▶ Ne pas mettre en service le chauffe- AVIS : eau s'il possède un câble ou une fiche endommagé, s'il ne fonctionne pas correctement ou s'il a été endommagé ▶ L'installateur devra examiner le ou tombé.
- Page 21 Explication des symboles et des consignes de sécurité tallateur. Références: UPC 2006 PRUDENCE : (Code de plomberie uniforme), sec- tion (article) 508.1, ou IPC 2006 (Code de plomberie international), ▶ De l'hydrogène peut émaner d'un cir- section (article) 504.7. cuit d'eau chaude raccordé à cet appareil de chauffage si celui-ci n'est pas été...
-
Page 22: Informations Sur Le Produit
Informations sur le produit Modèles ES8 (installation horizontal) Informations sur le produit Aperçu des modèles Modèles ES2.5 et ES4 Fig. 2 [1] Soupape de décharge à sécurité thermique, ¾ NPT mâle [2] Entrée d'eau froide, ½ NPT mâle [3] Thermostat Fig. -
Page 23: Dimensions
Informations sur le produit Dimensions Modèles ES2.5 et ES4 (installation verticale exclusivement) 13 ¾” 10 ¾” 13 ½” 6 ¼” 9” 3 ¾” 3 ½” 3 ½” ½ NPT male 2 ½” 2 ½” ES2.5 6720801072-04.1V Fig. 4 Modèles ES8 (installation verticale) Fig. -
Page 24: Données Techniques
Informations sur le produit Modèles ES8 (installation horizontale) Fig. 6 Données techniques Données techniques Unités ES 2.5 ES 4 ES 8 Capacité galons 7.0 (Vert.) / 5.1 (Hor.) Tension 110/120 pour chaque modèle Puissance à 120 VAC Watts 1440 Pression d'eau maximale Poids (à... -
Page 25: Instructions D'installation
Instructions d'installation ▶ Installer le bouchon en laiton fourni sur le robinet du côté du Instructions d'installation chauffe-eau. ▶ La soupape de décharge à sécurité thermique fournie devra être installée sur la partie du dessus. Voir l'emplacement de la soupape T&P sur la figure 4 et 5. Les chauffe-eau ES2.5 et ES4 peuvent être installés sous l'évier. -
Page 26: Raccordements Électriques
Instructions d'installation de sûreté, un clapet antiretour ou une soupape de contrôle de ▶ Dévisser le couvercle de la boite électrique, et l’enlever. pression d'eau (vanne d'arrêt) qui ira former un circuit hydrau- ▶ Insérer 12 AWG à travers le conduit dans la boîte de jonc- lique fermé.Pendant le cycle de chauffage du chauffe-eau, l'eau tion et le fixer avec le dispositif anti-traction (non fourni). -
Page 27: Utilisation
Utilisation Utilisation Entretien Démarrage et essais PRUDENCE : PRUDENCE : Ne pas essayer de réparer le chauffe-eau vous-même. Appeler un agent de service pour l'assistance. Toujours couper l'alimen- NE PAS brancher le chauffe-eau à l'électricité avant qu'il ne soit tation électrique du chauffe-eau avant de réparer ou de vider le rempli d'eau. -
Page 28: Inspection De La Tige D'anode
• applications à haut débit En cas de mauvaise qualité de l'eau, Bosch recommande de consulter un professionnel local de traitement d'eau pour des options de traitement des eaux. Toujours s'assurer que le chauffe-eau est mis à la terre. Les modèles ES2.5 et ES4 doivent être connectés uniquement à... -
Page 29: Remplacement Des Pièces
Remplacement des pièces ▶ Réinstaller l'élément avec le joint d'étanchéité et faire les ▶ Installer un nouvel élément avec le joint d'étanchéité, en raccordements des câbles. s'assurant que le joint d'étanchéité et l'élément sont correc- tement mis en place. Serrer les écrous de fixation et faire les raccordements. -
Page 30: Dépannage
Vérifiez les raccords d'eau et de montage T & P en haut du réservoir. Enlever le capot avant et inspecter le joint d'étanchéité de l'élément chauffant. Si le réservoir a des fuites, appeler les services chauffe-eau de Bosch s'il est encore dans le délai de garantie. - Page 31 Dépannage IMPORTANT: Vérifier le fonctionnement du thermostat: ▶ Tourner le sélecteur de température, d'une température haute vers basse. Si le voyant rouge ne s'éteint pas à basse température: ▶ Coupez l'alimentation électrique et appelez un technicien pour remplacer le thermostat. Si le voyant rouge s'éteint, le thermostat fonctionne bien: ▶...
-
Page 32: Aperçu Des Composants Intérieurs
Aperçu des composants intérieurs Aperçu des composants intérieurs 6720801072-13.1V Fig. 13 Pièce Description TTNR Modèle RESISTANCE 1440W 8 738 704 439 0 ES 2.5 / ES 4 RESISTANCE 1440W 8 738 704 440 0 ES 8 THERMOSTAT CABLE 8 738 711 260 0 ES 2.5 / ES 4 THERMOSTAT CABLE 8 738 711 261 0... -
Page 33: Bosch Tronic 3000T Garantie Limitée
2. Le fabricant décline toute responsabilité à l’égard des dom- tion de retour de marchandise que vous aura donné Bosch mages ou dépenses accessoires, consécutifs ou ndirects et les envoyer à Bosch en port payé à l’adresse indiquée ci- résultant, directement ou indirectement, de toute défec- dessous. - Page 34 Bosch Tronic 3000T GARANTIE LIMITÉE Tronic 3000T – 6 720 892 061 2019/02...
- Page 35 Bosch Thermotechnik GmbH Junkersstrasse 20-24 D-73249 Wernau www.bosch-thermotechnology.com...