Samsung AM Series User Manual
Duct type
Hide thumbs
Also See for AM Series:
- User manual (46 pages) ,
- Installation manual (35 pages) ,
- User manual (44 pages)

Related Manuals for Samsung AM Series


Summary of Contents for Samsung AM Series
- Page 1 Duct Type Series BIG duct : AM FNHDEH Air Conditioner user manual imagine the possibilities Thank you for purchasing this Samsung product.
- Page 2 features of your new air conditioner Cool Summer Offer On those hot sweltering summer days and long restless nights, there is no better escape from the heat than the cool comforts of home. Your new air conditioner brings an end to exhausting hot summer days and lets you rest.
- Page 3 If you have any questions, call your nearest contact center or find help and information online at www.samsung.com. Important safety symbols and precautions: Hazards or unsafe practices that may result in severe personal injury WARNING or death.
- Page 4 safety information FOR INSTALLATION WARNING Install a switch and circuit breaker dedicated to the air conditioner. Failing to do so may result in electric shock or fire. Fix the outdoor unit firmly so that the electric part of the outdoor unit is not exposed.
- Page 5 FOR POWER SUPPLY WARNING When the circuit breaker is damaged, contact your nearest service center. Do not pull or excessively bend the power line. Do not twist or tie the power line. Do not hook the power line over a metal object, place a heavy object on the power line, insert the power line between objects, or push the power line into the space behind the appliance.
- Page 6 safety information FOR USING WARNING Do not touch the circuit breaker with wet hands. This may result in electric shock. Do not strike or pull the air conditioner with excessive force. This may result in fire, injury, or problems with the product. Do not place an object near the outdoor unit that allows children to climb onto the machine.
- Page 7 FOR USING WARNING If any foreign substance such as water has entered the appliance, cut the power by unplugging the power plug and turning the circuit breaker off and then contact your nearest service center. Failing to do so may result in electric shock or fire. Do not attempt to repair, disassemble, or modify the appliance yourself.
- Page 8 safety information FOR USING CAUTION Avoid directly exposing humans, animals or plants from the air flow from the air conditioner for long periods of time. This may result in harm to humans, animals or plants. This appliance is not intended for use by persons (including children) with reduced physical, sensory or mental capabilities, or lack of experience and knowledge, unless they have been given supervision or instruction concerning use of the appliance by a person responsible for their safety.
-
Page 9: Table Of Contents
Business users should contact their supplier and check the ter ms and conditions of the purchase contract. This product and its electronic accessories should not be mixed with other commercial wastes for disposal. For more information on safe disposal and recycling, visit our website www.samsung.com/in/support or contact our Helpline numbers - 1800 40 SAMSUNG (1800 40 7267864). -
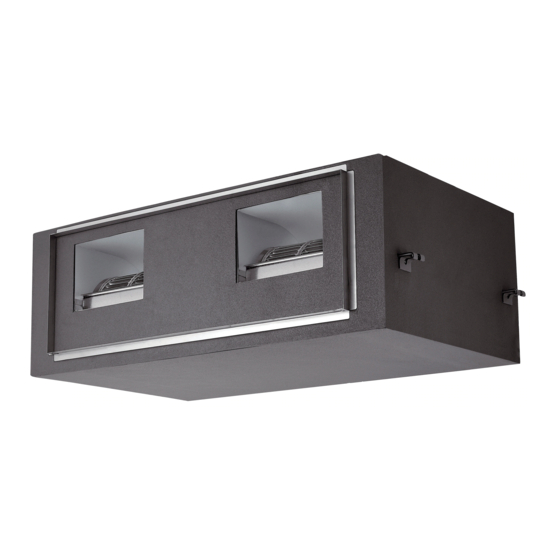
Page 10: Big Duct Type
viewing your air conditioner Congratulations on the purchase of the air conditioner. We hope you enjoy the features of your air conditioner and stay cool or warm with optimal efficiency. Please read the user manual to get started and to make the best use of the air conditioner. BIG DUCT TYPE Air Outlet Air intake... -
Page 11: Tips On Using Your Air Conditioner
using your air conditioner TIPS ON USING YOUR AIR CONDITIONER Here are some tips that you would follow when using your air conditioner. TOPIC RECOMMENDATION Cooling If current outside temperatures are much higher than the selected indoor temperature, it may take time to bring the inner temperature to the desired coolness. -
Page 12: Maintaining Your Air Conditioner
cleaning and maintaining the air conditioner MAINTAINING YOUR AIR CONDITIONER If the air conditioner will not be used for an extended period of time, dry the air conditioner to maintain it in best condition. Dry the air conditioner thoroughly by operating in Fan mode for 3 to 4 hours and disconnect the power plug. -
Page 13: Internal Protections Via The Unit Control System
Internal protections via the unit control system This internal protection operates if an internal fault occurs in the air conditioner. Type Description The internal fan will be off to against cold air when the heat pump is Against cold air heating. -
Page 14: Troubleshooting
appendix TROUBLESHOOTING Refer to the following chart if the air conditioner operates abnormally. This may save time and unnecessary expenses. PROBLEM SOLUTION The air conditioner does not Because of the protective mechanism, the appliance does not start operating operate immediately after it immediately to keep the unit from overloading. -
Page 15: Operation Ranges
OPERATION RANGES The table below indicates the temperature and humidity ranges the air conditioner can be operated within. Refer to the table for efficient use. MODE INDOOR OUTDOOR Condensation may occur on the indoor unit with risk to have COOLING 18˚C to 32˚C -5˚C to 48˚C 80% or less... -
Page 16: Installation Part
Installation Part Hang the indoor unit to the suspension bolts between two nuts. Note Piping must be laid and connected inside the ceiling when suspending the unit. If the ceiling is already constructed, lay the piping Indoor Unit Installation into position for connection to the unit before placing the unit inside the ceiling. - Page 17 Drain pipe and Drain Hose Installation Wind insulating tape around the pipes and drain hose avoiding to compress the insulation too much. Insulation cover pipe Install the drain hose as short as possible. Insulation pipe Indoor Note Give a 10mm slant to the drain hose for unit proper drainage of condensate.
- Page 18 Drainpipe Connection Wiring Work Without the drain pump Power and communication cable connection Install horizontal drainpipe with a slope of 1/100 or more and fix it by hanger space of 1.0~1.5m. Before wiring work, you must turn off all power source. Install U-trap at the end of the drainpipe to prevent a Indoor unit power should be supplied through the nasty smell to reach the indoor unit.
- Page 19 Setting an indoor unit address and installation option Set the indoor unit address and installation option with remote controller option. Set the each option separately since you cannot set the ADDRESS setting and indoor unit installation setting option at the same time.
- Page 20 Setting an indoor unit address and installation option(Continued) Option setting Status 1. Setting SEG2, SEG3 option Press Low Fan button(∨) to enter SEG2 value. Press High Fan button(∧) to enter SEG3 value. Each time you press the button, … will be selected in rotation. SEG2 SEG3 2.
- Page 21 Option setting Status 12. Setting Cool mode Press Mode button to be change to Cool mode in the OFF status. 13. Setting SEG16, SEG17 option Press Low Fan button(∨) to enter SEG16 value. Press High Fan button(∧) to enter SEG17 value. Each time you press the button, …...
- Page 22 Setting an indoor unit address and installation option(Continued) Setting an indoor unit address (MAIN/RMC) Check whether power is supplied or not. - When the indoor unit is not plugged in, there should be additional power supply in the indoor unit. Indoor Unit 1(L) The panel(display) should be connected to an indoor unit to receive option.
- Page 23 Setting an indoor unit installation option (suitable for the condition of each installation location) Check whether power is supplied or not. - When the indoor unit is not plugged in, there should be additional power supply in the indoor unit. Indoor Unit 1(L) The panel(display) should be connected to an indoor unit to receive option.
- Page 24 Setting an indoor unit address and installation option(Continued) 02 series installation option(Detailed) Option No. : 02XXXX-1XXXXX-2XXXXX-3XXXXX Option SEG1 SEG2 SEG3 SEG4 SEG5 SEG6 Use of external room temperature sensor / Explanation PAGE MODE Use of robot cleaning Minimizing fan operation when thermostat Use of central control FAN RPM compensation is off Remote...
- Page 25 Option SEG19 SEG20 SEG21 SEG22 SEG23 SEG24 EEV Step of stopped Individual control of a Heating setting compensation / Removing Explanation PAGE unit during oil return / Motion detect sensor remote controller condensated water in heating mode defrost mode Remote Controller Display Details...
- Page 26 Setting an indoor unit address and installation option(Continued) (*5) This function can be applied to 4 Way Cassette and Mini 4 Way Cassette only. If the air conditioner operates the heating mode immediately after finishing the cooling mode, the condensated water in the drain pan becomes water vapor by the heat of the indoor unit heat exchanger. Since the water vapor might be condensed on the indoor unit, which may fall into a living space, use this function to get rid of the water vapor out of the indoor unit by operating the fan (for maximum 20 minutes) even when the indoor unit is turned off after cooling mode is turned to heating mode .
- Page 27 05 series installation option(Detailed) Option No. : 05XXXX-1XXXXX-2XXXXX-3XXXXX Option SEG1 SEG2 SEG3 SEG4 SEG5 SEG6 (When setting SEG3) Use of Auto Change (When setting SEG3) (When setting SEG3) Standard for mode Explanation PAGE MODE Over for HR only in Standard heating temp. Standard cooling temp.
- Page 28 Setting an indoor unit address and installation option(Continued) Option SEG13 SEG14 SEG15 SEG16 SEG17 SEG18 Control variables when using hot water / external Explanation heater Remote Controller Display Details Indication Set temp. for Delay time for heater On/Off heater On At the same time No delay as thermo on...
- Page 29 SEG 3, 4, 5, 6, 8, 9 additional information When the SEG 3 is set as "1" and follow Auto Change Over for HR only operation, it will operate as follows. Standard temp. for Temp. → Heating Cooling Standard temp. for Cooling Set temp.
- Page 30 Setting an indoor unit address and installation option(Continued) Changing a particular option You can change each digit of set option. Option SEG1 SEG2 SEG3 SEG4 SEG5 SEG6 The tens’ digit of an The unit digit of an The option mode Explanation PAGE MODE...
- Page 31 Setting temperature control of discharge air Use of “Temperature control of discharge air” or target temperature of discharge air in cooling/heating can be set with the service mode of a wired remote controller. (Refer to the installation manual of a wired remote controller.) When using temperature control of discharge air, thermo on/off of Indoor unit is decided by set room temperature and room temperature, and the temperature of discharge air is adjusted to meet the target temperature of discharge air in thermostat On section.
- Page 32 *8000 (apel in retea) ROMANIA www.samsung.com/ro/support 08008-726-78-64 (08008-SAMSUNG) Apel GRATUIT CYPRUS 8009 4000 only from landline, toll free www.samsung.com/gr/support 80111-SAMSUNG (80111 726 7864) only from land line GREECE (+30) 210 6897691 from mobile and land line LITHUANIA 8-800-77777 www.samsung.com/lt/support LATVIA 8000-7267 www.samsung.com/lv/support...