Table of Contents
Advertisement
Quick Links
Advertisement
Table of Contents

Related Manuals for BEL Engineering HPBG Series


Summary of Contents for BEL Engineering HPBG Series
- Page 1 User manual HPBG Revision software: R_8.02 MAN_BEL_HPBG_EN_R_8.02_Rev2 26/01/19...
-
Page 2: Table Of Contents
INDEX POSITIONING THE INSTRUMENT ................... 3 ..........................3 REFACE ............3 LACE RECOMMENDED TO INSTALL THE INSTRUMENT RECOMMENDATIONS FOR A CORRECT USE OF THE INSTRUMENT ....4 ..........................4 REFACE ........................4 IRST POWER ON ......................4 SING THE ALANCE ................ - Page 3 11.1.2 Automatic updating of the average unit weight ............42 11.2 ....43 ROGRAM FOR THE DETERMINATION OF THE DENSITY OF A SOLID OR A LIQUID 11.2.1 Solid density determination ..................43 11.2.2 Liquid density determination ..................45 11.3 ....................47 ORMULATION FUNCTION 11.3.1 Manual formulation ....................
-
Page 4: Positioning The Instrument
1 Positioning the instrument 1.1 Preface Balances with resolutions 0.1mg and 0.01mg are instruments of high sensitivity and precision. To achieve reliable and accurate results it is fundamental to install the instrument in a suitable environment to meet the requirements necessary to ensure its proper functioning. -
Page 5: Recommendations For A Correct Use Of The Instrument
2 Recommendations for a correct use of the instrument 2.1 Preface To obtain accurate and repeatable weighing pay attention to the following. 2.2 First power on THE FIRST TIME THAT YOU CONNECT THE BALANCE TO THE MAINS, BEFORE USE, WAIT AT LEAST 12 HOURS TO ENSURE THE WARM-UP OF THE INSTRUMENT. -
Page 6: Care And Cleaning Of The Balance
Pay attention to substances that can Evaporate (alcohol) or Absorb humidity (silicon gel). Because of these types of materials weight may vary constantly in one direction. Be careful to Magnetic materials: magnetic objects will attract each other, the force that results are wrongly interpreted as a load. -
Page 7: Unpacking / Packing
3 Unpacking / Packing User Manual - After opening the box from upper side you can find accessories box containing: User manual, Weighing Pan, Support Pan, Antiventilation Ring, Power Supply. Scales with resolution 0,01mg on the Support Pan and the Weighing Pan is in ONE piece. - Page 8 Always use original packing in case of balance return to assistance centre to avoid damages to the instrument. Please note following procedures. Before re-packing, remove all movable objects and put them in the accessories box. - Following this sequence, re-pack the balance inside its own box: User Manual...
-
Page 9: Balance Hpbg Overview
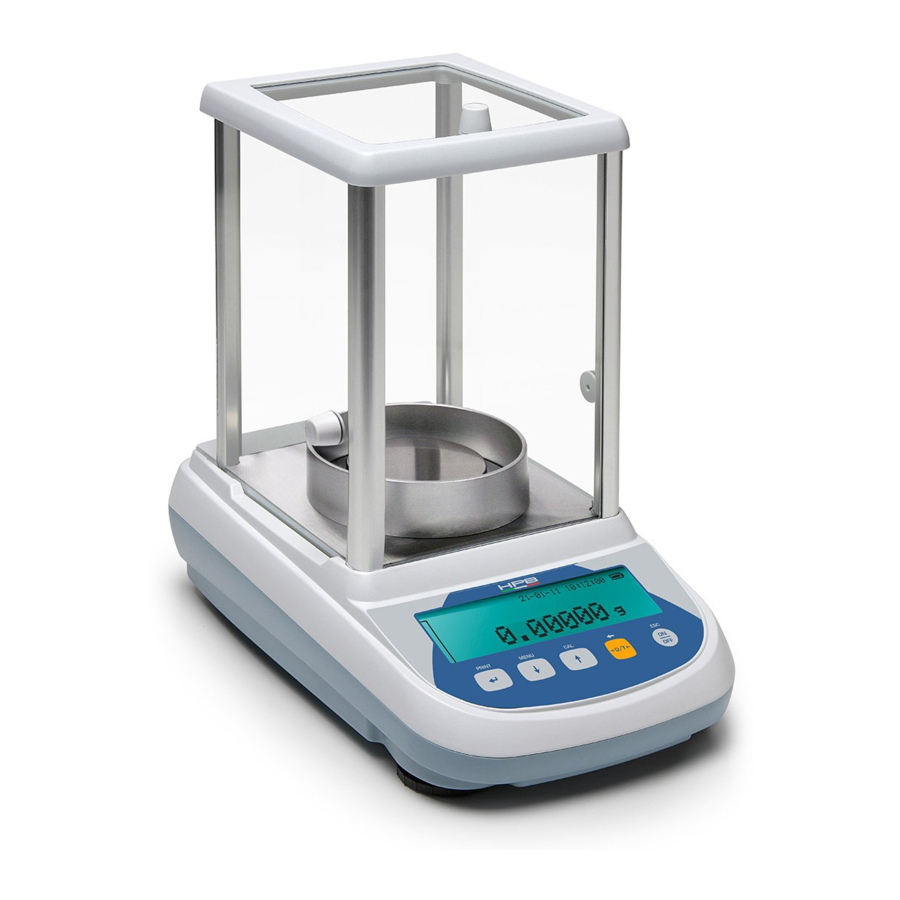
4 Balance HPBG Overview 4.1 Front Balance view 4.2 Rear Balance view 1 Draft windshield 7 Level bubble 2 Balance Power Supply 8 Connector 9 poles (pin) female for interface RS232 for printer PC 3 Master with Function keys and LCD Display 9 Rear Fixed Foot 4 Antiventilation Ring 10 Label with Balance Model and serial... -
Page 10: Ioniser ( Only For Models -Ion)
4.3 Ioniser ( only for models -ION) Using the ioniser: Keys descriptions. 1 Activation button ioniser in continuous mode. (Auto power off after 8 hours of operation) 2 Activation button ioniser in timed mode. (Operation for 2 minutes) To switch from one function or to turn off the device, press either one of the two keys. - Page 11 The ionizer is mounted in place of the rear glass as in the photo. Technical data Ioniser Distance “sample ion source” c. 5 - 40 cm Ozone concentration 0 ~ 0.05 ppm (2cm from ion source) 0 – 50°C, 20 ~ 80% air humidity (non-condensing) Ambient conditions AC adapter (primary) AC 100-240V, 50/60Hz...
-
Page 12: Keyboard And Display
Keyboard and display 01-06-10 13:15:24 0.0000 Standby (OFF) or operating Stability indicator (ON) button or ESC Zero indicator Percent weight TARE and zeroing button Piece counting Battery indicator Selection CONFIRM or SEND data to the printer button Data insertion mode Upper threshold Button for accessing the MENU to set the balance’s parameters... -
Page 13: Operating
6 Operating 6.1 Components location - As a first step place Pan Support ( 3 ) on balance cone - Lay Weighing Pan ( 2 ) on pan support and check the pan is placed properly. - Put Antiventilation ring ( 1 ) - Insert power supply connector in DC plug placed on the back of the balance. -
Page 14: Balance Levelling
6.2 Balance levelling - Level the balance with level bubble, adjusting the Front Feet ( 2 ) until the air Bubble is placed at the centre of the indicator ( - Adjust the balance according to the level bubble: Lift the balance rotate front feet clockwise Lower the balance ... -
Page 15: Weighing
Weighing After connecting the balance to power supply, an autodiagnosis of electronic circuits is automatically effected, ending with stand by indication Balance Warm-up: Wait 8 hours from switch on for warm up It is suggested to never disconnect the balance from power socket and use ON/OFF key to put the instrument in standby mode until end of work. -
Page 16: Calibration
Calibration The electronic balance carries out mass measurements using gravity (g). Differences in geographical regions and altitudes vary the gravitational acceleration (g). The balance must therefore be adapted to environmental conditions to obtain accurate measurements. This regulation is carried out through the calibration function. 8.1 Balances with external calibration The calibration is carried out through the CAL button. - Page 17 NOTE: an error message will be displayed if there is some interference during the calibration process. To interrupt the calibration process, press the ON/OFF button while the calibration weight indication flashes. It is also possible to calibrate the balance with a calibration weight greater than the pre-set calibration weight: 1.
-
Page 18: Balances With Internal Calibration
01-06-10 13:15:24 200.0000 NOTE: an error message will be displayed if there is some interference during the calibration process. To interrupt the calibration process, press the ON/OFF button while the calibration weight indication flashes. 8.2 Balances with internal calibration In these models the calibration is carried out through an internal automatic system: 1. -
Page 19: Tare Function
Tare function 1. The relative weight will be shown on the display. 01-06-10 13:15:24 21.3140 2. Press the O/T button. The word “Tare” will be displayed. 01-06-10 13:15:24 Tare 3. Once stability has been achieved, the zero value “0.000” will be displayed. In case stability is not achieved due to drafts, vibrations, or other types of disturbance, the dashes will continue to be displayed. -
Page 20: Manual Tare Function
9.1 Manual tare function This function allows a tare value to be entered manually. Press and hold the O/T button with the plate empty until the beeping stops, and then release the button. The following word will be shown on the display: 01-06-10 13:15:24 Manual tare... -
Page 21: Balance Parameters Setup Menu
Balance parameters setup menu 1. Press and hold the MENU button with the plate empty until the beeping stops, and then release the button. 2. The following writing will be shown on the display: Setup Menù - Weight Unit - Serial output 2 Sec - Baud rate - Auto zero... -
Page 22: Weight Units
10.1 Weight Units The scale can be set to display the weight in the different units, one primary (Weight Units 1) and one secondary (Weight Units 2). When we supply the scale, the default unit of measurement is Weight Units 1. 1. - Page 23 After setting Weight Units 1 (by pressing the PRINT button to confirm), the screen select “Weight Units 2” and press relative to the setup menu will be displayed again, PRINT to confirm. Setup Menù Weight Units 1 - Weight Units 2 - Serial output 2 Sec - Baud rate...
- Page 24 It is useful to set a second unit of measure when it is necessary to quickly display the result of a weighing in two different units. 9. By setting both units of measurement, retorns to normal weighing condition, it will be sufficient to press the PRINT button until the acoustic alarm gets mute, then release the button to switch from one unit of measurement to another.
-
Page 25: Serial Output Setup
10.2 Serial output setup Different data transmission devices and modes can be selected. 1. Select the serial output parameter as described in paragraph 10. The currently set transmission mode will be shown on the display: Serial output Continuous 2. Now by pressing the MENU or CAL button it will be possible to scroll through the serial output MENU forward or backward. -
Page 26: Transmission Speed Selection
10.3 Transmission speed selection Different data transmission speeds can be selected. 1. Select the baud rate parameter as described in paragraph 10. The currently set transmission speed will be shown on the display: Baud rate 1200 Baud 2. Select the serial data transmission speed (1200-2400-4800-9600 baud). By pressing the MENU or CAL button you can scroll the different transmission speeds forward or backward;... -
Page 27: Autozero Function
10.4 Autozero function Autozero is a correction from a possible deviation from zero. Different autozero levels can be selected. 1. Select the autozero parameter as described in chapter 10. The currently set autozero parameter will be shown on the display: Auto zero Autozero 2 2. -
Page 28: Filter Selection
10.5 Filter selection The balance can be adapted to different environmental conditions thanks to the selection of three different filters: 1. Select the filter parameter as described in paragraph 10. The currently set filter type will be shown on the display: Filter Filter 2. -
Page 29: Stability Function
10.6 Stability function The stability symbol will appear on the display when the weight is stable within a defined interval. 1. Select the stability parameter as described in paragraph 10. The currently set type of stability will be shown on the display: Stability Stability 2 2. -
Page 30: Contrast Adjustment
10.7 Contrast Adjustment The balance’s display is equipped with an LCD display; the contrast can be regulated in order to make the indication as visible as possible from different angles. 1. Select the contrast adjustment parameter as described in paragraph 10. The currently set contrast value will be shown on the display: Contrast adjustment Contrast adjustment... -
Page 31: Backlight Regulation
10.8 Backlight regulation The balance’s display is equipped with a backlight to make the indication visible even in low light conditions. 1. Select the backlight parameter as described in paragraph 10. The currently set mode will be shown on the display: Backlighting Auto 2. -
Page 32: Timer-Off Function
10.9 Timer-off function This function allows you to activate the automatic turn-off of the balance after a preset time of inactivity. 1. Select the Timer off parameter as described in paragraph 10. The currently set mode will be shown on the display: Timer off 15 minutes 2. -
Page 33: Date And Time Regulation
10.10 Date and time regulation This function allows you to regulate the date and time, and to modify the date display format. 1. Select the date and time parameter as described in paragraph 10. The current set date and time will be shown on the display: Date and time Format:dd-mm 10-06-10... -
Page 34: Language Selection
10.11 Language selection This function allows you to set the desired usage language. 1. Select the language parameter as described in paragraph 10. The currently set language will be shown on the display: Language Italian 2. Select the desired language. By pressing the MENU or CAL button it will be possible to scroll the various levels forward or backward;... -
Page 35: Calibration Mode Setting
10.12 Calibration mode setting This function allows you to set the calibration mode. 1. Select the calibration mode parameter as described in paragraph 10. The currently set calibration mode will be shown on the display: Calibration mode External calib. 2. Select the desired mode. By pressing the MENU or CAL buttons it will be possible to scroll the different calibration modes forward or backward: ... -
Page 36: Internal Calibration (I-Cal)
In this mode, it is also possible to carry out the calibration with the internal reference mass by pressing the CAL button at any moment, first ensuring that no weight is loaded on the plate. 1. Press the CAL button with the plate empty. The display will show the message “CAL” and the balance’s calibration will be carried out automatically. - Page 37 2. When the value of the calibration weight begins to flash, load the calibration weight on the plate. 01-06-10 13:15:24 3. Wait for the calibrated weight to be displayed and the stability symbol to turn on, and then remove the weight from the plate. 4.
-
Page 38: Calibration Data
10.13 Calibration data This function allows you to display the data relative to the last calibration carried out. Date Calibration mode Correction 1. Select the calibration data parameter as described in paragraph 10. The data relative to the last calibration carried out will be shown on the display: Calibration data 10-06-10 External calib. -
Page 39: Balance Programs Menu
Balance programs menu 1. Press the MENU button with the plate empty. 2. The following writing will be shown on the display: Main Menù - Piece counting - Density - Formulation - Limits - Percent weight. 3. Now use the CAL and MENU buttons to navigate forward or backward in the menu of parameters. -
Page 40: Piece Counting Function
11.1 Piece counting function The piece counting program allows you to carry out a total count of the pieces after having carried out a sampling of pieces or having inserted the average unit weight of the piece. 1. Select the piece counting program as described in paragraph 10. The following screen will be shown on the display: 01-06-10 13:15:24... -
Page 41: Manual Insertion Of The Average Unit Weight
If the pieces to be counted have a weight that is too little with respect to the balance’s resolution, an error message will be displayed. In this case it will be necessary to turn to a balance with greater resolution. If the weight of the samples is acceptable but not sufficient, the following message will be displayed: Add enough pieces so as to approximately double the quantity loaded on the plate, then press the PRINT button. - Page 42 2. Press the MENU button until the following message appears on the display: 01-06-10 13:15:24 Piece counting Manual Select the number of samples 3. Then press the PRINT button to confirm. 01-06-10 13:15:24 Piece counting Insert the weight of a sample 4.
-
Page 43: Automatic Updating Of The Average Unit Weight
It is also possible to use the optional alphanumeric keyboard to insert the average unit weight of the sample. In this case, carry out the same procedure described above to enter manual insertion mode. 01-06-10 13:15:24 Piece counting Insert the weight of a sample 1. -
Page 44: Program For The Determination Of The Density Of A Solid Or A Liquid
11.2 Program for the determination of the density of a solid or a liquid The density calculation program allows the determination of the density of a solid or liquid through the use of the lower weighing hook or the hydrostatic kit 11.2.1 Solid density determination 1. - Page 45 01-06-10 13:15:24 Density 0.0000 g Weight in air 7. Carry out a tare if necessary and load the solid. Wait for the stability symbol to appear and press the PRINT button to acquire the value. The word ‘wait…’ will appear during the acquisition of the value.
-
Page 46: Liquid Density Determination
11.2.2 Liquid density determination 1. Select the density program as described in paragraph 10. The following screen will be shown on the display: 01-06-10 13:15:24 Density Solid Select the mode 2. Press the MENU button select liquid mode. Then press the PRINT button to confirm. 01-06-10 13:15:24 Density... - Page 47 01-06-10 13:15:24 Density 0.0000 g Weight in air 7. Carry out a tare if necessary and load the dipstick. Wait for the stability symbol to appear and press the PRINT button to acquire the value. The word ‘wait…’ will appear during the acquisition of the value.
-
Page 48: Formulation Function
11.3 Formulation function 11.3.1 Manual formulation 1. Select the formulation program as described in paragraph 10. The following screen will be shown on the display: 01-06-10 13:15:24 Formulation Formula:00 Manual 2. Then press the PRINT button to confirm the selection. Formulation 01-06-10 13:15:24... -
Page 49: Formula Saving
7. Repeat the operation for a maximum number of 99 ingredients. Note: During the acquisition of the ingredient, the display of Err10 indicates a negative weight value. Check not to have made a mistake with the ingredient loading and zeroing procedure. 8. - Page 50 01-06-10 13:15:24 Form. setup Formula:01 Torta 4. Press the PRINT button to confirm. 01-06-10 13:15:24 Form. setup Cake 01 _ 5. Enter the name of the first component (it can be a series of numbers or letters, max 11 characters) using the MENU or CAL buttons to scroll through the available characters. 6.
-
Page 51: Formula Recall
11.3.3 Formula recall 1. Select the formulation program as described in paragraph 10. The following screen will be shown on the display: 01-06-10 13:15:24 Formulation Formula:00 Manual 2. Choose the name of the formula (previously saved) using the CAL and MENU keys to scroll through the various formulas inserted. - Page 52 7. Press the PRINT button again to begin weighing the various components.If necessary, carry out the tare operation before measuring out the quantity of component indicated at the top right of the display Formulation 01-06-10 13:15:24 10.0000g 01-Flour - 1.0 % + 2.0 % : 0 .0000g TOT: 0.0000 g E premere ‘...
-
Page 53: Max-Min Thresholds Function
11.4 Max-Min thresholds function. The thresholds function allows you to determine if the weight loaded on the plate is above or below two thresholds pre-set by the user. 1. Select the thresholds function as described in paragraph 10. The following screen will be shown on the display: Thresholds 01-06-10 13:15:24... -
Page 54: With Both The Limits Set
7. The following screen will then be displayed. Thresholds 01-06-10 13:15:24 Select the buzzer 8. Through the MENU key, select the activation or not of the acoustic signal when the weight is within the two set limits. Then confirm the selection by pressing the ENTER button. 9. -
Page 55: Percentage Weighing Function
11.5 Percentage weighing function This function allows you to read the weight as a percentage of a reference weight. The reference weight is assumed as the 100% value (factory setting). There are two modes for the acquisition of the reference weight – an automatic one (with reference weight), and a manual one (with the manual entry of the value of the reference weight). -
Page 56: Mode With Manual Insertion Of The Reference Weight
11.5.2 Mode with manual insertion of the reference weight. 1. Select the percentage weight function as described in paragraph 10. The following screen will be shown on the display: Percent. weight 01-06-10 13:15:24 Automatic Select the mode 2. Press the MENU button to select manual mode Percent. -
Page 57: Animal Weighing Function
11.6 Animal weighing function Thus function allows you to acquire an averaged weight of moving objects or animals for a settable period of time. 1. Select the animal weighing function as described in paragraph 10. The following screen will be shown on the display: Animal weighing 01-06-10 13:15:24... -
Page 58: Maximum Load Function
11.7 Maximum load function The “maximum load” function allows you to measure the maximum breakage load of a solid. 1. Select the maximum load function as described in paragraph 10. A tare will automatically be carried out and the following screen will be shown on the display with an indication of the maximum load function at the top left: Maximum load 01-06-10... -
Page 59: Glp Function (Good Laboratory Practices)
11.8 GLP function (Good Laboratory Practices) The “GLP” function allows you to save the identifying parameters of the instrument and operator to be able to print them along with the value of the test results. 1. Select the GLP function as described in paragraph 10. The following screen will be shown: 01-06-10 13:15:24... - Page 60 5. Enter the project identifier (it can be a series of numbers or letters, max 18 characters) using the MENU and CAL buttons to scroll through all of the available characters. Note: It is also possible to set the value by using the optional alphanumeric keypad. 01-06-10 13:15:24 Project ID:...
-
Page 61: Rs232 Interface Features
RS232 Interface features 12.1 General features The balance transmits the value visualized on the display following serial RS232C standard, allowing to print the value of weight to a PC monitor or to a serial printer. In the case of connection to a PC, it will be possible to select the transmission in continuous mode or transmission at user command through pressing of the PRINT button. -
Page 62: Connection Of The Balance To Computer
12.3 Connection of the Balance to computer To receive/transmit data, link the connector of the balance to the serial port of your Personal Computer as shown below: Balance side side Connector Connector 25 Pins Balance side side Connector Connector 9 Pins There are three ways of transmission in which the Balance and the computer can be interfaced: ... -
Page 63: Continuous Transmission Mode
12.3.1 Continuous Transmission mode String transmitted is composed by the following 14 characters: First character: weight sign (blank or -) Second to ninth character: weight or other data Tenth to twelfth character: weight unit symbol thirteenth character: stability indicator ... - Page 64 FORMULATION: -------------------- 03-04-11 10:54:57 -------------------- Manual 31.05 g 100.02 g 26.89 g -------------------- NOTE: To transmit the print of total of weights, press and keep pressed the PRINT button 157.96 g THRESHOLDS: Value under threshold Value inside thresholds Value over threshold -------------------- -------------------- --------------------...
-
Page 65: On Demand Transmission With G.l.p
12.3.3 On demand transmission with G.L.P. In the on demand transmission with G.L.P., the data transmitted to computer are the same as described as in the on demand transmission without G.L.P. mode but with the add of G.L.P. parameters before of each transmission, as described below: -------------------- 03-04-11 12:14:03 Balance ID:... -
Page 66: Connection Of Balance With Serial Printer
12.4 Connection of balance with serial printer It is possible to connect the balance to a printing peripherical. To print the weight, connect the connector of the balance to the serial printer as shown in the scheme below: Balance Input data side Busy signal Printer side... - Page 67 Density: -------------------- 03-04-11 10:51:15 -------------------- d: 1.4504 g/cm3 Formulation: -------------------- 03-04-11 10:54:57 -------------------- Manual 31.05 g 100.02 g 26.89 g -------------------- NOTE: To transmit the print of total of weights, press and keep pressed the PRINT button 157.96 g Thresolds: Value under threshold Value inside thresolds Value over threshold...
-
Page 68: Generic Printer Or Tlp 50 Printer With G.l.p
12.4.2 Generic Printer or TLP 50 printer with G.L.P. In the print mode with G.L.P. the printed data are the same as shown in the print mode without G.L.P. but with the add of G.L.P. paramters as shown below: -------------------- 03-04-11 12:14:03 Balance ID: G.L.P. -
Page 69: Error Codes
13 Error codes ERROR MESSAGE MEANING POSSIBLE SOLUTIONS ON DISPLAY Protect the balance from air Weight not stable after operation ERR01 flows or from vibrations of of tare the working table Protect the balance from air impossible to start the calibration ERR02 flows or from vibrations of due to instability of the balance... -
Page 70: Maintenance And Care
14 Maintenance and care Regular maintenance of yours balance guarantee accurate measurements. Cleaning Before cleaning the balance unplug the power supply of the balance from the voltage supply of your room. Do not use aggressive cleaning product (as solvents or similar), use a humid towel with soft detergent, Avoid liquids to go inside the instrument during the cleaning. -
Page 71: Quick Guide To Balance Paramters Setup
16 Quick guide to balance paramters setup To enter the balance parameters setup menu, press and keep pressed the MENU button until the acoustic alarm gets mute. Use then the MENU button to go to next parameter, use the CAL button to go to previous and the PRINT button to confirm the choice. ... - Page 72 AutoSwitchOff Ora e data Format Disabled Date 2 Minutes time 5 Minutes Language 15 Minutes Balance parameters settings Menu Modalità di calibrazione German Ext. Calibration Italian Automatic Calib. English Int. Calibration Spanish Calibration data Tech Calibration French Data of calibration Portoguese Return...
-
Page 73: Balance Technical Charactheristics
17 Balance Technical charactheristics All the models listed are only for internal use. Maximum altitude using limit: 4000m. Pollution level: 2. Over voltage category: II Power supply provided: INPUT: 230V ~ 50Hz o 115V ~ 60Hz, OUTPUT: 24V DC 1A, Max power absorbed 13.2VA- Enviroment conditions adaption: Filters selection Autozero:... -
Page 74: Warranty
01-06-10 10-06-10 01-06-10 01-06-10 01-06-10 Piece 01-06-10 Density 01-06-10 Weight in air Density 01-06-10 Density 01-06-10 Density Select the 01-06-10 Density Select the 01-06-10 Enter the Density 01-06-10...