Denon MC2000 Owner's Manual
Dj controller
Hide thumbs
Also See for MC2000:
- Service manual (76 pages) ,
- Quick setup manual (2 pages) ,
- Quick start manual (9 pages)
Table of Contents
Advertisement
Quick Links
Advertisement
Table of Contents

Related Manuals for Denon MC2000


Summary of Contents for Denon MC2000
- Page 1 DJ Controller MC2000 Owner’s Manual...
- Page 2 This product, when installed as indicated in the instructions contained in this manual, meets FCC the presence of important operating and maintenance (servicing) instructions in the requirements. Modification not expressly approved by DENON may void your authority, granted by literature accompanying the appliance.
- Page 3 IMPORTANT SAFETY INSTRUCTIONS READ BEFORE OPERATING EQUIPMENT This product was designed and manufactured to meet strict quality and safety standards. There are, however, some installation and operation precautions which you should be particularly aware of. Read these instructions. 2. Keep these instructions. 3.
- Page 4 n NOTE ON USE/HINWEISE ZUM GEBRAUCH/OBSERVATIONS RELATIVES A L’UTILISATION/ NOTE SULL’USO/NOTAS SOBRE EL USO/ALVORENS TE GEBRUIKEN/OBSERVERA WARNINGS WARNHINWEISE AVERTISSEMENTS AVVERTENZE ADVERTENCIAS WAARSCHUWINGEN VARNINGAR • Keep the unit free from • Gehen Sie vorsichtig mit dem • Manipuler le cordon • Manneggiate il cavo di • Maneje el cordón de energía • Hanteer het netsnoer • Hantera nätkabeln varsamt.
- Page 5 • D ECLARATION OF CONFORMITY • D ECLARACIÓN DE CONFORMIDAD (English) (Español) We declare under our sole responsibility that this product, to which this declaration relates, is Declaramos bajo nuestra exclusiva responsabilidad que este producto al que hace referencia in conformity with the following standards: esta declaración, está...
- Page 6 A NOTE ABOUT RECYCLING: This product’s packaging materials are recyclable and can be reused. Please dispose of any materials in accordance with the local recycling regulations. When discarding the unit, comply with local rules or regulations. Batteries should never be thrown away or incinerated but disposed of in accordance with the local regulations concerning battery disposal.
-
Page 7: Table Of Contents
Before use Contents Before use Basic operation USB settings ·················································································1 ·····································································10 ··········································································12 Accessories ····················································································2 Basic operation ············································································10 USB AUDIO Input ········································································12 About this manual ········································································2 Turning the power on ·································································10 MIDI command input/output ·····················································13 Features ·························································································2 Turning the power off ·································································10 Setting the MIDI command transmission interval time ··············13 Cautions on handling ····································································3 Microphone input ········································································10... -
Page 8: Accessories
USB cable ................1 Disc This symbol indicates a supplementary 2. USB MIDI controller • MC2000 Resource disc............1 information and tips for operations. • Equipped with a physical controller function that controls DJ • DJ software (Serato DJ Intro) ..........1 software. -
Page 9: Cautions On Handling
Cautions on handling • About condensation If there is a major difference in temperature between the inside of the unit and the surroundings, condensation (dew) may form on the operating parts inside the unit, causing the unit not to operate properly. If this happens, let the unit sit for an hour or two with the power turned off and wait until there is little difference in temperature before using the unit. -
Page 10: Connections
Connections Input terminal connection Output terminal connections NOTE • Do not connect this device to the PC using the USB cable until all Connecting a microphone/external devices Outputting to an amplifier/powered other connections with external devices are completed. • When making connections, also refer to the operating instructions of speakers and recording devices the other components. -
Page 11: Connecting To A Computer
Connecting to a computer Use the supplied USB cable to connect the unit with a computer so n Automatic driver installation that USB MIDI and USB AUDIO signals can be sent and received. When you connect this unit to a computer for the first time or change USB connections on the computer, a message “Installing device driver software”... -
Page 12: Installing And Setting Up Supplied Software
DENON DJ ASIO for DJ Controller or use this Software. D&M is the legal owner to all the intellectual property embedded,embodied and The InstallShield(R) Wizard will install DENON DJ ASIO for DJ Controller on your computer. to continue, click Next. Print... - Page 13 Installing DENON DJ ASIO for DJ Controller The program features you selected are being installed. NOTE Please wait while the InstallShield Wizard installs DENON DJ ASIO for DJ Controller, This may take several minutes. • When installing this software on Windows XP, the “Install Software”...
-
Page 14: Starting
DENON DJ devices in a list. Use this button to close the ASIO control panel, When the DENON DJ ASIO driver “ASIO Control Panel” is opened from the DJ software or desktop icon, (Example: MC2000) reflecting the changes to the settings. -
Page 15: Installing Serato Dj Intro
Installing SERATO DJ INTRO Use the following steps to install the DJ software “SERATO DJ INTRO” in the supplied disc. Installation onto a Mac computer Installation onto a Windows computer Insert Disc “SERATO DJ INTRO” into your Insert Disc “SERATO DJ INTRO” into your computer. -
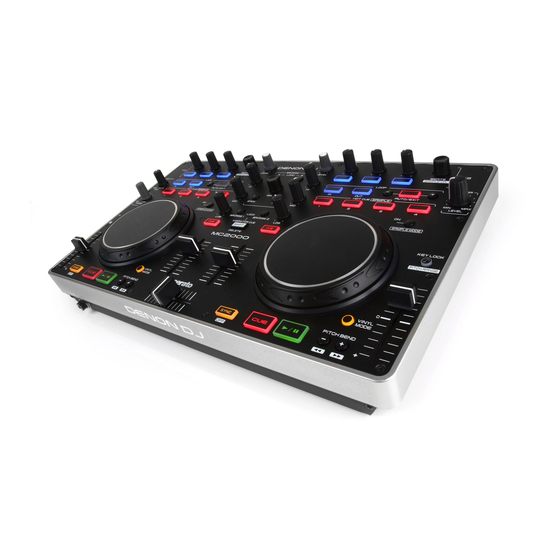
Page 16: Basic Operation
Basic operation This section describes operations of the unit without using the DJ software. Front panel • For information about how to operate the DJ software, see the instruction manual for the DJ software or the help menu. • For information about the buttons on the unit for operating the DJ software and their functions, see 17 – 19 pages. Basic operation Microphone input Turning the power on... -
Page 17: Adjusting The Sensitivity Of The Touch Sensor
Adjusting the sensitivity of the Top panel SHIFT SEL. LOAD A LOAD B touch sensor The sensitivity of the touch sensor for the jog wheel can be set in 9 different steps (-4 - 0 - +4). • “–4” is the lowest sensitivity, and “+4” is the highest sensitivity. • The default setting is “0”. -
Page 18: Shift Lock Function
SHIFT lock function USB settings Top panel SHIFT SHIFT Various functions can be used by holding down and pressing other buttons. By using the SHIFT Lock function, however, it is USB AUDIO Input possible to use the same functions that are accessed by holding down SHIFT SHIFT without needing to hold down This device is equipped with a sound card function that enables a maximum of 2 channels (stereo, 2 input) of USB AUDIO input. -
Page 19: Midi Command Input/Output
MIDI command input/output This unit is equipped with a USB MIDI command input/output function. This function enables the unit to control the DJ software in the computer, and lights the main unit display (LEDs). • If SERATO DJ INTRO is used normally, there is no need to switch MIDI command settings or the MIDI channel. Doing so may cause undesired operation or no operation at all. Other DJ software can be customized to match the MIDI commands of this device, and can then be controlled by this device. Most of the controls in this device support the MIDI control function. Top panel BROWSE1 BROWSE2... -
Page 20: Midi Command List
MIDI command input/output MIDI command list n Send command MIDI command Items Command Number Value MONITOR CUE (LEFT CH) 0x01 C#-1 VINYL MODE 0x04 MONITOR CUE (RIGHT CH) 0x05 KEY LOCK 0x06 F#-1 BEND + 0x0C BEND - 0x0D FX1-2 SW 0x12 FX1-3 SW 0x13... - Page 21 MIDI command input/output MIDI command Items Command Number Value Reverse 0x3F ~ 0x01 JOG WHEEL FWD/REV Foward 0x41 ~ 0x7F 0xBn 0x51 (VINYL MODE = ON) slow->fast ※ relative data Reverse 0x3F ~ 0x01 JOG WHEEL FWD/REV Foward 0x41 ~ 0x7F 0xBn 0x52 (VINYL MODE = OFF)...
- Page 22 MIDI command input/output n Reception commands Range of MIDI CH1 MIDI command Items (Lit display (LED)) Command Number SHIFT LOCK 0x02 VINYL MODE 0x06 KEY LOCK 0x08 SYNC 0x09 CUE1 0x11 CUE2 0x13 CUE3 0x15 CUE4 0x17 SAMP.1 (LEFT) 0x19 SAMP.2 (LEFT) 0x1B SAMP.3 (LEFT)
-
Page 23: Part Names And Functions
Part names and functions Top panel The top panel is explained for SERATO DJ INTRO. Operations of the top panel only operate the DJ software and do not control audio input/output. For buttons not explained here, see the page indicated in parentheses ( ). Effects adjustment knob (1/2/3) Headphone output volume adjustment knob Adjusts the effect balance. (MONITOR PHONES) Adjusts the volume output to the headphones. Beats select/Sample volume knob Turn the knob to select the effect beats, and Sample mode switching button... - Page 24 Top panel Cue button (CUE) ······································· (11) Channel input level adjustment knob Sets the cue point and stutters the cue point (LEVEL) when pushed repeatedly. Load button (LOAD A, LOAD B) SEL. Play/pause button ( Loads the file selected using W3 to either Plays back when pressed while playback is DECK A or DECK B.
- Page 25 Top panel Window switch button (BACK/FWD) Move the cursor. BROWSE 1 button (BROWSE 1) Not used in SERATO DJ INTRO operation. BROWSE 2 button (BROWSE 2) Not used in SERATO DJ INTRO operation. SHIFT button (SHIFT) MONITOR CUE button (MONITOR CUE) The source of the channel selected using MONITOR CUE is mixed with the monitor, and...
-
Page 26: Front Panel
Front panel Rear panel For buttons not explained here, see the page indicated in parentheses ( ). For buttons not explained here, see the page indicated in parentheses ( ). Headphone jack (PHONES) ························ (10) Theft protection lock hole Connect to an anti-theft wire. USB terminal (USB) Master output terminal (MASTER OUT) ···········································... -
Page 27: Troubleshooting
Troubleshooting Specifications If a problem should arise, first check the following: n Audio (0dBu = 0.775 Vrms, 0dBV = 1 Vrms) 1. Are the connections correct? • LINE inputs 1 Stereo 2. Is the set being operated as described in this owner’s manual? Unbalanced RCA terminal 3. Is the external device (player or effects processor) operating correctly? Input impedance: 10 kΩ... -
Page 28: Index
Index ASIO driver ··························································· 6 Microphone ························································ 10 MIDI command ············································· 13,14 Cable ···································································· 4 Coaxial cable for microphone ····························· 4 Power on/off ······················································ 10 RCA pin plug cable············································· 4 USB cable ·························································· 4 Condensation ······················································· 3 Rear panel ·························································· 20 Connection ···························································... -
Page 29: Signal System Chart
Signal system chart... - Page 30 n Dimensions Unit: in. (mm) 27/64 (10.6) 3/16 (4.6) 15 3/4 (400.0) 29/64 (11.5) 1 31/32 (50.0) Weight: 5 lbs 15 1/4 oz (2.7 kg)
- Page 31 3520 10165 00AP...