Table of Contents
Advertisement
Quick Links
Advertisement
Chapters
Table of Contents

Related Manuals for Yamaha PortaTone PSR-330


Summary of Contents for Yamaha PortaTone PSR-330
-
Page 2: Special Message Section
Yamaha. This product should be used only with the components supplied or; a cart, rack, or stand that is recommended by Yamaha. If a cart, etc., is used, please observe all safety markings and instructions that accom- pany the accessory product. - Page 3 SAVING USER DATA • Save all data to an external device such as the Yamaha MIDI Data Filer MDF2, in order to help prevent the loss of important data due to a malfunc- tion or user operating error.
-
Page 4: Important Features
You are the proud owner of a fine electronic keyboard. The Yamaha PSR-330 PortaTone combines the most advanced tone generation technology with state-of-the-art digital electronics and features to give you stunning sound quality with maximum musical enjoyment. A large graphic display and easy-to-use interface also greatly enhance the operability of this advanced instrument. -
Page 5: Table Of Contents
Local Control ... 70 Clock ... 70 Bulk Data Send ... 70 Initial Data Send ... 71 Appendix PSR-330 Display MENU/SUB MENU Structure ... 72 Troubleshooting ... 73 Voice List ... 74 Maximum Polyphony ... 74 Drum Kit List ... 78 Data Backup &... -
Page 6: Panel Controls
Panel Controls Top Panel Controls POWER Switch ... page 12 MASTER VOLUME Control ... page 12 DEMO Button ... page 12 TEMPO Buttons ... page 21 TRANSPOSE Buttons ... page 38 ACCOMPANIMENT/SONG VOLUME Buttons ... pages 26, 45 AUTO ACCOMPANIMENT SECTION •... -
Page 7: Included Accessories
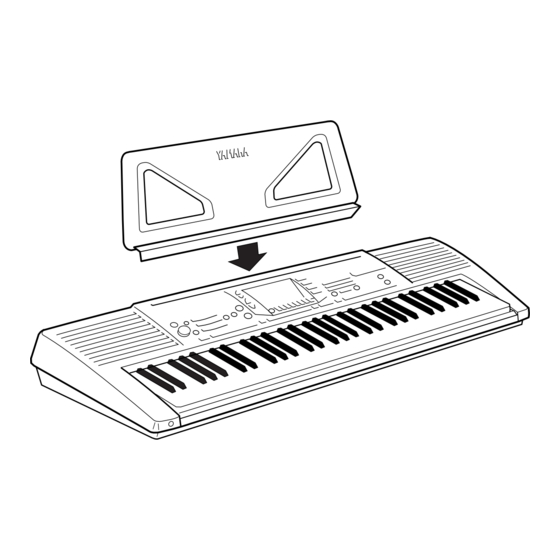
CLASSIC BOTTLE KEYBOARD DUAL VOICE SPLIT VOICE PSR-330 The Music Stand The PSR-330 is supplied with a music stand that can be attached to the instrument by insert- ing it into the slot at the rear of the control panel. -
Page 8: Basic Display Operation
Basic Display Operation The PSR-330 LCD panel is a large multi-function type that simultaneously displays and provides access to a number of important parameters. Basic operation of the display as well as the MENU and SUB MENU buttons, and the meaning of the icons which appear in the display, are summarized briefly below. - Page 9 REPEAT Indicates the “A” and “B” repeat points when programming a re- peat section, and whether RE- PEAT PLAY is on or off (page 49). ONE TOUCH SETTING ONE TOUCH Appears when the ONE TOUCH SETTING SETTING feature is engaged (page 32).
-
Page 10: The Menus
Basic Display Operation The Menus The buttons to the right of the display directly select one of the PSR-330’s four main function menus: VOICE, STYLE, SONG, and CARTRIDGE. The currently selected menu is indicated by a triangular indicator in the display next to the menu list printed immediately to the right of the display panel. -
Page 11: Shortcuts
REVERB type selection function. The shortcut buttons and the functions they access are listed on the PSR-330 panel, near the upper left corner of the display. The shorcuts will also be described where appropriate throughout this manual. -
Page 12: Setting Up
Setting Up This section contains information about setting up your PSR-330 and preparing to play. Be sure to go through this section carefully before using your PSR-330. Power Supply Although the PSR-330 will run either from an optional AC adaptor or batteries, Yamaha recommends use of the more enviromentally safe AC adaptor. -
Page 13: Connections
The MIDI IN connector receives MIDI data from an external MIDI device (such as a MIDI sequencer) which can be used to control the PSR-330. The MIDI OUT connector transmits MIDI data generated by the PSR-330 (e.g. note and velocity data produced by playing the keyboard). -
Page 14: The Demonstration
The Demonstration Once you’ve set up your PSR-330, try listening to the pre-programmed demonstration songs. A total of 20 demo songs are provided. Switch ON Turn the power ON by pressing the [POWER] switch. Set an Initial Volume Level Turn the [MASTER VOLUME] control up (clockwise) about a quarter-turn from its minimum position. - Page 15 • When a demo which uses the PSR-330’s internal ac- companiment styles is playing, the names of the chords being played will appear on the display.
-
Page 16: Playing The Psr-330
A Word About the “R1”, “R2”, and “L” Voices The PSR-330 allows up to three voices to be selected at the same time: “R1” (Right- hand 1), “R2”, (Right-hand 2) and “L” (Left-hand). Only the “R1” voice is used when you’re playing a single voice over the entire range of the keyboard. -
Page 17: Selecting & Playing Voices
GrandPno Select a Panel Voice The PSR-330 voices can be selected by using the [–] and [+] buttons, the number buttons, or the [VOICE] button. The panel voices are listed in the VOICE list printed at the top of the instrument’s control panel. -
Page 18: Keyboard
Play & Adjust Volume You can now play the selected voice on the PSR-330 keyboard. Use the [MASTER VOLUME] control to adjust the overall volume level. If the Voice Set function (page 65) is turned “on”, whenever a panel voice is selected appropriate “R2”... -
Page 19: Keyboard Percussion
ACCOM- VOICE VOICE VOICE PANIMENT DUAL TRACK Playing the PSR-330 • The HARMONY effect (page 35) cannot be turned on while a drum kit is selected for the “R1” voice, and will automatically be turned off if a drum kit is selected while HARMONY is on. -
Page 20: The Split Voice Mode
(when a frame appears around the voice icons). MELODY Changing the SPLIT VOICE Split Point The SPLIT VOICE split point can be set to any key on the PSR-330 keyboard to match your individual playing requirements. Select the SPLIT VOICE Split Point Function Use the MENU [ ] and [ ] buttons to the left of the display to move the triangular indicator next to “OVERALL”... - Page 21 (C3) is “60”, and the highest key (C5) is 96. The split point can be set at any key number from 0 through 127, allowing the split point to be set outside the range of the PSR-330 keyboard for MIDI applications. S.Split Playing the PSR-330 •...
-
Page 22: Auto Accompaniment
Auto Accompaniment The PSR-330 has 100 different accompaniment “styles” that can be used to provide fully- orchestrated or rhythm-only accompaniment. The PSR-330’s sophisticated AUTO ACCOM- PANIMENT system can provide automated bass and chord backing that is perfectly matched to the selected accompaniment style. -
Page 23: Select A Style
Select a Style The PSR-330 has 100 styles that can be selected by using the [–] and [+] buttons, the number buttons, or the [STYLE] button (these controls function in the same way as for voice selection — see page 15). The styles are listed in the STYLE list printed at the top of the instrument’s control panel. -
Page 24: Sync Start Button
Auto Accompaniment Start the Accompaniment There are several ways to start the accompaniment: Straight start Press the [START/STOP] button. The rhythm will begin playing immediately without bass and chord accompaniment. The currently selected MAIN [A] or [B] section will play. START/STOP Start with an introduction followed by the MAIN A variation Press the [INTRO] button so that its indicator lights, press the MAIN/AUTO... - Page 25 START Play On the Auto-accompaniment Section Of the Keyboard As soon as you play any chord that the PSR-330 can “recognize” on the left- hand section of the keyboard, the PSR-330 will automatically begin to play the chord along with the selected rhythm and an appropriate bass line. The name of the current chord will appear on the display.
-
Page 26: The Synchro Stop Function
SYNC STOP FINGERING • The MAIN A section is auto- matically selected when- ever the PSR-330 power is initially turned on. • The indicator of the destina- tion section (MAIN A or B) will flash while the corre- sponding fill-in is playing. -
Page 27: Accompaniment Track Muting
Accompaniment Track Muting The PSR-330 has eight accompaniment tracks — RHYTHM 1, RHYTHM 2, BASS, CHORD 1, CHORD 2, PAD, PHRASE 1, and PHRASE 2 — that you can control to modify the “orchestration” and therefore the overall sound of the accom- paniment. -
Page 28: Accompaniment Volume Control
Auto Accompaniment Accompaniment Volume Control When the STYLE menu is selected (i.e. the accompaniment track and volume icons are framed) the volume of the accompaniment in relation to the keyboard can be adjusted for the best overall balance by using the ACCOMPANIMENT/SONG VOLUME [ ] and [ ] buttons. -
Page 29: Changing The Accompaniment Split Point
The lowest key on the keyboard (C1) is key number “36”, middle C (C3) is “60”, and the highest key (C5) is 96. The split point can be set at any key number from 0 through 127, allowing the split point to be set outside the range of the PSR-330 keyboard for MIDI applications. -
Page 30: Interaction Between The Auto Accompaniment And Split Voice Split Points
Accompaniment/ L Voice The Auto Accompaniment Fingering Modes The PSR-330 AUTO ACCOMPANIMENT feature has five different fingering modes which can be selected as follows. Select the Fingering Mode Function Use the MENU [ ] and [ ] buttons to the left of the display to move the triangular indicator next to “OVERALL”... - Page 31 Then use the SUB MENU [ ] and [ ] buttons to select the “FngrngMd” function from within the OVERALL menu. The abbreviated name of the current fingering mode will appear to the left of “FngrngMd” on the top line of the display. Select the Required Fingering Mode Use the [–] and [+] buttons to select the desired fingering mode: Single Finger...
- Page 32 The Fingered 1 mode lets you finger your own chords on the AUTO ACCOMPA- NIMENT section of the keyboard (i.e. all keys to the left of and including the split- point key — normally 54) while the PSR-330 supplies appropriately orchestrated rhythm, bass, and chord accompaniment in the selected style.
- Page 33 This means you can play in just about any style anywhere on the keyboard, and the PSR-330 will automatically produce appropriate accompaniment.
-
Page 34: The Stop Accompaniment Function
While the SINGLE FINGER, FINGERED 1, FINGERED 2, or MULTI-FIN- GER mode is selected chords played in the AUTO ACCOMPNIMENT section of the keyboard are also detected and played by the PSR-330 Auto Accompaniment system when the accompaniment is stopped (except when the FULL KEYBOARD mode is engaged). - Page 35 Select a Style Select the STYLE menu and select an accompaniment style as described on page Press the [ONE TOUCH SETTING] Button Press the [ONE TOUCH SETTING] button. The ONE TOUCH SETTING and REGIST [1] icons will appear in the display, and the ONE TOUCH SETTING type 1 panel settings will be recalled.
-
Page 36: Digital Effects
Digital Effects The PSR-330 has digital REVERB and HARMONY effects that can be used to add extra ambience and depth to your sound. Reverb The PSR-330 has 8 digital reverb effects that simulate the natural reverberation of a range of acoustic environments. There’s also an “Off” setting:... -
Page 37: Harmony
Use the [–] and [+] buttons or number buttons to select the desired REVERB effect (the name of the selected REVERB effect will appear on the top line of the display). Select “OFF” if you want no REVERB effect on any part of the PSR-330 sound. Harmony... -
Page 38: Turning The Harmony Effect On Or Off
Digital Effects Type 5 Trill 1/4 6 Trill 1/6 7 Trill 1/8 8 Trill 1/12 9 Trill 1/16 10 Trill 1/24 11 Trill 1/32 12 Tremolo 1/4 13 Tremolo 1/6 14 Tremolo 1/8 15 Tremolo 1/12 16 Tremolo 1/16 17 Tremolo 1/24 18 Tremolo 1/32 Turning the Harmony Effect On or Off Press the [HARMONY] button so that the HARMONY icon appears in the display... -
Page 39: Adjusting The Harmony Volume
Then use the SUB MENU [ ] and [ ] buttons to select “Harmony”. After a few seconds the name of the currently selected HARMONY type will appear on top line of the display. Select a Harmony Type Use the [–] and [+] buttons or number buttons to select the desired HARMONY type (the name of the selected HARMONY type will appear on the top line of the display). -
Page 40: Transpose
Transpose This functions allow the overall pitch of the PSR-330 to be transposed up or down by a maximum of one octave in semitone increments. Setting Transposition Use the TRANSPOSE [ ] and [ ] buttons to set the desired degree of transposi- tion. -
Page 41: Registration Memory
Registration Memory The PSR-330 Registration Memory feature can be used to memorize 32 complete control- panel setups (8 banks, 4 setups each) that you can recall whenever needed. Registering the Panel Settings Set Up the Controls as Required Make the desired control settings. The following settings are memorized by the... -
Page 42: Recall The Registered Panel Settings
• No REGISTRATION MEMORY indicator REPEAT MEASURE will be showing when REGISTRATION MULTI PAD the PSR-330 is ini- tially turned on or when a bank is se- lected prior to actually selecting a REGIS- TRATION MEMORY number. • FREEZE remains on... -
Page 43: The Multi Pads
The Multi Pads The PSR-330 MULTI PADS can be used to play a number of short pre-recorded rhythmic and melodic sequences that can be used to add impact and variety to your keyboard perfor- mances. Percussion type pad phrases simply play back as programmed, while the “pitched”... -
Page 44: Turning The Chord Match Function On/Off
The Multi Pads Turning the CHORD MATCH Function On/Off The CHORD MATCH function can be individually turned on or off for each of the MULTI PADs, as described below. Select the MULTI PAD Function Use the MENU [ ] and [ ] buttons to select the MULTI PAD function so that the triangular indicator in the display appears next to “MULTI PAD”... -
Page 45: Playing The Multi Pads
MULTI PAD plays a brass chord stab. When the CHORD MATCH function for a pad is turned on, the corresponding phrase will be automatically transposed to match chords played using the PSR-330 Auto-accompaniment feature. MULTI PAD playback can be terminated by pressing the MULTI PAD [STOP] button. -
Page 46: Song Playback
Song Playback Use the following procedure to play back the PSR-330’s internal demonstration songs as well as songs you record yourself (see “Song Recording”, page 50). Song Playback Procedure Select the Song Menu Press the [SONG] button to select the SONG menu (the triangular indicator will appear next to “SONG”... -
Page 47: Song Volume Control
Start Playback Playback will begin as soon as the [START/STOP] button is pressed. You can turn the MELODY and ACCOMPANIMENT tracks on and off during playback as required by using the TRACK buttons. Play Along If You Like Play along on the keyboard if you like. You can also change the tempo during playback. -
Page 48: Play From A Specified Measure
Song Playback Play from a Specified Measure You can start SONG playback from any specified measure, as long as the specified measure is within the range of measures that has already been recorded: Select the Measure Parameter While the SONG menu is selected, but no playback or recording is in progress, use the SUB MENU [ ] and [ ] buttons to select the “Measure”... -
Page 49: Minus-One Practice
(see “Using Music Cartridges”, page 55) have more than 4 channels — as many as 16, in fact. This function lets you assign any of the song’s channels to the PSR-330’s MELODY tracks so they can be turned on or off for minus-one practice. - Page 50 Song Playback Select a MELODY Track Use the TRACK buttons to select the song MELODY track (1…4) to which a minus-one channel is to be assigned. A frame will appear around the selected track icon. MELODY Assign a Channel to the Selected Track Use the [–] and [+] buttons to assign the desired minus-one channel (1…16) to the selected MELODY track.
-
Page 51: Repeat Play
Repeat Play This function allows you to specify any section of a song — internal or cartridge — for continuous repeat playback. Select the A-b Repeat Parameter While the SONG menu is selected, but no recording is in progress, use the SUB MENU [ ] and [ ] buttons to select the “A-b Repeat”... -
Page 52: Song Recording
The SONG tracks include one ACCOMPANIMENT track and four MELODY tracks. The PSR-330 can retain up to 2 complete songs in internal memory, and these can be selected and played back as described in the preceding section. -
Page 53: Song Recording Procedure
Song Recording Procedure Set Up to Record Before recording set up the PSR-330 as required: e.g. select the required voice(s), effects, accompaniment style, accompaniment fingering mode, etc. Engage the Record Ready Mode Press the [RECORD] button to engage the record-ready mode. The [RECORD] button indicator will light, the SONG menu will automatically be selected, and a SONG number will appear on the top line of the display. - Page 54 • Before actually starting to record you can try playing the PSR-330 the way it is set up by using the “Rehearsal Mode”: press the [SYNC START] button to temporarily disengage the record ready mode, rehearse as necessary, then press the [SYNC START] button again to return to the record ready mode.
-
Page 55: Stop Recording
• Recording is carried out in 1-measure increments. If you stop recording in the middle of a measure, rests will automatically be recorded until the end of that measure. • If you start recording by pressing the [START/STOP] button, nothing will be recording on a MELODY track until you begin playing on the keyboard. -
Page 56: Clearing Song Data
Song Recording Clearing Song Data This function makes it possible to clear unneeded data from the PSR-330 SONG memory. While the SONG record-ready or rehearsal mode is engaged use the SUB MENU [ ] and [ ] buttons to select the “SongClr?” function, then press the [+] (YES) button: “Sure?”... -
Page 57: Using Music Cartridges
The PSR-330 features a catridge slot which accepts pre-programmed Yamaha Music Cartridges containing style and/or song data. One sample Music Cartridge containing song data is supplied with the PSR-330. Others are available from your Yamaha dealer. Inserting a Music Cartridge... -
Page 58: Cartridge Songs
Cartridge Songs Using Yamaha Music Cartridges (the one supplied with the PSR-330 includes 7 songs, others are available from your Yamaha dealer), the PSR-330 will let you enjoy listening to automated performances, or function as your “private music tutor,” allowing you to practice various parts of a piece while the others are played automatically. -
Page 59: Cartridge Accompaniment Styles
Start Playback Playback will begin as soon as the [START/STOP] button is pressed. You can turn the MELODY and ACCOMPANIMENT tracks on and off during playback as required by using the TRACK buttons. Cartridge Accompaniment Styles Optional Style Music Cartridges provides extra accompaniment styles that can be used in the same way as the internal accompaniment styles after pressing the [STYLE] button to select the STYLE menu. -
Page 60: Revoicing
Revoicing The PSR-330 REVOICE function lets you change the following parameters for the R1, R2 and L voices, the AUTO ACCOMPANIMENT tracks, and the user SONG tracks. Revoice Parameters Parameter Display Voice Voice Name Volume Volume Octave Octave Reverb Send Level... - Page 61 [CAR- TRIDGE] button is pressed. • Save any revoice settings you want to keep to the PSR-330 REGISTRATION MEMORY (page 39). The revoice setting are tempo- rary and will be lost if the power is turned off, a differ-...
-
Page 62: Revoicing A Style
Revoicing Revoicing a Style Select the STYLE REVOICE Mode While the STYLE menu and the style you want to revoice are selected, press the [REVOICE] button (actually, the order here is not important: you can also press the [STYLE] button after pressing the [REVOICE] button). The [REVOICE] button indicator will light and a frame will appear around the RHYTHM 1 track icon in the display (i.e. -
Page 63: Revoicing A User Song
[CARTRIDGE] button is pressed. • Save any revoice set- tings you want to keep to the PSR-330 REGISTRATION MEMORY (page 39). The revoice setting are temporary and will be lost if the power is... - Page 64 TRIDGE] button is pressed. • Since revoicing a user song actually rewrites the song data, the revoiced song will remain in memory as long as a working set of batteries is installed in the PSR-330, or the AC adapter is connected.
-
Page 65: Overall Functions
Overall Functions Some of the functions in the OVERALL function group have already been described in appropriate sections of this manual. Others will be introduced for the first time in this section. Refer to the chart below for the page numbers on which each function is described. The chart also lists the full name of each function, the abbreviated name which appears on the display, and the available settings or range of settings. -
Page 66: Touch Sensitivity
Master Tuning The Tuning function sets the overall pitch of the PSR-330 over a 50 cent range (from –50 to +50) in 1-cent increments. Since 1 cent is 1/100th of a semitone, the total tuning range is from a semitone below normal pitch to a semitone above normal pitch. -
Page 67: Metronome
Metronome When turned “on” the PSR-330 metronome will sound during AUTO ACCOMPA- NIMENT playback as well as SONG playback and recording. Metronom Split Voice Split Point See page 18. Accompaniment Split Point See page 27. Fingering Mode See page 28. -
Page 68: Midi Functions
The MIDI IN connector receives MIDI data from an external MIDI device which can be used to control the PSR-330. The MIDI OUT connector transmits MIDI data generated by the PSR-330 (e.g. note and velocity data produced by playing the keyboard). -
Page 69: Midi Sequence Recording
MIDI Sequence Recording Although the PSR-330 features a built-in “sequencer” (the SONG recorder is a type of sequencer), the same type of musical information transfer described above can be used for more sophisticated MIDI sequence recording using an external sequencer or music computer. -
Page 70: Transmit Channel & Transmit Track
MIDI channels. Transmit Channel The “Tr.Ch” function selects a MIDI channel to which a PSR-330 track can be assigned via the Transmit Track function, below. First select a transmit channel, then the transmit track for that channel. Different tracks can be assigned to each of the 16 MIDI channels. -
Page 71: Receive Channel & Receive Mode
Rcv.Mod “Normal”. Received MIDI data is sent directly to the PSR-330 tone generator. If all channels are set to “nor”, the PSR-330 functions as a 16- channel multi-timbral tone generator. No MIDI data is received on channels set to “oFF”. -
Page 72: Local Control
When MIDI clock reception is enabled (“on”), however, all timing is controlled by an external MIDI clock signal received via the MIDI IN terminal (in this case the PSR-330 TEMPO setting has no effect). The default setting is “off”. -
Page 73: Initial Data Send
BkRcv Initial Data Send Transmits all current panel settings to a second PSR-330 or a MIDI data storage device. To send the initial data select the “InitSnd?” function, then press the [+] (YES) button. “Sure?” will appear on the display. Press the [+] (YES) again to begin transmission of the initial data. -
Page 74: Appendix
Appendix PSR-330 Display MENU/SUB MENU Structure MENU VOICE GrandPno STYLE 8BtPop1 SONG DancePop Measure MinusCh A-b : Repeat SongClr? TrkClr? CARTRIDGE StåLife REGISTRATION MEMORY Bank1 MULTI PAD Funky Pad1Chd Pad2Chd Pad3Chd Pad4Chd MIDI Tr.Ch Tr.Trk Rcv.Ch Rcv.Mod Local ExtClock BlkSnd? -
Page 75: Troubleshooting
Control is turned on (page 70). You are probably exceeding the maximum polyphony of the PSR-330. The PSR-330 can play up to 31 notes at the same time — including split, dual, auto-accompaniment, song, and multi pad notes. Notes exceeding this limit will not sound. -
Page 76: Voice List
Voice List Maximum Polyphony The PSR-330 has 31-note maximum polyphony. This means that it play a maximum of up to 31 notes at once, regardless of what functions are used. Auto Accompaniment uses a number of the available notes, so when Auto Accompaniment is used the total number of notes that can be played on the keyboard is correspondingly reduced. - Page 77 Bank Select MIDI Voice Voice Name Program Number MSB Number Koto Harp Sitar BRASS Trumpet Muted Trumpet Trombone Trombone Section French Horn Tuba Brass Section Brass+Sax Brass+Trombone Brass+Trumpet Synth Brass 1 Synth Brass 2 REED Soprano Sax Alto Sax Tenor Sax Baritone Sax Sax+Clarinet Sax+Trombone...
- Page 78 Voice List Bank Select MIDI Voice Program Number MSB Number Piano Acoustic Grand Piano Bright Acoustic Piano Electric Grand Piano Honky-tonk Piano Electric Piano 1 Electric Piano 2 Harpsichord Clavi Chromatic Percussion Celesta Glockenspiel Music Box Vibraphone Marimba Xylophone Tubular Bells Dulcimer Organ Drawbar Organ...
- Page 79 Bank Select MIDI Voice Voice Name Program Number MSB Number Synth Effects FX 1 (rain) FX 2 (soundtrack) FX 3 (crystal) FX 4 (atmosphere) FX 5 (brightness) FX 6 (goblins) FX 7 (echoes) FX 8 (sci-fi) Ethnic Sitar Banjo Shamisen Koto Kalimba Bagpipe...
-
Page 80: Drum Kit List
Drum Kit List • “<——” indicates that the drum kit is the same as “127: Standard Kit”. • Each percussion voice uses one note. • The MIDI Note # and Note actually sound one octave lower than listed. For example, in “127: Standard kit”, the “ Seq Click corresponds to (Note# 24/Note C0). - Page 81 Voice# Bank MSB# Bank LSB# Program# Keyboard Analog Kit Note# Note <—— <—— <—— <—— Reverse Cymbal <—— Hi Q SD Rock H <—— Bass Drum H 5 <—— BD Analog 1 L BD Analog 1 H Analog Side Stick SD Analog 1 H <——...
-
Page 82: Data Backup & Initialization
Data Backup & Initialization Data Backup Except for the data listed below, all PSR-330 panel settings are reset to their initial settings whenever the power is turned on. • Registration Memory • User Song Data • MIDI Transmit Settings • MIDI Receive Settings The data listed above can be backed up —... -
Page 83: Midi Implementation Chart
MIDI Implementation Chart [Portable Keyboard] Model: PSR-330 Function Basic Default 1~16 CH Channel Changed 1~16 CH Default Mode 3 Mode Messages Altered ***** Note 0~127 Number : True voice ***** Velocity Note on O 9nH, v=1~127 Note off X 9nH, v=0 After key’s... - Page 84 16 channel multi-timbral tone generator. The Remote Channel can be designated with the panel settings. The designated channel can be controlled in the same manner as the PSR-330’s keyboard ON/ OFF control. The following messages can be received by the designated channel in this mode.
-
Page 85: Midi Data Format
MIDI channels. The current standard recognized by the International MIDI Association is known as “GM System Level 1.” The PSR-330 voice allocation complies with the GM System Level 1 standard. -
Page 86: Specifications
Specifications Keyboards • 61 standard-size keys (C1 — C6) with touch response. Display • Large multi-function LCD display Setup • Power : ON/OFF • Master Volume : MIN — MAX Control & Number Buttons • MENU , VOICE, STYLE, SONG, CARTRIDGE, SUB MENU , [1] —... -
Page 87: Index
Index AC power adaptor ... 10 Accompaniment styles, cartridge ... 57 Accompaniment tracks, song ... 50 Auto accompaniment ... 20 Auto accompaniment on/off ... 20 Auto Fill ... 23 Bank, registration ... 39 Batteries ... 10 Beat indicator ... 23 Bulk data receive ... -
Page 88: Limited Warranty
PSR SERIES OF PORTATONE ELECTRONIC KEYBOARDS If during the first 90 days that immediately follows the purchase date, your new Yamaha product covered by this warranty is found to have a defect in material and/or workmanship, Yamaha and/or its authorized representative will repair such defect without charge for parts or labor. - Page 89 For details of products, please contact your nearest Yamaha or the authorized distributor listed below. Pour plus de détails sur les produits, veuillez-vous adresser à Yamaha ou au distributeur le plus proche de vous figurant dans la liste suivante. NORTH AMERICA CANADA Yamaha Canada Music Ltd.
- Page 90 M.D.G., EMI Division © 1997 Yamaha Corporation VV67430 704PO?????-01A0 Printed in China...