Advertisement
Quick Links
OPERATOR'S
MANUAL
Ver3.0C201-H
Fingertip Pulse Oximeter
General Description
Thank you very much for purchasing a Concord Pulse Oximeter.
This Manual describes the Pulse Oximeter's features and requirements, functions, specifications, correct methods for
transportation, installation, usage, operation, repair, maintenance and storage, as well as the safety procedures to protect both the
user and equipment. Please read and follow the User Manual carefully before using this product. Failure to follow the User Manual
may cause measuring abnormality, equipment damage and human injury. The manufacturer is NOT responsible for the safety,
reliability and performance issues and any monitoring abnormality, human injury and equipment damage due to improper use. The
specific products you received may not be exactly as described in this User Manual. This product can be used repeatedly for sports
and aviation use. If you have any questions regarding to the use of this product, please call us at 888-970-2999 Monday- Friday
from 8:00 AM to 5:00 PM Central Time.
Measurement Principle
Principle of the oximeter is as follows: A mathematical formula is established making use of Lambert Beer Law according to
Spectrum Absorption Characteristics of Reductive hemoglobin (RHb) and Oxyhemoglobin (HbO
Operation principle of the instrument: Photoelectric Oxyhemoglobin Inspection Technology is adopted in accordance with Capacity
Pulse Scanning and Recording Technology, so that two beams of different wavelength of lights (660nm red and 940nm near
infrared light) can be focused onto a human nail tip through a clamping finger-type sensor. A measured signal obtained by a
photosensitive element, will be shown on the oximeter's display through process in electronic circuits and microprocessor.
Diagram of Operation Principle
1. Red and Infrared-ray Emission Tube
2. Red and Infrared-ray Receipt Tube
Precautions For Use
1
Before use, carefully read the manual.
2
Check the main unit and all accessories periodically to make sure that there is no visible damage that may affect
user's safety and monitoring performance. It is recommended that the device should be inspected once a week.
3
The fingertip pulse oximeter must be able to measure the pulse properly to obtain an accurate SpO2 measurement. Verify
that nothing is hindering the pulse measurement before relying on the SpO2 measurement.
4
Keep the oximeter away from dust, vibration, corrosive substances, explosive materials, high temperature and moisture.
5
Do not use the fingertip pulse oximeter in an explosive atmosphere.
6
Not intended for Continuous monitoring
7
The fingertip pulse oximeter is intended only for sports and aviation monitoring
8
Do not sterilize the device using autoclaving, ethylene oxide sterilizing, or immersing the device in liquid. The device is not
intended for sterilization.
9
Follow local ordinances and recycling instructions regarding disposal or recycling of the device and device components,
including batteries.
10
This equipment complies with IEC 60601-1-2:2007 for electromagnetic compatibility for electrical equipment and/ or
systems. However, because of the proliferation of radio-frequency transmitting equipment and other sources of electrical
noise the environment, it is possible that high levels of such interference due to close proximity or strength of a source might
disrupt the performance of this device.
11
Portable and mobile RF communications equipment can affect electrical equipment.
12
This equipment should not be used adjacent to or stacked with other equipment.
13
It may be unsafe to:
—use accessories 、detachable parts and materials not described in the instructions for use
—interconnect this equipment with other equipment not described in the instructions for use
—disassemble, repair or modify the equipment.
14
These materials that contact with the users skin contain medical silicone and ABS plastic enclosure all pass the ISO10993-5
Tests for invitro cytotoxicity and ISO10993-10 Tests for irritation and delayed-type hypersensitivity.
Contraindication
It is not for continuous monitoring.
Inaccurate measurements may be caused by
1
Significant levels of dysfunctional hemoglobin (such as carbonyl - hemoglobin or methemoglobin).
2
High ambient light. Shield the sensor area if necessary.
3
Excessive user movement.
4
High-frequency interference.
5
Poor blood perfusion.
6
Placement of a sensor on an extremity with a blood pressure cuff.
7
Fingernail polish or false fingernails.
8
Weak pulse quality.
9
Low hemoglobin.
Product Properties
1
Simple to operate and convenient to carry.
2
Small volume, light weight and low power consumption.
3
High brightness OLED display SpO
, PR, and Pulse bar; two directions display mode.
2
4
2 display modes.
5
2pcs AAA-size alkaline batteries; battery-low indicator.
6
When no or low signal is detected, the pulse oximeter will power off automatically in 8 seconds.
Intended Use
Fingertip pulse oximeter is a portable non-invasive device intended for spot-checking of oxygen saturation of arterial hemoglob
(SpO2) and pulse rate of adult and pediatric users in sports and aviation.
Operation Instructions
1
Install two AAA batteries according to the Battery Installation instructions.
2
Place one of your fingers into the rubber opening of the pulse oximeter.
3
Press the switch button one time on front panel to turn the pulse oximeter on.
4
Keep your hands still for the reading. Do not shake your finger during the test. It is recommended
that you do not move your body while taking a reading.
5
Read the data from the display screen.
6
Press the button again to toggle between two display modes.
After turning on the Oximeter, each time you press the power switch, the Oximeter will switch to another display mode.
There are 2 display modes shown as follows:
1.
Holding the power switch for longer than one second, will adjust the brightness of the oximeter. There are 10 levels of brightness.
The default level is level four.
Concord Black Ox
CCI-BLACK-OX
) in red and near-infrared zones.
2
2.
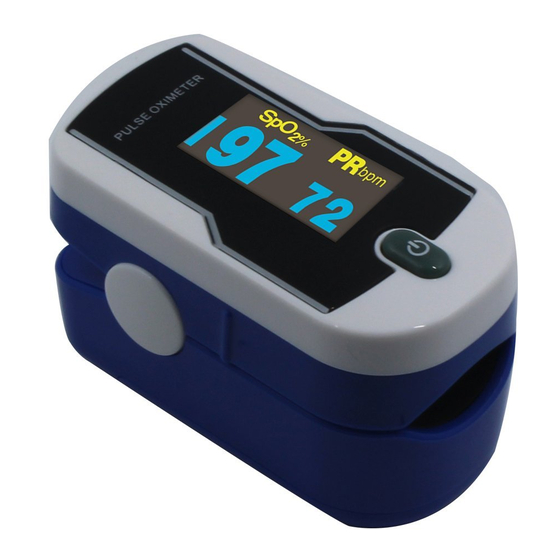
Front Panel
The pulse bar less than 30% indicates signal inadequacy and the displayed SpO
Battery Installation
1.
Install two AAA batteries into the battery compartment. Match the plus (+) and minus (-) signs in the compartment. If
the polarities are not matched, damage may be caused to the oximeter.
2.
Slide the battery door cover horizontally along the arrow shown as the picture.
Note:
Please remove the batteries if the pulse oximeter will not be used for long periods of time.
Please replace the battery when the low battery power indicator.
Using the Lanyard
1.
Thread thinner end of the lanyard through the loop.
2.
Thread thicker end of the lanyard through the threaded end before pulling it tightly.
Warnings!
Keep the oximeter away from young children. Small items such as the battery door, battery, and lanyard are choking hazards.
Do not hang the lanyard from the device's electrical wire.
Please notice that the lanyard which is tied to the oximeter may cause strangulation due to excessive length.
Maintenance and Storage
1.
Replace the batteries in a timely manner when low voltage lamp is lighted.
2.
Clean surface of the fingertip oximeter before it is used in diagnosis for users.
3.
Remove the batteries if the oximeter is not operated for a long time.
4.
It is best to store the product in -20 ℃~+55℃ and ≤93% humidity .
5.
Keep in a dry place. Extreme moisture may affect oximeter lifetime and may cause damage.
6.
Dispose of battery properly; follow any applicable local battery disposal laws.
Cleaning the fingertip pulse oximeter
Please use medical alcohol to clean the silicone touching the finger inside of oximeter with a soft cloth dampened with
70% isopropyl alcohol. Also clean the being tested finger using alcohol before and after each test.
Do not pour or spray liquids onto the oximeter, and do not allow any liquid to enter any openings in the device. Allow the oximeter to
dry thoroughly before reuse.
The use life of the device is five years when it is used for 15 measurements every day and 10 minutes per one
measurement. Stop using and contact local service center if one of the following cases occurs:
An error in the Possible Problems and solutions is displayed on screen.
The oximeter cannot be powered on in any case and not the reasons of battery.
There is a crack on the oximeter or damage on the display resulting readings cannot be identified; the spring is invalid; or
the key is unresponsive or unavailable.
Specifications
1. Display Type
OLED display
2. SpO
2
Display range: 0%~100%
Measurement range: 70%~100%
Accuracy: 70%~100%: ±2%; 0%~69% no definition
Resolution: 1%
ARMS Value Analysis
Testing Range
70--<80
80--<90
90--100
70--100
Bland-Altman graphical plot of all sampled data points as below
in
Note: A functional tester cannot be used to assess the accuracy of a pulse oximeter monitor or sensor. Clinical testing is used to
establish the SpO2 accuracy. The measured arterial hemoglobin saturation value (SpO2) of the sensors is compared to arterial
hemoglobin oxygen (SaO2) value, determined from blood samples with a laboratory CO-oximeter. The accuracy of the sensors in
comparison to the CO-oximeter samples measured over the SpO2 range of 70%~100%. Accuracy data is calculated using the
root-mean-squared (Arms value) for all subjects, per ISO 9919:2005, Medical Electrical Equipment – Particular requirements for the
basic safety and essential performance of pulse oximeter.
A functional tester is used to measure how accurately Fingertip Pulse Oximeter is reproducing the specified calibration curve
and the PR accuracy.
The model of functional tester is Index2 FLUKE simulator and the version is 2.1.3.
3. Pulse Rate
Display range: 0bpm~250bpm
Measure range: 30bpm~250bpm
Accuracy: 30bpm~99bpm, ±2bpm; 100bpm~250bpm, ±2%
Resolution: 1bpm
4. LED Wavelengths
Wavelength
Radiant Power
RED
660±3nm
3.2mw
and pulse rate value is potentially incorrect.
2
Data Points
Bias
ARMS
Specification
81
-0.70
1.82
±2
71
-0.60
1.52
±2
84
-0.15
1.78
±2
236
-0.47
1.72
±2
Advertisement

Related Manuals for CONCORD Black Ox


Summary of Contents for CONCORD Black Ox
- Page 1 The pulse bar less than 30% indicates signal inadequacy and the displayed SpO and pulse rate value is potentially incorrect. Thank you very much for purchasing a Concord Pulse Oximeter. Battery Installation This Manual describes the Pulse Oximeter’s features and requirements, functions, specifications, correct methods for transportation, installation, usage, operation, repair, maintenance and storage, as well as the safety procedures to protect both the Install two AAA batteries into the battery compartment.
- Page 2 One instruction manual Notes: The illustrations used in this manual may differ slightly from the appearance of the actual product. The specifications are subject to change without prior notice. Concord Health Supply, Inc. Off: 888-970-2999 Fax: 888-970-8999 www.ConcordHealthSupply.com ALL RIGHTS RESERVED...