
Related Manuals for Miele F 2411 Vi


Summary of Contents for Miele F 2411 Vi
- Page 1 Operating and installation instructions Freezer To avoid the risk of accidents or damage to the appliance it is essential to read these instructions before it is installed and used for the first time. en-AE, SA M.-Nr. 11 633 570...
-
Page 2: Table Of Contents
Contents Warning and Safety instructions..............Caring for the environment ................15 Installation......................16 Location....................... 16 Climate range ....................16 Installation notes ....................17 Adjoining cabinets/units ................. 17 Load-bearing capacity of the niche floor ............18 Ventilation ....................... 18 Door hinging ....................18 Side-by-side .................... - Page 3 Performing a Self test ..................68 Switching on the Door assistant ..............69 Switching off the Door assistant ..............71 Setting up Miele@home ..................71 Switching off the Demo mode ................75 Resetting the settings to their default settings ..........76 Switching Sabbath mode on or off ..............78 Switching on, switching off or resetting the Water filter display ...
- Page 4 Contents Placing food in the freezer................... 92 Storage time for frozen food................92 Defrosting frozen goods ..................93 Cooling drinks quickly ..................93 Making ice cubes ....................94 Automatic defrosting ..................96 Cleaning and care ..................... 97 Cleaning agents....................97 Before cleaning the refrigeration appliance............
-
Page 5: Warning And Safety Instructions
Miele cannot be held liable for injury or damage caused by non- compliance with these instructions. Keep these instructions in a safe place and pass them on to any future owner. - Page 6 The refrigeration appliance is also not suitable for use in areas where there is a risk of explosion. Miele cannot be held liable for damage caused by improper or incorrect use or operation of the appliance. ...
- Page 7 Warning and Safety instructions Safety with children Children under 8 years of age must be kept away from the refrigeration appliance unless they are constantly supervised. Children 8 years and older may only use the appliance unsupervised if they have been shown how to use it in a safe way and recognise and understand the consequences of incorrect operation.
- Page 8 - Ventilate the room where the refrigeration appliance is located for several minutes. - Contact your Miele Dealer. The more coolant there is in a refrigeration appliance, the larger the room it should be installed in. In the event of a leakage, if the appliance is in a small room, there is the danger of a combustible gas/air mixture building up.
- Page 9 If the electrical connection cable supplied is damaged, it must only be replaced by an original spare part to prevent a hazard for the user. Miele can only guarantee the safety of the appliance when original Miele spare parts are used.
- Page 10 Replacement lamps may only be fitted by a Miele authorised technician or by the Miele Customer Service Department. This refrigeration appliance contains light sources rated as energy efficiency class F. Miele cannot be held liable for damage caused by a faulty mains water connection.
- Page 11 Warning and Safety instructions The ice-cube maker must only be connected to a cold water supply. Risk of injury. Ensure that you do not come into contact with moving parts on dispensing mechanism of the ice cube maker or the heating element on the ice cube maker.
- Page 12 Warning and Safety instructions Danger of injury and damage to the appliance. When cooling drinks quickly in the freezer zone, make sure bottles are not left in for more than one hour. Otherwise they could burst. Danger of injury. Never handle frozen food or the metal parts of the appliance with wet hands.
- Page 13 Warning and Safety instructions Accessories and spare parts Only use genuine original Miele accessories and spare parts with this appliance. Using accessories or spare parts from other manufacturers will invalidate the warranty, and Miele cannot accept liability. Cleaning and care ...
- Page 14 Warning and Safety instructions Transport Always transport the appliance in an upright position and in its original transport packaging to avoid damage in transit. Danger of injury and damage to the appliance. The refrigeration appliance is very heavy and must be transported by two people. Disposal of your old appliance ...
-
Page 15: Caring For The Environment
Instead, please make use of officially designated collection and disposal points to dispose of and recycle electrical and electronic appliances in your local community, with your dealer or with Miele. By law, you are solely... -
Page 16: Installation
*INSTALLATION* Installation If installation near a heat source is Location unavoidable, observe the following This appliance should be installed in a minimum distances between the dry, well-ventilated room. appliance and the heat source: When deciding where to install your - At least 3 cm refrigeration appliance, please bear in to electric or gas stoves mind that it will use more energy if... -
Page 17: Installation Notes
*INSTALLATION* Installation Installation notes Risk of damage due to high humidity. Risk of damage and injury due to In environments with high humidity, the refrigeration appliance tipping condensation can build up on over. external refrigeration appliance This refrigeration appliance is very panels, which can cause corrosion. -
Page 18: Load-Bearing Capacity Of The Niche Floor
When fully loaded, the weight of the ventilation gaps. The ventilation gaps refrigeration appliance is approx.: must not be covered or blocked in any way. F 2411 Vi 261 kg F 28x1 Vi 368 kg Door hinging F 29x1 Vi 426 kg ... -
Page 19: Side-By-Side
*INSTALLATION* Installation Side-by-side If the door hinges of the refrigeration appliances are next to each other, This appliance can be installed side-by- you must take into account the side with another refrigeration thickness of the furniture fronts and appliance. The following overview will door handles so that the appliance show you which side-by-side doors do not collide and become... -
Page 20: Specifications For The Mains Water Connection
*INSTALLATION* Installation . . . without partition wall Specifications for the mains water connection - Connection to the water supply must comply with the applicable regulations in the country where the appliance is being installed. All appliances and systems used to supply water to the refrigeration appliance must also comply with the applicable regulations in the... -
Page 21: Building-In Dimensions
*INSTALLATION* Installation Building-in dimensions F 2411 Vi 2134–2164 mm 458 mm 610 mm + furniture front (19–38 mm) F 2801 Vi, 2134–2164 mm 762 mm 610 mm + furniture front F 2811 Vi (19–38 mm) F 2901 Vi, 2134–2164 mm 915 mm 610 mm + furniture front F 2911 Vi (19–38 mm) - Page 22 *INSTALLATION* Installation 30 mm ≥ 262 mm 22 mm ≥ 102 mm ≥ 85 mm 102 mm Side view...
-
Page 23: Dimensions With Appliance Door Open (Opening Angle 115°)
*INSTALLATION* Installation Dimensions with appliance door open (opening angle 115°) 10 mm D (with a furniture front of 19 mm) F 2411 Vi 525 mm Furniture Handle 237 mm front (19–38 mm) F 2801 Vi, 829 mm Furniture Handle 363 mm F 2811 Vi front (19–38 mm) - Page 24 *INSTALLATION* Installation The opening angle of the appliance door must not be limited to 90° because otherwise the freezer baskets and ice cube container cannot be removed.
-
Page 25: Dimensions Of The Furniture Front
*INSTALLATION* Installation Dimensions of the furniture front ≥ 102–132 mm F 2411 Vi 451 mm 2029 mm ≥ 102–132 mm F 2801 Vi, 756 mm 2029 mm F 2811 Vi ≥ 102–132 mm F 2901 Vi, 908 mm 2029 mm... -
Page 26: Installing The Appliance
*INSTALLATION* Installation Tools required Installing the appliance - Cordless drill Before starting ... - TX 20 screwdriver It is essential to read these operating - Hammer drill and installation instructions carefully before starting to install the - Drill bits in various sizes, refrigeration appliance. -
Page 27: Weight Of The Furniture Front
*INSTALLATION* Installation Weight of the furniture front Aligning the building-in niche Before fitting a furniture front, ensure that the weight of the furniture front does not exceed the maximum permitted weight: Refrigeration Max. weight of appliance the furniture front F 1411 Vi 59 kg F 2801 Vi, F 2811 Vi 28 kg F 2901 Vi, F 2911 Vi 34 kg... -
Page 28: Checking The Installation Niche
*INSTALLATION* Installation Check the surroundings for possible Checking the installation niche collisions (see “Installation – Check the installation dimensions Dimensions with appliance door (see “Installation – Installation open”). dimensions”). Only install the refrigeration appliance Check the position of the electrical in stable, solid installation niches, connection. -
Page 29: Before Installation
*INSTALLATION* Installation Before installation Before installation, remove any accessories from the back of the appliance. Check the refrigeration appliance for transport damage. Do not install a damaged refrigeration appliance. Check that all parts at the back of the appliance are unhindered. -
Page 30: Preparing The Building-In Niche
*INSTALLATION* Installation With the help of several people as Preparing the building-in niche required, carefully lift the refrigeration Risk of damage and injury due to appliance from the pallet, starting the refrigeration appliance tipping with the back of the appliance. over. - Page 31 *INSTALLATION* Installation Risk of injury and damage due to tipping refrigeration appliance. If the anti-tip brackets are fixed too high up, they cannot be used to secure the refrigeration appliance. The distance between the anti-tip brackets and the refrigeration appliance must not exceed 8 mm.
- Page 32 *INSTALLATION* Installation The accessory pack supplied contains fixing screws for various applications/materials. Securing with a wooden wedge Secure the building-in niche to the wall behind it and/or above it as required using the anti-tip brackets . Connect the refrigeration appliance to the mains water supply (see Securing to a concrete wall “Installation –...
-
Page 33: Pushing The Refrigeration Appliance Into The Building-In Niche
*INSTALLATION* Installation Pushing the refrigeration appliance into the building-in niche Push the refrigeration appliance into the niche, taking care not to damage the electrical and mains water connections. If you are installing several refrigeration appliances side by side, now secure the appliances to one another (see the installation instructions for the side-by-side ... -
Page 34: Aligning The Refrigeration Appliance
*INSTALLATION* Installation Carefully push the refrigeration Aligning the refrigeration appliance appliance into the niche. The installation aids on the If the refrigeration appliance cannot appliance door provide assistance be pushed into the niche (because with the alignment of the refrigeration the floor is uneven, for example), appliance in the building-in niche. - Page 35 *INSTALLATION* Installation Furniture front thickness of 38 mm The adjustable feet at the front and back of the appliance can all be Position the supplied spacers on adjusted from the front of the both sides on the markings next to appliance.
- Page 36 *INSTALLATION* Installation Adjust the rear feet with a ratchet Adjust the front feet with a ratchet (attachment: socket, 8 mm) or a (attachment: socket, 8 mm) or a TX 20 screwdriver . TX 20 screwdriver . Tip: Proceed carefully when adjusting the feet, alternating between the left and right feet.
-
Page 37: Securing The Refrigeration Appliance In The Building-In Niche
*INSTALLATION* Installation Check the alignment of the refrigeration appliance again using the installation aids and the spirit level. Securing the refrigeration appliance in the building-in niche Place a spirit level across the installation aids on the appliance door to check the refrigeration appliance’s alignment. - Page 38 *INSTALLATION* Installation Open the appliance door. If it is not possible to secure the refrigeration appliance at the top, it can be attached to the building-in niche with the side fixing plates: Screw the fixing plate lugs at the top and bottom to the cabinets/units adjacent to the appliance.
-
Page 39: Preparing To Install The Furniture Fronts
*INSTALLATION* Installation Preparing to install the furniture fronts Open the appliance door as far as it will go. Unscrew the angle trims from both sides of the appliance door and place the trims and screws to one side – they will be required later. - Page 40 *INSTALLATION* Installation Remove the nuts and washers from the threaded bolts and place them to one side – they will be required later. Take the mounting frame off the Place the furniture front on a firm appliance door by removing it surface, with the external side facing upwards.
- Page 41 *INSTALLATION* Installation Screw the appliance handle to the furniture front from the inside if necessary (not for handle-free kitchens). Secure the mounting frame to the top of the furniture front, using 6 to 10 screws depending on the size. The mounting frame has several different types of holes to take account of a variety of furniture fronts.
-
Page 42: Securing And Aligning The Furniture Front
*INSTALLATION* Installation Securing and aligning the furniture front Press the angle trims into the white plastic frame on both sides from the outside and screw them on loosely at first. Spare screws are provided in the plastic bag marked with the letter E. ... - Page 43 *INSTALLATION* Installation Close the appliance door and check the distance between the door and adjacent furniture fronts again. Align the depth of the furniture front via the gaps in the angle trims . Place the washers and nuts back in position and tighten the nuts .
- Page 44 *INSTALLATION* Installation Mounting the fixing bracket The fixing bracket is used to secure the furniture front to the bottom of the appliance door. Do not mount the fixing bracket until the refrigeration appliance (or side-by- side combination, if applicable) has been installed and the furniture front has been aligned.
- Page 45 *INSTALLATION* Installation Tighten the screw at the bottom of Click the cover onto the fixing the appliance door. bracket. Fit the cover over the fixing bracket .
-
Page 46: Securing The Covers
*INSTALLATION* Installation Securing the covers Before the cover can be installed in the gap above the refrigeration appliance, it must be assembled as follows: Place the assembled cover into the gap above the refrigeration appliance so it clicks into place. While doing so, slide both parts of the cover together as required. - Page 47 *INSTALLATION* Installation Fit the plastic covers on both sides Now attach the covers onto the of the appliance door by clicking retaining clips on each side. them into the gap between the In the case of side-by-side appliance door and the furniture front, installation, the covers are only starting at the bottom and working up required on the outer side.
-
Page 48: Securing The Plinth Ventilation Grille And Plinth Panel
*INSTALLATION* Installation Securing the plinth ventilation grille and plinth panel Click the plinth ventilation grille onto the bottom of the appliance plinth. If necessary, cut the plinth panel to the required length and height (cut along the lower edge of the plinth where it touches the floor). -
Page 49: Mains Water Connection
*INSTALLATION* Installation Mains water connection Connection to the water supply must comply with the applicable Information about the mains water regulations in the country where the connection appliance is being installed. All appliances and systems used to Risk of injury and appliance supply water to the refrigeration damage if appliance is not appliance must also comply with the... -
Page 50: Connecting The Refrigeration Appliance To The Water Supply
*INSTALLATION* Installation The stainless steel hose must only be replaced by an original Miele spare part. The food-grade, stainless steel hose is available to order from your Miele dealer. A stopcock must be provided between the stainless steel hose and the mains water supply to ensure that the water supply can be cut off if necessary. -
Page 51: Electrical Connection
(AC 220–240 V 50/60 Hz from the appliance. This could result in supply). A longer connection cable is a short circuit. available to order from your Miele Do not plug in other appliances behind Dealer. the refrigeration appliance. The fuse rating must be at least 10 A. - Page 52 *INSTALLATION* Installation Connecting the appliance Insert the plug connector into the socket at the back of the refrigeration appliance. Make sure that the plug connector has clicked into position correctly. Insert the plug of the refrigeration appliance into the socket. The refrigeration appliance is now connected to the electricity supply.
-
Page 53: Saving Energy
Saving energy Normal energy Increased energy consumption consumption Installation / In a ventilated room. In an enclosed, unventilated Maintenance room. Protected from direct In direct sunlight. sunlight. Not near to a heat source Near to a heat source (radiator, oven). (radiator, oven). - Page 54 Saving energy Normal energy Increased energy consumption consumption Drawers and shelves arranged as they were when the appliance was delivered. Only open the door when Frequent opening of doors necessary and for as short a for long periods will cause a time as possible.
-
Page 55: Guide To The Appliance
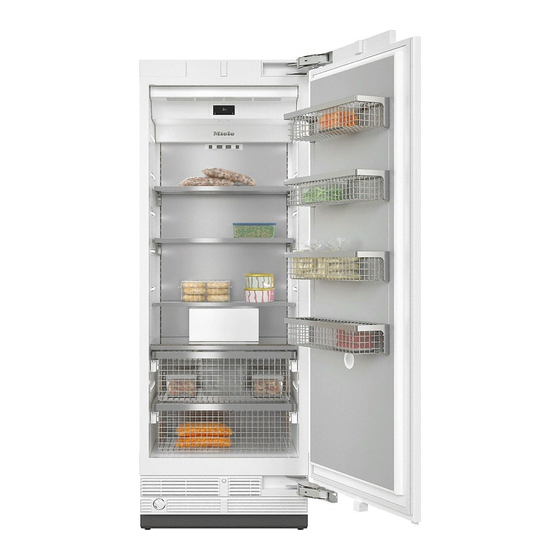
Guide to the appliance F 2411 Vi a Display b On/Off switch c Shelves in the appliance door d Interior lighting e Shelves f Ice cube maker g Ice cube container h Freezer baskets i Automatic door opening (Push2open/Pull2open) j Water filter... -
Page 56: F 2801 Vi, F 2811 Vi, F 2901 Vi, F 2911 Vi
Guide to the appliance F 2801 Vi, F 2811 Vi, F 2901 Vi, F 2911 Vi a Display b On/Off switch c Shelves in the appliance door d Interior lighting e Shelves f Ice cube maker g Ice cube container h Freezer baskets i Automatic door opening (Push2open/Pull2open) j Water filter... -
Page 57: Main Screen
(only visible when the SuperFreeze function has been switched on) b Temperature display (target temperature) c Sensor control for setting the temperature d Display for Miele@home connection status (only visible when Miele@home has been set up) e Sensor control for adjusting various settings in Settings mode... -
Page 58: Settings Mode
Guide to the appliance Settings mode In Settings mode, you can select the following appliance functions and alter their settings to some extent: Symbol Function Language Display brightness Adjust (darker to brighter) Colour scheme Set (dark or bright) /... - Page 59 Guide to the appliance Set up, deactivate or query WiFi connection status Miele@home (see “Selecting additional settings”) * Demo mode Switch off * (only visible when , is switched on Demo mode see “Selecting additional settings”) Factory default...
-
Page 60: Accessories
Optional accessories If you wish to install two furniture fronts next to each other instead of one A range of useful Miele accessories and furniture front, they will have to be care products are available for your connected with a metal filler panel. -
Page 61: Initial Commissioning
Initial commissioning Choosing the right door assistant Before using for the first time (Push2open/Pull2open) Allow the refrigeration appliance to The door assistant helps you to open stand for approx. 1 hour before the appliance door. connecting it to the power supply. This will prevent potential functional You can choose between the two door problems with the refrigeration... -
Page 62: Operating The Refrigeration Appliance
Initial commissioning Settings mode Operating the refrigeration appliance In Settings mode , you can select different refrigeration appliance The touch display can be scratched functions and alter their settings to by pointed or sharp objects, e.g. some extent (see “Selecting additional pens. -
Page 63: Starting Up For The First Time
- Set the Temperature unit °C (degrees Celsius) or °F (degrees Fahrenheit) - Set up Miele@home Select if you wish to set up Continue Miele@home now (to do this, follow the instructions under “Selecting additional settings – Miele@home”). -
Page 64: Switching On And Off
Switching off the refrigeration on when the appliance door is opened. appliance Miele will appear on the refrigeration Switch the refrigeration appliance off appliance display, followed by the main by pressing the On/Off switch. -
Page 65: Switching Off For Longer Periods Of Time
Switching on and off Switching off for longer periods of time If the refrigeration appliance is not going to be used for a longer period of time: Switch the refrigeration appliance off. Switch off at the wall and withdraw the plug from the socket, or disconnect the fuse. -
Page 66: Selecting Additional Settings
Selecting additional settings In Settings mode , you can select The display is unlocked briefly so you different refrigeration appliance settings can adjust the setting as required. and alter their settings to some extent, Closing the appliance door will allowing you to adjust the appliance to reactivate the sensor lock. -
Page 67: Switching Eco Mode On Or Off
Selecting additional settings Switching Eco mode on or Health risk caused by decomposing food. The usability and quality of food may Eco mode is useful when you go on deteriorate if the temperature holiday, for example, if you do not wish remains above -18 °C for an to switch off the refrigeration appliance extended period. -
Page 68: Performing A Self Test
sensor control. Make a note of the error message(s) displayed. Contact your Miele Dealer and inform them of the error message(s) on the display. Confirm the message with OK. -
Page 69: Switching On The Door Assistant
Selecting additional settings Touch the sensor control to return Switching on the Door to the previous menu level. assistant – Adjusting the intensity You can choose between the two door assistants: Push2open Pull2open You can also adjust the intensity of the The default door assistant is Push2open Push2open... - Page 70 Selecting additional settings – Adjusting the duration of the – Adjusting the intensity AutoClose function You can also adjust the intensity of the You can also adjust the duration for function. The lower the set Pull2open how long the appliance door will remain intensity, the less force required when open until it closes automatically.
-
Page 71: Switching Off The Door Assistant
Use the and sensor controls to - The Miele@mobile app select and select OK to confirm - A Miele user account. The user your selection. account can be created via the Touch the sensor control to return Miele@mobile app. - Page 72 Your refrigeration appliance‘s password Miele@home availability is its serial number, which can be found The ability to use the Miele@mobile app on the data plate. depends on the availability of the The data plate can be found in the Miele@home service in your country.
- Page 73 Now follow the instructions on the display. Confirm the process with OK. To be able to use the Miele@home functions, you also have to register your refrigeration appliance in the app. As soon as your refrigeration...
- Page 74 Miele@home and then disconnected the connection, you will need to If you have changed your WiFi network, reactivate the connection. you can set up Miele@home again for your refrigeration appliance. In Settings mode , use the and sensor controls to ...
-
Page 75: Switching Off The Demo Mode
Selecting additional settings Resetting the network configuration Switching off the Demo mode Reset the refrigeration appliance’s settings to the default settings when Demo mode allows the refrigeration disposing of your refrigeration appliance to be presented in the appliance, selling it or putting a used showroom without the cooling refrigeration appliance into operation. -
Page 76: Resetting The Settings To Their Default Settings
Selecting additional settings Resetting the settings to their default settings You can reset the refrigeration appliance‘s settings to their default settings. Reset the refrigeration appliance’s settings to the default settings when disposing of your refrigeration appliance, selling it or putting a used refrigeration appliance into operation. - Page 77 °C °F Temperature unit / Keypad lock Switched off Eco mode Switched off Door assistant Push2open Miele@home Switched off Dispenser unit Switched on Sabbath mode Switched off Water filter display Switched on Temperature...
-
Page 78: Switching Sabbath Mode On Or Off
Selecting additional settings - The ice cube maker Switching Sabbath mode on (if previously switched on) or off You can still select: The refrigeration appliance has a Sabbath mode to support the observance - The sensor control for Settings of religious customs. mode ... -
Page 79: Switching On, Switching Off Or Resetting The Water Filter Display
Selecting additional settings Switching the Water filter display Switching on, switching off or resetting the Water filter If the has been Water filter display display switched off, it must be switched on Depending on the quantity of ice cubes again if required. produced, the Water filter display will... - Page 80 Selecting additional settings Resetting the Water filter display After you have cleaned the water filter, you must reset the Water filter display that it will be displayed automatically again after 6 months. If you do not reset the display, it appears again and again. ...
-
Page 81: The Correct Temperature
The correct temperature It is very important to set the correct Setting the temperature temperature for storing food in the Touch the sensor control to set the appliance. Bacteria will cause food temperature. which is not stored at the correct temperature to deteriorate rapidly. -
Page 82: Temperature Range
The correct temperature Temperature range The temperature can be adjusted from -14 °C to -24 °C. The ambient temperature in the room and the installation location can affect the time it takes for the appliance to reach the lowest temperature. If the ambient temperature is too high, the appliance may not reach the lowest temperature. -
Page 83: Using Super Freeze
Using Super freeze SuperFreeze function Switching off SuperFreeze Touch the sensor control to set the For best results, switch the SuperFreeze temperature. function on before putting fresh food into the freezer. The symbol will be highlighted in colour and the temperature value of This helps food to freeze quickly and -30 °C will be shown on the display. -
Page 84: Temperature And Door Alarm
Temperature and door alarm The appliance has been fitted with a Health risk caused by warning system which ensures that the decomposing food. temperature in the freezer cannot rise If the temperature in the freezer unnoticed and to avoid energy being remains above -18 °C for a long wasted if the door is left open. - Page 85 Temperature and door alarm Switching the temperature alarm off Door alarm early An alarm will sound if the appliance door has been left open for longer than Before you switch the temperature 2 minutes. alarm off, you must determine the The message Close the door will also cause and rectify it.
-
Page 86: Adjusting The Interior Fittings
Adjusting the interior fittings Removing or moving the door Removing or moving the shelves shelves Only move or remove the door shelves when they are empty. Use both hands to grip the shelf from below and raise it slightly so that it can be lifted with the catches over the guide at the back. -
Page 87: Removing The Shelf Above The Ice Maker
Adjusting the interior fittings Removing the shelf above the Removing the freezer baskets ice maker Open the appliance door as wide as possible. The opening angle of the appliance door must not be limited to 90° because otherwise the freezer baskets cannot be removed. -
Page 88: Removing The Ice Cube Container
Adjusting the interior fittings Removing the dividing panel Removing the ice cube (depending on the model) container Open the appliance door as far as it will go. The opening angle of the appliance door must not be limited to 90° because otherwise the upper freezer basket cannot be pulled out as far as it will go. - Page 89 Adjusting the interior fittings To replace the ice cube container, pull the upper freezer basket out again as far as it will go. Insert the ice cube container with the rearmost side first, so that it engages. Push the upper freezer basket all the way back in.
-
Page 90: Freezing And Storing Food
Freezing and storing food Maximum freezing capacity Storing frozen food To ensure that fresh food placed in the Never re-freeze partially or fully freezer freezes through to the core as defrosted food. Defrosted food may quickly as possible, the maximum only be re-frozen after it has been freezing capacity must not be cooked. -
Page 91: Home Freezing
Freezing and storing food - Placing hot foods or drinks in the Home freezing freezer causes food that is already Only freeze fresh food which is in a frozen to partially thaw and increases good condition. energy consumption. Allow hot foods and drinks to cool down before Hints on home freezing placing them in the freezer. -
Page 92: Placing Food In The Freezer
Freezing and storing food Before placing food in the Storage time for frozen food appliance The storage life of food is very variable, even at a constant temperature of When freezing more than 2 kg of -18 °C. Decomposition processes also fresh food, switch on the SuperFreeze take place in frozen food, albeit at a function some time before placing the... -
Page 93: Defrosting Frozen Goods
Freezing and storing food Defrosting frozen goods Cooling drinks quickly When cooling drinks quickly in the Never re-freeze partially or fully freezer, make sure bottles are not left in defrosted food. Defrosted food may for more than one hour; otherwise only be re-frozen after it has been they could burst, causing injury and cooked. -
Page 94: Making Ice Cubes
Making ice cubes Ice cube production is halted For the automatic ice cube maker to automatically when the ice cube operate, it must be connected to a container is full. mains water supply (see “Mains water connection”). The ice maker can make up to approx. 1.3 kg of ice cubes in 24 hours. - Page 95 Making ice cubes Switching the ice maker off The ice maker can be turned off independently of the freezer zone if you do not want to make any ice cubes. Close the stopcock in the water supply line approx. 3 hours before switching off the refrigeration appliance to avoid the build-up of mould caused by stagnant water.
-
Page 96: Automatic Defrosting
Automatic defrosting The appliance is equipped with a “NoFrost” system. The freezer defrosts automatically. The moisture generated in the appliance collects on the condenser and is automatically defrosted and dissipated from time to time. This automatic defrosting system enables the freezer to remain permanently ice-free. -
Page 97: Cleaning And Care
Cleaning and care Cleaning agents Do not let water get into the electronic unit or the lighting. To avoid damaging the surfaces of your appliance, do not use: Risk of damage due to moisture - Cleaning agents containing soda, ingress. -
Page 98: Before Cleaning The Refrigeration Appliance
Cleaning and care Before cleaning the Interior cabinet and refrigeration appliance accessories Switch the refrigeration appliance off Clean the refrigeration appliance by pressing the On/Off switch. regularly, or at least once a month. Remove soiling immediately to Take any food out of the appliance prevent it from drying on. -
Page 99: Cleaning The Door Seal
The ventilation gaps should be cleaned on a regular basis with a brush or vacuum cleaner (you could use a Miele vacuum cleaner dusting brush, for example). Turn the cap of the filter cartridge anti-clockwise until it is in the horizontal position 1. - Page 100 Cleaning and care Slide the filter cartridge as far as it will go into the filter opening 5., making sure the cap is horizontal. Rinse the filter under running lukewarm water. Turn the filter over under the running water to clean it on all sides.
-
Page 101: After Cleaning
Cleaning and care on the display (see “Resetting the Water filter display ” in “Selecting additional settings”). After cleaning Replace all shelves and accessories in the refrigeration appliance. Switch the refrigeration appliance back on. Switch the SuperFreeze function on for a while so that the freezer zone can cool down quickly. -
Page 102: Water Filter
Water filter The refrigeration appliance is supplied Depending on the quantity of ice cubes with a water filter (IntensiveClear mesh produced, the IntensiveClear mesh filter filter) that filters mains water for making must be cleaned approx. every ice cubes. 6 months. appears on the Clean the water filter The IntensiveClear mesh filter filters... -
Page 103: Problem Solving Guide
Insert the plug into the socket. The mains fuse has tripped. There could be a fault with the refrigeration appliance, the household electrical wiring or another electrical appliance. Contact a qualified electrician or your Miele Dealer. - Page 104 Problem solving guide Issue Cause and remedy The compressor is The ventilation gaps in the housing unit have been switching on more covered or become too dusty. frequently and for Do not block the ventilation gaps. longer periods of time. ...
- Page 105 Problem solving guide Issue Cause and remedy The compressor comes This is not a fault. The temperature setting is too on less and less often high. and for shorter periods Correct the temperature setting. of time. The Check the temperature again after 24 hours. temperature in the The frozen food begins to defrost.
- Page 106 Problem solving guide Issue Cause and remedy The appliance door Pull2open door assistant is switched on but the cannot be opened. refrigeration appliance has a handle-free furniture front. For handle-free furniture fronts, switch on the Push2open door assistant (see “Selecting additional settings –...
- Page 107 Problem solving guide Display warnings Message Cause and remedy The warning sounds The temperature in the refrigeration appliance has and the message Freezer risen significantly. temperature too high. Max. This could be due to, for example: appears temperature °C – The appliance door being opened too often, or on the display.
- Page 108 Make a note of the error message if necessary. and an alarm sounds. Call the your Miele Dealer. To turn the alarm off, touch the symbol. The error message will not disappear from the display until the error has been rectified.
- Page 109 Problem solving guide Problems with the ice cube maker Issue Cause and remedy The ice maker is not The refrigeration appliance and the ice maker are not producing any ice switched on. cubes. Switch the refrigeration appliance and the ice maker on.
- Page 110 Problem solving guide Issue Cause and remedy The ice maker is only Several household appliances connected to the producing small ice mains water connection are in operation, which has cubes. reduced the amount of water being taken in. Avoid using the dishwasher, washing machine, etc.
- Page 111 Close the stopcock immediately. appliance. Check whether the water line is damaged. Contact your Miele Dealer. Check whether the water pressure is too high. If the water pressure is too high, this can cause leaks (see “Mains water connection” in ”Installation”).
- Page 112 When removing the lighting cover, there is a risk of coming into contact with live electrical components. Do not remove the lighting cover. The LED lighting may only be repaired or replaced by your Miele Dealer. Risk of injury from LED lighting.
-
Page 113: Noises
Noises Normal What causes them noises Brrrrr ... A humming noise is made by the motor (compressor). This noise can get louder for brief periods when the motor switches on. Blubb, A gurgling noise can be heard when coolant is circulating blubb ... -
Page 114: Service
Miele dealer. please contact your Miele Dealer. Contact details for your Miele dealer are given at the end of this document. Please note that telephone calls may be monitored and recorded for training... -
Page 115: Copyrights And Licences
Copyrights and Licences Miele uses their own and third party software which is not subject to any so-called Open Source Licence for the operation and control of the appliance. This software/ these software components are protected by copyright. The copyright powers of Miele and third parties have to be respected. - Page 119 Tel. +966 11 2013501, Fax. +966 11 2013502 Taif Hadiya Street Tel. +966 12 7327001, Fax. +966 12 7369596 Khobar Al Zahran Road Tel. +966 13 8646150, Fax. +966 13 8646190 Manufacturer: Miele & Cie. KG, Carl-Miele-Straße 29, 33332 Gütersloh, Germany...
- Page 120 F 2411 Vi, F 2801 Vi, F 2811 Vi, F 2901 Vi, F 2911 Vi en-AE, SA M.-Nr. 11 633 570 / 00...