Advertisement
Quick Links
Modelli di riferimento: / Reference Ducati Motorcycles:
Diavel
Kit valigie semirigide laterali / Semi-rigid side pannier kit - 96780011A
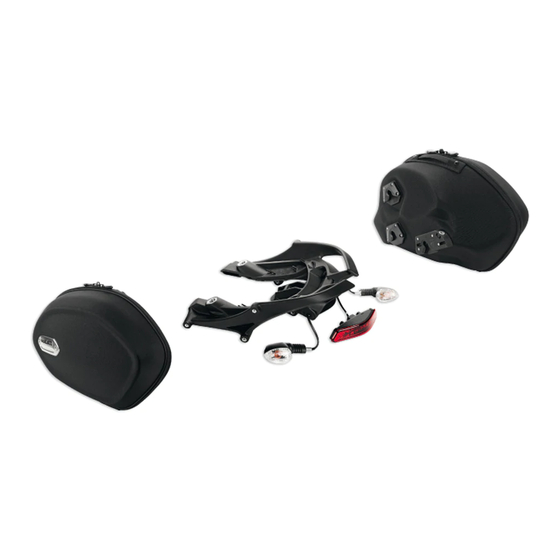
1 Telaietto supporto borse
2 Vite TBEI M8x45
3 Recuperatore di gioco
4 Ghiera
5 Cablaggio posteriore sinistro
6 Cablaggio posteriore destro
7 Fanale posteriore
8 Indicatore posteriore destro
9 Indicatore posteriore sinistro
10 Dado autobloccante
11 Gommino
12 Rosetta
13 Distanziale
14 Vite TEF M5x22
15 Piastrino massa destro
16 Piastrino massa sinistro
17 Vite STEI M8x30
1 Pannier subframe
2 TBEI screw M8x45
3 Clearance adjuster
4 Nut
5 LH rear wiring loom
6 RH rear wiring loom
7 Tail light
8 RH rear indicator
9 LH rear indicator
10 Self-locking nut
11 Rubber block
12 Washer
13 Spacer
14 TEF screw M5x22
15 RH ground plate
16 LH ground plate
17 STEI screw M8x30
Cod. ISTR - 508
ED./ED. 01
8
12
6
14
17
1
3
4
I particolari evidenziati in grigio e riferimento numerico (Es.
installare e gli eventuali componenti di montaggio forniti a kit. I particolari con riferimento
alfabetico (Es.
A
) rappresentano i componenti originali presenti sul motoveicolo.
Per una lettura rapida e razionale sono stati impiegati simboli che evidenziano situazioni di
massima attenzione, consigli pratici o semplici informazioni.
Tutte le indicazioni destro o sinistro si riferiscono al senso di marcia del motociclo.
Parts highlighted in grey and with a numeric reference (Example
installed and any assembly components supplied with the kit. Parts with an alphabetic reference
(Example
) are the original components fitted on the vehicle.
A
For easy and rational reading, this document uses graphic symbols for
highlighting situations in which maximum care is required, practical advice or simple information.
Any right- or left-hand indication refers to the vehicle direction of travel.
Attenzione / Warning
La non osservanza delle istruzioni riportate può creare una situazione di pericolo e causare
gravi lesioni personali e anche la morte. / Failure to follow these instructions might give raise to
a dangerous situation and provoke severe personal injuries or even death.
Importante / Caution
Indica la possibilità di arrecare danno al veicolo e/o ai suoi componenti se le istruzioni
riportate non vengono eseguite. / Failure to follow these instructions might cause damages to the
vehicle and/or its components.
Note / Note
Fornisce utili informazioni sull'operazione in corso. / Useful information on the procedure
being described.
15
10
13
11
17
2
ISTR - 508 ED./ED. 01
11
13
16
10
12
14
3
4
2
5
) rappresentano l'accessorio da
2
) are the accessory to be
2
Pag. - Page 1/17
7
9
Advertisement

Related Manuals for Ducati 96780011A


Summary of Contents for Ducati 96780011A
- Page 1 Modelli di riferimento: / Reference Ducati Motorcycles: Diavel ISTR - 508 ED./ED. 01 Kit valigie semirigide laterali / Semi-rigid side pannier kit - 96780011A 1 Telaietto supporto borse 2 Vite TBEI M8x45 3 Recuperatore di gioco 4 Ghiera 5 Cablaggio posteriore sinistro...
- Page 2 18 Tappo foro M8 19 Tappo per presa 20 Funghetto aggancio borse corto 21 Fissaggio a corona 22 Maniglia 23 Catadiottro posteriore 24 Vite TCEIF M8x25 25 Rosetta piana 26 Vite TSPEI M6x20 27 Vite TCEI M6x20 28 Funghetto aggancio borse lungo 29 Borsa destra 30 Borsa sinistra 31 Paracalore borsa...
- Page 3 Warning Attenzione Have the kit installed by a trained Le operazioni di seguito riportate technician or at a DUCATI Authorized devono essere eseguite da un tecnico Workshop. specializzato o da un’officina autorizzata DUCATI. Removing the original...
- Page 4 Montaggio componenti kit Kit installation Importante Caution Verificare, prima del montaggio, che Check that all components are clean tutti i componenti risultino puliti e in and in perfect condition before installation. perfetto stato. Take adequate measures to avoid damaging Adottare tutte le precauzioni necessarie per the internal components of the engine.
- Page 5 Rimuovere la pellicola protettiva presente Remove protective film from cat's eyes (23) sul lato posteriore del catadiottro (23). rear side. Applicare il catadiottro (23) sul telaietto Fit cat's eye (23) to pannier subframe (1), supporto borse (1), premendo exerting an even pressure on the whole uniformemente su tutta la superficie del cat's eye surface (23).
- Page 6 Posizionare la guida inferiore maniglione Place original grab handle lower guide (C2) originale (C2) sulla vasca portaoggetti (L), on glove compartment (L) against retainer portandola in appoggio sul dentino di fermo tooth (L1). (L1). Fully insert grab handle (22) cavity (22A) on Inserire, sino a battuta sul dentino di fermo retainer tooth (L1) through the opening on (L1) la cavità...
- Page 7 Impuntare manualmente fino a battuta le 2 Manually start 2 STEI service screws fully viti STEI (17) di servizio nei due fori inferiori home (17) in the two lower holes on the dei telaietti (S) e (T) del veicolo. subframe (S) and (T) of the vehicle. Inserire il telaietto supporto borse (1), Insert panniers subframe (1), previously pre- premontato in precedenza, sulla maniglia...
- Page 8 Connettere il cablaggio posteriore sinistro Connect LH rear wiring (5C) to RH rear one (5C) e quello posteriore destro (6A) al (6A) to main wiring. cablaggio principale. Fit 2 cut rubber cable rings (V) on glove Montare 2 passacavi in gomma tagliati (V) compartment (L), into RH rear turn indicator sulla vasca portaoggetti (L), nei fori di holes (5) and LH rear turn indicator/tail lamp...
- Page 9 Aprire la borsa destra (29) e togliere il Open RH side pannier (29), and remove rivestimento interno. internal lining. Sul lato esterno, inserire i cinque distanziali On the outside, insert five spacers (34) in (34) nei fori presenti sul semiguscio e the holes on shell and then fit the washers inserire le rosette (33) sulle viti (32).
- Page 10 Attivazione indicatori di direzione Turn indicators and stop light e luce stop activation Collegare lo strumento di diagnosi al Connect the diagnostic tool to the data connettore acquisizione dati (Z). acquisition socket (Z). (A1) Selezionare la famiglia "DIAVEL" (A1). Select "DIAVEL" family (A1). (A2) Selezionare la versione "DVL 1200"...
- Page 11 Selezionare l'ambiente "Autodiagnosi" (A4). Select "Self-Diagnosis" (A4). (A4) Selezionare impianto "BBS" (A4). Select "BBS" system (A4). Selezionare Costruttore "MTA - - [02/11>]" Select Manufacturer "MTA - - [02/11>]" (A4). (A4). (A5) Nel menù di sinistra selezionare Select "ADJUSTMENTS" (A5) from the "REGOLAZIONI"...
- Page 12 Attendere il completamento dell'operazione Wait for the operation to be completed and (A8) con la conferma sulla avvenuta modifica make sure that the settings changes (A8) delle impostazioni (A8). are actually applied. (A9) Nel menù di sinistra, alla voce "STATI", è From "STATUSES", on the menu on the left, possibile selezionare "Configurazione you can select "Model configuration"...
- Page 13 Aggiornamento software della Software update of BBS and centralina BBS e Cruscotto Instrument Panel. Collegare lo strumento di diagnosi al Connect the diagnostic tool to the data connettore acquisizione dati (Z). acquisition socket (Z). (B1) Selezionare la famiglia "DIAVEL" (B1). Select "DIAVEL"...
- Page 14 Eseguire un Global Scan e verificare che i Carry out a Global Scan and ensure that BBS software BBS e DSB Master siano i and Master DSB software versions are as (B4) seguenti (B4): follows (B4): Centralina Versione Software Electronic control Software Version Elettronica unit...
- Page 15 Selezionare l'ambiente "ECU Update" (C4). Select "ECU Update" (C4). (C4) Selezionare "Riprogrammazione BBS" (C4). Select "BBS Reprogramming" (C4). Selezionare Costruttore "MTA - - [02/11>]" Select Manufacturer "MTA - - [02/11>]" (C4). (C4). (C5) Nel menù di sinistra selezionare Select "MAPS" (C5) from the menu on the "MAPPATURE"...
- Page 16 Aggiornamento software della Update of Master instrument (D1) centralina Cruscotto Master panel control unit software Selezionare la famiglia "DIAVEL" (D1). Select "DIAVEL" family (D1). (D2) Selezionare la versione "SERVICE UPDATE Select "SERVICE UPDATE DVL 1200" DVL 1200" (D2). version (D2). (D3) Selezionare il codice veicolo "Moto ( Select vehicle code "Motorcycle (Road use)
- Page 17 Nel menù di sinistra selezionare Select "MAPS" (D5) from the menu on the (D5) "MAPPATURE" (D5). left. Selezionare "_MSTF07" (D5). Select "_MSTF07" (D5). Premere il pulsante "ECU update" (D5). Press "ECU update" (D5). (D6) Attendere il termine della programmazione Wait for Master Instrument panel software software Cruscotto Master (D6).
- Page 18 Modèles de référence: / Bezugsmodelle: Diavel ISTR/ANLEIT - 508 ED./AUSG. 01 Kit valises semi-rigides latérales / Kit halbsteife Seitenkoffer - 96780011A 1 Sous-cadre support valises 2 Vis TBHC M8x45 3 Rattrapeur de jeu 4 Écrou annulaire 5 Câblage arrière gauche 6 Câblage arrière droit...
- Page 19 18 Bouchon trou M8 19 Bouchon pour prise 20 Accrochage valises type court 21 Élément de fixation à couronne 22 Poignée 23 Catadioptre arrière 24 Vis TCHCF M8x22 25 Rondelle plate 26 Vis TEPHE M6x20 27 Vis TCHC M6x20 28 Accrochage valises type long 29 Valise droite 30 Valise gauche 31 Pare-chaleur valise...
- Page 20 Les opérations reportées ci-après doi- Die nachstehend beschriebenen Ar- vent être effectuées par un technicien spé- beitseingriffe müssen von einem Fachtech- cialisé ou par un atelier agréé DUCATI. niker oder einer DUCATI Vertragswerkstatt ausgeübt werden. Dépose composants d'origine Abnahme der Original-Teile...
- Page 21 Pose composants kit Montage der Komponenten des Kits Important Wichtig Vérifier, avant la pose, que tous les Vor der Montage überprüfen, dass sich composants sont propres et en parfait état. alle Komponenten im sauberen und perfekten Adopter toutes les précautions nécessaires Zustand befinden.
- Page 22 Enlever la pellicule de protection présente Die Schutzfolie von der Rückseite des sur le côté arrière du catadioptre (23). Rückstrahlers (23) abziehen. Appliquer le catadioptre (23) sur le sous- Den Rückstrahler (23) am cadre support valises (1), en appuyant Kofferhalterahmen (1) anbringen, dazu uniformément sur toute la surface du gleichmäßig auf die gesamte Oberfläche catadioptre (23) même.
- Page 23 Positionner le guide inférieur poignée Die untere Führung des Original-Haltegriffs passager d'origine (C2) sur le bac vide- (C2) an Staufach (L) befestigen und dabei poches (L), en le portant en appui sur l'ergot am Sperrzahn (L1) zum Anliegen bringen. d'arrêt (L1). Die Aussparung (22A) des Haltegriffs (22) Introduire, jusqu'en butée sur l'ergot d'arrêt über die Öffnung im Staufach (L) bis auf...
- Page 24 Présenter manuellement jusqu'en butée les Die 2 Spezial-Innensechskant- 2 vis TCHCF (17) de service dans les deux Serviceschrauben (17) von Hand bis auf trous inférieurs des sous-cadres (S) et (T) du Anschlag in den unteren Bohrungen der véhicule. Rahmen (S) und (T) des Fahrzeugs Introduire le sous-cadre support valises (1), einschrauben.
- Page 25 Relier le câblage arrière gauche (5C) et celui Die hintere linke (5C) und rechte arrière droit (6A) au câblage principal. Verkabelung (6A) an den Hauptkabelbaum Poser 2 passe-fils en caoutchouc coupés (V) schließen. sur le bac vide-poches (L), dans les trous de 2 zugeschnittene Kabelführungen aus passage du câble du clignotant de direction Gummi (V) auf das Staufach (L) in die...
- Page 26 Ouvrir la valise droite (29) et enlever le Den rechten Koffer (29) öffnen und die revêtement intérieur. Innenverkleidung entfernen. Sur le côté extérieur, introduire les cinq An der Außenseite die fünf Distanzstücke entretoises (34) dans les trous présents sur (34) in die Bohrungen in der Kofferschale la demi-coque et introduire les rondelles einfügen, dann die Unterlegscheiben (33) (33) sur les vis (32).
- Page 27 Activation clignotants et feu de Aktivierung der Blinker und des stop Bremslichts Brancher l'instrument de diagnostic au Das Diagnoseinstrument an den connecteur de saisie des données (Z). Datenerfassungsanschluss (Z) schließen. (A1) Sélectionner la famille « DIAVEL » (A1). Die Familie „DIAVEL” wählen (A1). (A2) Sélectionner la version «...
- Page 28 Sélectionner l'environnement Das Ambiente „Eigendiagnose” wählen (A4) « Autodiagnostic » (A4). (A4). Sélectionner système « BBS » (A4). Die Anlage „BBS” wählen (A4). Sélectionner Constructeur « MTA - - Den Hersteller „MTA - - [02/11>]” [02/11>] » (A4). markieren (A4). (A5) Dans le menu à...
- Page 29 Attendre que l'opération soit terminée avec Das Beenden des Verfahrens mit (A8) la confirmation que la modification des Bestätigung der erfolgten Änderung der configurations (A8) ait bien été effectuée. Einstellungen abwarten (A8). (A9) Dans le menu à gauche, à l'entrée « ÉTATS Im links stehenden Menü...
- Page 30 Mise à jour logiciel du boîtier Aktualisierung der Software der électronique BBS et Tableau de BBS und Cockpit-Steuergeräte bord Das Diagnoseinstrument an den Datenerfassungsanschluss (Z) schließen. Brancher l'instrument de diagnostic au connecteur de saisie des données (Z). (B1) Sélectionner la famille « DIAVEL » (B1). Die Familie „DIAVEL”...
- Page 31 Exécuter un Global Scan et vérifier que les Ein Global Scan vornehmen und logiciels BBS et DSB Master sont les überprüfen, dass es BBS und DSB Master (B4) suivants (B4) : jeweils die folgenden Softwares enthalten (B4): Boîtier Électronique Version Logiciel Elektronisches Software-Version Steuergerät...
- Page 32 Sélectionner l'environnement « ECU Das Ambiente „ECU Update” wählen (C4). (C4) Update » (C4). „Neuprogrammierung BBS” wählen (C4). Sélectionner « Reprogrammation BBS » Den Hersteller „MTA - - [02/11>]” (C4). markieren (C4). Sélectionner Constructeur « MTA - - [02/ 11>] » (C4). (C5) Dans le menu à...
- Page 33 Mise à jour logiciel du boîtier Aktualisierung der Software des (D1) électronique du Tableau de Bord Steuergeräts des Master- Master Cockpits Sélectionner la famille « DIAVEL » (D1). Die Familie „DIAVEL” wählen (D1). (D2) Sélectionner la version « SERVICE UPDATE Die Version „SERVICE UPDATE DVL 1200”...
- Page 34 Dans le menu à gauche sélectionner « Im links stehenden Menü die Angabe (D5) CARTOGRAPHIES » (D5). „KENNFELDER” markieren (D5). Sélectionner « _MSTF07 » (D5). „_MSTF07” markieren (D5). Appuyer sur le bouton « ECU update » (D5). Die Taste „ECU update” drücken (D5). (D6) Attendre la fin de la programmation du Die Beendigung der Software-...
- Page 35 Modelos de referência: / Reference Ducati Motorcycles: Diavel ISTR - 508 ED./ED. 01 Kit de malas semirrígidas laterais / Semi-rigid side pannier kit - 96780011A 1 Subchassi de suporte das bolsas 2 Parafuso TBEI M8x45 3 Recuperador de folga 4 Anilha...
- Page 36 18 Tampa furo M8 19 Tampa para tomada 20 Parafuso botão curto para engate das bolsas 21 Fixação coroa 22 Pega 23 Refletor traseiro 24 Parafuso TCEIF M8x25 25 Anilha plana 26 Parafuso TSPEI M6x20 27 Parafuso TCEI M6x20 28 Parafuso botão longo para engate das bolsas 29 Bolsa direita 30 Bolsa esquerda...
- Page 37 Warning Atenção Have the kit installed by a trained As operações mostradas a seguir technician or at a DUCATI Authorized devem ser executadas por um técnico Workshop. especializado ou por uma oficina autorizada DUCATI. Removing the original...
- Page 38 Montagem dos componentes do Kit installation Caution Check that all components are clean Importante and in perfect condition before installation. Verifique, antes da montagem, se Take adequate measures to avoid damaging todos os componentes estão limpos e em the internal components of the engine. perfeito estado.
- Page 39 Remova a película de proteção existente no Remove protective film from cat's eyes (23) lado traseiro do refletor (23). rear side. Aplique o refletor (23) no subchassi de Fit cat's eye (23) to pannier subframe (1), suporte das bolsas (1), pressionando exerting an even pressure on the whole uniformemente em toda a superfície do cat's eye surface (23).
- Page 40 Posicione a guia inferior da pega original Place original grab handle lower guide (C2) (C2) no compartimento porta-objetos (L), on glove compartment (L) against retainer apoiando-a no dente de retenção (L1). tooth (L1). Insira, até encostar no dente de retenção Fully insert grab handle (22) cavity (22A) on (L1), a cavidade (22A) da pega (22) através retainer tooth (L1) through the opening on...
- Page 41 Introduza manualmente até encostar os 2 Manually start 2 STEI service screws fully parafusos STEI (17) de serviço nos dois home (17) in the two lower holes on the furos inferiores dos subchassis (S) e (T) do subframe (S) and (T) of the vehicle. veículo.
- Page 42 Ligue a cablagem traseira esquerda (5C) e Connect LH rear wiring (5C) to RH rear one aquela traseira direita (6A) na cablagem (6A) to main wiring. principal. Fit 2 cut rubber cable rings (V) on glove Monte 2 passa-cabos de borracha cortados compartment (L), into RH rear turn indicator (V) no compartimento porta-objetos (L), nos holes (5) and LH rear turn indicator/tail lamp...
- Page 43 Abra a bolsa direita (29) e retire o Open RH side pannier (29), and remove revestimento interno. internal lining. No lado externo, insira os cinco On the outside, insert five spacers (34) in espaçadores (34) nos furos existentes na the holes on shell and then fit the washers semicobertura e insira as anilhas (33) nos (33) on screws (32).
- Page 44 Ativação dos indicadores de Turn indicators and stop light direção e da luz de stop activation Ligue o instrumento de diagnóstico ao Connect the diagnostic tool to the data conector de aquisição de dados (Z). acquisition socket (Z). (A1) Selecione a família "DIAVEL" (A1). Select "DIAVEL"...
- Page 45 Selecione o ambiente "Autodiagnótico" (A4). Select "Self-Diagnosis" (A4). (A4) Selecione o sistema "BBS" (A4). Select "BBS" system (A4). Selecione o Fabricante "MTA - - [02/11>]" Select Manufacturer "MTA - - [02/11>]" (A4). (A4). (A5) No menu da esquerda, selecione Select "ADJUSTMENTS" (A5) from the "REGULAÇÕES"...
- Page 46 Aguarde a completação da operação com a Wait for the operation to be completed and (A8) confirmação sobre a ocorrência da make sure that the settings changes (A8) modificação das programações (A8). are actually applied. No menu da esquerda, no item "ESTADOS", From "STATUSES", on the menu on the left, é...
- Page 47 Atualização do software da Software update of BBS and unidade eletrónica BBS e do Instrument Panel. Painel de Instrumentos Connect the diagnostic tool to the data acquisition socket (Z). Ligue o instrumento de diagnóstico ao conector de aquisição de dados (Z). (B1) Selecione a família "DIAVEL"...
- Page 48 Execute um Global Scan e verifique se os Carry out a Global Scan and ensure that BBS softwares BBS e DSB Master são os and Master DSB software versions are as (B4) seguintes (B4): follows (B4): Unidade Eletrónica Versão do Software Electronic control Software Version unit...
- Page 49 Selecione o ambiente "ECU Update" (C4). Select "ECU Update" (C4). (C4) Selecione "Reprogramação BBS" (C4). Select "BBS Reprogramming" (C4). Selecione o Fabricante "MTA - - [02/11>]" Select Manufacturer "MTA - - [02/11>]" (C4). (C4). (C5) No menu da esquerda, selecione Select "MAPS"...
- Page 50 Atualização do software da Update of Master instrument (D1) unidade eletrónica do Painel de panel control unit software Instrumentos Master Selecione a família "DIAVEL" (D1). Select "DIAVEL" family (D1). (D2) Selecione a versão "SERVICE UPDATE DVL Select "SERVICE UPDATE DVL 1200" 1200"...
- Page 51 No menu da esquerda, selecione Select "MAPS" (D5) from the menu on the (D5) "MAPEAMENTOS" (D5). left. Selecione "_MSTF07" (D5). Select "_MSTF07" (D5). Pressione o botão "ECU update" (D5). Press "ECU update" (D5). (D6) Aguarde o final da programação do Wait for Master Instrument panel software software do Painel de Instrumentos Master programming to be completed (D6).
- Page 52 Modelos de referencia: / 参照モデル : コード番号 版 Diavel ISTR / - 508 ED./ Kit maletas semirígidas laterales / セミハードパニアケースキット - 96780011A 1 Subchasis soporte bolsas 2 Tornillo TBEI M8x45 3 Recuperador de juego 4 Virola 5 Cableado trasero izquierdo...
- Page 53 18 Tapón orificio M8 19 Tapón para toma 20 Trinquete enganche bolsas corto 21 Fijación de corona 22 Manilla 23 Catadióptrico trasero 24 Tornillo TCEIF M8x25 25 Arandela plana 26 Tornillo especial TSPEI M6x20 27 Tornillo especial TCEI M6x20 28 Trinquete enganche bolsas largo 29 Bolsa derecha 30 Bolsa izquierda 31 Protector calor bolsa...
- Page 54 ください。 Atención 注記 Las operaciones indicadas a continua- ここに記載されている一連の作業は ción deben ser realizadas por un técnico es- 熟練の技術者又はドゥカティオフィシャル pecializado o por un taller autorizado サービスセンターが行わなければなりませ DUCATI. ん。 Desmontaje componentes オリジナル部品の取り外し originales 注記 以下の作業は指示の通り行わないと Atención ライダーの安全を脅かす可能性がありま Si las siguientes operaciones no se す。...
- Page 55 Montaje componentes kit キット部品の取り付け Importante 重要 Controlar, antes del montaje, que to- 取り付け前にすべての部品に汚れが dos los componentes se encuentren lim- なく、完璧な状態であることを確認しま pios y en perfecto estado. す。 Adoptar todas las precauciones necesarias 作業する部品の外側表面を傷つけないため para evitar daños en la superficie exterior de に、必要な予防措置を取ってください。...
- Page 56 Quitar la película protectora presente en el リフレクター (23) の後ろ側にある保護 lado trasero del catadióptrico (23). フィルムをはがします。 Aplicar el catadióptrico (23) en el subchasis リフレクター (23) の表面全体を均等に押 soporte bolsas (1), presionando しながらバッグマウントブラケット (1) uniformemente sobre toda la superficie del に取り付けます。 catadióptrico (23) mismo. 参考...
- Page 57 Colocar la guía inferior asa original (C2) en el オリジナルグラブハンドルのロアガイド compartimiento portaobjetos (L), (C2) を小物入れ (L) に配置し、固定用の apoyándola en el diente de bloqueo (L1). つめ (L1) に当たるようにします。 Introducir hasta el tope en el diente de ハンドル (22) の溝 (22A) を小物入れ (L) bloqueo (L1) la cavidad (22A) de la manilla の開口部に通し、固定用のつめ...
- Page 58 Introducir manualmente hasta el tope los 2 2 本の作業用スクリュー STEI (17) を車両 tornillos STEI (17) de servicio en los dos のサブフレーム (S) および (T) の下側の orificios inferiores de los subchasis (S) y (T) 2 つの穴に奥まで手で差し込みます。 del vehículo. あらかじめ仮取り付けしたバッグマウント Introducir el subchasis soporte bolsas (1), ブラケット...
- Page 59 Conectar el cableado trasero izquierdo (5C) 左リア配線 (5C) および右リア配線 (6A) y el trasero derecho (6A) al cableado をメイン配線に接続します。 principal. 小物入れ (L) のカットされた 2 つのゴム Montar 2 pasacables de goma cortados (V) 製ケーブルガイド (V) を右リアターンイ en el compartimiento portaobjetos (L), en ンジケーターのケーブル...
- Page 60 Abrir la bolsa derecha (29) y quitar el 右バッグ (29) を開き、インナーコーティ revestimiento interior. ングを外します。 En el lado exterior introducir los cinco 外側からケースの穴に 5 個のスペーサー separadores (34) en los orificios presentes (34) を挿入し、ワッシャー (33) をスク en la semi-carcasa e introducir las arandelas リュー...
- Page 61 Activación de los indicadores de ターンインジケーターおよびス dirección y luz de parada トップランプの起動 Conectar la herramienta de diagnosis al 診断テスターをデータロガーコネクター conector de adquisición de datos (Z). (Z) に接続します。 (A1) "DIAVEL" ファミリーを選択します (A1)。 Seleccionar la familia "DIAVEL" (A1). (A2) "DVL 1200" バージョンを選択します (A2)。 Seleccionar la versión "DVL 1200"...
- Page 62 Seleccionar la sección "Autodiagnosis" (A4). " 自己診断 " を選択します (A4)。 (A4) Seleccionar sistema "BBS" (A4). "BBS" システムを選択します (A4)。 Seleccionar Fabricante "MTA - - [02/11>]" メーカー "MTA - - [02/11>]" を選択し (A4). ます (A4)。 (A5) En el menú de la izquierda seleccionar 左メニューの...
- Page 63 Esperar la finalización de la operación con la 設定変更が正常に完了したことが確認でき (A8) confirmación del cambio realizado de las るまで待ちます (A8)。 configuraciones (A8). (A9) En el menú de la izquierda, en la opción 左メニューの " ステータス " から " モデ "ESTADOS", es posible seleccionar ル設定...
- Page 64 Actualización software de la BBS およびインストルメントパ central BBS y Salpicadero ネルコントロールユニットのソ フトウェアの更新 Conectar la herramienta de diagnosis al conector de adquisición de datos (Z). 診断テスターをデータロガーコネクター (Z) に接続します。 (B1) Seleccionar la familia "DIAVEL" (B1). "DIAVEL" ファミリーを選択します (B1)。 (B2) Seleccionar la versión "DVL 1200" (B2). "DVL 1200"...
- Page 65 Realizar un Global Scan y comprobar que los グローバルスキャンを行い、BBS およびマ softwares BBS y DSB Master sean los スター DBS のソフトウェアが次の通りで (B4) siguientes (B4): あることを確認します (B4)。 Central Electrónica Versión Software ソフトウェアバー ジョン Central BBS MTA 0014 [02/11>] MTA BBS コントロー ルユニット [02/ 0014 Central salpicadero 11>]...
- Page 66 Seleccionar la sección "ECU Update" (C4). "ECU 更新 " を選択します (C4)。 (C4) Seleccionar "Nueva Programación BBS" "BBS 再プログラミング " を選択します (C4). (C4)。 Seleccionar Fabricante "MTA - - [02/11>]" メーカー "MTA - - [02/11>]" を選択し (C4). ます (C4)。 (C5) En el menú de la izquierda seleccionar 左メニューの...
- Page 67 Actualización software de la マスターインストルメントパネ (D1) central Salpicadero Master ルコントロールユニットのソフ トウェアの更新 Seleccionar la familia "DIAVEL" (D1). "DIAVEL" ファミリーを選択します (D1)。 (D2) Seleccionar la versión "SERVICE UPDATE "SERVICE UPDATE DVL 1200" バージョンを DVL 1200" (D2). 選択します (D2)。 (D3) Seleccionar el código vehículo "Moto 車両コード...
- Page 68 En el menú de la izquierda seleccionar 左メニューの " マップ " を選択します (D5) "MAPEADOS" (D5). (D5)。 Seleccionar "_MSTF07" (D5). "_MSTF07" を選択します (D5)。 Presionar el pulsador "ECU update" (D5). "ECU 更新 " ボタンを押します (D5)。 (D6) Esperar la finalización de la programación マスターインストルメントパネルコント...
- Page 69 DUCATI PERFORMANCE レース専用部品 ご注文書 ご注文商品 商品名 P/N P/N 商品名 商品名 P/N P/N 商品名 P/N 商品名 お客様ご記入欄 私は上記レース専用部品を下記車両に装着し、サーキット走行のみに 利用し、一般公道には利用しません。 車台番号 ZDM モデル名 お客様署名 ご注文日 ドゥカティ正規ネットワーク店記入欄 お客様に上記レース専用部品を販売し、レース専用部品のご利用方法を 説明いたしました。 販売店署名 販売日 年 月 日 販売店様へお願い 1. 上記ご記入の上、弊社アフターセールス部までFAXしてください。FAX:03-6692-1317 1. 上記ご記入の上、弊社アフターセールス部までFAXしてください。FAX:03-6692-1317 2. 取り付け車両1台に1枚でご使用ください。...