Motorola APX NEXT User Manual
Hide thumbs
Also See for APX NEXT:
- Quick start manual (29 pages) ,
- User manual (119 pages) ,
- Installation manual (2 pages)

Related Manuals for Motorola APX NEXT


Summary of Contents for Motorola APX NEXT
- Page 1 APX TWO-WAY RADIOS APX NEXT User Guide APRIL 2019 *MN005642A01* 2019 Motorola Solutions, Inc. All rights reserved © MN005642A01-AA...
-
Page 2: Declaration Of Conformity
Address: 1303 East Algonquin Road, Schaumburg, IL 60196-1078, U.S.A. Phone Number: 1-800-927-2744 Hereby declares that the product: Model Name: APX NEXT conforms to the following regulations: FCC Part 15, subpart B, section 15.107(a), 15.107(d), and section 15.109(a) Class B Digital Device... - Page 3 English As a personal computer peripheral, this device complies with Part 15 of the FCC Rules. This device complies with Industry Canada license-exempt RSS standard(s). Operation is subject to the following two conditions: 1 This device may not cause harmful interference, and 2 This device must accept any interference received, including interference that may cause undesired operation.
-
Page 4: Important Safety Information
RF energy awareness and control for Compliance with applicable standards and Regulations. For a list of Motorola Solutions-approved antennas, batteries, and other accessories, visit the following website: http://www.motorolasolutions.com Under Industry Canada regulations, this radio transmitter... -
Page 5: Notice To Users (Fcc And Industry Canada)
• This device must accept any interference received, including interference that may cause undesired operation. • Changes or modifications made to this device, not expressly approved by Motorola Solutions, could void the authority of the user to operate this equipment. -
Page 6: Software Version
English Software Version All the features described in the following sections are supported by the software version R19.00.00 or later. Accessing the Radio Information on page 209 determine the software version of your radio. Check with your dealer or system administrator for more details of all the features supported. -
Page 7: Déclaration De Conformité
Numéro de téléphone : 1 800 927-2744. Déclare par les présentes que le produit : Nom de modèle : APX NEXT sont conformes aux réglementations suivantes : Partie 15, sous-partie B, section 15.107(a), 15.107(d) et section 15.109(a) des règlements de la FCC... - Page 8 Français (Canada) En tant que périphérique d'ordinateur personnel, cet appareil est conforme aux stipulations de la partie 15 des règlements de la FCC. Cet appareil est conforme aux CNR d'Industrie Canada applicables aux appareils radio exempts de licence. Son utilisation est assujettie aux deux conditions suivantes : 1 Cet appareil ne doit pas causer d'interférence nuisible.
-
Page 9: Consignes De Sécurité Importantes
Cet émetteur radio a été approuvé par Industrie Canada produit pour utilisation avec une antenne approuvée par Motorola Solutions offrant le gain maximal autorisé et l'impédance requise pour le type d'antenne indiqué. Il est strictement... -
Page 10: Version Logicielle
• Toute modification effectuée à cet appareil sans l'autorisation explicite de Motorola Solutions peut annuler l'autorisation d'utiliser cet appareil. Version logicielle Toutes les fonctions décrites dans les sections suivantes sont prises en charge par les versions logicielles R19.00.00 ou plus récentes. -
Page 11: Computer Software Copyrights
English Computer Software Copyrights The Motorola Solutions products described in this manual may include copyrighted Motorola Solutions computer programs stored in semiconductor memories or other media. Laws in the United States and other countries preserve for Motorola Solutions certain exclusive rights for... -
Page 12: Documentation Copyrights
No duplication or distribution of this document or any portion thereof shall take place without the express written permission of Motorola Solutions. No part of this manual may be reproduced, distributed, or transmitted in any form or by any means, electronic or mechanical, for any purpose without the express written permission of Motorola Solutions. - Page 13 The information in this document is carefully examined, and is believed to be entirely reliable. However, no responsibility is assumed for inaccuracies. Furthermore, Motorola Solutions reserves the right to make changes to any products herein to improve readability, function, or design. Motorola Solutions does not assume any liability arising out of the applications or use of any product or circuit described herein;...
-
Page 14: Getting Started
English Getting Started NOTICE: An operational procedure, practice, or condition and so on, which is essential to emphasize. This User Guide covers the basic operation of the APX Portables . Top Control However, your dealer or system administrator may have customized your radio for your specific needs. - Page 15 English • Which buttons have been programmed to access other features? • What optional accessories may suit your needs? NOTICE: Specifications may vary for different radio models. Check with your dealer or system administrator for more information.
-
Page 16: Preparing Your Radio For Use
Solutions battery upon powering up, charging, or removing from the charger. This feature is applicable for IMPRES and Non-IMPRES battery. When the radio is attached with the non-Motorola Solutions battery, a tone sounds, display shows Unknown Battry temporarily and battery indicator •... -
Page 17: Installing The Antenna
English Installing the Antenna Ensure the radio is turned off before attaching the antenna. • Attaching the antenna. a. Set the antenna in the receptacle. • Removing the antenna. b. Turn the antenna clockwise and tighten the a. To remove the antenna, turn the antenna antenna by hand securely to the radio. -
Page 18: Charging The Radio
When removing the antenna, ensure that To avoid possible explosion: the radio is turned off. • Do not replace the battery in any area labeled Hazardous Atmosphere. • Do not discard batteries in a fire. Place the radio in a Motorola Solutions-approved charger. -
Page 19: Powering On The Radio
English Powering On the Radio NOTICE: Ensure to fully charge the battery before the first use. • Turn on the radio. a. Rotate the On/Off/Volume Control Knob clockwise until you hear a click. • Turn off the radio. a. To turn off the radio, rotate the On/Off/Volume Control Knob counterclockwise until you hear a click. -
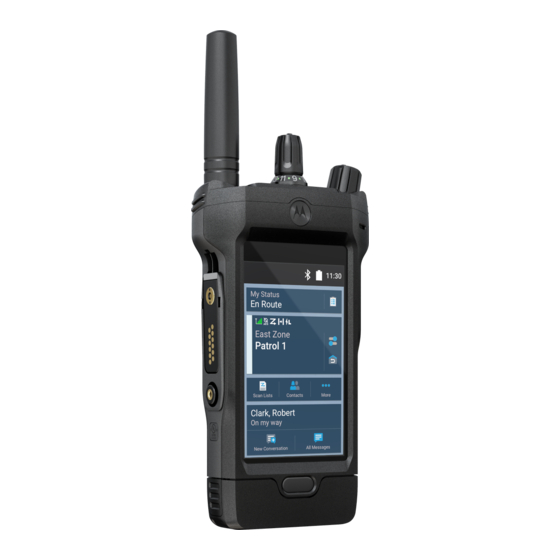
Page 20: Radio Controls
English Radio Controls APX NEXT Overview Front View This chapter explains the buttons and functions to control the radio. - Page 21 English Rear View Description Digital Mic 1 Touch Screen Display Sleep/Wake and Home Button Description RF Antenna...
- Page 22 English Top View Description Secure/Clear Switch Channel Selector On/Off and Volume Control Knob Digital Mic 2 3-Dot Programmable Feature Button Speaker NFC Antenna Battery Charging Contacts Description Status LED ABC Programmable Switch Top Display Top (Orange) Button...
-
Page 23: Home Screen
English Side Views Description Accessory Connector Home Screen Figure 2: Home Screen Table 1: Home Screen Description Status Bar Status icons appear at the status bar to pro- vide device-specific information or status. Cockpit Widget Allows you to view and change your current operational status. -
Page 24: Programmable Features
English Description Description LMR Icons Menu Feature Launcher Widget Provides information or status of LMR-specific Provides shortcuts to features that are config- features. ured to this widget. Also launches the Menu Feature Launcher screen. Zone and Channel Display/Changer Allows you to change zone and channel from Widgets the Home screen. - Page 25 English Bluetooth Configuration Dynamic Priority (Conventional Only) Allows you to access to the Bluetooth menu. Allows any channel in a Scan List (except for the Priority-One channel) to temporarily replace the Priority- Bluetooth Audio Reroute Two channel. Allows you to toggle the audio route between the radio speaker or Remote Speaker Microphone and the Emergency Bluetooth headset.
- Page 26 English Monitor (Conventional Only) Query Monitors a selected channel for all radio traffic until the Launches a list of predefined short text messages only function is disabled. after successfully logged in the two-Factor Authentication. Multiple Private Line (Conventional Only) Selects the Multiple Private Line lists. Radio Profiles Allows easy access to a set of preprogrammed visual Nuisance Delete...
- Page 27 English Scan List Programming Talkgroup (Conventional Only) Selects the scan list for editing (by pressing and holding Allows a call from an individual radio to a group of the Scan button). radios. Secure Transmission Select (Conventional and Text Messaging Service (TMS) Trunking) Selects the text messaging menu.
-
Page 28: Assignable Settings Or Utility Functions
English Assignable Settings or Utility Gestures Functions Use finger gestures on the screen to navigate through your radio. Light/Flip Press the button to toggle the display backlight on or Table 2: Gestures and Behaviors off; press and hold the button to reverse the content of the top display. - Page 29 English with the Virtual Partner feature to provide an enhanced ViQi is activated only with Press and Hold of the Voice hands-free user experience. Interface Button (VIB). You can start giving commands to your radio by pressing and holding the Voice Control button. For example, you can say things such as: •...
- Page 30 English • "Search driver's license..."...
-
Page 31: Status Indicators
English Status Indicators Icon Description Bluetooth Connected This chapter explains the status indicators of the radio. Bluetooth is connected to the external Blue- tooth device. Radio Icons GPS is enabled and Table 3: Status Icons signal is available. These icons appear at the status bar to provide device- specific information or status. - Page 32 English Table 4: LMR Icons Icon Description These icons appear at the Radio Control Widget to provide Roaming information or status of LMR-specific features. The radio has roamed to and is registered to a Icon Description foreign system. Received Signal Monitor (Carrier Strength Indicator Squelch)
- Page 33 English Icon Description Icon Description Blinking – The radio is designated Priority- receiving an encrypted Two channel. voice call. Vote Scan AES Secure Operation The Vote Scan feature Steady – The radio is is enabled. operating in an AES- secure channel. Priority Vote Scan Blinking –...
- Page 34 English Icon Description Icon Description User Login Indicator (IP Packet Data) Steady – The user is associated with the ra- dio. Backup PTT Blinking – The device registration or user reg- istration with the server failed due to an invalid username or pin.
-
Page 35: Led Indications
English LED Indications Table 6: LED Indications (Recovery and Fastboot Mode) The LED Indicators are activated in the following modes Indication Status (order by priority): Solid Red (two seconds) Recovery/software update • Radio Configuration Mode to Blinking Red (twice) • Recovery and Fastboot Mode Blinking Red Fastboot... - Page 36 English Table 8: LED Indications (Operation Mode) Color Call State Indication Status Light Blue Open Green Powering on Blinking Red Low battery (< 15%) Rapidly Blinking Red Critically Low Battery (< Blinking Blue Low priority notification Rapid Blinking Blue High priority notification Yellow Receiving Blinking Yellow...
- Page 37 English Color Call State Gray Unprogrammed...
-
Page 38: General Radio Operation
English General Radio Operation If… Then… name>, then This chapter explains the general radio operations of your select the re- radio. quired zone fol- lowed by the re- Selecting a Zone quired channel. Use one the following methods to select a zone. If…... -
Page 39: Selecting A Channel
English If… Then… If… Then… chan- TICE: nel. If the b Select Recent followed by one fault of the recently or last used zone and known channel. chan- nel is The change of zone is reflected on the Home con- screen. -
Page 40: Managing Notifications
English Navigate to the required zone and channel. If… Then… If you want a From the Home screen, tap 1 From the Home screen, tap More to launch the to use the the Zone and Channel Dis- Menu Feature Launcher screen. Radio Con- play/Changer. - Page 41 English • To clear all notifications, tap Clear All. 3 Swipe up from the bottom of the screen to close the Notification Center.
-
Page 42: Radio Calls
English Radio Calls Making Talkgroup Calls 1 Use one of the following methods to make talkgroup Your radio can make talkgroup, private, enhanced private, calls. and telephone call in conventional and/or trunking mode. If… Then… Table 10: Types of Radio Call and Their Supported Modes If you want to make a See... - Page 43 English If… Then… The change of talk- group is reflected on the Home screen. 2 Press and hold the PTT button to transmit. 3 Wait for the Talk Permit tone, then speak into the microphone. 4 Release the PTT button to listen.
-
Page 44: Advanced Features
English Advanced Features • Call Alias (Name) • Call ID (Number) This chapter explains the operations of the features • Call Type (Icon) available in your radio. • WACN ID (ASTRO 25 Trunking IDs only) • System ID Contacts NOTICE: This feature provides “address-book”... -
Page 45: Searching Contacts
English Call List Tab Changing Call Type in Contacts Your radio supports a maximum of 50 Call Lists. Each list 1 From the Home screen, tap Contacts. can store up to 100 IDs. NOTICE: 2 Scroll to the required contact. Your radio is preprogrammed with a few contacts per Call Lists. - Page 46 English 3 Tap New Contact. 2 Enter the required number. 4 Enter the name of the contact in the text field. 3 Tap the More Options icon to select the call type. 5 Tap More Numbers. 4 Press the Initiate Call icon to start the call. 6 Select a contact type.
- Page 47 English Icon Description Emergency Call Tap the icon. All of your recent calls are displayed here. Private Call 3 Tap any call from the list to make the call. Page 4 Press the Initiate Call icon to start the call. No icon Dispatch Call 5 Press End to end the call.
-
Page 48: Scan Lists
English Composing and Sending Text Message Scan Lists Scan lists are created and assigned to individual channels/ groups. Your radio scans for voice activity by cycling to compose a new text message to a through the channel/group sequence specified in the scan contact. - Page 49 English Changing Priority Status Change the priority status from the Scan List menu. Menu Feature Launcher Menu Feature Launcher widget has three menu features. The first two will be for top priorities features. The third slot will be for More options. More will bring down an overlay screen that will have up to 24 slots for programmed feature menu options.
- Page 50 English Utilities This chapter explains the operations of the utility functions available in your radio. Seamless Update The Seamless Update feature is a cloud management solution for your radio. This feature supports firmware (full and delta), radio configuration, and security management through Wi-Fi or LTE.
-
Page 51: Smart Connect
English SmartConnect SmartConnect allows user to have voice communication by switching the device to LTE when LMR is out of range. When a channel is SmartConnect enabled and goes out of range, the Radio Control Widget displays Out of Range and SmartConnect capable icon Once the device is connected to the LTE, the Radio Control Widget displays Backup On and SmartConnect connected... - Page 52 English Accessories Not all accessories are FCC certified to operate with all radio models and/or bandsplits. Refer to the radio price pages for a list of FCC certified accessories or contact your sales representative for accessory compatibility. Visit http://www.motorolasolutions.com to know more about the accessories supported by this radio.
-
Page 53: Limited Warranty
MOTOROLA SOLUTIONS which is attached to or used in scheduled below: connection with the Product, or for operation of the Product... -
Page 54: General Provisions
Provides for extended hardware repair coverage II. GENERAL PROVISIONS: INCLUDING CHEMICAL, LIQUID, FIRE, AND OTHER This warranty sets forth the full extent of MOTOROLA PHYSICAL DAMAGE. Comprehensive coverage is SOLUTIONS'S responsibilities regarding the Product. available in conjunction with MOTOROLA SOLUTIONS’S... -
Page 55: How To Get Warranty Service
Product item, transportation and insurance prepaid, to an authorized warranty service location. Warranty service will 5 A Product subjected to unauthorized Product be provided by MOTOROLA SOLUTIONS through one of modifications, disassembles or repairs (including, its authorized warranty service locations. If you first contact without limitation, the addition to the Product of non- the company which sold you the Product (e.g., dealer or... -
Page 56: Patent And Software Provisions
SOLUTIONS’s published specifications or the FCC certification labeling in effect for the Product at the time 3 should the Product or parts become, or in MOTOROLA the Product was initially distributed from MOTOROLA SOLUTIONS’s opinion be likely to become, the subject SOLUTIONS. -
Page 57: Governing Law
MOTOROLA SOLUTIONS software. MOTOROLA SOLUTIONS software may be used in only the Product in which the software was originally embodied and such software in such Product may not be replaced, copied, distributed, modified in any way, or used to produce any derivative thereof.