Kohler STACCATO K-3363 Manual
Top-mount kitchen sink
Hide thumbs
Also See for STACCATO K-3363:
- Installation manual (20 pages) ,
- Homeowner's manual (16 pages) ,
- Installation and care manual (12 pages)
Table of Contents
Advertisement
Quick Links
Advertisement
Chapters
Table of Contents

Related Manuals for Kohler STACCATO K-3363


Summary of Contents for Kohler STACCATO K-3363
- Page 1 Spec Seq#: 72...
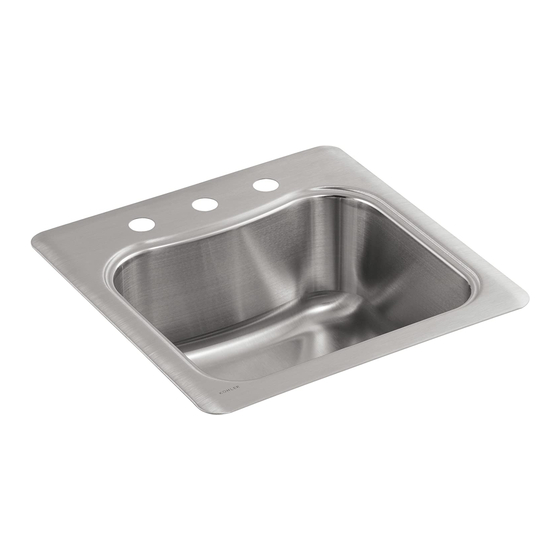
- Page 2 The top-mount kitchen sink shall be made of 18-gauge stainless steel. Sink shall be 20″ (508 mm) in length and 20” (508 mm) in width. Sink shall be single compartment. Sink shall be available with 3-hole (-3), 2-hole (-2) or single hole (-1). Sink shall include installation hardware. Sink shall be Kohler Model K-3363-___-____. USA/Canada: 1-800-4KOHLER...
- Page 3 Spec Seq#: 73 STACCATO Technical Information Installation Notes Install this product according to the installation guide. Fixture*: Cut-out is 19-1/2″ (495 mm) x 19-1/2″ (495 mm) with 1″ (25 Bowl area 16-1/8″ (410 mm) x 13-9/16″ (344 mm) mm) radius corners. Water depth 8″...
- Page 4 Spec Seq#: 74 Required/Requis/Requiere Rags Silicone Sealant Installation Guide Installation Guide Chiffons Joint en silicone Guide d’installation Guide d’installation Trapos Sellador de silicona Guía de instalación Guía de instalación Position and trace the sink. Draw the cut-out line 1/4" (6 mm) Drill a pilot hole and cut the Verify fit.
- Page 5 Kohler Co. n’est pas responsable des coûts de démontage is not responsible for removal or installation costs. Use of in-tank toilet transcurso de un (1) año a partir de la fecha de la instalación. Kohler Co. no ou d’installation. L’utilisation de nettoyants à l’intérieur du réservoir cleaners will void the warranty.
- Page 6 flow, and pause function. Product shall include flexible connections for easy installation. Product shall be available with an 8″ (203 mm) or 9″ (229 mm) spout reach. Product shall meet CalGreen requirements for kitchen faucets. Product shall be 1.8 gallon (6.8 L) per minute maximum flow rate. Pull-down kitchen faucet shall be Kohler Model K-____-____. USA/Canada: 1-800-4KOHLER...
- Page 7 Spec Seq#: 75 SIMPLICE ® Optional Accessories 1124126 Deep roughing-in kit ❑ NA 1167289 Low flow kit – reduces maximum flow to 1.5 gpm (5.7 L) at 60 psi (4.1 bar) ❑ NA 1167290 High flow kit – increases maximum flow to 2.2 gpm (8.3 L) at 60 psi (4.1 bar) ❑...
- Page 8 To prevent water For care and cleaning and other sink. ci-dessous pour toute référence contamination, do not remove any information, visit www.us.kohler.com. Observe all local codes. ultérieure: internal components from this faucet. Shut off the main water supply. Informations importantes Apunte abajo su número de mode-...
- Page 9 Si le robinet goutte de que la Grifería presente fugas o goteo durante el uso normal, Kohler Co. enviará to put the Faucet in good working condition. This warranty applies only to Kohler ou présente des fuites lors d'une utilisation normale, Kohler Co.
- Page 10 Spec Seq#: 77 HEAVY DUTY BASKET STRAINER SPECIFICATIONS • Heavy Duty Forged Brass Body • Brass Basket with Brass Stopper • Brass Post • 4” Tailpiece • Heavy Brass Lock Nut & Brass Tailpiece Nut Model # Finish ML8801 Polished Chrome ML8801SS Stainless Steel Part Name...
- Page 11 Spec Seq#: 78 Mainline Core Plumbing Warranty MAINLINE warrants that for a period of two years from purchase by the original consumer purchaser, the Product will be free of all defects in material and workmanship that would impair the intended and proper use of the product. If the Product is installed in a commercial application, the above mechanical warranty shall be limited to a period of two years from the date of purchase of the Product.
- Page 12 GARANTIE GARANTÍA MAINLINE garantit que, pour une période de deux ans à compter de la date d'achat par MAINLINE garantiza que por un período de dos años de la fecha de compra por el l'acheteur consommateur initial, le Produit sera exempt de vices de matériau et de comprador-consumidor original, el producto estará...
- Page 13 Spec Seq#: 79 Part No. McGuire Manufacturing Co., Inc. 60 Grandview Court 8872CBECO, C8872CECO, 8904CBECO P.O. Box 746 • Cheshire, CT 06410 8912CBECO, C8912CECO, McGUIRE 203-699-1801 • Fax: 203-699-1813 8912CNCBECO, 8912C18BECO www.mcguiremfg.com Cast Body P-Trap With PRODUCT SPECIFICATION or Without Cleanout Job Name: Submittal Number: Rubber Washer...
- Page 14 Spec Seq#: 80 Part No. McGuire Manufacturing Co., Inc. 60 Grandview Court H2165, H2165LK, P.O. Box 746 • Cheshire, CT 06410 H2167, H2167LK McGUIRE 203-699-1801 • Fax: 203-699-1813 www.mcguiremfg.com Heavy Lavatory Supply PRODUCT SPECIFICATION 1/2" I.P.S. x O.D. Job Name: Submittal Number: Wheel Handle Loose Key...
- Page 15 Spec Seq#: 81...
- Page 16 The top-mount kitchen sink shall be made of 18-gauge stainless steel. Sink shall be 33″ (838 mm) in length and 22″ (559 mm) in width. Sink shall feature double equal compartments. Sink shall be available with 4-hole, 3-hole, or single-hole. Sink shall feature SilentShield sound-absorption technology. Sink shall include installation hardware. Sink shall be Kohler Model K-3369-__-NA.
- Page 17 Spec Seq#: 82 STACCATO Technical Information Installation Notes Install this product according to the installation guide. Fixture*: Cut-out is 32-1/2″ (826 mm) x 21-1/2″ (546 mm) with 1″ (25 Bowl area, 17-1/16″ (433 mm) x 13-15/16″ (354 mm) mm) radius corners. left Bowl area, 17-1/16″...
- Page 18 Spec Seq#: 83 Required/Requis/Requiere Rags Silicone Sealant Installation Guide Installation Guide Chiffons Joint en silicone Guide d’installation Guide d’installation Trapos Sellador de silicona Guía de instalación Guía de instalación Position and trace the sink. Draw the cut-out line 1/4" (6 mm) Drill a pilot hole and cut the Verify fit.
- Page 19 Kohler Co. n’est pas responsable des coûts de démontage is not responsible for removal or installation costs. Use of in-tank toilet transcurso de un (1) año a partir de la fecha de la instalación. Kohler Co. no ou d’installation. L’utilisation de nettoyants à l’intérieur du réservoir cleaners will void the warranty.
- Page 20 flow, and pause function. Product shall include flexible connections for easy installation. Product shall be available with an 8″ (203 mm) or 9″ (229 mm) spout reach. Product shall meet CalGreen requirements for kitchen faucets. Product shall be 1.8 gallon (6.8 L) per minute maximum flow rate. Pull-down kitchen faucet shall be Kohler Model K-____-____. USA/Canada: 1-800-4KOHLER...
- Page 21 Spec Seq#: 84 SIMPLICE ® Optional Accessories 1124126 Deep roughing-in kit ❑ NA 1167289 Low flow kit – reduces maximum flow to 1.5 gpm (5.7 L) at 60 psi (4.1 bar) ❑ NA 1167290 High flow kit – increases maximum flow to 2.2 gpm (8.3 L) at 60 psi (4.1 bar) ❑...
- Page 22 To prevent water For care and cleaning and other sink. ci-dessous pour toute référence contamination, do not remove any information, visit www.us.kohler.com. Observe all local codes. ultérieure: internal components from this faucet. Shut off the main water supply. Informations importantes Apunte abajo su número de mode-...
- Page 23 Si le robinet goutte de que la Grifería presente fugas o goteo durante el uso normal, Kohler Co. enviará to put the Faucet in good working condition. This warranty applies only to Kohler ou présente des fuites lors d'une utilisation normale, Kohler Co.
- Page 24 To prevent water For care and cleaning and other sink. ci-dessous pour toute référence contamination, do not remove any information, visit www.us.kohler.com. Observe all local codes. ultérieure: internal components from this faucet. Shut off the main water supply. Informations importantes Apunte abajo su número de mode-...
- Page 25 Si le robinet goutte de que la Grifería presente fugas o goteo durante el uso normal, Kohler Co. enviará to put the Faucet in good working condition. This warranty applies only to Kohler ou présente des fuites lors d'une utilisation normale, Kohler Co.
- Page 26 Spec Seq#: 86 HEAVY DUTY BASKET STRAINER SPECIFICATIONS • Heavy Duty Forged Brass Body • Brass Basket with Brass Stopper • Brass Post • 4” Tailpiece • Heavy Brass Lock Nut & Brass Tailpiece Nut Model # Finish ML8801 Polished Chrome ML8801SS Stainless Steel Part Name...
- Page 27 Spec Seq#: 87 Mainline Core Plumbing Warranty MAINLINE warrants that for a period of two years from purchase by the original consumer purchaser, the Product will be free of all defects in material and workmanship that would impair the intended and proper use of the product. If the Product is installed in a commercial application, the above mechanical warranty shall be limited to a period of two years from the date of purchase of the Product.
- Page 28 GARANTIE GARANTÍA MAINLINE garantit que, pour une période de deux ans à compter de la date d'achat par MAINLINE garantiza que por un período de dos años de la fecha de compra por el l'acheteur consommateur initial, le Produit sera exempt de vices de matériau et de comprador-consumidor original, el producto estará...
- Page 29 Spec Seq#: 88 Part No. McGuire Manufacturing Co., Inc. 60 Grandview Court 8872CBECO, C8872CECO, 8904CBECO P.O. Box 746 • Cheshire, CT 06410 8912CBECO, C8912CECO, McGUIRE 203-699-1801 • Fax: 203-699-1813 8912CNCBECO, 8912C18BECO www.mcguiremfg.com Cast Body P-Trap With PRODUCT SPECIFICATION or Without Cleanout Job Name: Submittal Number: Rubber Washer...
- Page 30 Spec Seq#: 89 Part No. McGuire Manufacturing Co., Inc. 60 Grandview Court H2165, H2165LK, P.O. Box 746 • Cheshire, CT 06410 H2167, H2167LK McGUIRE 203-699-1801 • Fax: 203-699-1813 www.mcguiremfg.com Heavy Lavatory Supply PRODUCT SPECIFICATION 1/2" I.P.S. x O.D. Job Name: Submittal Number: Wheel Handle Loose Key...
- Page 31 Spec Seq#: 90 WF-1...
- Page 32 MF2933 Terreon Tri-Fount Washfountains ® ™ • cUPC Certified • Serves One to Three Users at a Time • Unique, Repairable, Solid Surface Material • Highly Vandal Resistant • Saves Water, Energy and Space • ADA Compliant Specifications Size and Capacity Accommodates 1-3 users at a time, using less water, energy and space than three lavs equipped with conventional faucets.
- Page 33 MF2933 Terreon Tri-Fount Washfountains ® ™ Standard Selections (Must select one from each category) Dimensions - Standard and Juvenile Height (mm) Pedestal Height (select one) 11" ¨ STD Standard Height ¨ JUV Juvenile Height (279) ¨ OBC Ontario Building Code Height Top View Valves (select one) ¨ AST...
- Page 34 MF2933 Terreon Tri-Fount Washfountains ® ™ Rough-Ins (mm) Wall or Floor 10" 10" Mounting Panels (254) (254) For Installations with TouchTime and 7" (2) Appropriate Anchors and 3/8" Bolts Infrared Activation, 110V GFI Electrical Outlet (178) (Supplied By Installer) To Mount Bowl To Wall Recommended Location (Refer To Local Codes Before Rough-In) 1-1/2"...
- Page 35 Installation MF2933/BIR Terreon Tri-Fount Washfountain with ® ™ Battery Operated Infrared Control (Standard*, Juvenile and OBC Height) * Standard Height is ADA Compliant Table of Contents Pre-Installation Information . . . . . . . . . . . . . . . . . . . . . . . . . . 2 Parts Included with the Tri-Fount .
- Page 36 MF2933/BIR3 Installation Supplies Required by Installer • (6) 3/8" diameter bolts with washers and (6) wall anchors appropriate for your installation • (2) 3/8" diameter bolts with washers and (2) floor anchors appropriate for your installation • 1/2" nominal copper tubing for hot and cold water supply lines •...
- Page 37 MF2933/BIR3 Installation Parts included with the Tri-Fount ™ Separate all parts from packaging materials and ensure you have all the parts required for assembly . If any parts are missing, do not attempt to assemble the Bradley Terreon Tri-Fount Washfountain until you obtain all parts . ®...
- Page 38 MF2933/BIR3 Installation Rough-Ins Flush the supply lines before making connections. Debris in supply lines will cause the valves to malfunction. Rough in 1/2" nominal copper tubing for hot and cold supply lines through wall or floor at dimensions shown . Wall anchors need to withstand 1000 lbs.
- Page 39 MF2933/BIR3 Installation Install Pedestal Remove molding strips or tiles which could prevent a flush mounting to the wall. Measure and mark the centerline of the washfountain on the wall and floor . Before mounting the pedestal to the floor, make sure MOUNTING PANEL the floor is level .
- Page 40 MF2933/BIR3 Installation Install Solenoid Assembly The letter "H" on the Navigator ® mixing valve indicates hot water supply inlet. Attach the stops to hot and cold water rough-ins . 1/4" - 20 x 1/2" Screws Connect one end of each supply hose to the stops . Solenoid Valve Inside the pedestal, install the two 1/4"...
- Page 41 MF2933/BIR3 Installation Assemble and Install Bowl Do not leave the bowl on the pedestal unsupported, as it may fall and cause personal injury or damage to property. Discard rubber gasket included with drain spud. It cannot be used in this application. Back View of Washfountain Bowl Install two 3/8"...
- Page 42 MF2933/BIR3 Installation Electrical and Supply Connections Sensor cables must be attached before the battery cables are plugged into the circuit boards. Connections of leads other than shown may cause permanent damage to the sensor. Black Supply Tube (from Sprayhead) Green Supply Tube Solenoid Assembly Insert 3 different colored sprayhead (From Sprayhead)
- Page 43 MF2933/BIR3 Installation Check Operation Check to make sure both stops are fully open (see page 6) . This valve is NOT factory preset. Upon installation, the Turn on the main water supply to the temperature of this valve must be checked and adjusted Tri-Fount and check for leaks .
- Page 44 MF2933/BIR3 Installation Cleaning and maintenance instructions for Terreon Material Description: Terreon is an NAHB Certified densified solid surface material composed of polyester resin and is resistant to chemicals, stains, burns and impact . Surface damage can be easily repaired with everyday cleansers or fine grit abrasives . Routine Cleaning: Clean daily or as often as conditions require using a standard commercial or household cleaner such as Formula or Windex ®...
- Page 45 MF2933/BIR3 Installation Cleaning and maintenance instructions for stainless steel Material Description: Stainless steel is extremely durable, and maintenance is simple and inexpensive . Proper care, particularly under corrosive conditions, is essential . Always start with the simplest solution and work your way toward the more complicated . Routine cleaning: Daily or as often as needed use a solution of warm water and soap, detergent, or ammonia .
- Page 46 MF2933/BIR3 Installation Troubleshooting BIR3 Components CAUTION: Turn off water supplies to unit before troubleshooting. Problem: An individual operating station drips and fails to shut off. Cause: There is debris trapped between the diaphragm and the valve seat. Solution: Remove debris between diaphragm and the valve seat. Disconnect the plug from the battery to the circuit board of the problem valve .
- Page 47 MF2933/BIR3 Installation Troubleshooting – Solenoid Valve: Part nos. S07-073 (closed body) & S07-073A (thru body) Item Qty. Part No. Description 118-307 Valve Body, ¼" Closed 118-307A Valve Body, ¼" Thru 269-983 Diaphragm 269-577 Armature 269-578 Spring 269-1729 Armature Housing 269-1730 Clamp, Armature Housing 269-579 Coil, Solenoid Valve...
- Page 48 MF2933/BIR3 Installation Thermostatic Mixing Valve Troubleshooting Before attempting to troubleshoot the valve or disassemble the components, check for the following conditions: • If stop valves are used, make sure that they are fully open. • Make sure that the hot and cold inlet pipes are connected properly, and that there are no cross-connections or leaking stop valves.
- Page 50 Spec Seq#: 94 MB-1...
- Page 51 Mop Service Basin — Model 63M SEE PAGE 2 FOR A LIST OF ACCESSORIES! Design features: All Mustee basins are one-piece molded from high impact resistant ƒ DURASTONE structural fiberglass (24” x 24”) ® Integral, molded-in drain for connection to 3” ABS, PVC (Sch. 80) ƒ...
- Page 52 Spec Seq#: 96...
- Page 54 Spec Seq#: 96...
- Page 55 5431 West 164th Street • Brook Park, Ohio 44142...
- Page 56 MECHANICAL FAUCETS 782-ISCP Manual and Metering Faucets Product Type ___________________________________________________ Wall Mounted 8" Fixed Centers Concealed Hot and Cold Job Name ________________________________________________ Water Sink Faucet with Pail Hook Item Number _____________________________________________ Features & Specifications ___________________________________________________ Section/Tag ______________________________________________ • 8" Fixed Centers •...
- Page 57 782-ISCP Manual and Metering Faucets Architect/Engineer Specification ________________________________________________________________________________________________________ Chicago Faucets No. 782-ISCP, Wall Mounted 8" Fixed Centers Concealed Hot and Cold Water Sink Faucet with Pail Hook, Chrome Plated solid brass construction. 5 3/4" Center to Center Integral Cast Spout with Pail Hook and Wall Brace. 3" Metal Cross handle(s) with Eight Point Tapered Broach and Secured Blue and Red Buttons.
- Page 58 Spec Seq#: 98 Cartridge Maintenance/Repair Guide...
-
Page 59: Table Of Contents
Spec Seq#: 98 Introduction Thank you for choosing Chicago Faucets! All Chicago Faucet products are carefully assembled and tested to insure the highest quality in the plumbing industry. We are proud to offer you a product that will provide years of dependable, reliable service. - Page 60 Spec Seq#: 98 Installation of Ceramic Cartridge Color-coded seat Stem Identification Ensure cartridges are in the closed Step 1 Push each cartridge into valve Step 2 Rotate RIGHT handle (and position before installing into valve body. body until it seats. Add cap nuts and cartridge) counter clockwise to the hand tighten.
- Page 61 Spec Seq#: 98 Renewing "XT" Quaturn ™ or Slow Compression Cartridges STEP 1 - Turn off water at stop STEP 2 - Remove cartridge STEP 3 - Unscrew stem nut (K) STEP 4 - Turn sleeve (D) off or main valve. Remove handle from faucet.
-
Page 62: Renewing Klo-Self Cartridges
Spec Seq#: 98 Renewing KLO-SELF Cartridges STEP 1 - Turn off water at stop STEP 2 - With pliers, grab the STEP 3 - Holding the flat portion or main valve. Remove handle, cartridge stem and pull up, of plunger (E) remove stem nut loosen cap nut (A) with flat faced removing it from the body. -
Page 63: Metering Valves
Spec Seq#: 98 ™ Metering Valve 665-505JKNF - 3/32" hex socket wrench 665-PSHJKCP - Push handle 665-309KJKNF - Red with red and blue and blue index buttons index buttons 665-116JKNF - Hex socket screw and set screw 665-015JKRBF - Spring retainer 665-105JKNPF - Stem 668-013JKNF - Return spring 665-190KJKNF - Actuator... -
Page 64: Renewing Mvp Metering Valves
Spec Seq#: 98 Renewing MVP ™ Metering Valve Adjustment Step 1 Remove color coded index button Step 2 Insert 3/32" allen wrench in handle Step 3 To adjust the flow cycle of the MVP from handle with small, flathead screwdriver. hole, loosen allen screw and remove handle. -
Page 65: Naiad
Spec Seq#: 98 NAIAD ™ 333-X and 333-XSLO Push Button Cartridge 333-044KJKCP - Button Assembly (Hot) 333-144KJKCP - Button Assembly (Cold) 333-244KJKCP - Button Assembly (Push) 395-018JKNF - Spring 319-012JKRBF - Washer 319-035JKNF - Leather Washer 319-140JKNF - “O” Rings 319-003JKCP - Bonnet Cap 1-043JKNF - Gasket 433-042JKRBF - Sleeve... -
Page 66: Renewing Naiad Cartridges
Spec Seq#: 98 Renewing NAIAD ™ Cartridges STEP 1 - Turn off water at stop or main STEP 2 - To disassemble cartridge, insert pin STEP 3 - Remove washer (N), washer (M), valve. Loosen bonnet cap (F) with flat faced through hole in sleeve (H) and stem (A) to cup (L), retainer (K), washer (J) and seat (I) from wrench and remove operating cartridge from... - Page 67 Spec Seq#: 98 NAIAD ™ 335-XJKNF Tip-Tap Cartridge 335-007KJKCP - Hot Push Tilt Handle 335-107KJKCP - Cold Push Tilt Handle 335-207KJKCP - Plain Push Tilt Handle 335-002KJKRBF - Stem 395-018JKNF - Spring 319-012JKRBF - Washer 319-035JKNF - Leather Washer 319-140JKNF - O-Rings 335-005JKCP - Bonnet 1-043JKNF - Gasket 433-042JKRBF - Sleeve...
- Page 68 Spec Seq#: 98 How to Repair a NAIAD ™ Cartridge with Dashpot and Oscillating Handle 1. To uncover operating cartridges on 386-XSLO urinal valves with non-sag handles, unscrew bonnet (17) and remove entire assembly (23), on self-closing stops as shown on diagram below. For 386-X, remove bonnet (24) and handle (19). 2.
- Page 69 Spec Seq#: 98 Replacement Cartridges Quaturn Ceramic ™ Compression Cartridge Cartridge Opens and closes in just a 1/4 turn Positive 1/4 turn, eliminating handle travel Unique design closes with water pressure Available as a substitute for the Quaturn compression cartridge Standard in all centerset and widespread faucets for sink and lavatory ADA Compliant when used with lever or wing handles ADA Compliant when used with lever or wing handles...
-
Page 70: Replacement Cartridges For Ecast
Spec Seq#: 98 ECAST ® Replacement Cartridges Replacement Cartridges for Existing ECAST Installations Chicago Faucets has a line of cartridges that should be used to repair or update any existing ECAST product installation. These cartridges are designed and manufactured to the exact specifications to maintain the certified status of your existing ECAST product installations. -
Page 71: Repair Kits
Spec Seq#: 98 Repair Kits Repair Kit for Quaturn ™ and Slow Compression Operating Cartridges Jiffy Minute Junior Repair Repair Repair Description Part No. 1277-D 1273-NF 1276-NF – Complete Left hand (HOT) Cartridges 1-100XTJKNF – Complete Right Hand (COLD) Cartridges 1-099XTJKNF –... - Page 72 Spec Seq#: 98 Repair Kits Repair Kit for NAIAD ™ Push Button & Oscillating Handle Operating Cartridges One- Jiffy Minute Junior Repair Repair Repair Description Part No. #849-D #820-NF #821-NF — Complete NAIAD Cartridges 333-XPSHJKNF Springs 395-018JKNF — — Slow Dash Pot Assembly 333-073KJKNF Cup Washers 333-040JKNF...
- Page 73 Spec Seq#: 98 Chicago Faucets, a member of the Geberit Group, is the leading brand of commercial faucets and fittings in the United States, offering a complete range of products for schools, laboratories, hospitals, office buildings, food service, airports and sports facilities. Whatever your requirements may be, Chicago Faucets extensive standard and made-to-order product offering are designed to meet any commercial application.
- Page 74 Spec Seq#: 98 NISH: AS SPECIFIED PARTS LIST CHK'D: DATE: 9-24-01 782-IS ITEM NO. PART NO. DESCRIPTION ITEM NO. PART NO. DESCRIPTION 173-006 769-201 FLAT HEAD WOOD SCREW WALL FLANGE 173-003K 217XTLH ROD ASSEMBLY SLO-COMPRESSION UNIT (LH) 173-105 1-214 WALL BRACKET 50-007 633-HOT 4-ARM CROSS HANDLE ASSEMBLY...
- Page 75 Spec Seq#: 98 Care & Maintenance Cuidado y mantenimiento Entretien All Chicago Faucet fittings are designed and engineered to meet or exceed industry performance standards. Care should be taken cleaning this product. Do not use abrasive cleaners, chemicals or solvents as they can result in surface damage. Use mild soap with warm water for cleaning and protecting the life of Chicago Faucets fittings.
- Page 76 Spec Seq#: 98 Cartridge Maintenance/Repair Guide...
- Page 77 Spec Seq#: 98 Introduction Thank you for choosing Chicago Faucets! All Chicago Faucet products are carefully assembled and tested to insure the highest quality in the plumbing industry. We are proud to offer you a product that will provide years of dependable, reliable service.
- Page 78 Spec Seq#: 98 Installation of Ceramic Cartridge Color-coded seat Stem Identification Ensure cartridges are in the closed Step 1 Push each cartridge into valve Step 2 Rotate RIGHT handle (and position before installing into valve body. body until it seats. Add cap nuts and cartridge) counter clockwise to the hand tighten.
-
Page 79: Renewing Quaturn
Spec Seq#: 98 Renewing "XT" Quaturn ™ or Slow Compression Cartridges STEP 1 - Turn off water at stop STEP 2 - Remove cartridge STEP 3 - Unscrew stem nut (K) STEP 4 - Turn sleeve (D) off or main valve. Remove handle from faucet. -
Page 80: Renewing Klo-Self Cartridges
Spec Seq#: 98 Renewing KLO-SELF Cartridges STEP 1 - Turn off water at stop STEP 2 - With pliers, grab the STEP 3 - Holding the flat portion or main valve. Remove handle, cartridge stem and pull up, of plunger (E) remove stem nut loosen cap nut (A) with flat faced removing it from the body. -
Page 81: Metering Valves
Spec Seq#: 98 ™ Metering Valve 665-505JKNF - 3/32" hex socket wrench 665-PSHJKCP - Push handle 665-309KJKNF - Red with red and blue and blue index buttons index buttons 665-116JKNF - Hex socket screw and set screw 665-015JKRBF - Spring retainer 665-105JKNPF - Stem 668-013JKNF - Return spring 665-190KJKNF - Actuator... -
Page 82: Renewing Mvp Metering Valves
Spec Seq#: 98 Renewing MVP ™ Metering Valve Adjustment Step 1 Remove color coded index button Step 2 Insert 3/32" allen wrench in handle Step 3 To adjust the flow cycle of the MVP from handle with small, flathead screwdriver. hole, loosen allen screw and remove handle. -
Page 83: Naiad
Spec Seq#: 98 NAIAD ™ 333-X and 333-XSLO Push Button Cartridge 333-044KJKCP - Button Assembly (Hot) 333-144KJKCP - Button Assembly (Cold) 333-244KJKCP - Button Assembly (Push) 395-018JKNF - Spring 319-012JKRBF - Washer 319-035JKNF - Leather Washer 319-140JKNF - “O” Rings 319-003JKCP - Bonnet Cap 1-043JKNF - Gasket 433-042JKRBF - Sleeve... -
Page 84: Renewing Naiad Cartridges
Spec Seq#: 98 Renewing NAIAD ™ Cartridges STEP 1 - Turn off water at stop or main STEP 2 - To disassemble cartridge, insert pin STEP 3 - Remove washer (N), washer (M), valve. Loosen bonnet cap (F) with flat faced through hole in sleeve (H) and stem (A) to cup (L), retainer (K), washer (J) and seat (I) from wrench and remove operating cartridge from... - Page 85 Spec Seq#: 98 NAIAD ™ 335-XJKNF Tip-Tap Cartridge 335-007KJKCP - Hot Push Tilt Handle 335-107KJKCP - Cold Push Tilt Handle 335-207KJKCP - Plain Push Tilt Handle 335-002KJKRBF - Stem 395-018JKNF - Spring 319-012JKRBF - Washer 319-035JKNF - Leather Washer 319-140JKNF - O-Rings 335-005JKCP - Bonnet 1-043JKNF - Gasket 433-042JKRBF - Sleeve...
- Page 86 Spec Seq#: 98 How to Repair a NAIAD ™ Cartridge with Dashpot and Oscillating Handle 1. To uncover operating cartridges on 386-XSLO urinal valves with non-sag handles, unscrew bonnet (17) and remove entire assembly (23), on self-closing stops as shown on diagram below. For 386-X, remove bonnet (24) and handle (19). 2.
- Page 87 Spec Seq#: 98 Replacement Cartridges Quaturn Ceramic ™ Compression Cartridge Cartridge Opens and closes in just a 1/4 turn Positive 1/4 turn, eliminating handle travel Unique design closes with water pressure Available as a substitute for the Quaturn compression cartridge Standard in all centerset and widespread faucets for sink and lavatory ADA Compliant when used with lever or wing handles ADA Compliant when used with lever or wing handles...
-
Page 88: Replacement Cartridges For Ecast
Spec Seq#: 98 ECAST ® Replacement Cartridges Replacement Cartridges for Existing ECAST Installations Chicago Faucets has a line of cartridges that should be used to repair or update any existing ECAST product installation. These cartridges are designed and manufactured to the exact specifications to maintain the certified status of your existing ECAST product installations. -
Page 89: Repair Kits
Spec Seq#: 98 Repair Kits Repair Kit for Quaturn ™ and Slow Compression Operating Cartridges Jiffy Minute Junior Repair Repair Repair Description Part No. 1277-D 1273-NF 1276-NF – Complete Left hand (HOT) Cartridges 1-100XTJKNF – Complete Right Hand (COLD) Cartridges 1-099XTJKNF –... - Page 90 Spec Seq#: 98 Repair Kits Repair Kit for NAIAD ™ Push Button & Oscillating Handle Operating Cartridges One- Jiffy Minute Junior Repair Repair Repair Description Part No. #849-D #820-NF #821-NF — Complete NAIAD Cartridges 333-XPSHJKNF Springs 395-018JKNF — — Slow Dash Pot Assembly 333-073KJKNF Cup Washers 333-040JKNF...
- Page 91 Spec Seq#: 98 Chicago Faucets, a member of the Geberit Group, is the leading brand of commercial faucets and fittings in the United States, offering a complete range of products for schools, laboratories, hospitals, office buildings, food service, airports and sports facilities. Whatever your requirements may be, Chicago Faucets extensive standard and made-to-order product offering are designed to meet any commercial application.
- Page 92 Spec Seq#: 99 ES-8 For Health Hazard Applications Job Name Contractor –––––––––––––––––––––––––––––––––––––––––––– ––––––––––––––––––––––––––––––––––––––––––– Job Location ––––––––––––––––––––––––––––––––––––––––– Approval ––––––––––––––––––––––––––––––––––––––––––––– Engineer ––––––––––––––––––––––––––––––––––––––––––––– Contractor’s P.O. No. ––––––––––––––––––––––––––––––––––– Approval ––––––––––––––––––––––––––––––––––––––––––––– Representative –––––––––––––––––––––––––––––––––––––––– Series 8 Non-Removable Model Hose Connection Vacuum Breakers Size: ⁄ " (20mm) hose thread Series 8 is a line of unique vacuum breakers specially made to permit the attachment of portable hoses to hose thread faucets.
- Page 93 Spec Seq#: 99 Installations Capacity Performance* Curve kPa psi For Inside or Outside Use 276 40 Installation - Inside Service Sink 241 35 207 30 Hose Bibb Vacuum 172 25 Breaker 138 20 103 15 10 gpm 11.4 15.1 18.9 38 lpm What is Backsiphonage? A reversal of normal flow in the system...
- Page 94 Spec Seq#: 100 SH-1...
- Page 95 floor pattern, integral soap ledges, and ″pit″ installation options detailed in instructions. Product shall include brushed stainless steel grab bars (-C) or polished stainless steel grab bars (-P). Shower module shall be Kohler Model K-_____-_____-_____. USA/Canada: 1-800-4KOHLER...
- Page 96 Spec Seq#: 101 FREEWILL ® Technical Information Installation Notes Install this product according to the installation guide. Fixture*: For optimum accessibility, specify faucets and fittings to install Configuration one-piece and operate within the control area shown. Weight 170 lbs (77 kg) For increased accessibility, utilize ″pit″...
- Page 97 Spec Seq#: 102 Installation Guide One-Piece Barrier-Free Shower Modules K-12100, K-12101, K-12102, K-12103, K-12104, K-12107, K-12108, K-12109, K-12110, K-12111, K-12112, K-12113 M product numbers are for Mexico (i.e. K-12345M) Los números de productos seguidos de M corresponden a México (Ej. K-12345M) Français, page “Français-1”...
- Page 98 We appreciate your commitment to Kohler quality. Please take a few minutes to review this manual before you start installation. If you encounter any installation or performance problems, please don’t hesitate to contact us. Our phone numbers and website are listed on the back cover. Thanks again for choosing Kohler Company.
- Page 99 Consult all applicable instructions for options and accessories before beginning this installation. Fixture conforms to ANSI Standard Z124.2. All dimensions are nominal. Kohler Co. reserves the right to make revisions in the design of products without notice, as specified in the Price Book.
- Page 100 5" (12.7 cm) K-12103 LH Drain (213.4 cm) K-12104 RH Drain C L Spout 4" (10.2 cm) 2-7/8" (7.3 cm) 19" 4" (10.2 cm) 1-1/2" (48.3 cm) 3/4" (2 cm) Models K-12102, K-12103, K-12104 3" (7.6 cm) Roughing-In 1030529-2-B Kohler Co.
- Page 101 (12.7 cm) 36" (91.4 cm) 22-1/2" Elbow *45" (114.3 cm) (57.2 cm) Supply 1-1/4" (3.2 cm) Models K-12100, K-12101, K-12107, K-12108 3-1/4" (8.3 cm) *84" (213.4 cm) 37" (94 cm) 2-1/2" (6.4 cm) 1/2" (1.3 cm) Roughing-In Kohler Co. 1030529-2-B...
- Page 102 43" (109.2 cm) Elbow Supply *52" (132.1 cm) 1-1/4" (3.2 cm) 5" (12.7 cm) 18" 3-1/4" (45.7 cm) (8.3 cm) *84" (213.4 cm) 37" (94 cm) 19" (48.3 cm) 3-1/4" (8.3 cm) 1/2" (1.3 cm) Models K-12109, K-12110 Roughing-In 1030529-2-B Kohler Co.
- Page 103 (45.7 cm) (8.3 cm) 3-1/4" *84" (8.3 cm) (213.4 cm) 37" *84" (94 cm) (213.4 cm) 19" (48.3 cm) 1/2" 3-1/4" (8.3cm) 2-1/2" (6.4 cm) 1/2" (1.3 cm) (1.3 cm) 37" (94 cm) Models K-12111, K-12112, K-12113 Roughing-In Kohler Co. 1030529-2-B...
- Page 104 1/2″ (1.3 cm) below the module threshold height. Make sure the subfloor is flat and level. Wheelchair Ramp Alternative Build a wheelchair ramp above the subfloor up to the outside threshold of the module. Make sure the subfloor is flat and level. 1030529-2-B Kohler Co.
- Page 105 NOTE: If plumbing is to be installed on the unfinished stud wall, install the supplies after the module is installed. Position the plumbing according to the roughing-in information. Cap the supplies and check for leaks. Install a drain pipe according to the roughing-in information. Strap the supply connections to the stud framing. Kohler Co. 1030529-2-B...
- Page 106 From the inside of the module (finished surface), use a hole saw of the correct diameter to carefully drill the fitting holes. Clean any debris from the module to reduce the risk of surface damage. Be careful not to scratch the surface of the unit. 1030529-2-B Kohler Co.
- Page 107 Drill holes in the front nailing-in flanges and 2x2 braces at 18″ (45.7 cm) centers. Secure the nailing-in flanges to the 2x2 braces at the pre-drilled locations using #6 large head galvanized nails or screws. Be careful when nailing, not to damage the finished surfaces. Kohler Co. 1030529-2-B...
- Page 108 If applicable, install the grab bars and towel bars. Refer to the accessory manufacturer’s instructions to properly secure the accessory to the wall surround. If applicable, install the shower door according to the manufacturer’s instructions. Only apply sealant where instructed to do so. Clean up with a non-abrasive cleaner. 1030529-2-B Kohler Co.
- Page 109 Shower drain shall be of brass construction. Product is intended for installations with 2” (51 mm) caulk connection. Drain shall be less stopper, body, and tailpiece. Product shall include housing, connection gasket, and perforated strainer. Drain shall be Kohler Model K-9132-_____. USA/Canada: 1-800-4KOHLER...
- Page 110 Spec Seq#: 103 Installation Notes Install this product according to the installation guide. Seal To Meet Local Codes Ø 4-3/8" (111 mm) 1-1/4" (32 mm) Max 1-15/16" (49 mm) Seal To Meet Local Codes 2-1/2" (64 mm) 2-7/8" (73 mm) 3-1/16"...
- Page 111 Guía de instalación y cuidado Shower Drain Drain de douche Desagüe de ducha K-9132 M product numbers are for Mexico (i.e. K-12345M) Los números de productos seguidos de M USA/Canada: 1-800-4KOHLER corresponden a México (Ej. K-12345M) México: 001-800-456-4537 kohler.com 1114755-2-B ©2011 Kohler Co.
- Page 112 Locate the rough plumbing for the drain according to the roughing-in for the fixture and the drain. Kohler Co. reserves the right to make revisions in the design of drains without notice, as specified in the Price Book. Avant de commencer Respecter tous les codes de plomberie et de bâtiment locaux.
- Page 113 Sitúe las tuberías para el desagüe según el diagrama de instalación para la unidad y el desagüe. Kohler Co. se reserva el derecho de modificar el diseño de los desagües sin previo aviso, tal como se especifica en la lista de precios.
- Page 114 1-1/4" (32 mm) Max/Max/Máx 1-15/16" (49 mm) Seal to meet local codes. Sceller pour satisfaire les codes locaux. Selle para cumplir con los códigos locales. 2-1/2" (64 mm) 2-7/8" (73 mm) 3-1/16" (78 mm) 4-1/2" (114 mm) K-9132 1114755-2-B Kohler Co.
- Page 115 Properly seat the fixture into the pocket of the subfloor or slab and over the drain pipe. Apply a bead of plumbers putty to the underside of the flange on the strainer body. Thread the strainer body into the nut of the fixture. Kohler Co. 1114755-2-B...
- Page 116 Utiliser une clé à robinet de montée pour bien serrer le corps de la crépine sur l’appareil. Toutes les installations Terminer l’installation de l’appareil selon les instructions fournies avec l’appareil. Terminer l’installation du drain. Se reporter à la section ″Joint/Connecteur″ ou à la section ″Calfeutrage classique″. 1114755-2-B Kohler Co.
- Page 117 Con una llave de lavabo, apriete con seguridad el cuerpo de la coladera a la unidad. Todas las instalaciones Termine la instalación de la unidad según las instrucciones incluidas con la unidad. Termine la instalación del desagüe. Consulte la sección ″Empaque/conector″ o la sección ″Calafateo tradicional″. Kohler Co. 1114755-2-B...
- Page 118 Pousser le joint/connecteur vers le bas dans le corps de la crépine, jusqu’à ce que le dessus du tuyau du drain soit au même niveau que celui du dessus du joint/connecteur. Passer à la section ″Vérification de l’installation″. 1114755-2-B Kohler Co.
- Page 119 While the lead is melting: Yarn and pack oakum into the gap between the drain pipe and the strainer body. The packed oakum must be 1-5/16″ (33 mm) deep from the top of the strainer body [5/8″ (16 mm) thickness]. Kohler Co. 1114755-2-B...
- Page 120 Déplacer lentement le fer de calfeutrage extérieur autour du bord extérieur du joint. Utiliser un maillet de calfeutrage pour marteler le fer afin de calfeutrer complètement le bord extérieur du joint. Passer à la section ″Vérification de l’installation″ . 1114755-2-B Kohler Co.
- Page 121 Mueva lentamente el escoplo calafateador exterior alrededor del filo exterior de la junta. Con un martillo calafateador, golpee el escoplo para sellar completamente el filo exterior de la junta. Prosiga en la sección ″Verificación de la instalación″. Kohler Co. 1114755-2-B...
- Page 122 Presione bien la placa de la coladera en el cuerpo de la coladera. Care and Cleaning For best results, keep the following in mind when caring for your KOHLER product: • Use a mild detergent such as liquid dishwashing soap and warm water for cleaning.
- Page 123 • Utilice una esponja o trapo suave y húmedo. Para limpiar las superficies nunca utilice materiales abrasivos como cepillos o estropajos de tallar. Para obtener información detallada de limpieza y los limpiadores a considerar, visite www.kohler.com/clean. Para solicitar información sobre el cuidado y la limpieza, llame al 1-800-456-4537. Kohler Co.
- Page 124 Si un vice est découvert au cours d’une utilisation normale, Kohler Co. choisira, à sa discrétion, la réparation, le remplacement ou la rectification appropriée après inspection desdits vices par Kohler Co. pendant un (1) an à partir de la date d’installation. Kohler Co. n’est pas responsable des frais d’enlèvement ou d’installation. L’utilisation de nettoyants à...
- Page 125 Garantía GARANTÍA LIMITADA DE UN AÑO Se garantiza que los productos de plomería KOHLER están libres de defectos de material y mano de obra por un año a partir de la fecha de instalación. Kohler Co., a su criterio, reparará, reemplazará o realizará los ajustes pertinentes en los casos en que la inspección realizada por Kohler Co.
- Page 126 Spec Seq#: 104 Service Parts/Pièces de rechange/Piezas de repuesto 43070** Strainer Plate Plaque de la crépine Placa de la coladera 75448 Gasket/Connector Joint/connecteur Empaque/conector 43071** Strainer Body Corps de crépine Cuerpo de la coladera 43094 Gasket Joint Empaque 41929 Washer Rondelle Arandela 43072...
- Page 127 Product shall have mixing valve cycles from ″cold″ to ″hot″ and a high-temperature limit stop for added safety. Product shall be available without or with screwdriver stops. Valve shall be Kohler Model K-304-_____-NA. USA/Canada: 1-800-4KOHLER...
- Page 128 Spec Seq#: 105 RITE-TEMP ® Optional Accessories 58229 Deep roughing-in kit for Rite-Temp valve for Triton standard handles ® ® 73418 Deep roughing-in kit for Rite-Temp valve for Pinstripe , Finial , Revival , Memoirs Stately ® ® ® ® and Memoirs Classic standard handles ®...
- Page 129 Spec Seq#: 106 Installation and Care Guide Single-Handle Bath and Shower Valves K-304 M product numbers are for Mexico (i.e. K-12345M) Los números de productos seguidos de M corresponden a México (Ej. K-12345M) Français, page “Français-1” Español, página “Español-1” 1110626-2-H...
- Page 130 The PEX connections on the 304-PX and 304-PS are designed for use with any ASTM F 1807 compliant copper crimp rings and ASTM F 887 compliant PEX tubing. These fittings are not compatible with ASTM F 1960 cold expansion fittings with PEX reinforcing ring assemblies. 1110626-2-H Kohler Co.
- Page 131 Tools and Materials Strap Wrench Hacksaw or PEX Crimp Tool Solder Tubing Cutter (Optional) Hex Wrench Cold Expansion Tool Sealant Tape Before You Begin CAUTION: Risk of personal injury. The water temperature should never be set above 120°F (49°C). Kohler Co. 1110626-2-H...
- Page 132 flowing from the showerhead and bath spout at the same time. NOTICE: Do not force the handle in any direction. Forcing the handle will damage the valve. Observe all local plumbing and building codes. Shut off the main water supply. 1110626-2-H Kohler Co.
- Page 133 72" (1829 mm) – 2-1/16" 78" (1981 mm) (52 mm) To Floor (Typical) 7" (178 mm) – 18" (457 mm) [10" (254 mm) Recommended] 4" (102 mm) 2-3/4" (70 mm) – 3-1/2" (89 mm) Bath/Shower Thick Wall Roughing-In Kohler Co. 1110626-2-H...
- Page 134 Remove internal valve components as shown and set aside. Back-to-Back Installations Remove the plaster guard (not shown). For the reversed valve, remove internal components as shown and set aside. The stop assembly does not need to be removed if soldering is not needed. 1110626-2-H Kohler Co.
- Page 135 Install 1/2″ piping and elbows to the showerhead and bath spout outlets. Use sealant tape on all threaded connections. Secure the piping to the framing. Connect the water supplies using 1/2” copper, CPVC, or PEX components. Kohler Co. 1110626-2-H...
- Page 136 Position the Valve and Route Piping (cont.) Solder all needed connections. Temporarily install 1/2” pipe nipples to the elbows so they will extend at least 2” (51 mm) beyond the finished wall. Install caps to both pipe nipples. 1110626-2-H Kohler Co.
- Page 137 NOTE: One valve will have reversed supply connections, hot supply to ″COLD″ inlet and cold supply to ″HOT″ inlet. Connect the water supplies as shown. Use sealant tape on all threaded connections. Install 2x4 bracing behind the plate (not shown). Kohler Co. 1110626-2-H...
- Page 138 Reinstall the stop assembly (if present) and the pressure balancing unit. Reinstall the cap assembly with the tab oriented up. For reversed valves in back-to-back installations: reinstall the cap assembly with the tab oriented down. Install the collar and secure with the screws. 1110626-2-H Kohler Co.
- Page 139 Turn the valve stem clockwise to the full open position. Turn on the hot and cold water supplies. Check for leaks. Turn the valve stem counterclockwise to close. Reinstall the cap. Repeat for the second pipe nipple. Reinstall the cap. Kohler Co. 1110626-2-H...
- Page 140 NOTE: The plaster guard can be used as a guide for marking the cutout. Cut a 5-9/16″ (141 mm) hole in the wall material. Install the finished wall material. Leave the plaster guard in place at this time. 1110626-2-H Kohler Co.
- Page 141 For Valves with Stops: Using the holes in the valve backing plate as a guide, cut openings for the stops. Secure the wall material to the valve backing plate at the locations shown. Leave the plaster guard dome in place at this time. Kohler Co. 1110626-2-H...
- Page 142 Slowly turn the valve stem until the water temperature is 120°F (49°C) or less. Leave the water running at the desired maximum temperature and reinstall the collar with the setscrew positioned against the tab. Turn off the water. Reinstall the O-ring. 1110626-2-H Kohler Co.
- Page 143 If the Faucet should leak or drip during normal use, Kohler Co. will, free of charge, mail to the purchaser the cartridge necessary to put the Faucet in good working condition.
- Page 144 WARRANTIES IN LIEU OF ALL OTHER WARRANTIES, EXPRESSED OR IMPLIED, INCLUDING BUT NOT LIMITED TO THE IMPLIED WARRANTIES OF MERCHANTABILITY AND FITNESS FOR A PARTICULAR PURPOSE. KOHLER CO. AND/OR SELLER DISCLAIM ALL LIABILITY FOR SPECIAL, INCIDENTAL OR CONSEQUENTIAL DAMAGES. Some states/provinces do not...
- Page 145 If the Faucet should leak or drip during normal use, Kohler Co. will, free of charge, mail to the purchaser the cartridge necessary to put the Faucet in good working condition.
- Page 146 WARRANTIES IN LIEU OF ALL OTHER WARRANTIES, EXPRESSED OR IMPLIED, INCLUDING BUT NOT LIMITED TO THE IMPLIED WARRANTIES OF MERCHANTABILITY AND FITNESS FOR A PARTICULAR PURPOSE. KOHLER CO. AND/OR SELLER DISCLAIM ALL LIABILITY FOR SPECIAL, INCIDENTAL OR CONSEQUENTIAL DAMAGES. Some states/provinces do not...
- Page 147 Shower only faucet shall include showerhead with arm and flange, and faceplate with handle. Valve only trim shall include faceplate with handle. Complete faucet shall be Kohler Model K-_____-_____-_____ OR separate trim and valve shall be Kohler Model K-T_____-_____-_____ with K-304-_____-NA Rite-Temp valve OR K-2971-KS-NA HiFlow Rite-Temp valve.
- Page 148 Spec Seq#: 107 FAIRFAX ® Required Accessories (For K-T12007, K-T12014, and K-T12021 Only) K-304-* Rite-Temp valve OR ® K-2971-KS HiFlow Rite-Temp valve with stops * For a complete listing of all the Rite-Temp valves, refer to the K-304-* Specification Sheet or Roughing-In sheet. Optional Accessories K-12002 Plug Button Set...
- Page 149 Guarnición de grifería monomando de bañera y ducha K-T12007 K-T12014 K-T12021 M product numbers are for Mexico (i.e. K-12345M) Los números de productos seguidos de M USA/Canada: 1-800-4KOHLER corresponden a México (Ej. K-12345M) México: 001-800-456-4537 kohler.com 1087994-2-C ©2011 Kohler Co.
- Page 150 Le mur fini ou la baignoire/douche doit être installé avant d’installer cette garniture. Si l’épaisseur du mur est supérieure à 3/4 (19 mm), utiliser le kit d’entretien de raccordement profond 1007937 pour ajouter 3/4 (19 mm) de profondeur à la poignée. 1087994-2-C Kohler Co.
- Page 151 La pared acabada o la unidad de la bañera/ducha debe instalarse antes que la guarnición. Si el espesor de la pared es superior a 3/4″ (19 mm), utilice el Kit de servicio de instalación profunda 1007937 para añadir 3/4″ (19 mm) de profundidad al montaje de la manija. Kohler Co. 1087994-2-C...
- Page 152 Retirer tout excédent endommager les tuyaux en mur. de mastic. cuivre! Afloje el tornillo de fijación y Limpie el exceso de ¡Si aprieta demasiado se deslice el surtidor contra la sellador. pueden dañar los tubos de pared. cobre! 1087994-2-C Kohler Co.
- Page 153 Appliquer du mastic de Retirer tout plombier ou d'étanchéité. excédent de mastic. Aplique masilla de plomería o sellador. Limpie el exceso de sellador. Leave a small gap. Laisser un petit espace. Deje una separación pequeña. Kohler Co. 1087994-2-C...
- Page 154 Puis presser l'applique contre Limpie el exceso Abra el suministro le mur fini. de sellador. principal de agua. Fije el brazo de ducha. Luego, presione el chapetón contra la pared acabada. Strap Wrench Clé à sangle Llave de correa 1087994-2-C Kohler Co.
- Page 155 Para cambios menores de temperatura, Para cambios mayores de temperatura, retire ajuste el tornillo de fijación y vuelva a el arosello y el collarín. verificar la temperatura. Setscrew Vis de retenue Tornillo de fijación Collar/Collier/Collarín O-Ring/Joint torique/Arosello Kohler Co. 1087994-2-C...
- Page 156 The water temperature should never be set above 120˚F (49˚C)! Attention: Risque de blessures. La température d'eau ne devrait jamais être réglée au-dessus de 120˚F (49˚C)! Precaución: Riesgo de lesiones personales. ¡La temperatura del agua nunca debe ajustarse a más de 120˚F (49˚C)! 1087994-2-C Kohler Co.
- Page 157 Placer le couvercle sur la valve et Deslice la manga sobre la espiga de la sécuriser avec les deux vis. válvula. Coloque la placa frontal sobre la válvula y fíjela con los dos tornillos. Faceplate Couvercle Placa frontal Screw Tornillo Kohler Co. 1087994-2-C...
- Page 158 Alinee bien la manija y presione sobre la espiga de la válvula. Fije la manija en su lugar con la arandela y el tornillo. Presione el tapón botón en su lugar. Insert Insertion Pieza de Handle inserción Poignée Manija Washer/Rondelle/Arandela Screw/Vis/Tornillo Plug Button Bouchon Tapón botón 1087994-2-C Kohler Co.
- Page 159 Deje correr agua para limpiar la suciedad y las partículas. Apply sealant tape. Thread the showerhead into place. Appliquer du ruban d'étanchéité. Visser la pomme de douche en place. Aplique cinta selladora. Enrosque la cabeza de ducha en su lugar. Kohler Co. 1087994-2-C...
- Page 160 Spec Seq#: 108 Care and Cleaning For best results, keep the following in mind when caring for your KOHLER product: • Use a mild detergent such as liquid dishwashing soap and warm water for cleaning. Do not use abrasive cleaners that may scratch or dull the surface.
- Page 161 Water temperature should not be set Pour une pomme de douche de débit ci-dessous pour toute référence Bec à ajustement glissant: product page at www.kohler.com. above 120°F (49°C). maximal (A), utiliser une vanne de Poser le tube de 1-1/2" (38 mm) ultérieure:...
- Page 162 Si le robinet goutte de que la Grifería presente fugas o goteo durante el uso normal, Kohler Co. enviará to put the Faucet in good working condition. This warranty applies only to Kohler ou présente des fuites lors d'une utilisation normale, Kohler Co.
- Page 163 25″ (635 mm) slide bar and 60″ (1524 mm) metal hose, vacuum breaker and wall elbow. Hotel handshower kit shall ® have a flow rate of 2.5 gallons (9.5 L) per minute. Hotel handshower kit shall be Kohler Model K-8520-____. USA/Canada: 1-800-4KOHLER...
- Page 164 Spec Seq#: 109 Installation Notes Install this product according to the installation guide. 2-3/16" 12" (56 mm) (305 mm) Max 60" (1524 mm) 3-7/16" (87 mm) Overall Length Ø 2-3/8" (60 mm) 1/2 NPT G1/2-14 1-3/8" (35 mm) 25" (635 mm) Elbow And Vacuum Breaker Details 15/16"...
- Page 165 Spec Seq#: 110 Installation Guide Hotel Handshower and Slide Bar K-8520 M product numbers are for Mexico (i.e. K-12345M) Los números de productos seguidos de M corresponden a México (Ej. K-12345M) Français, page “Français-1” Español, página “Español-1” 088148-2-AC...
- Page 166 Observe all local plumbing and building codes. Shut off the main water supply. Replace waste or supply tubing if necessary. Kohler Co. reserves the right to make revisions in the design of products without notice, as specified in the Price Book. 088148-2-AC...
- Page 167 Thread the escutcheon and wall elbow to the nipple. Securely tighten with a sturdy screwdriver inserted into the outlet. Apply thread sealant to the wall elbow threads, and install a vacuum breaker to the wall elbow. Securely wrench tighten. Kohler Co. 088148-2-AC...
- Page 168 NOTE: Do not use wall anchors. Position the bracket against the finished wall, and loosely attach it to the finished wall with the provided screw and washer. Fit the housing over the bracket, and snap it into place. 088148-2-AC Kohler Co.
- Page 169 For tile or solid surface materials, drill a hole at the marked locations. NOTE: Wall anchors are not required for this installation. Attach the bracket to the finished wall with the screws and washers provided. Tighten securely. Kohler Co. 088148-2-AC...
- Page 170 Press the stop in place in the bracket. Fit the housing over the bracket, and snap it into place. Assemble the ring to the housing with the indent over the housing tab. Install the soap dish to the housing. Secure with the provided screw. 088148-2-AC Kohler Co.
- Page 171 Securely tighten the top housing screw to ensure maximum strength. Assemble the ring to the top housing with the indent over the housing tab. Slide the top cover up and snap it firmly into place. Kohler Co. 088148-2-AC...
- Page 172 Securely wrench tighten the hose to the vacuum breaker. Flush water through the system. Install the screen washer in the remaining end of the hose. Securely hand tighten the handshower to the hose. Check the handshower for proper operation. 088148-2-AC Kohler Co.
- Page 173 Spec Seq#: 111 PlumBest SPECIALTIES ® & REPAIR VOLUME 4 - 2007 ALUMINUM SHOWER ROD •1” OD - .025 wall •Individually wrapped •CARTON QUANTITIES ONLY PART NO. DESCRIPTION CTN. QTY. S02-055 5’ rod S02-015 5’ rod S02-056 6’ rod S02-016 6’...
- Page 174 Spec Seq#: 112 SH-2...
- Page 175 The acrylic shower module shall be 36″ (914 mm) in length, 36-1/2″ (927 mm) in width, and 90” (2286 mm) in height. The shower module shall have an integral high dome ceiling, and integral soap ledges. The shower module shall be pre-drilled for K-9459 Sonata Accessory kit. The shower module shall be Kohler Model K-1689-_______. USA/Canada: 1-800-4KOHLER...
- Page 176 The K-1652 steam generator and K-1663 steam generator Drain outlet Ø 3-3/8″ (86 mm) control kit are designed for use with this product. Kohler shall not be responsible for problems encountered due to the installation and use of other manufacturer’s steam generators.
- Page 177 Spec Seq#: 114 Installation Guide Sonata Acrylic Shower Modules K-1681/K-1682 K-1687 K-1688 K-1689 K-1690 Français, Page 7 Español, Página 12 1022476-2-...
- Page 178 Thank You For Choosing Kohler Company We appreciate your commitment to Kohler quality. Please take a few minutes to review this manual before you start installation. If you encounter any installation or performance problems, please don’t hesitate to contact us. Our phone numbers and website are listed on the back cover.
- Page 179 88” plumbing (223.5cm) 25-7/8” (65.7cm) 8-3/8” (21.3cm) 35” (88.9cm) Measure and cut the drain 17-1/2” hole (44.5cm) 24-3/8” 45” (61.9cm) (114.3cm) 58” (147.3cm) Measure and cut 25-7/8” 24-3/8” the drain hole (65.7cm) (61.9cm) K-1681, K-1682 K-1690 Kohler Co. 1022476-2-...
- Page 180 - Stud opening tolerance is +1/4”, - 0” (+6mm, - 0mm). When a fire rated wall is specified, dimensions are to the inside of the wallboard. Some shimming between the stud frame and fixture may be required. 1022476-2- Kohler Co.
- Page 181 - Open the hot and cold water supplies, and check the connections for leakage. Install the faucet trim according to the manufacturer’s instructions. - Run water into the shower module, and check the drain connections for leakage. Kohler Co. 1022476-2-...
- Page 182 - Do not allow cleaners containing petroleum distillates to remain in contact with the module surface for any length of time. - Remove plaster by scraping with a wood edge. Do not use metal or wire tools. Use a powder-type detergent on a damp cloth to provide mild abrasive action to the residual plaster. 1022476-2- Kohler Co.
- Page 183 Shower drain shall be of brass construction. Product is intended for installations with 2” (51 mm) caulk connection. Drain shall be less stopper, body, and tailpiece. Product shall include housing, connection gasket, and perforated strainer. Drain shall be Kohler Model K-9132-_____. USA/Canada: 1-800-4KOHLER...
- Page 184 Spec Seq#: 115 Installation Notes Install this product according to the installation guide. Seal To Meet Local Codes Ø 4-3/8" (111 mm) 1-1/4" (32 mm) Max 1-15/16" (49 mm) Seal To Meet Local Codes 2-1/2" (64 mm) 2-7/8" (73 mm) 3-1/16"...
- Page 185 Guía de instalación y cuidado Shower Drain Drain de douche Desagüe de ducha K-9132 M product numbers are for Mexico (i.e. K-12345M) Los números de productos seguidos de M USA/Canada: 1-800-4KOHLER corresponden a México (Ej. K-12345M) México: 001-800-456-4537 kohler.com 1114755-2-B ©2011 Kohler Co.
- Page 186 Locate the rough plumbing for the drain according to the roughing-in for the fixture and the drain. Kohler Co. reserves the right to make revisions in the design of drains without notice, as specified in the Price Book. Avant de commencer Respecter tous les codes de plomberie et de bâtiment locaux.
- Page 187 Sitúe las tuberías para el desagüe según el diagrama de instalación para la unidad y el desagüe. Kohler Co. se reserva el derecho de modificar el diseño de los desagües sin previo aviso, tal como se especifica en la lista de precios.
- Page 188 1-1/4" (32 mm) Max/Max/Máx 1-15/16" (49 mm) Seal to meet local codes. Sceller pour satisfaire les codes locaux. Selle para cumplir con los códigos locales. 2-1/2" (64 mm) 2-7/8" (73 mm) 3-1/16" (78 mm) 4-1/2" (114 mm) K-9132 1114755-2-B Kohler Co.
- Page 189 Properly seat the fixture into the pocket of the subfloor or slab and over the drain pipe. Apply a bead of plumbers putty to the underside of the flange on the strainer body. Thread the strainer body into the nut of the fixture. Kohler Co. 1114755-2-B...
- Page 190 Utiliser une clé à robinet de montée pour bien serrer le corps de la crépine sur l’appareil. Toutes les installations Terminer l’installation de l’appareil selon les instructions fournies avec l’appareil. Terminer l’installation du drain. Se reporter à la section ″Joint/Connecteur″ ou à la section ″Calfeutrage classique″. 1114755-2-B Kohler Co.
- Page 191 Con una llave de lavabo, apriete con seguridad el cuerpo de la coladera a la unidad. Todas las instalaciones Termine la instalación de la unidad según las instrucciones incluidas con la unidad. Termine la instalación del desagüe. Consulte la sección ″Empaque/conector″ o la sección ″Calafateo tradicional″. Kohler Co. 1114755-2-B...
- Page 192 Pousser le joint/connecteur vers le bas dans le corps de la crépine, jusqu’à ce que le dessus du tuyau du drain soit au même niveau que celui du dessus du joint/connecteur. Passer à la section ″Vérification de l’installation″. 1114755-2-B Kohler Co.
- Page 193 While the lead is melting: Yarn and pack oakum into the gap between the drain pipe and the strainer body. The packed oakum must be 1-5/16″ (33 mm) deep from the top of the strainer body [5/8″ (16 mm) thickness]. Kohler Co. 1114755-2-B...
- Page 194 Déplacer lentement le fer de calfeutrage extérieur autour du bord extérieur du joint. Utiliser un maillet de calfeutrage pour marteler le fer afin de calfeutrer complètement le bord extérieur du joint. Passer à la section ″Vérification de l’installation″ . 1114755-2-B Kohler Co.
- Page 195 Mueva lentamente el escoplo calafateador exterior alrededor del filo exterior de la junta. Con un martillo calafateador, golpee el escoplo para sellar completamente el filo exterior de la junta. Prosiga en la sección ″Verificación de la instalación″. Kohler Co. 1114755-2-B...
- Page 196 Presione bien la placa de la coladera en el cuerpo de la coladera. Care and Cleaning For best results, keep the following in mind when caring for your KOHLER product: • Use a mild detergent such as liquid dishwashing soap and warm water for cleaning.
- Page 197 • Utilice una esponja o trapo suave y húmedo. Para limpiar las superficies nunca utilice materiales abrasivos como cepillos o estropajos de tallar. Para obtener información detallada de limpieza y los limpiadores a considerar, visite www.kohler.com/clean. Para solicitar información sobre el cuidado y la limpieza, llame al 1-800-456-4537. Kohler Co.
- Page 198 Si un vice est découvert au cours d’une utilisation normale, Kohler Co. choisira, à sa discrétion, la réparation, le remplacement ou la rectification appropriée après inspection desdits vices par Kohler Co. pendant un (1) an à partir de la date d’installation. Kohler Co. n’est pas responsable des frais d’enlèvement ou d’installation. L’utilisation de nettoyants à...
- Page 199 Garantía GARANTÍA LIMITADA DE UN AÑO Se garantiza que los productos de plomería KOHLER están libres de defectos de material y mano de obra por un año a partir de la fecha de instalación. Kohler Co., a su criterio, reparará, reemplazará o realizará los ajustes pertinentes en los casos en que la inspección realizada por Kohler Co.
- Page 200 Spec Seq#: 116 Service Parts/Pièces de rechange/Piezas de repuesto 43070** Strainer Plate Plaque de la crépine Placa de la coladera 75448 Gasket/Connector Joint/connecteur Empaque/conector 43071** Strainer Body Corps de crépine Cuerpo de la coladera 43094 Gasket Joint Empaque 41929 Washer Rondelle Arandela 43072...
- Page 201 Product shall have mixing valve cycles from ″cold″ to ″hot″ and a high-temperature limit stop for added safety. Product shall be available without or with screwdriver stops. Valve shall be Kohler Model K-304-_____-NA. USA/Canada: 1-800-4KOHLER...
- Page 202 Spec Seq#: 117 RITE-TEMP ® Optional Accessories 58229 Deep roughing-in kit for Rite-Temp valve for Triton standard handles ® ® 73418 Deep roughing-in kit for Rite-Temp valve for Pinstripe , Finial , Revival , Memoirs Stately ® ® ® ® and Memoirs Classic standard handles ®...
- Page 203 Spec Seq#: 118 Installation and Care Guide Single-Handle Bath and Shower Valves K-304 M product numbers are for Mexico (i.e. K-12345M) Los números de productos seguidos de M corresponden a México (Ej. K-12345M) Français, page “Français-1” Español, página “Español-1” 1110626-2-H...
- Page 204 The PEX connections on the 304-PX and 304-PS are designed for use with any ASTM F 1807 compliant copper crimp rings and ASTM F 887 compliant PEX tubing. These fittings are not compatible with ASTM F 1960 cold expansion fittings with PEX reinforcing ring assemblies. 1110626-2-H Kohler Co.
- Page 205 Tools and Materials Strap Wrench Hacksaw or PEX Crimp Tool Solder Tubing Cutter (Optional) Hex Wrench Cold Expansion Tool Sealant Tape Before You Begin CAUTION: Risk of personal injury. The water temperature should never be set above 120°F (49°C). Kohler Co. 1110626-2-H...
- Page 206 flowing from the showerhead and bath spout at the same time. NOTICE: Do not force the handle in any direction. Forcing the handle will damage the valve. Observe all local plumbing and building codes. Shut off the main water supply. 1110626-2-H Kohler Co.
- Page 207 72" (1829 mm) – 2-1/16" 78" (1981 mm) (52 mm) To Floor (Typical) 7" (178 mm) – 18" (457 mm) [10" (254 mm) Recommended] 4" (102 mm) 2-3/4" (70 mm) – 3-1/2" (89 mm) Bath/Shower Thick Wall Roughing-In Kohler Co. 1110626-2-H...
- Page 208 Remove internal valve components as shown and set aside. Back-to-Back Installations Remove the plaster guard (not shown). For the reversed valve, remove internal components as shown and set aside. The stop assembly does not need to be removed if soldering is not needed. 1110626-2-H Kohler Co.
- Page 209 Install 1/2″ piping and elbows to the showerhead and bath spout outlets. Use sealant tape on all threaded connections. Secure the piping to the framing. Connect the water supplies using 1/2” copper, CPVC, or PEX components. Kohler Co. 1110626-2-H...
- Page 210 Position the Valve and Route Piping (cont.) Solder all needed connections. Temporarily install 1/2” pipe nipples to the elbows so they will extend at least 2” (51 mm) beyond the finished wall. Install caps to both pipe nipples. 1110626-2-H Kohler Co.
- Page 211 NOTE: One valve will have reversed supply connections, hot supply to ″COLD″ inlet and cold supply to ″HOT″ inlet. Connect the water supplies as shown. Use sealant tape on all threaded connections. Install 2x4 bracing behind the plate (not shown). Kohler Co. 1110626-2-H...
- Page 212 Reinstall the stop assembly (if present) and the pressure balancing unit. Reinstall the cap assembly with the tab oriented up. For reversed valves in back-to-back installations: reinstall the cap assembly with the tab oriented down. Install the collar and secure with the screws. 1110626-2-H Kohler Co.
- Page 213 Turn the valve stem clockwise to the full open position. Turn on the hot and cold water supplies. Check for leaks. Turn the valve stem counterclockwise to close. Reinstall the cap. Repeat for the second pipe nipple. Reinstall the cap. Kohler Co. 1110626-2-H...
- Page 214 NOTE: The plaster guard can be used as a guide for marking the cutout. Cut a 5-9/16″ (141 mm) hole in the wall material. Install the finished wall material. Leave the plaster guard in place at this time. 1110626-2-H Kohler Co.
- Page 215 For Valves with Stops: Using the holes in the valve backing plate as a guide, cut openings for the stops. Secure the wall material to the valve backing plate at the locations shown. Leave the plaster guard dome in place at this time. Kohler Co. 1110626-2-H...
- Page 216 Slowly turn the valve stem until the water temperature is 120°F (49°C) or less. Leave the water running at the desired maximum temperature and reinstall the collar with the setscrew positioned against the tab. Turn off the water. Reinstall the O-ring. 1110626-2-H Kohler Co.
- Page 217 If the Faucet should leak or drip during normal use, Kohler Co. will, free of charge, mail to the purchaser the cartridge necessary to put the Faucet in good working condition.
- Page 218 WARRANTIES IN LIEU OF ALL OTHER WARRANTIES, EXPRESSED OR IMPLIED, INCLUDING BUT NOT LIMITED TO THE IMPLIED WARRANTIES OF MERCHANTABILITY AND FITNESS FOR A PARTICULAR PURPOSE. KOHLER CO. AND/OR SELLER DISCLAIM ALL LIABILITY FOR SPECIAL, INCIDENTAL OR CONSEQUENTIAL DAMAGES. Some states/provinces do not...
- Page 219 If the Faucet should leak or drip during normal use, Kohler Co. will, free of charge, mail to the purchaser the cartridge necessary to put the Faucet in good working condition.
- Page 220 WARRANTIES IN LIEU OF ALL OTHER WARRANTIES, EXPRESSED OR IMPLIED, INCLUDING BUT NOT LIMITED TO THE IMPLIED WARRANTIES OF MERCHANTABILITY AND FITNESS FOR A PARTICULAR PURPOSE. KOHLER CO. AND/OR SELLER DISCLAIM ALL LIABILITY FOR SPECIAL, INCIDENTAL OR CONSEQUENTIAL DAMAGES. Some states/provinces do not...