Table of Contents
Advertisement
Quick Links
Advertisement
Table of Contents

Related Manuals for Konica Minolta AccurioLabel 230

Summary of Contents for Konica Minolta AccurioLabel 230
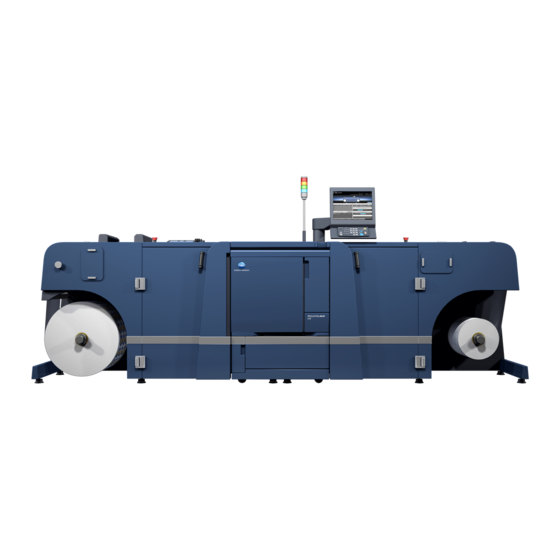
- Page 1 AccurioLabel 230 QUICK GUIDE...
-
Page 3: Table Of Contents
Step 2: Send print data........................3-25 3.2.3 Step 3: Print test pages ........................3-25 3.2.4 Step 4: Print all pages........................3-29 Operation after printing ........................ 3-33 3.3.1 Step 1: Replace the media core .......................3-33 3.3.2 Step 2: Idle the machine ........................3-33 AccurioLabel 230 Contents-1... - Page 4 Clean Roll Winder RW-210 .........................5-9 5.2.4 Adjust the position of the media .......................5-10 Weekly cleaning ..........................5-12 5.3.1 Clean the interior of the main body....................5-12 5.3.2 Set the media to the main body......................5-18 5.3.3 Clean the web cleaner ........................5-21 Contents-2 AccurioLabel 230...
- Page 5 Roll Winder RW-110 ...........................7-8 External machine items........................7-8 Internal machine items ........................7-9 7.1.3 Roll Winder RW-210 .........................7-10 External machine items........................7-10 Internal machine items ........................7-11 7.1.4 Status Indicator Light MK-744C .......................7-12 7.1.5 External Sensor Kit ES-101.......................7-13 AccurioLabel 230 Contents-3...
- Page 6 Typical specifications ........................7-14 7.2.1 Main body ............................7-14 7.2.2 Roll Winder RW-110 .........................7-14 7.2.3 Roll Winder RW-210 .........................7-14 7.2.4 Web guide............................7-15 7.2.5 External Sensor Kit ES-101.......................7-15 Contents-4 AccurioLabel 230...
-
Page 7: Introduction
Introduction... -
Page 9: Welcome
Bold Words in bold type indicate the name of a part, an option, or a key on the control panel. This check mark indicates a prerequisite of a procedural step. AccurioLabel 230... -
Page 10: Intended Use Of This Machine
Maintenance intervals have been exceeded, Mechanical or electrical functions do not work as they should. 1.3.3 Exclusion of liability The manufacturer of the system assumes no liability for damages if the system was operated under imper- missible conditions. AccurioLabel 230... -
Page 11: Target Groups
The User's Guides are intended for the following users of the system: Operator: Person who has been trained by Konica Minolta or authorized partner to operate the system for its intended use as well as manage consumables, and perform the maintenance and troubleshooting described in User's Guides. - Page 12 Configuration and usage of this manual AccurioLabel 230...
-
Page 13: Before Using This Machine
Before using this machine... -
Page 15: Power-On/Off
With the main power switch turned on, the power LED on the control panel lights in red. NOTICE The main power switch should normally be kept turned on. Be sure not to turn it off/on in usual oper- ation. AccurioLabel 230... - Page 16 The warm-up takes approximately 2 minutes. (This is the time period before [Ready to print] is displayed after the sub power switch is turned on.) The message [Ready to print] appears on the screen to inform you that the machine can now print jobs. AccurioLabel 230...
- Page 17 % When the message [Please confirm media unit] appears, turn on Roll Winder RW-110/Roll Winder RW-210 to make them ready. % For how to turn on the power, refer to page 2-7. % For details on how to make ready, refer to page 3-4. AccurioLabel 230...
-
Page 18: Turn The Main Body Off
Turning off the sub power switch will deactivate the Weekly Timer function. Turn OFF the main power switch. The main power switch is located inside the main body and can be reached from the left side door. AccurioLabel 230... -
Page 19: Turn On Roll Winder Rw-110/Roll Winder Rw-210
The main power switch is located on the left side of Roll Winder RW-210. Press the sub power switch on the upper side of Roll Winder RW-210. The power is turned on and the "Startup" screen is displayed on the touch panel. AccurioLabel 230... -
Page 20: Turn Off Roll Winder Rw-110/Roll Winder Rw-210
Confirm the MACHINE screen on the touch panel. % If the status display of Roll Winder RW-110 and Roll Winder RW-210 is blue, start from Step 2. % If the status display is red, start from Step 3. AccurioLabel 230... - Page 21 % Wait until the dancer arm lowers. Long-press [PowerOff] to turn off the display of the touch panel. The fixing of the media is released and the rewinder spindle rotates. Do not touch it while it is rotating. AccurioLabel 230...
- Page 22 Power-on/off Turn off the main power switch located on the left side of Roll Winder RW-210. 2-10 AccurioLabel 230...
-
Page 23: Machine Panel
Also provides various information about supply and dis- posal when pressed with the MACHINE screen displayed. Brightness adjustment dial Turned to adjust the brightness of the touch panel. Power Save Deactivates the power-saving mode. Also, activates pow- er-saving mode manually when pressed. AccurioLabel 230 2-11... - Page 24 [Cooling in progress / Power is turned off automatically] [Power off in progress / Please do not turn the main power off] Reference For how to turn off the power, refer to page 2-3. 2-12 AccurioLabel 230...
-
Page 25: Control Panel (Roll Winder Rw-110/Roll Winder Rw-210)
Make sure the dial is 10 before printing. This is not availa- ble on this machine. Touch panel Operate the touch panel to check the status and change the settings of Roll Winder RW-110 and Roll Winder RW-210. AccurioLabel 230 2-13... -
Page 26: Touch Panel (Roll Winder Rw-110/Roll Winder Rw-210)
[Startup] screen This section describes the [Startup] screen. Name Description [Startup] Press [Startup] to display the "Stop" screen to check the status and change the settings of Roll Winder RW-110 and Roll Winder RW-210. 2-14 AccurioLabel 230... -
Page 27: [Stop] Screen
[PowerOff] Long-press it to turn the machine power OFF. [Debug/Settings] Press to display the [Debug/Settings] screen. [Taper Tension] Press to display the [Taper Tension] screen. [Start] Displays the [Run] screen of unwinding and winding. AccurioLabel 230 2-15... -
Page 28: [Debug/Settings] Screen
Switches ON/OFF of low feeding detection. Keep it on dur- ing operation for this machine. [Web Break Detection] Switches ON/OFF of web break detection. Keep it on dur- ing operation for this machine. [Inspection Lamps] Switches ON/OFF of the inspection lamps of the inspec- tion table. 2-16 AccurioLabel 230... -
Page 29: [Taper Tension] Screen
Sets the diameter of the rewinder spindle. Switches ON/OFF of the setting. It has to be changed only if the diameter changes when the rewinder spindle is replaced. The setting shall not be changed during operation. [Back] The [Stop] screen is displayed again. AccurioLabel 230 2-17... -
Page 30: [Run] Screen
The rotation direction set in [Unwind spindle direction se- lector] is displayed with an arrow. [Taper Tension] Press to display the [Taper Tension] screen. [Clear Distance] Press to clear the value displayed in [Distance Covered]. 2-18 AccurioLabel 230... -
Page 31: Emergency Stop
Press the sub power switch of the control panel (The touch panel returns to the "Startup" screen). NOTICE Use EMERGENCY STOP only in case of emergency. If you press EMERGENCY STOP when stopping normal printing, it may result the machine and media being damaged. AccurioLabel 230 2-19... -
Page 32: Control Panel Of External Sensor Kit Es-101
Press this when adjusting eye mark detection. Long-press this together with the - button when entering the teach-in mode. Long-press this together with the + button when entering the teach-in mode. 2-20 AccurioLabel 230... -
Page 33: Web Guide
Starts the setup mode. Manual mode: Calls the setup menu. Automatic mode: Activates the gain setting. *This is not available on this machine. ENTER Enables the setting value and finishes the setup mode. *This is not available on this machine. AccurioLabel 230 2-21... - Page 34 The edge position shows the center in the automatic mode. Displays the gap between the edge position and setting value of the web guide of the roll winder in the center positioning mode. A value near ±0 is shown in the automatic mode. 2-22 AccurioLabel 230...
-
Page 35: Printing Workflow
Printing workflow... - Page 37 Print all pages of the job. 3. Operation After Printing Replace the Media Core Remove the media after printing and install a new media core. Idle the Machine Turn off the sub power of the machine and idle it. AccurioLabel 230...
-
Page 38: Before Printing
Replace the currently loaded paper with the media used for printing. For details, refer to the following page. Setting media: page 4-4 3.1.3 Step 3: Prepare the machine Prepare the machine to print. Turn on the main power switch located on the left side of Roll Winder RW-210. AccurioLabel 230... - Page 39 Press the sub power switch on the upper side of Roll Winder RW-210. The power is turned on and the "Startup" screen is displayed on the touch panel. Press [Startup]. The "Stop" screen is displayed. Press [Debug/Settings]. The "Debug/Settings" screen is displayed. AccurioLabel 230...
- Page 40 % [Unwind mandrel On/Off] (Right): Media core fixing mode with the rotation direction set to "Coun- terclockwise" % [Rewind mandrel On/Off] (Left): Media core fixing mode with the rotation direction set to "Counter- clockwise" AccurioLabel 230...
- Page 41 Confirm that the speed adjustment dial at the bottom right of the control panel is 10. Confirm that the value of "Web Speed" switches to "0m/min". Confirm the MACHINE screen on the touch panel and press [Start Convey]. % Confirm that the status of Roll Winder RW-110/Roll Winder RW-210 is displayed in blue. AccurioLabel 230...
-
Page 42: Step 4: Adjust (Image Position And Image Quality)
Press [Paper Setting] on the MACHINE screen. The "Paper Setting" screen is displayed. Press [Change Setting]. The "Change IndividualSet" screen is displayed. Select one of the buttons under "Paper Type" in the right side. [Available Weight settings] vary depending on the [Paper Type]. AccurioLabel 230... - Page 43 % Process speed can be selected from the keys under [Speed Setting]. Some speed settings cannot be selected depending on the paper weight. Select the desired button. % If [Registration Adj.] is desired, press [Registration Adj.]. % For details about how to adjust registration, refer to page 3-17. AccurioLabel 230...
- Page 44 % When completing the paper setting, press [Close]. The screen returns to the MACHINE screen. Specified paper condition is displayed in [Paper Setting] on the MACHINE screen. % To register paper conditions, go to the next step. Press [Register]. The "Register" screen is displayed. 3-10 AccurioLabel 230...
- Page 45 Enter the paper profile name and press [OK]. % Up to 25 two-byte characters or 50 one-byte characters can be entered for the paper profile name. The screen returns to the "Register" screen. AccurioLabel 230 3-11...
- Page 46 Before printing Check that the paper profile has been registered in [Paper Profile] and press [Close]. This returns to the "Paper Setting" screen. Press [Close]. 3-12 AccurioLabel 230...
- Page 47 Before printing % Return to the MACHINE screen and the registered paper condition is displayed on the MACHINE screen. [Recall] Specify paper setting using [Recall]. Press [Paper Setting] on the MACHINE screen. The "Paper Setting" screen is displayed. AccurioLabel 230 3-13...
- Page 48 Press [,] or [+] on the "Recall" screen, select a desired paper profile from the list of registered paper conditions, and then press [Confirm Details]. The selected entry will be highlighted. Details of the selected entry is displayed. 3-14 AccurioLabel 230...
- Page 49 When finished with checking, press [Close]. Press [OK] on the "Recall" screen. This returns to the "Paper Setting" screen. % If you want to change the recalled paper condition, refer to page 3-8, and change the paper setting. AccurioLabel 230 3-15...
- Page 50 Before printing Press [Close] on the "Paper Setting" screen. The [Paper Profile Name] changes to that of recalled specifications. % Return to the MACHINE screen and the recalled paper condition is displayed. 3-16 AccurioLabel 230...
-
Page 51: Image Position Adjustment
The adjustment data can be entered directly in percentage terms or in numerical terms to shift. See page 3-18. [Chart Adjustment]: You can print a chart and scale measurement points. Entering the measured value adjusts the magnification and printing position. See page 3-20. AccurioLabel 230 3-17... -
Page 52: [Zoom]/[Image Shift] Adjustment
% Press [Clear] to reset the value. % Adjustment example of [Image Shift]: When the printed image is misaligned downward by 0.5 mm/0.2", press [Up/Down], and then press [5] to specify +0.5 mm. The image shifts 0.5 mm up- ward. 3-18 AccurioLabel 230... - Page 53 With the paper conditions registered, you can print images in the same conditions as before, even after changing the media to be set. For details about editing or registering [Paper Profile], refer to "User's Guide [Utilize useful functions]/[Registering Paper Profile (Paper Catalog)]". AccurioLabel 230 3-19...
-
Page 54: [Chart Adjustment]
You can print a chart and scale measurement points. Entering the measured value adjusts the magnification and printing position. Press [Registration Adj.] on the MACHINE screen. The "Registration Adj." screen is displayed. Press [Chart Adjustment]. The "Chart Adjustment" screen is displayed. 3-20 AccurioLabel 230... - Page 55 Before printing Press [Print Mode]. The "PRINT MODE" screen is displayed. Press the Start button on the control panel. A test chart is printed. Press [Exit PrintMode]. The "Chart Adjustment" screen is displayed again. AccurioLabel 230 3-21...
- Page 56 Press the number indicating each point and use the touch panel keypad, [,] or [+] to enter the meas- ured value. % Press [Clear] to reset the value. Press [Adjustment Start]. The "Registration Adj." screen is displayed. 3-22 AccurioLabel 230...
-
Page 57: Quality Adj
In addition to regular calibration for the controller, use other image quality adjustments as necessary, such as when changing screens or papers or when hue is important. For details on the image quality adjustment flow (which timing, which image quality adjustment, in what or- der), refer to [User's Guide]. AccurioLabel 230 3-23... -
Page 58: Job Printing
Top margin (A): 2 mm + Bottom margin (C): 2 mm + 1 mm (to be inserted automatically) = Margin be- tween data (B): 5 mm / Top margin (A): 0.08" + Bottom margin (C): 0.08" + 0.04" (to be inserted auto- matically) = Margin between data (B): 0.2" 3-24 AccurioLabel 230... -
Page 59: Step 2: Send Print Data
The default values of the print stop positions of [Stop Position 1] and [Stop Position 2] are set to 800 cm and 90 cm, respectively. NOTICE You can adjust the paper stop position after printing in [Adjustment] > [Machine Adjustment] > [Printer Adjustment] > [Print Stop Position] on the MACHINE screen. AccurioLabel 230 3-25... - Page 60 Job printing Press the [JOB LIST] tab to display the "Hold Job" screen. Select a job to perform test printing for, then press [Job Ticket]. Press [Set Number]. 3-26 AccurioLabel 230...
- Page 61 Job printing Enter the number of copies for test printing, then press [OK]. Press [Overwrite]. Press [Output]. AccurioLabel 230 3-27...
- Page 62 % To adjust the image quality (color shade), use the following functions. For details, refer to the [User's Guide]. Tone Curve Adjustment Spot Color Use Alternative Color Conversion % If no adjustment is necessary, go to page 3-29. 3-28 AccurioLabel 230...
-
Page 63: Step 4: Print All
[Stop Position 2] is selected for [Print Stop Change Setting]. % If [Stop Position 3] is selected, press [Stop Position 1] or [Stop Position 2]. On the touch panel, press [JOB LIST] tab and display the "Hold Job" screen. AccurioLabel 230 3-29... - Page 64 % If you check [Continuous Job] to select multiple jobs, you can only insert the specified blank page and continuously output jobs while skipping stop processing between jobs, the warm-up operation, and the paper meandering prevention control operation. Press [Set Number]. Enter the number you want to print, then press [OK]. 3-30 AccurioLabel 230...
- Page 65 Job printing Press [Overwrite]. Press [Output]. % It is recommended to press [Job Ticket] and reconfirm [Set Number], [Paper Type], and [Thickness] (or [Weight]) on the "Job Ticket Edit" screen before pressing [Output]. AccurioLabel 230 3-31...
- Page 66 The blank page setting can be configured on the UTILITY screen. For details, refer to the [User's Guide]. Tips To pause or cancel output operation, press Stop on the control panel of the main body or [Stop] on the "Run" screen on the touch panel of Roll Winder RW-110/Roll Winder RW-210. 3-32 AccurioLabel 230...
-
Page 67: Operation After Printing
For details, refer to page 4-23. 3.3.2 Step 2: Idle the machine To idle the machine after printing, long-press [PowerOff] on the touch panel of Roll Winder RW-210 to turn off the display of the touch panel. AccurioLabel 230 3-33... - Page 68 Operation after printing 3-34 AccurioLabel 230...
-
Page 69: Handling Paper
Handling paper... -
Page 71: Media Route
Before setting or replacing the media, turn on the main power switch and sub power switch of the main body, and the main power switch and sub power switch of Roll Winder RW-110/Roll Winder RW-210. For the power operation, refer to page 2-3. AccurioLabel 230... -
Page 72: Setting Media
Specify the paper type and thickness (Weight): page 4-20 4.2.1 Set the media to the unwinder spindle Press the sub power switch on the upper side of Roll Winder RW-210. The power is turned on and the "Startup" screen is displayed on the touch panel. AccurioLabel 230... - Page 73 % If [-] is displayed in the circle, press the button to hide [-]. Press [Nip On/Off] to release fixture of the media. The black circle and lateral line indicate the roller and media, respectively. When you release fixture of the media, the media is displayed in green. AccurioLabel 230...
- Page 74 When setting the media, if it is stuck at the rear side and cannot be pushed, slightly raise the rear side of the media and move. Set the media with its edge adjusted with the position of 330 mm/12.99" of the scale on the unwinder spindle. AccurioLabel 230...
- Page 75 Cut both sides of the tip of the media with scissors for ease of feeding. Open the safety cover, pull out the media edge, and pass it into the workbench. NOTICE Pull out the media little by little. AccurioLabel 230...
-
Page 76: Feed The Media To Roll Winder Rw-110
Rollers (7) to (12) Open the front door and feed the media. Rollers (13) to (14) Open the safety cover of the upper side and feed the media. Roller (15) Open the front door and feed the media. AccurioLabel 230... -
Page 77: Feed The Media To The Main Body Of The Printer
Open the top cover of the leading section of the main body of the printer. Pass the edge of the media between the tension roller 1 and tension roller 2. Pass the media on the tension roller 4 and then between the tension roller 4 and tension roller 5. AccurioLabel 230... - Page 78 % Confirm with the scale of the leading section that the media passes through the center position of the leading section. Insert the media into the inside of the main body until [Start Convey] on the MACHINE screen on the touch panel on the main body of the printer lights. 4-10 AccurioLabel 230...
- Page 79 % Press [Start Convey] on the touch panel and then press [Stop Convey] after delivery of about 2 m to enable pass the media through Roll Winder RW-210. Close the top cover of the leading section of the main body of the printer. AccurioLabel 230 4-11...
-
Page 80: Feed The Media To Roll Winder Rw-210
Feed the media from the rewinder spindle side. Rollers (13) to (15) Open the safety cover of the upper side and feed the media. Rollers (16) to (19) Open the nip safety cover and feed the media. 4-12 AccurioLabel 230... -
Page 81: Set The Media Core To The Rewinder Spindle
Be sure to attach in three positions, center, back, and front in the order to equalize the tension on the front and back. Make sure the media is securely adhered to the media core. Otherwise, the media may lean to one side. AccurioLabel 230 4-13... -
Page 82: Adjust The Media Conveyance
Roll Winder RW-110/Roll Winder RW-210. Open the cover of the web guide of Roll Winder RW-110. Press the center positioning key of the web guide of Roll Winder RW-110. 4-14 AccurioLabel 230... - Page 83 After adjustment, tighten the knob to fix it. Press the manual mode key of the web guide. Open the top cover of the leading section of the main body of the printer. AccurioLabel 230 4-15...
- Page 84 % If the positions are misaligned, correct the position by confirming both scales of the leading sec- tion. Close the top cover of the leading section. Open the cover of the web guide of Roll Winder RW-210. 4-16 AccurioLabel 230...
- Page 85 After adjustment, tighten the knob to fix it. Press the manual mode key of the web guide of Roll Winder RW-210. AccurioLabel 230 4-17...
- Page 86 The black circle and lateral line indicate the roller and media, respectively. When you fix the media, the media is displayed in red. Press [Unwind mandrel On/Off] and [Rewind mandrel On/Off] to fix the media. When the media is fixed, [-] is displayed in the circle. Press [Start]. 4-18 AccurioLabel 230...
- Page 87 Redo it from step 1 if the value of the web guide set to ±0 is not stable or the media is wound being misaligned. Install the cover of the web guide of Roll Winder RW-110 and Roll Winder RW-210. AccurioLabel 230 4-19...
-
Page 88: Specify The Paper Type And Thickness (Weight)
Before printing, specify paper conditions such as the paper type and thickness (weight) on the main body to suit the media type. For details, refer to the User's Guide. Press [Paper Setting] on the MACHINE screen. The "Paper Setting" screen is displayed. Press [Change Setting]. The "Change IndividualSet" screen is displayed. 4-20 AccurioLabel 230... - Page 89 Select [Weight] from the buttons under [Change Setting] on the left, and set [Weight], [Speed], and [Weight Unit] from the buttons under [Weight] on the right. The available setting varies depending on the paper type you select in [Paper Type]. Press [OK]. AccurioLabel 230 4-21...
- Page 90 Setting media Press [Close]. The screen returns to the MACHINE screen. 4-22 AccurioLabel 230...
-
Page 91: Replacing The Media
Set the media to the unwinder spindle Fix the media with the four included magnets and cut it along the groove for cutter for the workbench of Roll Winder RW-110. Be careful not to cut your hand when cutting the media. AccurioLabel 230 4-23... - Page 92 % If [-] is displayed in the circle, press the button to hide [-]. Remove the media core of the unchanged media from the unwinder spindle. % If the remaining amount of the media is large, it will be heavy. Remove the media using a lifter, etc. 4-24 AccurioLabel 230...
-
Page 93: Connect The Media Using The Workbench
% For the positions of the rollers 1 and 2, refer to page 4-8. Put the rear end of the cut media on the front end of the media to join, and then fix it with four magnets. AccurioLabel 230 4-25... - Page 94 Be careful not to cut your hand when cutting the media. Stick the joint part of the media from the back side with masking tape. % Stick to protrude the masking tape from both ends of the media. 4-26 AccurioLabel 230...
- Page 95 Adhere the joint firmly by rubbing the surface of the masking tape to avoid peeling the media during transport. Cut the protruded parts of the masking tape from both ends of the joint part. Remove the four magnets. AccurioLabel 230 4-27...
-
Page 96: Convey The Media
Press [Start Convey] on the MACHINE screen on the touch panel of the main body to convey the media. Check the condition of the media, and press [Stop Convey] on the MACHINE screen on the touch panel of the main body. 4-28 AccurioLabel 230... -
Page 97: Replacing The Media Core
Masking tape (more than 30 mm / 1.18" in width) Ruler Lifter Press [Stop] on the "Run" screen on the touch panel. The "Stop" screen is displayed. Be sure to switch to the "Stop" screen before making the operation. AccurioLabel 230 4-29... - Page 98 Stick the cut media edge to the media with the masking tape. Press [Rewind mandrel On/Off] on the touch panel to release fixture of the media. If [-] is displayed in the circle, press the button to hide [-]. 4-30 AccurioLabel 230...
- Page 99 % Set the media core with its edge adjusted with the position of 330 mm/12.99" of the scale on the rewinder spindle. Press [Rewind mandrel On/Off] on the touch panel to fix the media. When the media is fixed, [-] is displayed in the circle. AccurioLabel 230 4-31...
- Page 100 Be sure to attach in three positions, center, back, and front in the order to equalize the tension on the front and back. Make sure the media is securely adhered to the media core. Otherwise, the media may lean to one side. 4-32 AccurioLabel 230...
-
Page 101: Splicing The Media (For Cleaning/Clearing Paper Jam)
Overlap the end of the media remaining onto the end of the media that has been cut between the main body and Roll Winder RW-210, by about 10 cm. Adhere the joint of the media from the back side with masking tape. % Stick to protrude the masking tape from both ends of the media. AccurioLabel 230 4-33... - Page 102 Adhere the joint firmly by rubbing the surface of the masking tape to avoid peeling the media during transport. Cut the protruded parts of the masking tape from both ends of the joint part. % When the procedures are completed, convey the media. For details, refer to page 4-28. 4-34 AccurioLabel 230...
-
Page 103: Additional Printing On The Media With Eye Mark Printed
Confirm/change the teach-in mode: page 4-45 Adjust the sensor position: page 4-46 Adjust the position of the media: page 4-47 Adjust ES-101: page 4-48 Print test pages: page 4-55 Adjust the additional printing position: page 4-55 Print all pages: page 4-56 AccurioLabel 230 4-35... -
Page 104: Conditions Of Detection Of Eye Mark
The following describes the procedure to remove ES-101 installed to the upper side of the leading section. Follow the same procedure when removing ES-101 installed to the lower side of the leading section. Open the top cover of the leading section of the main body of the printer. 4-36 AccurioLabel 230... -
Page 105: Installing Es-101 (When Checking The Eye Mark In The Upper Side Of The Media)
Installing ES-101 (When checking the eye mark in the upper side of the me- dia) When checking the eye mark in the upper side of the media, install ES-101 to the upper side of the leading section. AccurioLabel 230 4-37... - Page 106 Additional printing on the media with eye mark printed Install the sensor cover and sensor holder to ES-101 and fix them with two screws. Install the sensor holder with Up engraved. 4-38 AccurioLabel 230...
- Page 107 Additional printing on the media with eye mark printed Pull the sensor cable into inside of the leading section. Install the sensor cable to ES-101 and turn the nut to fix it. AccurioLabel 230 4-39...
- Page 108 Additional printing on the media with eye mark printed Install ES-101 to the upper sensor slider and fix it with two screws. Install it by holding ES-101 with hand. Install the rotation knob. Fix the sensor cable with a clamp. 4-40 AccurioLabel 230...
-
Page 109: Installing Es-101 (When Checking The Eye Mark In The Lower Side Of The Media)
When checking the eye mark in the lower side of the media, install ES-101 to the lower side of the leading section. Install the sensor cover and sensor holder to ES-101 and fix them with two screws. Install the sensor holder with Lw engraved. AccurioLabel 230 4-41... - Page 110 Additional printing on the media with eye mark printed Take out the sensor cable from the leading section and remove it from the clamp. Install the sensor cable to ES-101 and turn the nut to fix it. 4-42 AccurioLabel 230...
- Page 111 Additional printing on the media with eye mark printed Install ES-101 to the lower sensor slider and fix it with two screws. Install it by holding ES-101 with hand. Install the rotation knob. Fix the sensor cable with a clamp. AccurioLabel 230 4-43...
-
Page 112: Turn On The Additional Printing Function
Turn on the [additional printing mode] on the MACHINE screen. When [Additional Printing Mode] is turned on, continuous job printing is impossible. When outputting a test pattern, the normal mode applies even if [Additional Printing Mode] is turned on. 4-44 AccurioLabel 230... -
Page 113: Confirm/Change The Teach-In Mode
Confirm the current teach-in mode. The teach-in mode varies depending on the lighting status of LED as follows. Dynamic teach-in Two-point teach-in Long-press the + and - buttons of ES-101 at the same time to return to the normal mode. AccurioLabel 230 4-45... -
Page 114: Change In The Teach-In Mode
Set the media with eye mark. % For details, refer to page 4-4. Loosen the rotation knob and adjust the longitudinal position and angle of ES-101 so that the red spot mark projected from ES-101 passes above the eye mark. 4-46 AccurioLabel 230... -
Page 115: Adjust The Position Of The Media
When adjusting ES-101, you can adjust the position of the media by the following procedure. Feed the media in the conveyance direction with the delivering knob. Feed the media by holding both of its edges with hands in the feeding direction in the leading section. AccurioLabel 230 4-47... -
Page 116: For Black Eye Mark With White Background
Adjust ES-101 Adjust ES-101 to enable correct detection of the eye mark. For black eye mark with white background Keep pressing the SET button with the red spot mark projected from ES-101 aligned with the black eye mark. 4-48 AccurioLabel 230... - Page 117 Additional printing on the media with eye mark printed Feed the media in the conveyance or feeding direction and release the SET button where the spot mark is on the white background. AccurioLabel 230 4-49...
-
Page 118: For White Eye Mark With Black Background
Additional printing on the media with eye mark printed For white eye mark with black background Keep pressing the SET button with the red spot mark projected from ES-101 aligned with the white eye mark. 4-50 AccurioLabel 230... - Page 119 Additional printing on the media with eye mark printed Feed the media in the conveyance or feeding direction and release the SET button where the spot mark is on the black background. AccurioLabel 230 4-51...
-
Page 120: Confirmation Of The Detection Stability
Additional printing on the media with eye mark printed Confirmation of the detection stability Confirm the lighting status of LED. -..One LED is lighting: Detectable ----..Two to four LEDs are lighting: Good detection ---------- Five or more LEDs are lighting: Stable detection 4-52 AccurioLabel 230... -
Page 121: Install The Reflection Holder
Open the cover of the leading section. Install the assembled reflection holder to the lower sensor slider and fix it with two screws. Align the longitudinal position of the reflection holder with the position of the eye mark. Install the rotation knob. AccurioLabel 230 4-53... -
Page 122: Installing The Reflection Holder (When Checking The Eye Mark In The Lower Side Of The Media)
Install the assembled reflection holder to the upper sensor slider and fix it with two screws. Align the longitudinal position of the reflection holder with the position of the eye mark. Install the rotation knob. Close the cover of leading section. 4-54 AccurioLabel 230... -
Page 123: Print Test
[Registration Adj.]. Press [Registration Adj.] on the MACHINE screen. The "Registration Adj." screen is displayed. Press [Additional Printing Position]. [Additional Printing Position] is displayed only when [Additional Printing Mode] is turned ON on the MA- CHINE screen. AccurioLabel 230 4-55... -
Page 124: Print All
% The horizontal position can be adjusted between -20.0 and +400.0. When you press [Reset], the settings return to the defaults. Press [Close]. The screen returns to the MACHINE screen. 4.6.11 Print all pages Print all pages of the job. For details, refer to page 3-29. 4-56 AccurioLabel 230... -
Page 125: Cleaning
Cleaning... -
Page 127: Cleaning Parts And Intervals
Clean the web guide: page 5-26 7CAUTION When cleaning, be careful not to injure your hands with the edges of the metal plates and paper. NOTICE Depending on paper, cleaning may need to be performed at intervals shorter than the recommended ones. AccurioLabel 230... - Page 128 When cleaning the machine, be sure to turn off all of the main power switch and sub power switch of the main body, and the main power switch and sub power switch of Roll Winder RW-110/Roll Winder RW-210. AccurioLabel 230...
-
Page 129: Daily Cleaning
When cleaning the machine, use a soft cloth dampened with isopropyl alcohol. Other solvents may cause mal- function. 5.2.1 Clean the leading section Open the front door of Roll Winder RW-110. Open the top cover of the leading section. AccurioLabel 230... - Page 130 Clean tension roller 2, tension roller 3, tension roller 4, aligning roller, and the guide plate. % While shifting paper forward and backward or lifting it up, clean the sides and central portions of the parts with isopropyl alcohol. To prevent injuries, pay attention to the protrusions on the guide plate during cleaning. AccurioLabel 230...
-
Page 131: Clean The Delivering Section
% Make sure that it clicks when attaching. % Go to page 5-7. 5.2.2 Clean the delivering section Turn the thumbscrews on the top cover of the delivering section to detach the top cover of the de- livering section. Clean the upper delivering roller. AccurioLabel 230... - Page 132 Turn the feeding knob slowly and clean the parts of the upper delivering roller and the lower deliv- ering roller that are yet to be cleaned up. Turn the thumbscrews on the top cover of the delivering section to attach the top cover of the de- livering section. % Go to page 5-9. AccurioLabel 230...
- Page 133 % Firmly clean the nip roller as adhesive easily sticks to the both ends of the roller. NOTICE After cleaning is complete, allow isopropyl alcohol to dry before attaching the nip roller. Close the nip safety cover of Roll Winder RW-210. % Go to page 5-10. AccurioLabel 230...
-
Page 134: Adjust The Position Of The Media
Align the edge of the media with 330 mm/12.99" of the scale of the unwinder spindle. Press [Unwind mandrel On/Off] on the "Stop" screen of the touch panel to fix the media. When the media is fixed, [-] is displayed in the circle. 5-10 AccurioLabel 230... - Page 135 % The media does not protrude from each roller. % The media is centered against the scale marks indicated on the main body. Close the top cover of the leading section. Feed the media to Roll Winder RW-210. % For details, refer to page 4-12. AccurioLabel 230 5-11...
-
Page 136: Weekly Cleaning
Clean the interior of the main body Open the front door of Roll Winder RW-210. Cut the paper between the delivering section of the main unit and Roll Winder RW-210. Open the front door of Roll Winder RW-110. 5-12 AccurioLabel 230... - Page 137 Pull the media out straight. Pulling out the media diagonally can cause it to remain in the main body, resulting in a feeding error. Turn ON the sub power switch of the main body. Open the front door of the main body. Move the lever [M1] to the left, then pull out the ADU. AccurioLabel 230 5-13...
- Page 138 % To detach the leaf spring (front) and the leaf spring (back), unlock the hooks near the knobs first. % After unlocking the hooks near the knobs, open the cover [M2], and then unlock the hooks on the other side. 5-14 AccurioLabel 230...
- Page 139 % Firmly clean the springs as adhesive easily sticks to them. Follow the reverse procedure to detach the leaf springs, attach the leaf spring (front) and the leaf spring (back). % After attaching, make sure that both leaf springs are hooked up. AccurioLabel 230 5-15...
- Page 140 Insert the ADU and return the lever [M1] to the original position. NOTICE Gently insert the ADU to avoid strong shock. Note that applying a strong impact to the main body affects the setting position of the main body and may cause a meandering. 5-16 AccurioLabel 230...
- Page 141 Set the media to the leading section. % Set the media so that it is pulled under the leading section. NOTICE Be careful not to let the pulled media be touched on the floor. Go to page 5-18. AccurioLabel 230 5-17...
-
Page 142: Set The Media To The Main Body
Open the top cover of the leading section of the main body of the printer. Pass the edge of the media between the tension roller 1 and tension roller 2. Pass the media on the tension roller 4 and then between the tension roller 4 and tension roller 5. 5-18 AccurioLabel 230... - Page 143 NOTICE Stop feeding the media when [Start Convey] lights. Auto stop may not work after pressing [Start Convey] if the leading edge of the media reaches near the main body exit. AccurioLabel 230 5-19...
- Page 144 % Before closing the top cover, confirm that the rolling edge is not out of the guide. Connect the paper between the delivering section of the main unit and Roll Winder RW-210. Convey the media. % For details, refer to page 4-28. 5-20 AccurioLabel 230...
-
Page 145: Clean The Web Cleaner
Weekly cleaning 5.3.3 Clean the web cleaner Open the safety cover of Roll Winder RW-110 and clean inside the stainless tray in the front side of the brush. NOTICE Remove the media before cleaning. AccurioLabel 230 5-21... -
Page 146: Monthly Cleaning
Wipe the rollers other than the nip roller of Roll Winder RW-210 with a dry soft cloth. If the dirt cannot be removed, use a soft cloth dampened with isopropyl alcohol. NOTICE Remove the media before cleaning. Do not use water because metal will rust. 5-22 AccurioLabel 230... -
Page 147: Clean The Inspection Table
Remove the water accumulated in the compressor (only the drain-type compressor) Clean the air filter (only the air-filter type compressor) 5.4.5 Clean the web cleaner Open the front door of Roll Winder RW-110 and clean the box between the two brushes. NOTICE Remove the media before cleaning. AccurioLabel 230 5-23... -
Page 148: Clean The Exterior
When cleaning the machine, be sure to turn off all of the main power switch and sub power switch of the main body, and the main power switch and sub power switch of Roll Winder RW-110/Roll Winder RW-210. Never use paint solvents, such as benzine or thinners, to clean the exterior. 5-24 AccurioLabel 230... -
Page 149: Clean The Control Panel
NOTICE When cleaning, be careful not to press the control panel buttons and the touch panel too hard. Never use neutral detergent, glass cleaner, or paint solvents such as benzine or thinners to clean the control panel. AccurioLabel 230 5-25... -
Page 150: Clean The Web Guide
Clean the web guide Clean the web guide Remove the lids of the web guides of Roll Winder RW-110 and Roll Winder RW-210 and wipe the surfaces with a dry soft cloth. 5-26 AccurioLabel 230... -
Page 151: Troubleshooting
Troubleshooting... -
Page 153: Replenishing Toner Supply
For the subsequent treatment, please contact your service representative. 7WARNING Do not throw toner or a container that contains toner (e.g., toner cartridge and developing unit) into an open flame. The hot toner may scatter and cause burns or other damage. AccurioLabel 230... - Page 154 Perform the process while using [,] or [+] to follow the steps. Reference For details on help messages, refer to the [User's Guide]. Tips The number of replacements of the toner bottle can be counted. For details, contact your service rep- resentative. AccurioLabel 230...
-
Page 155: Replacing Waste Toner Box
For details about handling the waste toner box, contact your service representative. Display the help message on the MACHINE screen, and then press [Consumable/Scrap]. Press the [Waste Toner] tab in the help message area. Perform the process while using [,] or [+] to follow the steps. AccurioLabel 230... -
Page 156: Stop By Paper Mismatch During Printing
Cancel printing, change media, and restart printing Forcibly print on the set media Force print will be performed on the set media regardless of the paper setting. Cancel printing, change media, and restart printing Press [JOB LIST]. Press [Reserved Job]. AccurioLabel 230... - Page 157 Select the job to cancel printing for and click [Delete]. Press [Cancel Job]. Printing is canceled. Replace the media which is set on the printing job. % For details about how to replace the media, refer to page 4-4. Press Start on the control panel. Stop Start AccurioLabel 230...
-
Page 158: Forcibly Print On The Set Media
Stop by paper mismatch during printing Forcibly print on the set media Press [Confirm Details]. A dialog will be displayed. Press [Forced Output]. The MACHINE screen is restored with the message "Press [Start] to restart". Press Start on the control panel. Stop Start AccurioLabel 230... -
Page 159: Clearing Paper Jams
The paper jam clear method and the jam location number below are displayed in [JAM Position]. 94: Conveyor section inside the main body 95: Fixing section or delivery section inside the main body 96: Items related to Roll Winder RW-110 or Roll Winder RW-210 Tips Press [Close] to change to the MACHINE screen. AccurioLabel 230... -
Page 160: Jam Code List
Remove the paper error. inside the main body, and then J-1756 Pretransfer sen- open and close sor error. the front door of the main body. For instructions on how to remove the paper, refer to page 6-13. 6-10 AccurioLabel 230... - Page 161 Feeding and con- Engine error Remove the paper veying section inside the main body, and then open and close the front door of the main body. For instructions on how to remove the paper, refer to page 6-13. AccurioLabel 230 6-11...
- Page 162 J-5120 Feeding and con- Roller set detec- 1. Confirm the veying section tion error speed detection sensor of the printer. 2. Open the front door of the main body and confirm the paper. 6-12 AccurioLabel 230...
-
Page 163: Remove Paper Jam Inside The Main Body
Remove paper jam inside the main body Open the front door of Roll Winder. Cut the media. When cutting the paper, be careful not to injure your hands or fingers. Open the front door of Roll Winder. AccurioLabel 230 6-13... - Page 164 If JAM code [J-3105] is displayed, the paper may coil around the fixing unit. If the media cannot be pulled out from the delivering section, contact your service representative. Pulling out the media with excessive force may cause machine troubles. Open the front door of the main body. 6-14 AccurioLabel 230...
- Page 165 % If they come off, refer to page 5-12 and reattach them. DO NOT put your hand into the fixing part of the fixing unit. % Otherwise, you may get burned. Be especially careful when pulling out the fixing unit or opening the fixing part. AccurioLabel 230 6-15...
- Page 166 Cut the tips of the media in the leading section into triangle strips. Set the media to the leading section. Set the media so that it is pulled under the leading section. NOTICE Be careful not to let the pulled media be touched on the floor. 6-16 AccurioLabel 230...
- Page 167 Clearing paper jams Set the media on the machine. % For details, refer to page 5-18. Connect the media between the main body and Roll Winder. % For details, refer to page 4-33. AccurioLabel 230 6-17...
-
Page 168: A Media Feeding Error Occurs
For details, refer to page 6-25. transferred. The message "Safety door Opening of the safety doors of Roll Winder RW-110 and Roll Winder open" is displayed. RW-210 was detected. Close all of the safety doors. 6-18 AccurioLabel 230... -
Page 169: Media Snakes Or Is Mis-Centered
STEP 5: Confirm the Air Pressure of the Manometer If meandering and mis-centering are not solved even after STEP 4, check the air pressures of the manometers of the feeding dancer arm, winding dancer arm, and nip. % For details, contact your service representative. AccurioLabel 230 6-19... -
Page 170: Adjust The Media Conveyance Position To Solve Meandering And Mis-Centering
% When you move the sensor unit to the front and to the back, the value is changed to the minus and plus directions, respectively. % After adjustment, tighten the knob to fix it. 20.0 Press the manual mode key of the web guide. 20.0 Open the front door of Roll Winder RW-110. 6-20 AccurioLabel 230... - Page 171 % When you move the sensor unit to the front and to the back, the value is changed to the minus and plus directions, respectively. % After adjustment, tighten the knob to fix it. 20.0 Press the manual mode key. 20.0 AccurioLabel 230 6-21...
- Page 172 Roll Winder RW-210 to fix the media. % When the media is fixed, [-] is displayed in the circle. Press [Start]. Confirm that the value of [Web Speed] switches to [0 m/min]. 6-22 AccurioLabel 230...
-
Page 173: The Jam Code J-1714 Is Displayed
Clean the leading section or the delivering section if it is dirty with adhesive. % For details, refer to page 5-5, page 5-7. STEP 3: Clear Paper Jams Open and close the front door of the main body to clear the paper jam. AccurioLabel 230 6-23... -
Page 174: The Jam Code J-3105 Is Displayed
STEP 3: Adjust the Second Transfer Output Adjust MACHINE - [Paper Setting] - [Change Setting] - [Process Adjustment] - [2nd Transfer Out- put Adjustment]. % [Process Adjustment] is not displayed by default. For details, contact your service representative. 6-24 AccurioLabel 230... -
Page 175: The Media Wrinkles
If "Safety door open" is displayed on the touch panel of Roll Winder RW-210, follow the following procedure to solve the problem. STEP 1: Confirm the Preparation before Printing Close all of the doors and covers of Roll Winder RW-110 or Roll Winder RW-210. % For details, refer to page 3-4. AccurioLabel 230 6-25... -
Page 176: To Change The Timing Of Media-Break Detection
After determining the position, securely tighten the rotation knob to fix the remaining media sensor. NOTICE % Normally, configure the default setting, 9 mm. % When changing it, it is recommended to adjust it by the millimeter. You shall be responsible for changes in the setting. 6-26 AccurioLabel 230... -
Page 177: Trouble Of Optional Products
If it is dirty, wipe it with a cloth, etc. After cleaning, apply grease to the shaft. Clean the shaft once a month. STEP 2: Check the Status of the Compressor of the Knife If the compressor is dirty, clean it. % For details, refer to page 5-23. AccurioLabel 230 6-27... -
Page 178: How To Reset Emergency Stop
% For instructions on how to remove the paper, refer to page 6-13. If you have forgotten the administrator password The administrator password is set to "00000000" by factory default. If the administrator password is changed, contact your service representative. 6-28 AccurioLabel 230... -
Page 179: Appendix
Appendix... -
Page 181: Name Of Each Component
Pulled to the left to open the front door of the main body. Front door Opens to allow removal of paper jam or to turn on/off the main power switch. Waste toner box door Opens to allow replacement of the waste toner box. AccurioLabel 230... - Page 182 Used to operate as a USB-connected printer. Network port (10Base-T, Connected with an Ethernet cable to operate the machine, 100Base-T, 1000Base-T) or to use the machine as a network printer. Power cord Supplies the main body with electric power. AccurioLabel 230...
-
Page 183: Internal Machine Items
Forms the image. Lever [M1] Opens leftward to withdraw the fixing unit for removal of paper jam. Fixing unit Fuses toner onto paper. Leaf spring (back) Stabilizes the media conveyance. Also it prevents glue from sticking to the conveyance section. AccurioLabel 230... -
Page 184: Leading Section
Conveys the media. Media guide Reference position for the media. Tension roller 3 This is not available. Tension roller 6 This is not available. Guide plate Stabilizes the media conveyance. Aligning roller Conveys the media. Restriction roller Conveys the media. AccurioLabel 230... -
Page 185: Delivering Section
DO NOT pull out the toner bottle other than the time to exchange for running out of toner. If you pull out the toner bottle in which the toner remains, an area nearby may become dirty with toner. AccurioLabel 230... -
Page 186: External Machine Items
The default detection range is set to 9 mm, which is the clear- ance between the unwinder spindle and sensor. Front door (safety door) Protects the rollers in Roll Winder RW-110. Opened when setting or replacing the media. AccurioLabel 230... -
Page 187: Internal Machine Items
Internal machine items Name Description Web guide Adjusts the media conveyance position to prevent meandering and mis-centering of the media. Feed roller Conveys the media. 9, 10 Unwinder dancer arm Adjusts the media tension. 14~19 Feed roller Conveys the media. AccurioLabel 230... -
Page 188: External Machine Items
Front door (safety door) Protects the rollers in Roll Winder RW-210. Opened when setting or replacing the media. Web guide cover Protects the web guide. Remove it to operate the web guide. Rewinder spindle Winds the media. 7-10 AccurioLabel 230... -
Page 189: Internal Machine Items
Web guide Adjusts the media conveyance position to prevent meandering and mis-centering of the media. 3~11 Rewinder roller Conveys the media. 12, 13 Rewinder dancer arm Adjusts the media tension. 14~19 Rewinder roller Conveys the media. AccurioLabel 230 7-11... -
Page 190: Status Indicator Light Mk-744C
Green Printing is in process. Blue Ready for printing. Main power switch or sub power switch is off. Or, printing is not available if the machine is warming up or any door is opened. 7-12 AccurioLabel 230... -
Page 191: External Sensor Kit Es-101
Name of each component 7.1.5 External Sensor Kit ES-101 External Sensor Kit ES-101 is optional. Name Description Rotation knob Used for position adjustment of the External Sensor Kit. Control panel Used for setting and operation of the External Sensor Kit. AccurioLabel 230 7-13... - Page 192 Main Body Alongside Type Paper Winding System Capacity Maximum diameter 620 mm / 24.4" Maximum media weight 65 kg/143.30 lb Inside diameter of media 76.2 mm/3.00" core Outside diameter of mini- 82 mm / 3.23" or more mum media core 7-14 AccurioLabel 230...
- Page 193 Temperature 0°C to +45°C conditions Humidity 5 to 90%RH (No dew condensation) 7.2.5 External Sensor Kit ES-101 Specifications Type External Sensor Kit Operating environment Depends on the machine conditions Paper weight Supported paper type Thickness Paper size AccurioLabel 230 7-15...
- Page 194 Typical specifications 7-16 AccurioLabel 230...