Table of Contents
Advertisement
Quick Links
High Definition Studio Direct Box
O
Radial Engineering Ltd.
1588 Kebet Way, Port Coquitlam BC V3C 5M5
www.radialeng.com • 604-942-1001 • info@radialeng.com
Specifications and appearance are subject to change without notice.
Copyright © 2020 Radial Engineering Ltd.
HDI
'
M
wner
s
anual
True to the Music
www.radialeng.com
Advertisement
Table of Contents

Related Manuals for Radial Engineering HDI


Summary of Contents for Radial Engineering HDI
- Page 1 High Definition Studio Direct Box ’ wner anual Radial Engineering Ltd. 1588 Kebet Way, Port Coquitlam BC V3C 5M5 www.radialeng.com www.radialeng.com • 604-942-1001 • info@radialeng.com Specifications and appearance are subject to change without notice. Copyright © 2020 Radial Engineering Ltd.
-
Page 2: Table Of Contents
We encourage you to read through this manual to familiarize yourself with the many features available on the HDI, allowing you to get the most out of this device. If you have any questions not answered in this user guide, please visit our website at www.radialeng.com for additional resources and frequently asked questions. -
Page 3: Overview
A note from the HDI design engineer W.C. “Hutch” Hutchison The HDI Direct Box has its roots in the experiences of a live sound and recording engineer. We know what an engineer typically needs to process the signal from a conventional DI to make it sit in a mix. We also know that sometimes that pure clean sound is exactly what is called for and sometimes we wish it sounded more like a great old tube amp. -
Page 4: Features
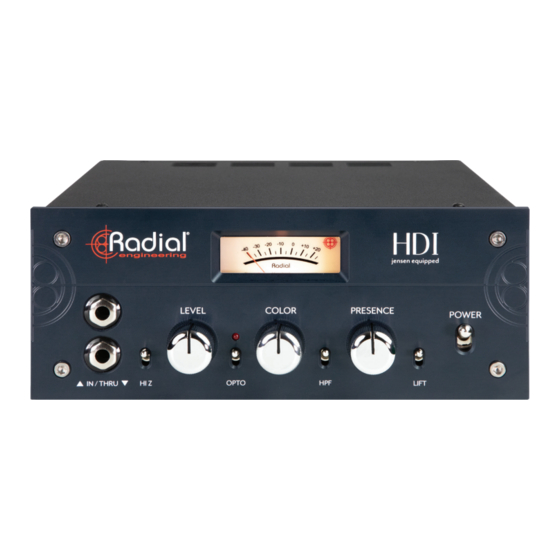
OUTPUT METER: Wide-range highly responsive peak meter corresponding to the signal present at the Line-Level XLR output. The highest marking on the scale of +20 refers to +20dBu, though the HDI is capable of producing max output levels of +25dBu. - Page 5 PROCESSED OUTPUT: Unbalanced 1/4” TS output that follows the tone-shaping circuitry of the HDI, allowing you to easily feed an affected signal to a stage amplifier, amp modeling unit, or any device with instrument-level inputs.
-
Page 6: Making Connections
The HDI features both front and rear-panel 1/4” TS inputs for connecting any mono instrument, from bass to acoustic guitar, or any instrument in between. When the HDI is rack mounted, the rear panel input can be used for a hard- wired connection to a patch bay or an input switcher, leaving the front panel input open to allow for spontaneous connection to the HDI without having to repatch any cables. -
Page 7: Connecting To The Synth Input
HDI. As a general rule of thumb, it helps to start by moving left- to-right across the front panel controls for your initial adjustments. - Page 8 LEVEL The Level control provides an input gain stage for the HDI: turning up this knob will drive your signal harder into the Opto compressor and the distortion channel associated with the Color control. The remaining controls on the front panel will have minimal impact on the the amount of gain applied to the signal, so the Level control is also helpful for setting your output levels, which are displayed on the Output Meter.
- Page 9 This switch disconnects the HDI audio ground from the chassis ground (which is also AC third pin ground). XLR Pin 1 on both of the HDI outputs is always connected to the chassis ground. There may be occasions where a modified XLR cable with shield disconnected from pin 1 on one end helps solve a ground loop issue.
-
Page 10: Rack Mounting The Hdi
RACK MOUNTING THE HDI The HDI can be used as a standalone device or it can be mounted in standard 19” equipment racks using the included rackmount adaptors. The HDI takes up 2 rack units of space and can be mounted left or right-aligned depending on the orientation of the two mounting brackets. - Page 11 ADDITIONAL APPLICATIONS CONTINUED Using distortion pedals before or after the HDI - You can use standard distortion pedals in front of the HDI to generate some interesting tones, or try connecting the 1/4” Processed Output into a distortion pedal or chain of pedals that then feed a guitar amplifier.
- Page 12 ADDITIONAL APPLICATIONS CONTINUED Use the EXTC-SA with the HDI - With the help of the EXTC-SA, you can simultaneously record to two channels on your recording interface, one that includes your favorite pedals, and another that includes only the tone from the HDI.
- Page 13 True to the Music NOTES: Radial Engineering Ltd. HDI™ Owner’s Manual...
- Page 14 True to the Music NOTES: HDI™ Owner’s Manual Radial Engineering Ltd.
-
Page 15: Warranty
Size (L x W x H): .............8.25” x 8.25” x 3.5” Weight: ................5.05lbs Conditions:..............For use in dry locations only between 5°C and 40°C Power: ................100-200VAC 0.45A ~ 50/60Hz Conformity: ..............CE Warranty: ................Radial 3-year, transferable *Specifications are subject to change without notice. Radial Engineering Ltd. HDI™ Owner’s Manual... - Page 16 RADIAL ENGINEERING LTD. 3 YEAR TRANSFERABLE WARRANTY RADIAL ENGINEERING LTD. (“Radial”) warrants this product to be free from defects in material and work- manship and will remedy any such defects free of charge according to the terms of this warranty. Radial will repair or replace (at its option) any defective component(s) of this product (excluding finish and wear and tear on components under normal use) for a period of three (3) years from the original date of purchase.