Toro EVOLUTION Series Quick Start Manual
Evo-hh handheld remote
Hide thumbs
Also See for EVOLUTION Series:
- Manual (96 pages) ,
- User manual (30 pages) ,
- Quick start manual (24 pages)
Table of Contents
Advertisement
Quick Links
Introduction
Congratulations on purchasing Toro's new EVOLUTION Series Controller with the EVO-HH
Handheld Remote Add-On. With the Handheld Remote Add-On, you will quickly realize
savings in both time and money while keeping your landscape healthy and beautiful.
The EVO-HH system is designed exclusively for your Toro EVOLUTION Series Controller
to allow the user to remotely control watering and auxiliary zones. The user can walk the site,
testing, troubleshooting, and/or providing supplemental watering without walking back to the
controller every time.
To familiarize yourself with EVO-HH handheld system, please take a few moments to read
through this guide in its entirety.
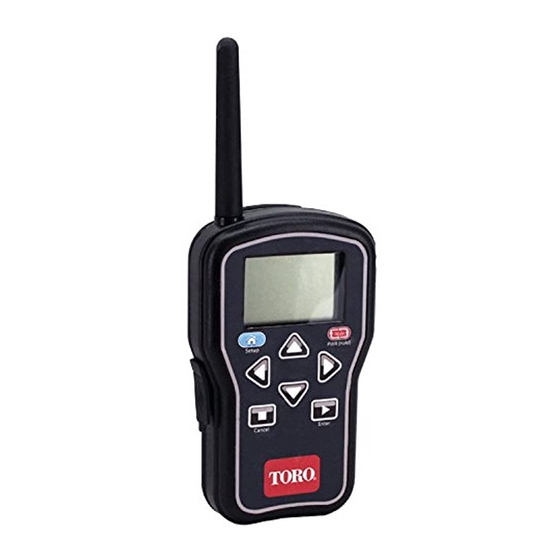
Specifications
Handheld Remote
•
Dimensions:
2.75" (7 cm) W x 7" (17,8 cm) H (over 2" antenna) x 1.25" (3,2 cm) D
(including mounting clip)
•
9V Alkaline battery (not included)
•
RF reception range: 1000' (152 m) LOS (line of sight)
•
Operating temperature range: 14° – 140° F ( -10°– 60°C)
EVOLUTION
EVOLUTION
EVO-HH Handheld Remote
EVO-HH Handheld Remote
Series Add-On:
Series Add-On:
®
®
LISTED
FCC-ID: OF7CLR1
IC: 3575A-CLR1
Mode
Setup
PWR (Hold)
Cancel
Enter
1
Advertisement
Table of Contents

Related Manuals for Toro EVOLUTION Series


Summary of Contents for Toro EVOLUTION Series
-
Page 1: Specifications
The EVO-HH system is designed exclusively for your Toro EVOLUTION Series Controller to allow the user to remotely control watering and auxiliary zones. The user can walk the site, testing, troubleshooting, and/or providing supplemental watering without walking back to the controller every time. -
Page 2: Table Of Contents
Change From One Running Scene to Another At the Controller Menu Navigation Return to Irrigation Mode Adding the Device Toro Support At the Remote Set the PIN Powering the Remote Set the Number of Stations Start Program “A”, “B”, or “C”... -
Page 3: Overview
Installation Overview EVOLUTION® Smart Connect® Please see the install sheet that came with the Smart Connect device. Installing the Remote Batteries LCD Screen The remote receives power from a 9-volt battery (not included). To install the battery: Setup button 1. Remove the three Up arrow (3) screws from the battery cover on the... -
Page 4: At The Controller
At the Controller Menu Navigation 3. Press REMOTE • to navigate the menu commands. • To change a value, press to move to the desired ADD/REMOVE DEVICE field, then press to adjust the value. WEATHER SELECT to input the desired value. •... -
Page 5: At The Remote
At the Remote Set the PIN Set the Number of Stations 1. Press to turn on To save time using the remote, set the number of stations in the PWR(Hold) Mode the remote transmitter. transmitter to match the number of stations on the 98 14 EVOLUTION®... -
Page 6: Run An All Stations Cycle
Run an All Stations Cycle (ASC) Stop All Running an All Stations Cycle is useful for troubleshooting a Press . A slashed-out raindrop indicates an Cancel sprinkler system. interrupted irrigation program. 1. Follow Step 1 above. Change from One Running Station to Another TEST P- C 2. -
Page 7: Start A Single Auxiliary Scene
Enter Press and hold down until the screen displays Cancel a Single Scene PWR(Hold) Mode “toro”. Release. Select the currently running scene and press Cancel Run All Auxiliary Running all scenes is useful for troubleshooting an auxiliary system. 1. Press... -
Page 8: Toro Support
Connect the equipment into an outlet on a circuit different from that to which and workmanship for a period of one year from the date of purchase. Neither The Toro the receiver is connected.