
Related Manuals for MB QUART MBQX-POD-1

Summary of Contents for MB QUART MBQX-POD-1
- Page 1 Installation Manual MBQX-POD-1 CAN-AM MAVERICK X3 400 WATT / TWO SPEAKER UTV-TUNED AUDIO PACKAGE...
-
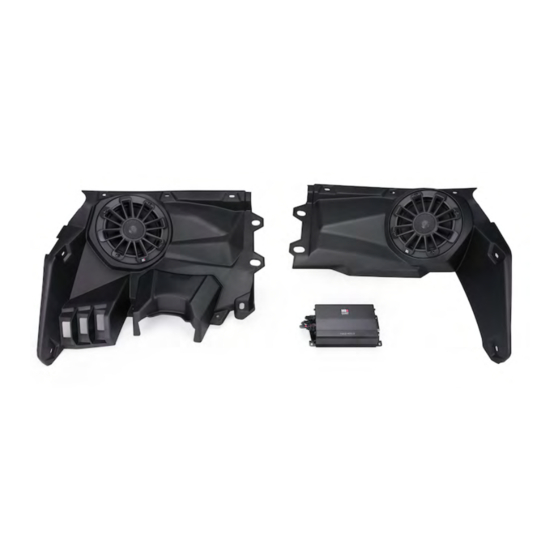
Page 2: What's Included
If you feel something is missing, please contact Maxxsonics directly via email – support@maxxsonics.com. OTHER CAN-AM X3 SPECIFIC PRODUCTS – MB Quart has thoughtfully created a range of vehicle- specific audio system products for your Can-Am X3. Everything from source units to subwoofers is available at www.MBQuart.com. -
Page 3: Installation Time
INSTALLATION TIME About 2 hours are required to complete this installation (assuming unmodified vehicle). Add installation time for your own source unit, choice in power wiring and any additional speakers, subwoofer(s) and amplifiers. TOOLS AND SUPPLIES NEEDED ● Wire Strippers and Crimpers ●... -
Page 4: Vehicle Disassembly
VEHICLE DISASSEMBLY This section covers console and dash component removal. REMOVE CONSOLE SIDES Remove driver’s side console Remove passenger’s side Remove front of center console side panel using a pry tool from console side panel using a side panel on passenger’s side the top to gently release the pry tool from the top to gently (footwell area) using a pry tool... - Page 5 VEHICLE DISASSEMBLY This section covers left and right side top dash speaker panels and gauge cluster removal. REMOVE PASSENGER & DRIVER TOP DASH PANELS 10mm nut on back side Remove gas filler access door Remove three T-30 screws Remove the remaining two on passenger side.
- Page 6 To install a complete audio system, you need to have the following items not included in this kit. If you already have an audio system installed and are simply adding the MBQX-POD-1 kit, you may only need some of the items depending on whether or not you have existing amplifier(s) and other components.
- Page 7 CONNECT AND ROUTE WIRING This section covers the recommendation of connecting your power, ground and ignition/accessory wiring to the bus bar in the passenger side center console and routing that wiring to the dash area. Ground Battery +12V Ignition +12V Remove the fuse from the main Identify bus bar in passenger Connect your Ground, Battery...
-
Page 8: Amplifier Installation
AMPLIFIER INSTALLATION This section covers general wiring and the installation the NA2-400.2 amplifier using the optional MBQX- SUB-ACC-1 mounting plate. If not using this mounting plate, you’ll need to determine your own mounting location. Source Unit “FRONT OUTPUTS” To Amplifier Location Audio input signal voltage from 4-Pin Speaker Plug... - Page 9 *AFTERMARKET ROLL CAGES Clips Although MB Quart front speakers come pre-installed in the Can-Am replacement panels, they may require removal from the panel to Clips fit low-slung aftermarket roll cages Drop Panel into Place &...
- Page 10 FRONT SPEAKER INSTALLATION (Continued) This section continues front speaker installation focusing on the driver’s side. Final driver’s side panel installation will occur AFTER the audio system initial testing is validated and complete. Depress Screws Tabs Replace Switches Remove switches on lower left Replace switches in the same If the vehicle has the Smart- of original driver’s side dash...
-
Page 11: Amplifier Settings
Instead, MB Quart system design experts recommend maintaining the 80Hz HP crossover point and adding a subwoofer such as the MBQX-SUB-2 engineered specifically for Can-Am X3 UTVs. -
Page 12: Initial Testing
INITIAL TESTING Confirm that everything is working as intended before final tuning, fitting and reassembly. STEP 1 – RECONNECT THE BATTERY First, ensure the battery is fully charged. Using a 10mm socket, then reconnect the negative terminal of the negative battery cable as indicated. STEP 2 –... -
Page 13: Fine Tuning
FINE TUNING After you’ve confirmed and tested all components are working, you can fine tune the amplifier settings. Through hundreds of installations we have determined the following settings are ideal for the Can-Am X3 UTV-Tuned Audio Packages. Only “A” settings 1, 2 and 3 apply to the NA2-400.2 amplifier in this kit. NOTE –... - Page 14 As you begin reassembly, take the time to ensure no fastener, screw or clip is excluded. Review any prior disassembly steps to ensure you don’t miss any hardware during reassembly. *AFTERMARKET ROLL CAGES Although MB Quart front speakers come pre-installed in the Can-Am replacement panels, they may...
-
Page 15: Final Inspection
FINAL INSPECTION Here is a check list to make sure your vehicle is ready to hit the trails. You should pull & tighten everything so that you know your Can-Am X3 and your audio equipment are secure. ● BATTERY IS FULLY CHARGED, ESPECIALLY AFTER TESTING AND FINE TUNING ●... - Page 16 COMPLETE CAN-AM X3 SYSTEM LAYOUT BUS BAR (CENTER CONSOLE) This diagram shows all optional MB Quart equipment available for the Can-Am X3. OPTIONAL MULTIMEDIA SOURCE UNIT STAGE 2, 3 and 5 UTV-Tuned SYSTEMS INCLUDE INTEGRATED PREF-TERMINATED WIRE HARNESS MBQX-RAD-1 OPTIONAL 2nd...
- Page 17 NOTES Use this section to record serial numbers of each product, final gain and crossover settings of amplifiers or any other wiring or installation-related details that will be helpful if you need to add on to the system or troubleshoot any unforeseen issues.
- Page 18 The Bluetooth ® word mark and logos are registered trademarks owned by the Bluetooth SIG, Inc. and any use such marks by MB Quart is under license. All product names, logos, and brands are property of their respective owners. All company, product and service names used in this literature are for identification purposes only.