
Related Manuals for natus ErgoJust LTM

Summary of Contents for natus ErgoJust LTM
- Page 1 Natus ErgoJust LTM and ErgoJust ICU Cart Instructions For Use Natus ErgoJust LTM cart Natus ErgoJust ICU cart 019667 Rev 07...
-
Page 3: Publisher's Notice
Technical Support Email: OTS@natus.com Customer Service Email: Oakville_Customer_Service@natus.com Website: www.natus.com Publisher’s notice Part 019667 Rev 07 Natus ErgoJust LTM and ErgoJust ICU Cart Instructions For Use Issued July 6, 2020 Natus EU Authorized Representative Natus Manufacturing Limited IDA Business Park Gort, Co.Galway, Ireland... -
Page 4: Safety And Standards Conformity
Natus Medical Incorporated is not responsible for injury, infection or other damage resulting from the use of this product. Any serious incident that has occurred in relation to ErgoJust LTM and ErgoJust ICU carts should be reported to Natus Medical Incorporated and the competent authority of the Member State in which the user and/or patient is established. -
Page 5: Table Of Contents
Tilting the keyboard tray (Natus ErgoJust LTM cart only) ......................2-6 Extending the mouse holder tray (Natus ErgoJust LTM cart only).....................2-7 Mounting the mouse holder for left or right handed mouse operation (Natus ErgoJust LTM cart only)........2-7 Raising/lowering the monitor or All-in-One computer .......................2-8 Rotating and tilting the monitor or All-in-One computer ......................2-9... - Page 6 1. Remove the optional Natus Photic Stimulator - Natus ErgoJust LTM ................... 3-4 2. Unplug the Video camera and IR Light power cables - Natus ErgoJust LTM and ErgoJust ICU ......... 3-5 3. Removing the video pole mounted with the Fixed-zoom video camera - Natus ErgoJust ICU ..........3-6 4.
-
Page 7: Introduction
NeuroWorks/ SleepWorks devices and accessories to provide a complete portable workstation for EEG applications. The Natus ErgoJust LTM cart provides a portable workstation at the point of care in any hospital room requiring EEG monitoring or testing. It is ideally designed for as a comprehensive solution for long-term EEG monitoring (LTM). -
Page 8: Using This Manual
When reviewing the procedures, we recommend you read the entire section first, before beginning a sequence. Please follow the instructions carefully. IMPORTANT: All Natus ErgoJust LTM and Natus ErgoJust ICU cart systems must be installed or upgraded by a qualified and trained Natus technician or representative. -
Page 9: Manual Conventions
Introduction Manual conventions Various symbols and typographical conventions are used throughout the manual. The table on the next page illustrates them and describes their meanings and functions. About the illustrations Models/styles of equipment listed in this publication may vary from those shown in the illustrations. -
Page 10: Labels And Symbols
Natus ErgoJust LTM and ErgoJust ICU Cart Information For Use Labels and symbols The following labels and symbols may be affixed to the Natus ErgoJust LTM cart and/or Natus Neurology Incorporated system components. Items marked with “-” are non-standardized symbols. - Page 11 Introduction Symbol Standard Standard Title of Symbol Title as per Explanation Reference Symbol Referenced Standard Medical devices — Symbols Indicates the need for the ISO 15223-1 to be used with medical user to consult the Symbol 5.4.4 device labels, labeling and instructions for use for information to be supplied.
- Page 12 Natus ErgoJust LTM and ErgoJust ICU Cart Information For Use Symbol Standard Standard Title of Symbol Title as per Explanation Reference Symbol Referenced Standard To identify any terminal which is intended for connection to an external ISO-7000/IEC-60417 Graphical Symbols for use Protective earth;...
-
Page 13: Safety Summary
Introduction Safety summary Warnings or The following is an overview of Warnings pertaining to the Natus ErgoJust LTM and Natus precautions ErgoJust ICU system cart. Additional Warnings and Precautions are located in the various sections of this User guide. Please read and understand the information in this User guide and any accompanying documentation thoroughly before using the Natus ErgoJust LTM and Natus ErgoJust ICU cart system. - Page 14 Natus ErgoJust LTM and ErgoJust ICU Cart Information For Use Impact Hazard! Moving parts can crush and cut. Minimize lift tension before removing mounted equipment. Failure to heed this warning may result in serious personal injury or property damage. Lower work surface to lowest position.
- Page 15 Do not open the cart tower or base. • Do not attempt to service the cart. • Do not remove safety guards or labels designed to protect or inform of possible hazards. • Only Natus approved installers may service or otherwise modify the cart. July 6, 2020...
-
Page 16: Environmental Specifications
50-60 Hz. ISO or UPS The Natus ErgoJust LTM and Natus ErgoJust ICU cart must be used with a Natus-approved ISO or requirements UPS to provide electrically isolated power to all system devices. Please contact Natus Technical Support for more information. -
Page 17: Compatible Natus Ergojust Ltm Cart And Natus Ergojust Icu Cart Accessories
Compatible Natus ErgoJust LTM cart and Natus ErgoJust ICU cart accessories The following is a list of equipment that may be mounted or installed on the Natus ErgoJust LTM cart. Other equipment compatible with the Natus NeuroWorks/SleepWorks system which are not directly mounted or installed are not listed (including software, devices, accessories and cables). -
Page 18: Disposal At End Of Operating Life Instructions
WEEE is reused or recycled safely. In line with that commitment Natus may pass along the obligation for take back and recycling to the end user, unless other arrangements have been made. Please contact us for details on the collection and recovery systems available to you in your region at natus.com... -
Page 19: Natus Ergojust Ltm Cart Weight Capacities
Natus ErgoJust LTM cart weight capacities Figure 1 shows the maximum weight limitations for the monitor holder, work surface, and keyboard tray. Figure 1: Natus ErgoJust LTM cart maximum weight capacities. Legend Description Monitor 27 inch = 5 to 18 lbs (2.3 - 8.1 kg) Work Surface = ≤... -
Page 20: Cleaning Instructions
For this cart, preventative maintenance consists of periodically cleaning and inspecting the exterior of the instrument. It is recommended that all repairs be performed by a qualified Natus Neurology Incorporated service representative only. You have the sole responsibility for any malfunctions resulting from improper maintenance or repair by anyone other than an authorized Natus Neurology Incorporated representative. -
Page 21: General Use
Chapter 2 General Use This chapter shows how to adjust the various components on the Natus ErgoJust LTM and Natus ErgoJust ICU carts. July 6, 2020... -
Page 22: Basic Natus Ergojust Ltm Cart System Component Identification
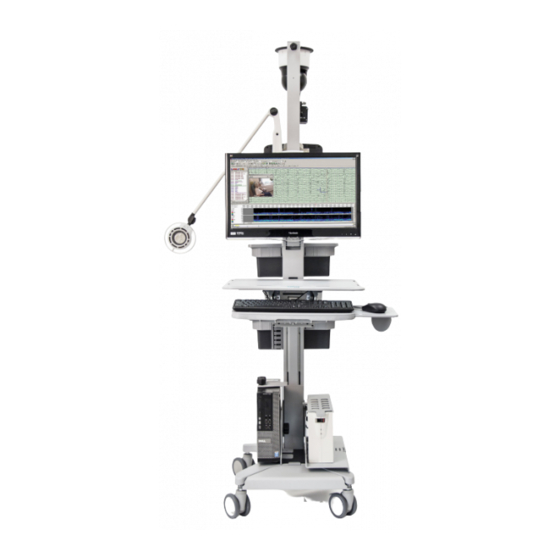
Natus ErgoJust LTM and ErgoJust ICU Cart Information For Use Basic Natus ErgoJust LTM cart system component identification Legend Description Monitor Work surface Keyboard Computer Video Extension power supply Natus Photic Stimulator power supply (option) Wheel lock (4) Natus Photic Stimulator (option) -
Page 23: Basic Natus Ergojust Icu Cart System Component Identification
Information Basic Natus ErgoJust ICU cart system component identification Legend Description PTZ or HD PTZ Video Camera IR Light and Microphone Monitor Keyboard Power Supply for PTZ or HD PTZ Video Camera, IR Light and Microphone, or Fixed-Zoom Video Camera... -
Page 24: Adjusting The Natus Ergojust Ltm And Ergojust Icu Cart Components
Adjusting the Natus ErgoJust LTM and ErgoJust ICU cart components The Natus ErgoJust LTM cart work surface, keyboard and monitor may be adjusted to use in sitting or standing positions. Adjust the height of these components to a comfortable position to minimize strain on the arms, wrists, neck and eyes. -
Page 25: Adjusting The Work Surface Height
(Natus maximum position (Figure 3). ErgoJust LTM cart Place your hands on top of the keyboard tray and push slowly downward to retract the tray. only) Figure 3: Extending the Natus ErgoJust LTM cart keyboard tray. July 6, 2020... -
Page 26: Tilting The Keyboard Tray (Natus Ergojust Ltm Cart Only)
Natus ErgoJust LTM and ErgoJust ICU Cart Information For Use Tilting the keyboard Extend the Natus ErgoJust LTM cart keyboard tray (Figures 4a and 4b). tray (Natus ErgoJust 2. Place your hands below the keyboard tray and lift slowly upward to tilt the tray upwards LTM cart only) (Figure 4c). -
Page 27: Extending The Mouse Holder Tray (Natus Ergojust Ltm Cart Only)
Information Extending the mouse You can extend the mouse holder tray to use the mouse on the tray for the Natus ErgoJust LTM holder tray (Natus cart. ErgoJust LTM cart NOTE: Store the mouse in the mouse holder when not in use or transporting the cart... -
Page 28: Raising/Lowering The Monitor Or All-In-One Computer
Natus ErgoJust LTM and ErgoJust ICU Cart Information For Use Raising/lowering the The Natus ErgoJust LTM cart uses a small-form factor desktop computer and a monitor. The Natus monitor or All-in-One ErgoJust ICU cart features a touchscreen All-in-One (AiO) computer. The AiO computer is mounted on the mast to monitor mount. -
Page 29: Rotating And Tilting The Monitor Or All-In-One Computer
Information Rotating and tilting the The monitor can be rotated 90 counterclockwise only for portrait or landscape viewing (Figure monitor or All-in-One computer NOTE: Ensure all cables connected to the All-in-One computer have freedom of motion before rotating it. The monitor can be tilted 20 to help reduce glare and accommodate viewing while in the sitting or standing position (Figure 2). -
Page 30: Transporting The Natus Ergojust Ltm And Ergojust Icu Cart
Transporting the Natus ErgoJust LTM cart. Transporting the Natus ErgoJust ICU cart. Figure 1: Transporting the Natus ErgoJust LTM or ErgoJust ICU cart. Raise the locking levers on all four caster wheels to transport the cart. 2. Push the display monitor down to it’s lowest position. -
Page 31: Natus Ergojust Ltm And Ergojust Icu Cart Installation
Chapter 3 Natus ErgoJust LTM and ErgoJust ICU Cart Installation This chapter shows how to mount and cable the components on the Natus ErgoJust ICU cart. Review the contents of this chapter before starting any of the procedures. IMPORTANT: All Natus ErgoJust ICU cart systems must be installed or upgraded by a qualified and trained Natus technician or representative. -
Page 32: Mounting The Keyboard - Natus Ergojust Ltm
2. Set the keyboard on the keyboard tray and secure it in place with the provided Velcro strips. Figure 1: Mounting the keyboard. NOTE: The Natus ErgoJust LTM cart is equipped with a height limiter on the mast below the Keyboard tray (Figure 2). This height limiter is designed to guard against the Keyboard tray from coming in contact with the equipment installed on the cart base (providing at least 1 inch clearance). -
Page 33: Mounting The Keyboard - Natus Ergojust Icu
Velcro tape pads. Figure 1: Keyboard location. NOTE: The Natus ErgoJust LTM cart is equipped with a height limiter on the mast below the Keyboard tray (Figure 2). This height limiter is designed to guard against the Keyboard tray from coming in contact with the equipment installed on the cart base (providing at least 1 inch clearance). -
Page 34: Removing The Video Pole - Ergojust Ltm And Ergojust Icu
Natus ErgoJust LTM and ErgoJust ICU Cart Instructions For Use Removing the video pole - ErgoJust LTM and ErgoJust ICU The video pole may on occasion need to be removed during transportation to fit the cart through an unusually small entryway, access cables inside the video pole, or replace the video pole. - Page 35 Natus ErgoJust and ErgoJust ICU Cart System 2. Unplug the Video Unplug the video camera cable (Figure 1). camera and IR Light Unplug the video camera and IR light power cables. Natus power cables - ErgoJust LTM and ErgoJust ICU...
-
Page 36: Removing The Video Pole Mounted With The Fixed-Zoom Video Camera - Natus Ergojust Icu
Natus ErgoJust LTM and ErgoJust ICU Cart Instructions For Use 3. Removing the video 3. Cut and remove the tie wraps shown below (Figure 1). pole mounted with the Fixed-zoom video camera - Natus ErgoJust ICU Legend Description To PC... - Page 37 Natus ErgoJust and ErgoJust ICU Cart System 4. Unplug the video camera cable (Figure 2). Unplug the video camera and camera control cables. Legend Description To Video Camera To Power Supply Unplug the Video Cable Unplug the Video Camera control cable Figure 2: Unplug the video camera signal cable and the video camera control and power cables.
- Page 38 Natus ErgoJust LTM and ErgoJust ICU Cart Instructions For Use 6. Unplug the Video camera power supply from the ISO/UPS (Figure 3). 7. Carefully remove the Video camera power supply cable from the channel. Legend Description Cable channel Remove cable from cable channel...
- Page 39 Natus ErgoJust and ErgoJust ICU Cart System 4. Remove the video IMPORTANT: Do NOT remove the mounting screws during the following step. If the Natus ErgoJust pole - mounting screws are removed, the mounting plate(s) will slide down. Ensure the plates are...
-
Page 40: Mounting The Cart Video Pole - Natus Ergojust Ltm And Ergojust Icu
Natus ErgoJust LTM and ErgoJust ICU Cart Instructions For Use Mounting the cart video pole - Natus ErgoJust LTM and ErgoJust ICU It is recommended to use an assistant when mounting the video pole to avoid injury or damage to the equipment. -
Page 41: Mount The Video Pole
Natus ErgoJust and ErgoJust ICU Cart System Feed two screws through the Video Pole mounting holes and thread them into the bracket until the ends of both screws are flush with the back side of the bracket (Figure 2). Legend... - Page 42 Natus ErgoJust LTM and ErgoJust ICU Cart Instructions For Use 4. With an assistant, carefully lower the Video Pole onto the bottom mast, ensuring that both brackets slide inside the two slots (Figure 4). Bracket positioned correctly inside the slots.
- Page 43 Natus ErgoJust and ErgoJust ICU Cart System NOTE: Confirm that the Video Pole is seated properly on the lower mast (Figure 5). If it is not seated correctly, the brackets did not slide into the two slots. Remove the Video Pole and repeat step 4 above.
-
Page 44: Mounting The Computer - Natus Ergojust Ltm Cart
Natus ErgoJust LTM and ErgoJust ICU Cart Instructions For Use Mounting the computer - Natus ErgoJust LTM Cart Loosen the six securing knobs (Figure 1). NOTE:There are two securing knobs on the other side of the computer cage, which are not shown in Figure 1. -
Page 45: Mounting The Iso Or Ups - Natus Ergojust Ltm And Ergojust Icu
Natus ErgoJust and ErgoJust ICU Cart System ErgoJust LTM and ErgoJust ICU Mounting the ISO or UPS - Natus Carefully set the ISO or UPS and cage on the cart base and slide the ISO or UPS into the cage (Figure 1). - Page 46 Natus ErgoJust LTM and ErgoJust ICU Cart Instructions For Use 3. Lower the ISO or UPS and cage such that Tab A inserts into Slot 7 (Figure 3). Legend Description Tab A Slot 7 Figure 3. 4. Inspect the power cables from the ISO or UPS and ensure none of the cables are pinched between the cage and cart.
- Page 47 Natus ErgoJust and ErgoJust ICU Cart System Feed the Natus Photic Stimulator power cable between the ISO or UPS cage and cart post (Figure 5). Legend Description Photic Stimulator power supply Video extension power supply Secure power supplies with Velcro strips Figure 5.
- Page 48 Natus ErgoJust LTM and ErgoJust ICU Cart Instructions For Use 8. Slide the cage rear cover into the ISO or UPS main cage (Figure 7). Natus ErgoJust ICU Cart Natus ErgoJust LTM Cart Figure 7: Slide ISO or UPS cage rear cover into place.
-
Page 49: Mounting The Natus Photic Stimulator (Option) - Natus Ergojust Ltm Cart
Natus ErgoJust and ErgoJust ICU Cart System Mounting the Natus Photic Stimulator (option) - Natus ErgoJust LTM Cart Insert the optional Natus Photic Stimulator mounting post into the accessory bar (Figure 1). It may be located on either side of the main post. -
Page 50: Mounting The Amplifier Base Unit - Natus Ergojust Ltm & Ergojust Icu
Natus ErgoJust LTM and ErgoJust ICU Cart Instructions For Use Mounting the amplifier base unit - Natus ErgoJust LTM & ErgoJust ICU NOTE: Ensure the base unit has a Headbox Side Quick Disconnect Bracket attached. Insert the four mounting pins on the rear of the Amplifier Base Unit into the four mounting holes on the video pole side quick disconnect bracket (Figure 1) and slide the Amplifier Base Unit downward until the locking pin snaps into the quick disconnect bracket locking hole. -
Page 51: Mounting The Ir Light And Microphone For Ptz And Hd Ptz Cameras - Natus Ergojust Icu
Natus ErgoJust and ErgoJust ICU Cart System Mounting the IR light and microphone for PTZ and HD PTZ Cameras - Natus ErgoJust Unscrew the cable channel mounting knob (Figure 1) and set the cable channel cover aside. Figure 1: Removing the cable channel cover. -
Page 52: Mounting The Video Camera - Natus Ergojust Icu
Install and tighten the four Video Camera mounting screws (Figure 1). Figure 1: Mounting the Video Camera. Mounting the PTZ or HD PTZ camera option - Natus ErgoJust ICU This procedure describes how to mount the PTZ and HD PTZ video camera and IR light with the microphone (Figure 1). -
Page 53: Mount The Video Camera
Natus ErgoJust and ErgoJust ICU Cart System 1. Mount the video camera With an assistant, hold on to the video camera during the next step to guard against dropping the camera. Install and tighten the four video camera mounting screws (Figure 1). -
Page 54: Mounting The Fixed-Zoom Video Camera Option - Natus Ergojust Icu
Natus ErgoJust LTM and ErgoJust ICU Cart Instructions For Use Mounting the Fixed-zoom video camera option - Natus ErgoJust ICU This procedure describes how to mount the Fixed-zoom video camera, IR light and microphone on the Natus ErgoJust ICU cart (Figure 1). -
Page 55: Mount The Fixed-Zoom Video Camera
Natus ErgoJust and ErgoJust ICU Cart System 1. Mount the Fixed- Attach the video camera mount to the video camera (Figure 2). zoom video camera With an assistant, hold on to the video camera during the next step to guard against dropping the camera. -
Page 56: Mount The Ir Light To The Video Camera
Natus ErgoJust LTM and ErgoJust ICU Cart Instructions For Use 2. Mount the IR light to Mount the IR light to the video camera (Figure 3). the video camera Legend Description Camera IR Light bracket IR Light Screw Figure 3. Mounting the IR light. - Page 57 Natus ErgoJust and ErgoJust ICU Cart System Mount the microphone bracket to the video pole using the bolt, washer and nut provided (Figure 5). 3. Secure the microphone to the microphone bracket using the two nuts provided. Legend Description Washer and nut...
-
Page 58: Mounting The Display Monitor / All-In-One Computer - Natus Ergojust Ltm And Ergojust Icu
Natus ErgoJust LTM and ErgoJust ICU Cart Instructions For Use Mounting the display monitor / All-in-One computer - Natus ErgoJust LTM and ErgoJust ICU The following procedure applies to both the Natus ErgoJust LTM display monitor and the Natus ErgoJust ICU All-in-One computer. - Page 59 Natus ErgoJust and ErgoJust ICU Cart System 2. Press in on the left side of the basket or, using a flat blade screwdriver, carefully pry the side of the basket away from the handle (Figure 2) until the basket mounting tab is free from the side mounting hole.
-
Page 60: Replacing The Basket/Handle - Natus Ergojust Ltm And Ergojust Icu
Natus ErgoJust LTM and ErgoJust ICU Cart Instructions For Use Replacing the basket/handle - Natus ErgoJust LTM and ErgoJust ICU This procedure replaces a damaged basket and/or handle. It is recommended using an assistant to avoid injury or damage to the equipment when removing the video pole. -
Page 61: Replacing A Damaged Handle
Natus ErgoJust and ErgoJust ICU Cart System 3. Replacing a NOTE: If the handle requires replacement, continue with Replacing a damaged handle on this damaged handle page. If the handle is not damaged, go to Installing the new basket on the next page. -
Page 62: Install The New Basket
Natus ErgoJust LTM and ErgoJust ICU Cart Instructions For Use 3. Insert each of the mounting screws through the handle and thread the screws into the mounting brackets until the ends of the screws are flush with the back side of the brackets (Figure 3). - Page 63 Natus ErgoJust and ErgoJust ICU Cart System Press in on the left side of the basket or carefully pry the left side of the basket while pushing up on the bottom of the basket until the mounting tab slides into the mounting hole (Figure 5).
-
Page 64: Reinstalling The Video Pole Mounting Brackets - Natus Ergojust Ltm And Ergojust Icu
Natus ErgoJust LTM and ErgoJust ICU Cart Instructions For Use Reinstalling the video pole mounting brackets - Natus ErgoJust LTM and ErgoJust ICU It is recommended to use an assistant when mounting the video pole to avoid injury or damage to the equipment. - Page 65 Natus ErgoJust and ErgoJust ICU Cart System Repeat steps 8 through 10 for the second bracket. IMPORTANT: Press all four screws inwards until they are tight against the Video Pole (Figure 3) when performing the next step. This is necessary to position both brackets properly in order to slide the brackets into both grooves on the bottom mast.
- Page 66 Natus ErgoJust LTM and ErgoJust ICU Cart Instructions For Use 6. Tighten all four screws until they are firm against the Video Pole (Figure 5). Figure 5: Tighten all four video pole mounting screws. 7. Wiggle the Video Pole. There should not be any movement. If the Video Pole moves, the brackets did not slide inside the two slots.
-
Page 67: Removing The Cable Channel Cover - Natus Ergojust Ltm And Ergojust Icu
Natus ErgoJust and ErgoJust ICU Cart System Removing the cable channel cover - Natus ErgoJust LTM and ErgoJust ICU The Video Camera, IR Light and Microphone cables feed through the video pole, which may require removing the cable channel cover to access the cables. - Page 68 Natus ErgoJust LTM and ErgoJust ICU Cart Instructions For Use Blank Page 3-38 July 6, 2020...
-
Page 69: Cabling Instructions
Chapter 4 Cabling Instructions Signal and control cables connections - Natus ErgoJust LTM See the cable routing diagram on the next page. Legend Description Legend Description Monitor Swivel arm Video camera Natus Photic Stimulator control panel Microphone Natus Amplifier Base Unit (right side) -
Page 70: Signal And Control Cables Routings - Natus Ergojust Ltm
Natus ErgoJust LTM and ErgoJust ICU Cart Instructions For Use Signal and control cables routings - Natus ErgoJust LTM Legend Description Legend Description Video camera Monitor IR Light and Microphone Keyboard Amplifier Base Unit (right side) Mouse Video pole Two tie wraps... -
Page 71: System Power Cables Connections - Natus Ergojust Ltm
Cabling Instructions System power cables connections - Natus ErgoJust LTM Ensure that the ISO or UPS is disconnected (unplugged) from the MAINS power source before connecting power cables to the system components. NOTE: ISO is shown in the example below. -
Page 72: System Power Cables Routings - Natus Ergojust Ltm
Natus ErgoJust LTM and ErgoJust ICU Cart Instructions For Use System power cables routings - Natus ErgoJust LTM Legend Description Legend Description Natus Photic Stimulator (option) MAINS Video Camera Computer IR Light and Microphone IR Light and Microphone power supply... -
Page 73: Ptz And Hd Ptz Video Option Signal And Control Cables Connections - Natus Ergojust Icu
Cabling Instructions PTZ and HD PTZ video option signal and control cables connections - Natus ErgoJust ICU See the PTZ and HD PTZ video option signal and control cable routing diagram on the next page. Legend Description Legend Description PTZ / HD PTZ Video Camera... -
Page 74: Ptz And Hd Ptz Option Signal And Control Cables Routings - Natus Ergojust Icu
Natus ErgoJust LTM and ErgoJust ICU Cart Instructions For Use PTZ and HD PTZ option signal and control cables routings - Natus ErgoJust ICU Legend Description Legend Description PTZ / HD PTZ Video Camera Cable channel IR Light and Microphone... -
Page 75: Ptz And Hd Ptz Video Option Power Cables Connections - Natus Ergojust Icu
Cabling Instructions PTZ and HD PTZ video option power cables connections - Natus ErgoJust ICU Ensure that the ISO or UPS is disconnected (unplugged) from the MAINS power source before connecting power cables to the system components. See the PTZ and HD PTZ video option power cable routing diagram on the next page. -
Page 76: Ptz And Hd Ptz Video Option Power Cables Routings - Natus Ergojust Icu
Natus ErgoJust LTM and ErgoJust ICU Cart Instructions For Use PTZ and HD PTZ video option power cables routings - Natus ErgoJust ICU Legend Description Legend Description PTZ / HD PTZ Video Camera Cable bundle IR Light and Microphone All-in-One computer... -
Page 77: Fixed-Zoom Video Option Signal And Control Cables Connections - Natus Ergojust Icu
Cabling Instructions Fixed-zoom video option signal and control cables connections - Natus ErgoJust ICU See the Fixed-zoom video option cable routing diagram on the next page. Legend Description Legend Description Microphone Keyboard Do not connect power to these two inputs... -
Page 78: Fixed-Zoom Video Option Signal And Control Cables Routings - Natus Ergojust Icu
Natus ErgoJust LTM and ErgoJust ICU Cart Instructions For Use Fixed-zoom video option signal and control cables routings - Natus ErgoJust ICU Legend Description Legend Description Fixed-zoom Video Camera Keyboard IR Light Cable bundle Microphone All-in-One Computer Natus Amplifier Base Unit... -
Page 79: Secure The Cables With Tie Wraps - Natus Ergojust Icu
Cabling Instructions Secure the cables with Attach tie wraps to the Natus ErgoJust ICU cart cables as shown below after cabling the tie wraps - Natus system components (Figure 1). ErgoJust ICU Legend Description Legend Description To PC Cable bundle... -
Page 80: Fixed-Zoom Video Option Power Cables Connections - Natus Ergojust Icu
Natus ErgoJust LTM and ErgoJust ICU Cart Instructions For Use Fixed-zoom video option power cables connections - Natus ErgoJust ICU Ensure that the ISO or UPS is disconnected (unplugged) from the MAINS power source before connecting power cables to the system components. -
Page 81: Fixed-Zoom Video Option Power Cables Routings - Natus Ergojust Icu
Cabling Instructions Fixed-zoom video option power cables routings - Natus ErgoJust ICU Legend Description Legend Description Fixed-zoom Video Camera Cable channel IR Light Cable bundle Microphone All-in-One Computer Natus Amplifier Base Unit Video pole MAINS Connectors and device styles may vary from those shown. - Page 82 Natus ErgoJust LTM and ErgoJust ICU Cart Instructions For Use Blank page. 4-14 July 6, 2020...
- Page 83 Compatible Natus ErgoJust cart and Natus ErgoJust ICU cart Cameras - Natus ErgoJust ICU 3-21 accessories 1-11 Mounting the ISO or UPS - Natus ErgoJust LTM and ErgoJust Convention description 3-15 Copyright and trademarks Mounting the Natus Photic Stimulator (option) - Natus...
- Page 84 Natus ErgoJust LTM and ErgoJust ICU Cart Instructions For Use Symbol/convention description Symbols Technical support Trademarks Transporting the Natus ErgoJust LTM and ErgoJust ICU cart 2-10 Using this manual Voltage requirements 1-10 Computer requirements 1-10 ISO or UPS requirements 1-10...
- Page 85 A Total Service Solution Standing behind every XLTEK product is Natus Medical Incorporated, an internationally respected innovator of medical products and services. Our Neurology systems are backed up by an in-house support team staffed with technical and clinical experts, 24/7 support, remote support via WebEx or VPN, the largest clinical and technical field support network in Neuro/Sleep and customized service con- tracts that include preventative maintenance visits and computer upgrades.