Advertisement
Quick Links
1M23N12746
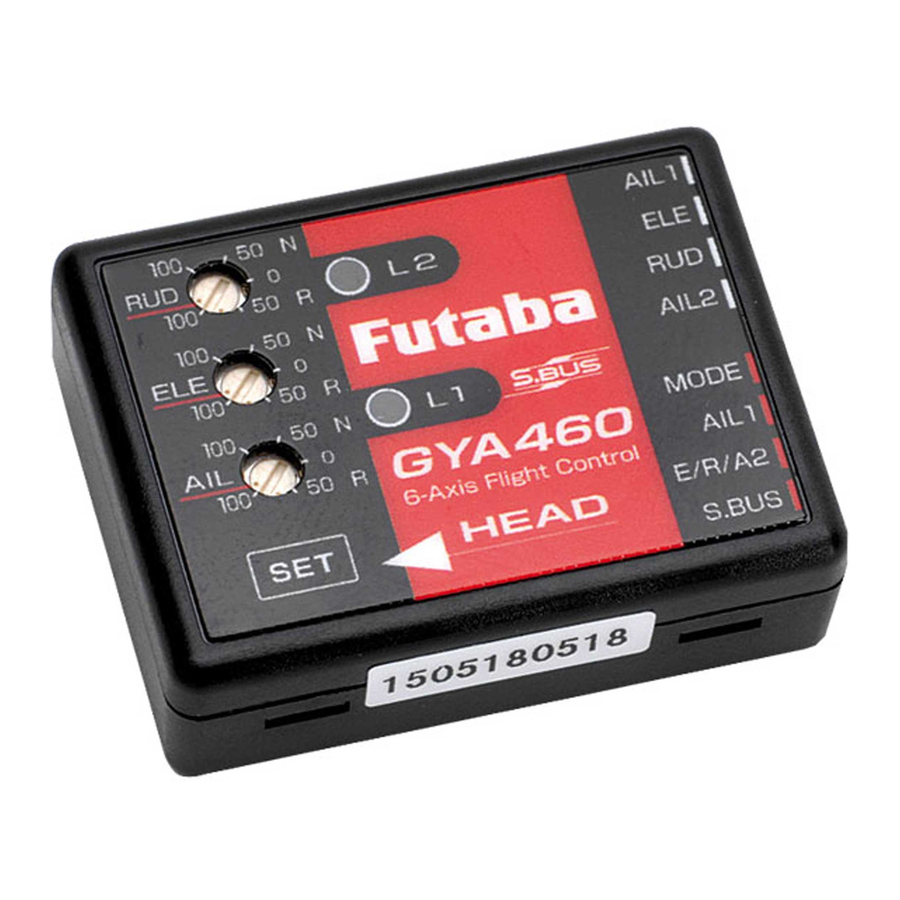
6-Axis Flight Control
Quick Reference
CONVENTIONAL CONNECTION
3-Signal
Cord
W
1 2 4 5 6
Normal
Receiver
・GYA460 : MODE ⇔ Extension Cord ⇔ RECEIVER : CH5
・GYA460 : AIL1 ⇔ Extension Cord ⇔ RECEIVER : CH1(AIL)
・GYA460 : E/R/A2 ⇔ 3-Signal Cord ⇔
White : ELE Red : RUD Black : AIL2
Match the nose direction mark and
the chassis nose direction
Firmly stick with the double side
tape supplied. Mount at a level
place near the center of gravity of
the fuselage where there is little
vibration.
*Depending on the airframe material such
as balsa, etc., the adhesive strength of the
double sided tape may drop. In this case,
use increasing the adhesive strength by
processing the mounting surface.
Thank you for purchasing a
CONNECTION
Aileron
Elevator
R
B
Rudder
Aileron2
Not connected in
case of 1AIL.
MOUNTING to the AIRPLANE
THREE MODES
・This mode is suitable for level flight training of
Beginner-MODE
beginners.
<Blue>
・The fuselage flight attitude angle is limited to
approximately ± 80° .
・When the transmitter sticks (except the throt-
tle) are set to neutral, automatic horizontal
level control returns the airplane to the level
state.
GYRO-OFF
・In this mode, the plane is not controlled by gyro
sensor.
<Yellow>
・This mode is suitable for inverted flight and
GYRO-MODE
acrobatics.
<Red>
・The plane is controlled by gyro sensor only.
・Fuselage attitude angle limit and automatic
horizontal level control are turned off.
S.BUS CONNECTION
Extension
Cord
S.BUS Port
S.BUS
Receiver
・GYA460 : S.BUS ⇔ Extension Cord ⇔ RECEIVER : S.BUS
Transmitter function
1CH:AIL1 2CH:ELE 3CH:THR
4CH:RUD 5CH:GEAR 6CH:AIL2
Ravel of GYA460
loads into the top.
Aileron
Elevator
Rudder
S.BUS channel
setting of each servo
is unnecessary.
Aileron2
The GYA460 can even
be used with servos
other than S.BUS.
So not tilted horizontally
relative to the fuselage
*When mounting the to the side of the
airframe or when the label plate is at the
bottom, perform the mounting direction
setting described on pages 19 and 20 of
the instruction manual.
Advertisement

Related Manuals for FUTABA GYA460


Summary of Contents for FUTABA GYA460
- Page 1 W B Rudder Rudder S.BUS channel 1 2 4 5 6 S.BUS Port setting of each servo is unnecessary. S.BUS Aileron2 Receiver Aileron2 Normal Not connected in Receiver The GYA460 can even case of 1AIL. be used with servos other than S.BUS. ・GYA460 : MODE ⇔ Extension Cord ⇔ RECEIVER : CH5 ・GYA460 : S.BUS ⇔ Extension Cord ⇔ RECEIVER : S.BUS ・GYA460 : AIL1 ⇔ Extension Cord ⇔ RECEIVER : CH1(AIL) Transmitter function 1CH:AIL1 2CH:ELE 3CH:THR ・GYA460 : E/R/A2 ⇔ 3-Signal Cord ⇔ 4CH:RUD 5CH:GEAR 6CH:AIL2 White : ELE Red : RUD Black : AIL2 MOUNTING to the AIRPLANE Match the nose direction mark and the chassis nose direction So not tilted horizontally Firmly stick with the double side ...
- Page 2 p e r f o r m e d ① Turn on the power in the GYRO OFF -MODE or GYRO- b y t u r n i n g t h e MODE. High Gain trimmers to the left Normal ② Fly the plane in the GYRO OFF-MODE or GYRO-MODE or right. and adjust the trimmers. ③ Land the plane and turn off the gyro power. Reverse ④ Turn on the gyro power again in the GYRO OFF-MODE Gain High or GYRO-MODE. This memorizes the trim position at the gyro. ©FUTABA CORPORATION 2015, 6 (1)