Kenwood TM-D710 Quick Manual
Knox county radios
Hide thumbs
Also See for TM-D710:
- Instruction manual (51 pages) ,
- Overview manual (14 pages) ,
- Setup manual (6 pages)
Advertisement
Quick Links
Quick Guide for TM-D710
Knox County Radios
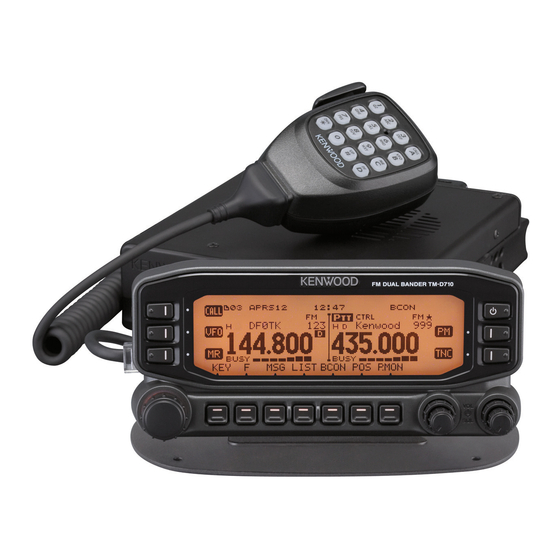
D710 Panel Showing the Default Configuration
General
The two sides of the display are termed Band A (left) and Band B (right). These have
nothing to do with the frequency bands. The D710 is set up so that packet (SARTrack
and RMS Express) work with Band A. Voice as well as data signals from the SignaLink
use Band B. This provides the ability to quickly move from voice to digital data (e.g.
NBEMS) without having to make any adjustments. If packet is not being used, Band A
can also be used for voice but not for data. The radio can listen on both bands
simultaneously but can only transmit on one band at a time.
The SignaLink cable connects to the data port at the back of the RF deck. This is the
mini-DIN socket beside the power leads. There is another mini-DIN socket beside this
one. This is only for programming the radio. The serial cable (PG-5G) for packet
connects to the rear-left of the radio's control head.
The standard APRS frequency is 144.390. The 1200 baud Maine packet frequency is
145.010. The 1200 baud Knox County packet frequency is 433.100.
Pressing the round knob at the lower right of the control head sets the active voice
channel. This places the PTT on Band B. This is the default position.
Pressing the TNC button activates the internal TNC. This is to the right of the screen.
Repeated pressing will cycle through several other modes. If no mode display appears in
the window, the TNC is disabled and Band A may be used for voice.
The following sections describe the most commonly used adjustments. When ever the
radio is programmed to settings other than the default shown in the figure, the radio must
be returned to the default settings prior to shut down.
Advertisement

Related Manuals for Kenwood TM-D710


Summary of Contents for Kenwood TM-D710
- Page 1 Quick Guide for TM-D710 Knox County Radios D710 Panel Showing the Default Configuration General The two sides of the display are termed Band A (left) and Band B (right). These have nothing to do with the frequency bands. The D710 is set up so that packet (SARTrack and RMS Express) work with Band A.
- Page 2 Change Frequency Band Press [F] [Band Sel]. Each cycle will make one step through the series of bands. Select Tone Frequency Turn on Tone function by pressing TONE. Each press will step through the tone modes. Press [F] [TONE]. Rotate Tuning control to select correct tone frequency. Press any control other than [F] or [ESC] to set the frequency To escape the selection function press [F] [ESC] Store in Memory...
- Page 3 Change the baud rate to match the GPS Set the input to “GPS” Set the Output to “Waypoint.” Waypoint Format Menu #603 Set format to “Kenwood.” Change NAME to “9-CHAR” The Output setting should be set to “ALL” Beacon Information Menu #606 (Mobile)
- Page 4 Cross Band Repeater Operation Enter Menu mode and access Menu 403 (RPT.MOD). Set the mode to CROSS BAND Turn the power Off Press [TONE] + Power ON. PTT and LOCK (key symbol) blink in the display. To return to normal operation, turn power Off then press [TONE] + Power ON.