HP A5120 EI Series Installation Manual
Hide thumbs
Also See for A5120 EI Series:
- Command reference manual (225 pages) ,
- Configuration manual (197 pages) ,
- Command reference manual (82 pages)
Table of Contents
Advertisement
Quick Links
Advertisement
Table of Contents

Related Manuals for HP A5120 EI Series


Summary of Contents for HP A5120 EI Series
- Page 1 HP A5120 EI & A5120 SI Switch Series Installation Guide Abstract This document guides you through installation of HP A Series products, including installing the device, connecting to the network, hardware management, and troubleshooting. Part number: 5998-1773 Document version: 6W100-20110730...
- Page 2 The only warranties for HP products and services are set forth in the express warranty statements accompanying such products and services. Nothing herein should be construed as constituting an...
-
Page 3: Table Of Contents
Contents Preparing for installation ················································································································································· 1 Safety recommendations ·················································································································································· 2 Installation site requirements ··································································································································· 2 Rack-mounting requirements···································································································································· 3 Installation tools ································································································································································· 3 Installing the switch ·························································································································································· 4 Rack-mounting the A5120 EI switch in a 19-inch rack ································································································· 5 Mounting brackets ···················································································································································· 5 Rack-mounting using only front mounting brackets ·······························································································... - Page 4 Power supply failure ······················································································································································ 46 Fan failure (A5120 EI switches only) ··························································································································· 48 Console terminal problems ··········································································································································· 48 Support and other resources ········································································································································ 49 Contacting HP ································································································································································ 49 Subscription service ·············································································································································· 49 Related information ························································································································································ 49 Documents ······························································································································································ 49 Websites ································································································································································ 49 Conventions ····································································································································································...
- Page 5 SFP port ·································································································································································· 71 Combo interface (only available on the A5120 EI switches) ··········································································· 72 LEDs (for the A5120 EI switches) ································································································································· 72 System status LED ·················································································································································· 72 RPS status LED ························································································································································ 73 Port mode LED························································································································································ 73 Seven-segment LED ················································································································································ 74 10/100/1000 Base-T Ethernet port LED ···········································································································...
-
Page 6: Preparing For Installation
Preparing for installation The HP A5120 EI Switch Series includes the models in Table 1, and the HP A5120 SI Switch Series includes the models in Table Table 1 Models in the HP A5120 EI Switch Series Product Type HP description... -
Page 7: Safety Recommendations
Safety recommendations WARNING! Compliance and Safety Gui Read all of the safety instructions in the de supplied with your device before installation and operation. This section provides general recommendations. For more information, see the Compliance and Safety Guide. Turn off all power and remove all power cables before opening the chassis. ... -
Page 8: Rack-Mounting Requirements
Before rack-mounting a switch, make sure the rack meets the following requirements: HP recommends that you mount a switch in an open rack. If you mount a switch in a closed rack, make sure there is a good heat dissipation system. -
Page 9: Installing The Switch
CAUTION: Keep the tamper-proof seal on a mounting screw on the chassis cover intact, and if you want to open the chassis, contact your HP Support for permission. Otherwise, HP shall not be liable for any consequence caused thereby. Figure 1 Hardware installation flow... -
Page 10: Rack-Mounting The A5120 Ei Switch In A 19-Inch Rack
Rack-mounting the A5120 EI switch in a 19-inch rack CAUTION: Switches with 420 mm (16.54 in) depth require either a rack shelf or rear mounting brackets. Front mounting brackets alone cannot support the weight of these switches. Table 6 shows installation methods for mounting switches of different depths in a 19-inch standard rack. The mounting position depends on the depth of the rack. - Page 11 Mounting bracket views Figure 2 Front mounting bracket (1) Hole for attaching to a rack (by using an M6 screw) (2) Hole for attaching to the switch chassis Figure 3 Rear mounting bracket (1) Hole for attaching to a rack (by using an M6 screw) Mounting brackets shipped with different switch models Table 7 shows the mounting brackets included with different switch models.
-
Page 12: Rack-Mounting Using Only Front Mounting Brackets
Chassis Front mounting brackets Rear mounting brackets A5120-24G-PoE+ EI (2 slots) A5120-24G-PoE+ EI TAA (2 slots) One pair One pair A5120-48G-PoE+ EI (2 slots) A5120-48G-PoE+ EI TAA (2 slots) Rack-mounting using only front mounting brackets Use this installation method only for A5120-24G EI (2 slots), A5120-24G EI TAA (2 slots), A5120-48G EI (2 slots), A5120-48G EI TAA (2 slots), A5120-24G EI, and A5120-48G EI switches. -
Page 13: Rack-Mounting Using Front Mounting Brackets And A Rack Shelf
Figure 5 Attach the front mounting brackets to the rack (1) Front square-holed post (2) Front panel (3) Screw for fastening the bracket to the square-holed post (4) Front mounting bracket Rack-mounting using front mounting brackets and a rack shelf This installation method can be used for all A5120 EI switches. - Page 14 This task requires two people. To install the switch in a 19-inch rack by using the front and rear mounting brackets: Wear an ESD-preventive wrist strap and make sure it makes good skin contact and is properly grounded. Unpack the front mounting brackets and the screws for fastening the brackets to the switch chassis. Fasten the front mounting brackets to chassis by aligning the round holes in the brackets with the holes in the front mounting position of the switch chassis, and fastening them with the removed screws, as shown in...
- Page 15 Figure 7 Attach the rear mounting brackets to a rack (1) Rear square-holed post (2) Rear mounting bracket...
- Page 16 One person lifts the chassis, supporting it with one hand underneath and the other hand holding the front. Gently push the chassis into the rack so that the load-bearing screws fit snugly over the upper edges of the rear mounting brackets. Verify that the load-bearing screws fit snugly over the upper edges of the rear mounting brackets, as shown in Figure...
- Page 17 Figure 9 Attach the front brackets to the rack (1) Load-bearing screw (2) Rear mounting bracket (3) Front panel (4) A screw used to fasten the front mounting bracket to the rack (5) Front mounting bracket (6) Front square-holed post...
-
Page 18: Rack-Mounting The A5120 Si Switch In A 19-Inch Rack
Rack-mounting the A5120 SI switch in a 19-inch rack Figure 10 shows the general procedure for installing an A5120 SI switch in a 19-inch rack. Figure 10 Install an A5120 SI switch in a 19-inch rack Install the mounting Choose proper installation Mount the brackets to the left and positions for mounting brackets... - Page 19 Repeat the preceding steps to attach the other mounting bracket to the chassis. Figure 12 Front mounting position (A5120-16G SI/A5120-24G SI) (1) Front panel Figure 13 Rear mounting position (A5120-16G SI/A5120-24G SI) (1) Front panel Figure 14 Front mounting position (A5120-24G-PoE+ SI/A5120-24G-PPoE+ SI/A5120-48G SI) (1) Front panel Figure 15 Mid-mounting position (A5120-24G-PoE+ SI/A5120-24G-PPoE+ SI) (1) Front panel...
-
Page 20: Rack-Mounting Procedure
Figure 16 Rear mounting position (A5120-24G-PoE+ SI/A5120-24G-PPoE+ SI/A5120-48G SI) (1) Front panel Rack-mounting procedure This task requires two persons. To mount the switch in a rack: Wear an ESD-preventive wrist strap and make sure it makes good skin contact and is properly grounded. - Page 21 Figure 17 Mount the switch in a rack (A5120-16G SI) (1) Front panel (2) Rear panel Figure 18 Mount the switch in a rack (A5120-24G-PoE+ SI/A5120-24G-PPoE+ SI)
-
Page 22: Mounting The Switch On A Workbench
(1) Front panel (2) Rear panel Mounting the switch on a workbench This installation method is available for all A5120 EI and A5120 SI switches. To mount the switch on a workbench: Check that the workbench is sturdy and properly grounded. Place the switch upside-down on the workbench. -
Page 23: Grounding The Switch
Grounding to a buried grounding conductor Grounding through the AC power cord HP recommends grounding the switch to a grounding strip in the equipment room, using the grounding cable provided with the switch, whenever possible. Grounding to a grounding strip If a grounding strip is available at the installation site, connect the grounding cable to the grounding strip. - Page 24 Figure 19 Connecting the grounding cable to the grounding hole of the switch chassis (1) Grounding sign (2) Grounding hole (3) OT terminal (4) Grounding cable (5) Grounding screw Remove the hex nut of a grounding post on the grounding strip. Cut the grounding cable as appropriate for connecting to the grounding strip.
-
Page 25: Grounding To A Buried Grounding Conductor
Figure 21 Connecting the grounding cable to a grounding strip (1) Grounding post (2) Grounding strip (3) Grounding cable (4) Hex nut Grounding to a buried grounding conductor If the installation site has no grounding strips, but earth ground is available, hammer a 0.5 m (1.64 ft) or longer angle iron or steel tube into the earth ground to serve as a grounding conductor, as shown in Figure The dimensions of the angle iron must be at least 50 ×... -
Page 26: Grounding Through The Ac Power Cord
Grounding through the AC power cord If the installation site has no grounding strips or earth ground, you can ground an AC-powered switch through the PE wire of the power cord, as shown in Figure You must make sure: The power cord has a PE terminal. ... -
Page 27: Connecting The Power Cord
Connecting the power cord WARNING! Make sure that the grounding cable has been properly connected before powering on the switch. Table 9 to identify the power cord connection procedures for your switch. Table 9 Power cord connection methods at a glance Chassis Connection procedure A5120-16G SI... -
Page 28: Connecting The Switch To A +12 Vdc Output Rps
Figure 24 Connect the AC power cord to the A5120-48G EI switch Figure 25 Connect the AC power cord to the A5120-24G SI switch Connecting the switch to a +12 VDC output RPS This section applies to the A5120-24G EI (2 slots), A5120-24G EI TAA (2 slots), A5120-48G EI (2 slots), A5120-48G EI TAA (2 slots), A5120-24G EI, and A5120-48G EI switches. -
Page 29: Connecting The Switch To A -52 To -55 Vdc Output Rps
Figure 27 Connect the RPS cable to the +12 VDC RPS receptacle Connecting the switch to a –52 to –55 VDC output RPS This section applies to the A5120-24G-PoE+ EI (2 slots), A5120-24G-PoE+ EI TAA (2 slots), A5120-48G- PoE+ EI (2 slots), A5120-48G-PoE+ EI TAA (2 slots) and A5120-24G-PoE+ SI switches. To connect these switches to the RPS that provides –52 to –55 VDC output: The RPS cable provided with the switch has a directional plug that fits the switch's RPS receptacle. -
Page 30: Installing/Removing An Interface Card (A5120 Ei Switches Only)
Installing/removing an interface card (A5120 EI switches only) IMPORTANT: To set up an A5120 EI IRF fabric, you must install interface cards. To choose a correct slot for an interface card, see “Planning the cabling scheme for an A5120 EI IRF fabric.”... -
Page 31: Removing An Interface Card
Figure 30 Install an interface card (II) Removing an interface card To remove an interface card: Wear an ESD-preventive wrist strap and make sure it makes good skin contact and is properly grounded. Use a Phillips screwdriver to completely loosen the captive screws at both sides of the interface card. -
Page 32: Verifying The Installation
Hold the cable connector and pull the pull latch of the connector to remove the cable from the switch. Verifying the installation Before powering on the switch, verify that: There is enough space around the switch for heat dissipation. The switch is mounted securely on a sturdy workbench or rack. -
Page 33: Accessing The Switch For The First Time
Accessing the switch for the first time Setting up the configuration environment To set up the configuration environment, connect a terminal (such as a PC) to the console port on the switch with a console cable. Figure 31 Connect the console port to a terminal Connecting the console cable Console cable A console cable is an 8-core shielded cable, with a crimped RJ-45 connector at one end for connecting... -
Page 34: Connection Procedure
Connection procedure CAUTION: PC serial ports do not support hot-swapping. If the switch has been powered on, be sure to connect or disconnect the cable as follows: Connecting: First connect the cable to the PC; then connect the cable to the switch. ... - Page 35 Figure 33 Connection description dialog box Select the serial port to be used from the Connect using list (Figure 34), and click OK. Figure 34 Setting the serial port...
- Page 36 In the Properties dialog box (Figure 35), set Bits per second to 9600, Data bits to 8, Parity to None, Stop bits to 1, and Flow control to None, and click OK. Figure 35 Setting the serial port parameters Select File > Properties in the HyperTerminal window (Figure 36).
-
Page 37: Powering On The Switch
On the Settings tab (Figure 37), set the emulation to VT100 and click OK. Figure 37 Setting terminal emulation Powering on the switch Verification before power-on Before powering on the switch, verify that: The power cord is properly connected. ... - Page 38 * HP A5120-24G-PoE+ EI TAA Switch with 2 Interface Slots BOOTROM, Version 205 ******************************************************************************** Copyright (c) 2010-2011 Hewlett-Packard Development Company, L.P. Creation date : Feb 23 2011, 09:36:58 CPU Clock Speed : 264MHz BUS Clock Speed : 33MHz Memory Size...
- Page 39 Restart the switch. NOTE: The system by default has no Boot ROM password. HP recommends that you set a Boot ROM password immediately after you access the Boot menu. If you perform no operation or press any key other than Ctrl + B within one second:...
-
Page 40: Changing The Startup Mode
Press Enter at the prompt, and you can configure the switch when the prompt <HP> appears. Changing the startup mode The system by default starts up in fast mode. To change to the full startup mode: Press Ctrl + B within one second to access the Boot menu:... - Page 41 User interface aux0 is available. Press ENTER to get started. Press Enter at the prompt, and you can configure the switch when the prompt <HP> appears. NOTE: For more information about the configuration commands and CLI, see the configuration guides and...
-
Page 42: Setting Up An Irf Fabric
Setting up an IRF fabric You can use HP Intelligent Resilient Framework (IRF) technology to connect and virtualize A5120 EI switches or A5120 SI switches into a virtual switch called an "IRF fabric" or "IRF virtual device," for flattened network topology and high availability, scalability, and manageability. -
Page 43: Planning Irf Fabric Setup
To set up an IRF fabric: Task Description Plan the installation site and IRF fabric setup parameters: Planning IRF fabric size and the installation site Identifying the master switch and planning IRF member IDs Plan IRF fabric setup ... -
Page 44: Planning Irf Topology And Connections
Prepare an IRF member ID assignment scheme. An IRF fabric uses member IDs to uniquely identify and manage its members, and you must assign each IRF member switch a unique member ID. Planning IRF topology and connections IRF topology You can create an IRF fabric in daisy chain topology, or more reliably, ring topology. -
Page 45: Identifying Physical Irf Ports On The Member Switches
A5120-24G SI IRF fabric daisy chain and ring topology examples are shown in Figure 42. Figure 41 A5120 SI IRF fabric in daisy chain topology IRF-port1 IRF-port1 IRF-port2 IRF-port2 Figure 42 A5120 SI IRF fabric in ring topology IRF-port1 IRF-port2 IRF-port2 IRF-port1 IRF-port1... -
Page 46: Planning The Cabling Scheme
HP recommends that you use Gigabit SFP ports and HP A3600 Switch SFP Stacking Kit cables for IRF connection. A5120 SI switches... - Page 47 Figure 43 Use 2-port interface cards to set up single-link IRF connection MOD2 MOD2 MOD1 MOD1 If 2-port interface cards are used and IRF links are aggregate, follow these guidelines on connecting two neighboring switches: The ports on the interface card MOD 1 on one switch must connect to the ports on the interface ...
- Page 48 MOD1 MOD2 Planning the cabling scheme for an A5120 SI IRF fabric HP recommends that you use Gigabit SFP ports and HP A3600 Switch SFP Stacking Kit cables for IRF connection. Figure 46 shows two IRF connection schemes, and uses Gigabit SFP ports and HP A3600 Switch SFP Stacking Kit cables for IRF connection.
-
Page 49: Configuring Basic Irf Settings
shows the IRF fabric topology. Figure 47 IRF fabric topology Configuring basic IRF settings After installing the IRF member switches, power on the switches and log in to each IRF member switch to configure their member IDs, member priorities, and IRF port bindings. For more information, see the fundamentals configuration guide for your switch. - Page 50 Table 12 Displaying and maintaining IRF configuration and running status To do … Use the command… Display information about the IRF fabric display irf Display all members’ configurations that take display irf configuration effect after switch reboots Display topology information about the IRF display irf topology fabric NOTE:...
-
Page 51: Maintenance And Troubleshooting
Log in through the console port without entering the password, and check the configuration file for the user password. Boot ROM password loss Contact the HP Support for help. Power supply failure The switch's power supplies are as follows: The A5120 EI switches and the A5120 SI switches use fastened power supplies. - Page 52 On the A5120-24G-PoE+ SI switch, look at the power LED and the RPS status LED of the switch. For more information, see "LEDs (for the A5120 SI switches)." On any other A5120 SI switch, look at the power LED of the switch. For more information, see "LEDs ...
-
Page 53: Fan Failure (A5120 Ei Switches Only)
The LED flashes F for fan failure. Seven-segment LED Unit The A5120 EI switches use fans that are not user-replaceable. If a fan failure occurs, contact HP Support for help and do not attempt to fix the problem yourself. Console terminal problems If the console terminal setup is correct, the console terminal displays boot information when the switch is powered on. -
Page 54: Support And Other Resources
Related information Documents To find related documents, browse to the Manuals page of the HP Business Support Center website: http://www.hp.com/support/manuals For related documentation, navigate to the Networking section, and select a networking category. ... -
Page 55: Conventions
Conventions This section describes the conventions used in this documentation set. Command conventions Convention Description Boldface Bold text represents commands and keywords that you enter literally as shown. Italic Italic text represents arguments that you replace with actual values. Square brackets enclose syntax choices (keywords or arguments) that are optional. Braces enclose a set of required syntax choices separated by vertical bars, from which { x | y | ... - Page 56 Network topology icons Represents a generic network device, such as a router, switch, or firewall. Represents a routing-capable device, such as a router or Layer 3 switch. Represents a generic switch, such as a Layer 2 or Layer 3 switch, or a router that supports Layer 2 forwarding and other Layer 2 features.
-
Page 57: Appendix A Technical Specifications
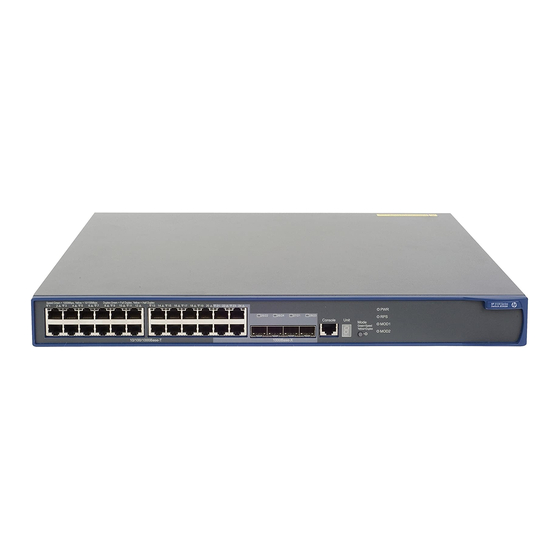
Appendix A Technical specifications Panel views A5120-24G EI (2 slots)/A5120-24G EI TAA (2 slots) The A5120-24G EI (2 slots) and A5120-24G EI TAA (2 slots) switches come with the expansion interface card slots covered by filler panels. Figure 48 Front panel (1) 10/100/1000Base-T auto-sensing Ethernet port (2) 10/100/1000Base-T Ethernet port LED (3) 1000Base-X SFP port... -
Page 58: A5120-48G Ei (2 Slots)/A5120-48G Ei Taa (2 Slots)
A5120-48G EI (2 slots)/A5120-48G EI TAA (2 slots) The A5120-48G EI (2 slots) and A5120-48G EI TAA (2 slots) switches come with the expansion interface card slots covered by filler panels. Figure 50 Front panel (1) 10/100/1000Base-T auto-sensing Ethernet port (2) 10/100/1000Base-T Ethernet port LED (3) Console port (4) Seven-segment LED (Unit) -
Page 59: A5120-24G Ei
A5120-24G EI CAUTION: The A5120-24G EI switch does not support interface cards. To ensure good ventilation, do not remove the interface card slot filler panels. Figure 52 Front panel (1) 10/100/1000Base-T auto-sensing Ethernet (2) 10/100/1000Base-T Ethernet port LED port (3) SFP port (4) SFP port LED (5) Console port (6) Seven-segment LED (Unit) -
Page 60: A5120-48G Ei
A5120-48G EI CAUTION: The A5120-48G EI switch does not support interface cards. To ensure good ventilation, do not remove the interface card slot filler panels. Figure 54 Front panel (1) 10/100/1000Base-T auto-sensing Ethernet (2) 10/100/1000Base-T Ethernet port LED port (3) Console port (4) Seven-segment LED (Unit) (5) Port mode LED (Mode) (6) System status LED (PWR) -
Page 61: A5120-24G-Poe+ Ei (2 Slots)/A5120-24G-Poe+ Ei Taa (2 Slots)
A5120-24G-PoE+ EI (2 slots)/A5120-24G-PoE+ EI TAA (2 slots) The A5120-24G-PoE+ EI (2 slots) and A5120-24G-PoE+ EI TAA (2 slots) switches come with the expansion interface card slots covered by filler panels. Figure 56 Front panel (1) 10/100/1000Base-T auto-sensing Ethernet port (2) 10/100/1000Base-T Ethernet port LED (3) 1000Base-X SFP port (4) 1000Base-X SFP port LED... -
Page 62: A5120-48G-Poe+ Ei (2 Slots)/A5120-48G-Poe+ Ei Taa (2 Slots)
A5120-48G-PoE+ EI (2 slots)/A5120-48G-PoE+ EI TAA (2 slots) The A5120-48G-PoE+ EI (2 slots) and A5120-48G-PoE+ EI TAA (2 slots) switches come with the expansion interface card slots covered by filler panels. Figure 58 Front panel (1) 10/100/1000Base-T auto-sensing Ethernet port (2) 10/100/1000Base-T Ethernet port LED (3) Console port (4) Seven-segment LED (Unit) -
Page 63: A5120-24G Si
(3) Console port (4) Port LED (5) Power LED (Power) Figure 61 Rear panel (1) AC-input power receptacle (2) Grounding screw A5120-24G SI Figure 62 Front panel (1) 10/100/1000Base-T auto-sensing Ethernet port (2) 1000Base-X SFP port (3) Console port (4) Port LED (5) Power LED (Power) Figure 63 Rear panel (1) AC-input power receptacle... -
Page 64: A5120-24G-Ppoe+ Si
(3) Console port (4) Power LED (Power) (5) 1000Base-X SFP port (6) 1000Base-X SFP port LED Figure 65 Rear panel (1) AC-input power receptacle (2) Grounding screw A5120-24G-PPoE+ SI Figure 66 Front panel (1) 10/100/1000Base-T auto-sensing Ethernet port (2) Port LED mode switching button (3) Port LED (4) Power LED (Power) (5) Port mode LED... -
Page 65: A5120-24G-Poe+ Si
A5120-24G-PoE+ SI Figure 68 Front panel (1) 10/100/1000Base-T auto-sensing Ethernet port (2) Port LED mode switching button (3) RPS status LED (RPS) (4) Port LED (5) Power LED (Power) (6) Port mode LED (7) Console port (8) 1000Base-X SFP port Figure 69 Rear panel (1) DC receptacle (2) Screw hole of the plug... -
Page 66: Technical Specifications
Technical specifications Chassis dimensions and weights Dimensions Dimensions Chassis Weight (H × W × D) A5120-24G EI 43.6 × 440 × 300 mm A5120-24G EI (2 slots) < 4.5 kg (9.92 lb) (1.72 × 17.32 × 11.81 in) A5120-24G EI TAA (2 slots) A5120-24G-PoE+ EI (2 slots) 43.6 ×... -
Page 67: Power Specifications
10/100/1000Base-T Console 1000Base-X Interafce Chassis auto-sensing Ethernet ports SFP ports card slots ports A5120-24G-PoE+ SI 24, PoE+ A5120-24G-PPoE+ SI 24, PPoE+ A5120-48G SI NOTE: On an A5120 EI switch, the last four 10/100/1000Base-T Ethernet ports and the four SFP ports are copper/fiber combo ports in pairs, as shown in Table 16. -
Page 68: Power Consumption Specifications For Non-Poe Switches
RPS input rated Chassis Compatible RPS voltage range A5120-24G-PoE+ EI (2 slots) A5120-24G-PoE+ EI TAA (2 slots) –52 VDC to –55 VDC A-RPS1600 (JG136A) A5120-48G-PoE+ EI (2 slots) A5120-48G-PoE+ EI TAA (2 slots) A5120-24G-PoE+ SI –52 VDC to –55 VDC A-RPS1600 (JG136A) Power consumption specifications for non-PoE switches Minimum power... -
Page 69: Cooling System
Maximum PoE Minimum Maximum power Total PoE Chassis power per power consumption (including output port consumption total PoE output) A5120-24G-PPoE+ SI 30 W 170 W 25.0 W 255 W Cooling system All A5120 EI and A5120 SI switches use fixed fans for heat dissipation. The airflow is from left to right. Chassis Fixed fans A5120-24G EI... -
Page 70: Appendix B Frus And Compatibility Matrixes
(A5120 EI switches only) NOTE: To guarantee the functionality of the SFP/SFP+/XFP ports, use only HP transceiver modules. Transceiver modules availability for this switch series changes over time. For the most up-to-date list of transceiver modules, consult your HP sales representative or technical support engineer. -
Page 71: Ge Sfp Transceiver Modules
(µm) distance (nm) (MHz × km) 550 m (1804.46 ft) 50/125 500 m (1640.42 ft) HP X120 1G SFP LC SX JD118B Transceiver 275 m (902.23 ft) 62.5/125 220 m (721.78 ft) 10 km (6.21 9/125 miles) HP X120 1G SFP LC LX... -
Page 72: 10-Ge Sfp+ Transceiver Modules
Transceiver SFP+ cables Product code Cable description Cable length JD095B HP X240 10G SFP+ SFP+ 0.65m DA Cable 0.65 m (2.13 ft) JD096B HP X240 10G SFP+ SFP+ 1.2m DA Cable 1.2 m (3.94 ft) JD097B HP X240 10G SFP+ SFP+ 3m DA Cable 3 m (9.84 ft) -
Page 73: 10-Ge Xfp Transceiver Modules
80 km (49.71 miles) XFP LC ZR Transceiver CX4 cables Product code Cable description Connector type Cable length HP X230 Local Connect 50cm JD363B 4X Infiniband 0.5 m (19.69 in) CX4 Cable HP X230 Local Connect 100cm JD364B 4X Infiniband 1 m (39.37 in) -
Page 74: Sfp Transceiver Modules And Sfp Stacking Kit (Only For The A5120 Si Switches)
The SFP transceiver modules available for this switch series are subject to change over time. For the most up-to- date list of SFP transceiver modules, consult your HP sales representative or technical support engineer. HP A-Series Switches Transceiver Modules User Guide For the SFP transceiver module specifications, see "... - Page 75 HP X125 1G SFP LC 70 km (43.50 JD063B 1550 9/125 LH70 Transceiver miles) TX: 1310nm HP X120 1G SFP LC BX 10 km (6.21 JD098B 9/125 10-U Transceiver miles) RX: 1490nm TX: 1490nm HP X120 1G SFP LC BX 10 km (6.21...
-
Page 76: Appendix C Ports And Leds
Appendix C Ports and LEDs Ports Console port Every A5120 EI or A5120 SI switch provides one console port on the front panel. Table 14 Console port specifications Item Specification Connector type RJ-45 Compliant standard EIA/TIA-232 Transmission baud rate 9600 bps (default) to 115200 bps ... -
Page 77: Combo Interface (Only Available On The A5120 Ei Switches)
16. They form four combo interfaces. When one port in a pair is activated, the other port automatically shuts down. For more information about combo interfaces, see "HP A5120 EI Switch Series Configuration Guides." Table 16 Copper/fiber combo ports in pairs... -
Page 78: Rps Status Led
LED mark Status Description The switch is performing power-on Flashing green (1 Hz) self test (POST). Steady red POST has failed. Flashing yellow (1 Hz) Some ports have failed to pass POST. The switch is powered off. RPS status LED The RPS status LED shows the operating status of the RPS DC input. -
Page 79: Seven-Segment Led
Seven-segment LED The seven-segment LED, together with the system status LED, shows detailed system operating information, as described in Table The seven-segment LED can also show the total PoE output power as a percentage of the maximum PoE output power that a PoE switch can supply (see Table 23). -
Page 80: 10/100/1000 Base-T Ethernet Port Led
Table 23 Seven-segment LED description (II) Port mode LED System status LED Seven-segment Description (Mode) status (PWR) status LED (Unit) status The LED displays different signs. Flashing green (1 For example, the sign indicates that Steady green Hz) (PoE mode) the switch is outputting 0 to 20% of the 81 - 100% 61 - 80%... -
Page 81: Sfp Port Led
SFP port LED Each 1000Base-X SFP port has a status LED to show port operating status and activities. The port mode LED indicates the type of information (for example, port rate or duplex mode) that the port LEDs are showing. You can use the port LED mode switching button to change the type of port information that is displayed. -
Page 82: Power Led
Power LED The power LED shows the operation status of the switch. Table 28 Power LED description LED mark Status Description Steady green The switch is operating properly. The system is performing power-on self test (POST) or Flashing green (1 Hz) downloading software. - Page 83 Table 31 Ethernet port LED description (A5120-48G SI) Status Description Steady green The port is operating at 1000 Mbps. Fast flashing green The port is sending or receiving data at 1000 Mbps. Steady yellow The port is operating at 10/100 Mbps. Fast flashing yellow The port is sending or receiving data at 10/100 Mbps.
-
Page 84: 1000Base-X Sfp Port Led
1000Base-X SFP port LED Table 34 1000Base-X SFP port LEDs description Status Description Steady green The port is operating at 1000 Mbps. Flashing green The port is sending or receiving data. No link is present on the port. -
Page 85: Index
Index +12 VDC output RPS, 23 chassis 10/100/1000 Base-T Ethernet attaching mounting bracket to A5120 SI switch chassis, 13 port, 71 combo interface port LED (A5120 EI switches), 75 technical specifications, 72 port LED (A5120 SI switches), 77 component 1000Base-X SFP A5120 EI switch mounting bracket, 5 port LED (A5120 SI switches), 79 A5120 SI switch mounting bracket, 13... - Page 86 46 Interface cards (A5120 EI switches only), 65 contacting HP, 49 SFP transceiver modules and SFP Stacking Kit, 69 cooling system specifications (-PoE switches), 64 SFP/SFP+/XFP transceiver modules and SFP+/CX4 cables (A5120 EI switches only), 65...
- Page 87 grounding the switch, 18 workbench mounting procedure (A5120 SI switch), interface card installation, 25 interface card installation (A5120 EI switches only), customer support and resources, 49 interface card removal, 26 document conventions, 50 interface card removal (A5120 EI switches only), documents and manuals, 49 icons used, 50 panel views, 52...
- Page 88 accessing IRF fabric to verify the configuration, 44 master switch (IRF), 38 basic settings configuration, 44 member switch (IRF), 38 connecting physical ports, 44 mode displaying configuration, 44 startup (changing), 35 displaying running status, 44 mounting bracket identifying master switch, 38 A5120 EI switch, 5 maintaining configuration, 44 A5120 SI switch, 13...
- Page 89 AC input voltage, 62 rack mounting (A5120 EI switch front brackets only), 7 DC input voltage specifications, 62 rack mounting (A5120 EI switch rack shelf), 8 input specifications, 62 rack mounting (A5120 SI switch), 15 power consumption specifications (non-PoE switches), 63 removing interface card, 26 power consumption specifications (-PoE switches), workbench mounting (A5120 SI switch), 17...
- Page 90 seven-segment LED (A5120 EI switches), 74 installing/removing dedicated CX4/SFP+ cable, IRF basic settings configuration, 44 port, 71 planning IRF cabling scheme, 41 port LED (A5120 EI switches), 76 planning IRF connections, 39 SFP transceiver modules and SFP Stacking Kit, 69 planning IRF fabric setup, 38 SFP/SFP+/XFP transceiver modules and SFP+/CX4 cables (A5120 EI switches only), 65...
- Page 91 Port mode LED (A5120 EI switches), 73 identifying IRF master switch, 38 Port mode LED (A5120 SI switches), 77 planning IRF, 39 power, 62 planning IRF cabling scheme, 41 power consumption specifications (non-PoE planning IRF connections, 39 switches), 63 planning IRF fabric setup, 38 power consumption specifications (-PoE switches), planning IRF member IDs, 38 setting IRF fabric, 37...