
Related Manuals for Viper Model 480XV


Summary of Contents for Viper Model 480XV
-
Page 1: 2 - - W W A A Y Y L L C C D D R R E E M M O O T T E E C C O O N N T T R R O O L L F F U U N N C C T T I I O O N N S
M M o o d d e e l l 4 4 8 8 0 0 X X V V ➤ O O w w n n e e r r ’ ’ s s G G u u i i d d e e... - Page 2 l l i i m m i i t t e e d d l l i i f f e e t t i i m m e e c c o o n n s s u u m m e e r r w w a a r r r r a a n n t t y y Directed Electronics, Inc.
- Page 3 CONSEQUENTIAL DAMAGES OF ANY KIND. IN THE EVENT OF A CLAIM OR A DISPUTE INVOLVING DIRECTED OR ITS SUBSIDIARY, THE PROPER VENUE SHALL BE SAN DIEGO COUNTY IN THE STATE OF CALIFORNIA. CALIFORNIA STATE LAWS AND APPLICABLE FEDERAL LAWS SHALL APPLY AND GOVERN THE DISPUTE.
-
Page 4: Table Of Contents
t t a a b b l l e e o o f f c c o o n n t t e e n n t t s s l l i i m m i i t t e e d d l l i i f f e e t t i i m m e e c c o o n n s s u u m m e e r r w w a a r r r r a a n n t t y y ................3 3 2 2 - - w w a a y y L L C C D D r r e e m m o o t t e e c c o o n n t t r r o o l l . - Page 5 v v e e h h i i c c l l e e r r e e c c o o v v e e r r y y s s y y s s t t e e m m ( ( v v r r s s ® ® ) ) ..................3 3 9 9 arming the vrs®...
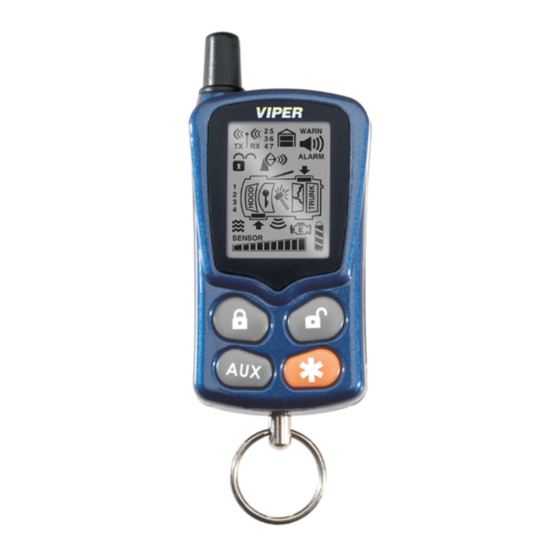
- Page 6 2 2 - - w w a a y y L L C C D D r r e e m m o o t t e e c c o o n n t t r r o o l l Auxiliary Channel Button Arm Button LCD Screen (see LCD Screen )
-
Page 7: L L C C D D S S C C R R E E E E N
L L C C D D s s c c r r e e e e n n 1. Transmit 2. Out of range 3. Receive 4. Auxiliaries 5. Garage door (519H option) 6. Warn Away ® 7. Alarm 8. Ultrasonic sensor 9. - Page 8 s s t t a a n n d d a a r r d d r r e e m m o o t t e e c c o o n n f f i i g g u u r r a a t t i i o o n n controls the L L o o c c k k –...
- Page 9 (located on back of the remote) selects the vehicle to control and also provides user selection of LCD remote response . w w h h a a t t i i s s i i n n c c l l u u d d e e d d ➤...
-
Page 10: System Maintenance
: : Your system MUST be installed by an Authorised dealer in accor- dance with the instructions we supply them. The Viper 460XV system is designed to be installed in any petrol or common rail diesel vehicle with a 12-volt battery. -
Page 11: Standard Configurations
control observing the correct polarity. When power is returned the remote control will display all icons in the LCD and generate all beeper tones once. Press any button on the remote to termi- nate the beeper tone review. ➜ your warranty It is necessary to retain your sales receipt, which reflects that the product was installed by an authorised dealer. - Page 12 Button Silent Mode™ and an optional auxiliary function are controlled by pressing this button. (Silent Mode™ works by pressing this button for less than one second before arming or disarming. An optional auxiliary function, such as boot release, can be controlled by pressing this button for 1.5 seconds.) This auxiliary output controls __________________________.
-
Page 13: Standard Lcd Icon Configurations
Buttons An optional auxiliary convenience or expansion function that you have added to your system can be activated by pressing these buttons simultaneously. This auxiliary output controls_________________________. Buttons An optional auxiliary convenience or expansion function that you have added to your system can be activated by pressing these buttons simultaneously. - Page 14 Icon The receive icon will be displayed while the remote control is receiving a page from the vehicle. Icon The auxiliary and sensor icons will display which auxiliary is oper- ating, or which security feature is in Warn Away Icon The garage door icon—for future use.
- Page 15 Icon The trunk (boot) icon will flash until the beep and/or vibrate stops then it will display continuously until the page is cleared. Icon The glass breakage sensor icon will display for full alarm by flashing 5-times and displaying continuously until the page is cleared.
- Page 16 Icon The ultrasonic sensor “sensor” icon will display for both Warn Away and full alarm by displaying continuously until the page ® is cleared. Icon The vibrate icon will always display if the remote is programmed for vibrate notification. Icon The ignition icon will display if the ignition is turned on when the vehicle’s doors are locked (alarm condition).
-
Page 17: System Signal Paging Features
Icon The arm icon will flash when the system is locking the doors and display continuously until the system is disarmed. Icon The disarm icon will flash when the system is unlocking the doors and display continuously until the system is armed. t t r r a a n n s s m m i i t t t t e e r r f f u u n n c c t t i i o o n n s s This system uses a computer-based learn routine to learn the transmitter buttons. - Page 18 When the remote control receives a page it will generate a page notification to the user (notifications are audible beeps and-or vibration) and the LCD Icons will display the current system status. Command Page When a command (arm/disarm, or auxiliary channel) from the remote control is sent and received, the system will send a command page back to confirm receipt.
-
Page 19: Out Of Range Notification
➜ out of range notification If a command is issued from the remote, but the remote is set to the incorrect vehicle or is beyond the range of the vehicle to receive the command, the remote responds with 3 set of 2 quick beeps and the p p r r o o g g r r a a m m m m i i n n g g L L C C D D r r e e m m o o t t e e ➜... -
Page 20: Illumination On/Off
B B e e e e p p / / V V i i b b r r a a t t e e s s e e t t t t i i n n g g s s Beeps only (default) Vibrate only Beep &... -
Page 21: To Exit Programming Mode
remote press Two beeps is page Off. When programmed off the remote will not give any notification that a page was received from the vehicle. n n o o t t e e : : If programmed Off, n n o o a a l l a a r r m m s s will be notified to the remote. -
Page 22: Passive Arming
protecting your vehicle. If you hear a second chirp after arming, and see the status LED flashing in groups, refer to the Diagnostics section of this guide. This extra chirp is called Bypass Notification. The LCD remote responds to active arming with one beep and icon will flash 5-times to indicate successful arming of the system. - Page 23 note: If any protected entry point (such as a door or a switch-protected (boot or bonnet)) is open, the system will not passively arm (unless forced passive arming is programmed on). See Programming Options section of this guide. Additionally, each time a protected entry is triggered during the arming countdown, the 30-second countdown starts from the beginning.
-
Page 24: One-Time Bypass
➜ one-time bypass This feature stops the alarm from arming or activating any outputs that are programmed to activate when the alarm is armed. One-time bypass will defeat the following actions: Passive arming: If programmed ON the alarm will not arm itself. -
Page 25: Transmitter Sensor Disable
➜ transmitter sensor disable To temporarily disable a sensor input, arm the system. Press the button again and the system will respond with 3 indicator flashes. This means all sensor warn-away triggers are bypassed. Press the button again and the system will respond with 4 indicator light flashes. -
Page 26: High Security Disarm
➜ high security disarm This security system offers High Security Disarm. High Security Disarm is a feature that makes it possible to silence and reset the system while it is triggering, without disarming the system. If the system is triggered and the siren has been sounding for longer than six seconds, pressing will stop the trigger and return the unit to the armed state. -
Page 27: Disarming Without A Transmitter
➜ disarming without a transmitter This feature allows you to disarm the system without the trans- mitter should it be lost, damaged, or disabled. In order to disarm without a transmitter, you must have the vehicle’s ignition key, know where the Valet switch is located, and have the PIN code. Check with the installer for the location of the Valet switch. -
Page 28: Interior Light Control
3. Turn the ignition key OFF. 4. Turn the ignition key to the ON position. 5. Enter the second number in your PIN (press the Valet switch three times). 6. Turn the ignition key OFF. 7. Turn the ignition key to the ON position 8. - Page 29 door controlled The interior light activates for 30-seconds after the system sees a door has closed. (If door was held open for longer than 3 minutes the interior light will not illuminate.) full The interior light activates for 30-seconds after seeing door closure, ignition, or security disarm.
- Page 30 To enter Valet Mode: 1. Turn the ignition on. 2. Turn the ignition off. 3. Press and release the Valet button within 10 seconds. The status LED will light solidly to indicate the system has entered Valet Mode. To exit Valet Mode: 1.
- Page 31 d d i i a a g g n n o o s s t t i i c c s s The microprocessor at the heart of your security system is constantly monitoring all of the switches and sensors that are connected to it.
-
Page 32: Disarming Diagnostics
➜ disarming diagnostics Extra disarm chirps are the Tamper Alert. If four chirps are heard when disarming, the system was triggered in your absence. If five chirps are heard, a zone was triggered so many times that Nuisance Prevention Circuitry has bypassed that zone. The status LED will ®... -
Page 33: Table Of Zones
➜ table of zones The zone number is the number of LED flashes used by the system to identify that input. The standard input assignments are listed below, along with spaces to write in any optional sensors or switches you have had installed. Zone - Number of LED Flashes ➜... - Page 34 Example If Zone 3 was active or triggered, the LED will flash three times with a two-second pause. Then it will flash three times again, and repeat until the ignition is turned on. note: Your system stores the last six triggered zones in memory.
- Page 35 h h i i g g h h f f r r e e q q u u e e n n c c y y Your system transmits and receives at 433 MHz. This provides a cleaner spectrum with less interference and a more stable signal. o o w w n n e e r r r r e e c c o o g g n n i i t t i i o o n n Owner Recognition is a feature available exclusively from Directed.
- Page 36 Valet Mode and the battery is disconnected for any reason, such as servicing the car, when the battery is reconnected the unit will still be in Valet Mode. This applies to all states of the system including arm, disarm, Autoimmobilised, VRS Mode.
- Page 37 p p r r o o g g r r a a m m m m i i n n g g Programming options control what your system does during normal operation, and require few or no additional parts. However, some may require additional installation labour. The following is a list of the program settings, with the factory settings in B B o o l l d d : : ➤...
- Page 38 been left open. This feature is useful if a door has been left ajar when leaving the vehicle. Forced passive arming ensures that the security system will be armed in every situation. ➤ Vehicle Recovery System (VRS): Refer to section later in this guide.
-
Page 39: Arming The Vrs
Directed has engineered this vehicle security system, and the feature to provide the best combination of personal safety ® and property protection available. When properly installed, the system can never inadvertently stop your vehicle in traffic or in a dangerous position while the vehicle is in operation. It is unlike other systems that shut down your engine while it is running. -
Page 40: Vrs® Triggered Sequence
➜ ® triggered sequence after the last door has closed, the system’s status Fifteen seconds LED will begin flashing. This delay is intended to allow you time to distance yourself from your vehicle in the event of a carjacking. , the siren begins chirping and the indi- Forty-five seconds later cator lights begin flashing. -
Page 41: Disarming The Vrs
➜ disarming the vrs Take the time to familiarise yourself with the VRS quence and the disarm procedure. It is important to recognise and identify the VRS it in case of accidental activation. Once the VRS is armed, it does not disarm automatically. You ®... - Page 42 p p r r o o g g r r a a m m m m i i n n g g o o p p t t i i o o n n s s See your dealer for further details on the options listed below available with this system.
- Page 43 u u l l t t r r a a s s o o n n i i c c s s e e n n s s o o r r s s Your security system incorporates two Ultrasonic sensors, which are most commonly mounted at the top of the A-pillars facing the rear of the vehicle.
- Page 44 An invisible dome of coverage is estab- Field Disturbance Sensor: lished by installing the 508D "radar" sensor. Your security system can then react to any intrusions into this field with the triggered sequence. The 545T Nite-Lite will automatically ® Headlight Automation: turn on your headlights when it gets dark.
- Page 45 g g l l o o s s s s a a r r y y o o f f t t e e r r m m s s Amplitude Shift Keying—a method of transmitting data. The "brain" of your system. Usually hidden under Control Unit: the dash area of the vehicle.
- Page 46 This is what happens when the Trigger or Triggered Sequence: alarm "goes off" or "trips". The triggered response of your system consists of the siren sounding and indicator light flashing for the programmed duration. : A small push-button switch mounted somewhere Valet Button inside the vehicle.
- Page 47 © 2005 directed electronics, inc.
-
Page 48: Health Check
Directed Electronics recommends you return to your installing Viper dealer to have your system checked for correct operation. The first check is due one year after the installation date and at yearly intervals thereafter. n n o o t t e e : : There may be a small charge incurred for this service. - Page 49 Your factory set 4-digit PIN code is noted below. See this manual for information on using your PIN code. place sticker here The company behind this system is Directed Electronics, Inc. E&OE, specification is subject to change without notice. Some vehicles require optional parts/wiring and a few are incompatible with some features.