
Related Manuals for Linksys 10/100 LAN Card 10/100


Summary of Contents for Linksys 10/100 LAN Card 10/100
- Page 1 EtherFast ® Series 10/100 LA N Card Use this guide to install any LNE100TX-based Linksys product User Guide...
- Page 2 COPYRIGHT & TRADEMARKS Copyright © 2000 Linksys, All Rights Reserved. EtherFast is a registered trademark of Linksys. Microsoft, Windows, and the Windows logo are registered trademarks of Microsoft Corporation. All other trademarks and brand names are the property of their respective proprietors.
-
Page 3: Table Of Contents
Table of Contents Introduction Getting to Know the EtherFast 10/100 LAN Card Installing the EtherFast 10/100 LAN Card Windows 98 Installation and Setup Windows 95 Installation and Setup Windows 2000 Installation and Setup Windows NT 4.0 Installation and Setup Novell Client32 Setup for Windows 95 & 98 Novell Network Server Setup Troubleshooting Appendix... -
Page 4: Introduction
If your PCI motherboard has built-in WOL support, you’ll be able to utilize this unique management feature. You can remotely turn on any computer with a WOL network card to perform after-hours tasks or to access files. The ultimate in managed 10/100 networking is yours! If you don’t have WOL support on your motherboard or you have no need for it,... - Page 5 Linksys EtherFast Series Package Contents for the EtherFast 10/100 LAN Card • One EtherFast 10/100 LAN Card(s) • One Wake-On-LAN wire (per card) • One 3.5” Driver Disk • One User Guide and Registration Card...
-
Page 6: Getting To Know The Etherfast 10/100 Lan Card
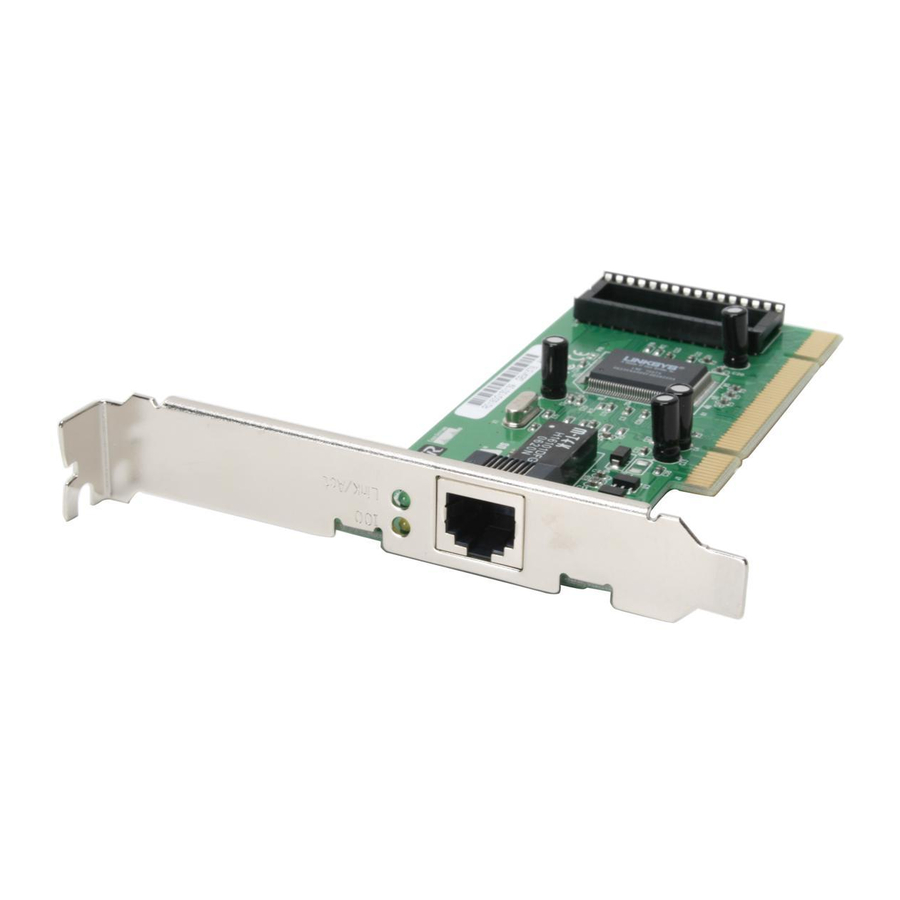
EtherFast ® 10/100 LAN Cards Getting to Know the EtherFast 10/100 LA N Card LEDs Link/Act The Link LED will illuminate when the card has been suc- cessfully connected to a network and flicker when data is being transmitted or received over the network. -
Page 7: Installing The Etherfast 10/100 Lan Card
3 and 5 twisted-pair cabling can be purchased at most computer stores, or if you prefer, you can crimp your own cables. See page 67 for wiring informa- tion. Installing the Network Card & Cabling 1. Power off your PC and any peripheral equipment attached to it. Unplug your PC’s power cord. - Page 8 EtherFast ® 10/100 LAN Cards 5. Once your EtherFast EtherFast 10/100 LAN Card is firmly in place, secure its fastening tab to your PC's chassis with a mounting screw. 6. Replace your PC's cover. 7. Connect one end of a twisted-pair cable to your PC at the EtherFast 10/100 LAN Card's RJ-45 port.
- Page 9 9. Reconnect your PC’s power, then power on your computer. Your com- puter will automatically recognize the card and assign it a unique IRQ ("interrupt") and I/O address. The card installation is complete. Next, you must configure your PC’s operating system to work with the EtherFast Card. •...
-
Page 10: Windows 98 Installation And Setup
Troubleshooting section on page 45. Installing the Network Card’s Driver 1. If you haven’t already, start up your computer. 2. Windows 98 will automatically detect the presence of the PCI Ethernet Controller hardware in your computer. - Page 11 4. Select "Search for the best driver for your device (Recommended).” Click Next. 5. Select "Floppy disk drives". Click Next to continue. 6. A window will open saying that Windows is now ready to install the Linksys LNE100TX Fast Ethernet Adapter driver (seen on the next page). Click Next.
- Page 12 EtherFast ® 10/100 LAN Cards 7. Windows will begin copying the EtherFast Card’s driver files to your PC. Refer to the chart below to help guide you through the process. Under no circumstance are you to click Cancel or Skip! •...
- Page 13 8. Windows will finish installing the software onto your PC. Click Finish. 9. When asked if you want to restart your PC, remove the Driver Disk and click Yes. If you are using the Windows CD-ROM, leave it in your PC. You may need it later.
- Page 14 EtherFast ® 10/100 LAN Cards Network Component Configuration 1. Once you are back at the Windows 98 desktop, click on your taskbar's Start button, then Settings, then Control Panel, and then double-click the Network icon. 2. The Network window will appear. Click on the Configuration tab. A window similar to the one below will appear.
- Page 15 4. If you'd like others to be able to access the files on your PC's hard drive, select I want to be able to give others access to my files. 5. If you'd like to share your printer with other users on the network, select I want to be able to allow others to print to my printer.
- Page 16 EtherFast ® 10/100 LAN Cards 8. Click on the Identification tab. Type the name of your computer in the Computer Name box. Choose a name that is unique from the other com- puter names on the network. 9. Type the name of your workgroup in the Workgroup box. The Workgroup name should be the same Workgroup Name in use by all of the other PCs on the network.
- Page 17 11. Optional: Choose the Access Control tab. Ensure that Shared-level access control is selected. If the setting is on User-Level access control and you can’t change it, skip to problem 5 in the Troubleshooting section on page 46. 12. Click the OK button. Your system may or may not ask you for your Windows 98 CD-ROM or the location of the Windows 98 installation files.
- Page 18 EtherFast ® 10/100 LAN Cards 14. A Logon window will appear, requiring you to enter a User name and Password. Make up a user name and password (if you haven’t already) and click OK. Do not click the Cancel button or Escape key. Clicking either of these buttons will prevent you from logging into the network.
-
Page 19: Windows 95 Installation And Setup
Windows 95 Installation & Setup Overview After installing the EtherFast hardware in your computer, follow these instructions for installing the network driver. The installation procedure for the network driver will vary slightly depending on the version of Windows 95 you are using and your current system configuration. For troubleshooting tips during setup, refer to page 45. - Page 20 EtherFast ® 10/100 LAN Cards Installing the Driver in Windows 95 Version B 1. While the Update Device Driver Wizard window is visible (previous page), put the EtherFast Card 10/100 LAN Card Driver Disk into your floppy drive and click Next. 2.
- Page 21 Under no circumstance are you to click Cancel or Delete! • If your PC asks for the Linksys Setup or Driver Disk • If you are asked to supply your Windows 95 Installation Files or Disks • If you are asked for a file that includes “LNE100TX”...
- Page 22 EtherFast ® 10/100 LAN Cards Network Component Configuration Once you are back at the Windows 95 desktop, click on your taskbar's Start button, then Settings, then Control Panel, and then double-click the Network icon. 2. The Network window will appear (next page). Click on the Configuration tab.
- Page 23 3. Click on the Configuration tab, followed by the File and Print Sharing button. The File and Print Sharing window will appear. 4. If you'd like others to be able to access the files on your PC's hard drive, select I want to be able to give others access to my files.
- Page 24 EtherFast ® 10/100 LAN Cards 8. Click on the Identification tab. The window on the next page will appear. Type the name of your computer in the Computer Name box. Choose a name that is unique from the other computer names on the net- work.
- Page 25 11. Optional: Choose the Access Control tab. Ensure that Shared-level access control is selected. If the setting is on User-Level access control and you can’t change it, skip to problem 5 in the Troubleshooting section on page 46. 12. Click the OK button. Your system may or may not ask you for your Windows 95 CD-ROM or the location of the Windows 95 installation files.
- Page 26 EtherFast ® 10/100 LAN Cards 14. A Logon window will appear, requiring you to enter a username and pass- word. Make up a username and password and click OK. Do not click the ESC or Cancel buttons, or you won't be able to log onto the network. If the a logon does not appear or if it does not allow you to log on, refer to problems 3 and 4 in the Troubleshooting section on page 45.
-
Page 27: Windows 2000 Installation And Setup
Windows 2000 Installation & Setup Overview After physically installing the EtherFast 10/100 LAN Card in your computer, follow these instructions to install the network driver. The installation procedure for the network driver will vary slightly depending on which version of Windows 2000 you are using, and on your cur- rent system configuration. - Page 28 EtherFast ® 10/100 LAN Cards 3. The Install Hardware Device Drivers dialog box will appear. When Ethernet Controller is displayed, select “Search for a suitable driver for your device (Recommended)”. Click Next. 4. The Locate Driver Files dialog box will appear. Select “Specify a loca- tion”.
- Page 29 5. When the Found New Hardware Wizard box appears, insert the Linksys EtherFast 10/100 Driver Disk into your floppy drive. In the “Copy manu- facturer’s files from“ field, type “A:\Win2000”. Click OK. 6. The Driver File Search Results dialog box will appear. Click Next. Linksys EtherFast Series...
- Page 30 EtherFast ® 10/100 LAN Cards 7. The Completing the Found New Hardware Wizard dialog box will appear.The following adapter name will be shown: Linksys LNE100TX Fast Ethernet Adapter (LNE100TX v4). Click Finish. 8. Remove the driver disk from the floppy drive. The Windows 2000 driver installation is complete.
-
Page 31: Windows Nt 4.0 Installation And Setup
Windows NT 4.0 Installation & Setup Overview The following instructions will set up the EtherFast 10/100 LAN Card in a computer running NT 4.0 server/workstation. You should have your original Windows NT CD-ROM handy during the installation, as you might be asked to supply it. - Page 32 EtherFast ® 10/100 LAN Cards 3. Click on the Select from list... button to select a network adapter. 4. Click on the Have Disk button. Insert the EtherFast 10/100 LAN Card Driver Disk into drive A. Type a:\ into the box on your screen and hit 5.
- Page 33 6. The adapter will be added to the list of installed Network Adapters. Click Next. 7. Place check marks beside each listed network protocol that you wish to install. See your Microsoft Windows NT user guide or talk to your network administrator for more informa- tion about network protocols.
- Page 34 EtherFast ® 10/100 LAN Cards 8. A list of services will appear. Click Next to approve these services, fol- lowed by Next again. 9. NT will probably ask you to supply your original Windows NT CD-ROM or setup disks. If so, place your Windows NT CD-ROM in your CD drive. If the CD-ROM loads a pop-up window, close it.
- Page 35 11. NT will copy the necessary network drivers to your PC. When the copying is complete, you will see a list of installed bindings. Change the bindings settings if needed and click Next. Click Next again. 12. Choose either Workgroup or Domain, depending on the type of network you're setting up.
- Page 36 EtherFast ® 10/100 LAN Cards 13. Click Finish. When asked if you want to restart your computer, remove the Driver Disk and click Yes. 14. Once your PC has rebooted and you are logged in, double-click the Network Neighborhood icon on your desktop. Ensure that you have access to the network.
- Page 37 Installing the EtherFast Network Driver if Networking is Already Installed The following steps will install the EtherFast Card’s driver software on your PC, enabling your PC to properly communicate with the card. Remember that you must be logged on as a network administrator to continue. 1.
- Page 38 EtherFast ® 10/100 LAN Cards 3. When the list of available network adapters appears, click the Have Disk button. 4. Put the EtherFast Card disk into drive A. Type a:\ into the box on your screen and click OK. 5. Highlight the Linksys LNE100TX Fast Ethernet Adapter (LNE100TX v4) entry in the window that appears.
- Page 39 6. When NT asks you for the media type. Choose the AutoSense option. When finished, click on OK. Click Close. 7. NT will probably ask you to supply your original Windows NT CD-ROM or setup disks. Direct Windows NT to the proper location (most likely D:\i386).
- Page 40 EtherFast ® 10/100 LAN Cards 10. Remove your Driver Disk and CD-ROM and click Yes to restart your PC. 11. Once your PC has rebooted, double-click the Network Neighborhood icon on your desktop. Ensure that you have access to the network. If you do, your card has been properly installed.
-
Page 41: Novell Client32 Setup For Windows 95
Novell Client32 Setup for Windows 95 and 98 Overview You must install Novell Client32 drivers connecting to a 4.x or 5.0 server while in Windows 95. If you are using Windows 98, you must obtain the latest version of Client32. The installation is very similar to that of Windows 95 OSR2. - Page 42 EtherFast ® 10/100 LAN Cards The Client32 installation will be different, depending on the version of Windows that you are using. • If you are using Windows 98, click Next. Choose Search for the best driver for your device (recommended) and click Next again. Skip to step 5.
- Page 43 Linksys EtherFast Series 8. Double-click on Novell NetWare Client32 and make any setting changes as necessary. When you're finished, save your changes and reboot. The Client32 drivers have been installed. You should now be able to access your Novell NetWare network through the Network Neighborhood icon.
-
Page 44: Novell Network Server Setup
EtherFast ® 10/100 LAN Cards Novell NetWare Server Setup Overview The EtherFast Card network driver will be automatically installed during all of the following NetWare installation procedures. During the setup you may want to refer to your NetWare Installation Manual for help. •... - Page 45 5. If the LAN driver is not located in the default directory, specify the file's path on the command line. The LOAD command prompts you for the con- figuration parameters if they are not supplied on the command line. 6. At the server command line, type (for example): LOAD c:\LNE100\NBI31X.NLM LOAD c:\LNE100\MSM31X.NLM LOAD c:\LNE100\ETHERTSM.NLM...
- Page 46 EtherFast ® 10/100 LAN Cards 7. Add the LOAD and BIND statements to your server's AUTOEXEC.NCF file so that the LAN driver loads automatically each time your server is started up. The loading and binding is complete. The server is ready. Installing a 5.x Server 1.
- Page 47 14. Highlight Save Parameters and Load Driver. Press Enter. 15. Your PC will examine the network. This may take a few minutes. 16. You may be prompted several times for a network on which to bind IPX to LNE100TX_1. Accept the default numbers if you are not sure which values to assign.
-
Page 48: Troubleshooting
EtherFast ® 10/100 LAN Cards Troubleshooting Troubleshooting hints for Windows can be found below. If you are using Windows NT, NetWare, or another network operating system, skip to the Card Diagnostics instructions on page 49. Troubleshooting Hints for Windows 95 and 98 1. - Page 49 • You may have not have enabled File and Printer Sharing. To do so, go to page 20 step number 3, or page 11 step number 3. • The network card might not be setup properly. Try reinstalling the card’s drivers. To clean your system of the old installation, go to page 55 and then re-install.
- Page 50 EtherFast ® 10/100 LAN Cards 10. In Network Neighborhood you can only see computers running the same operating system as your computer (i.e., your PC is running Windows 95 and it can only see other Windows 95 computers and not any computer running Windows 98).
- Page 51 • Click on the IRQ Steering tab. Remove the check from Use IRQ Holder and click OK. Windows will ask you to restart the PC (if it doesn’t ask you, then reboot the PC manually). • After the computer boots up, Windows will try to re-detect the PCI Steering.
- Page 52 1. Choose the Safe mode command prompt only option. Press Enter on the keyboard. 2. Insert the Linksys Fast Ethernet 10/100 Network Card Driver Disk into drive A. Enter the appropriate commands after the following prompts: • When “C:\>” appears, type “a:” then press Enter.
-
Page 53: Appendix
Appendix Sharing Your Files and Printers Overview By sharing your files and printers, other PCs on your network will be able to access the resources on your PC. Before sharing your files and printers, you should prepare your computer to be used with any file servers that may be on the network. - Page 54 EtherFast ® 10/100 LAN Cards 6. If you want to assign access passwords, type the passwords into the Password boxes. 7. When you're done, click on the Apply button, followed by OK. Repeat steps 1-7 for any drive or folder you desire to share on the network. You have successfully enabled File Sharing on your PC.
-
Page 55: Installing The Driver In Windows 95 Version A
Installing the Driver in Windows 95 Version A 1. Windows 95 will detect the EtherFast card and display a New Hardware Found window. 2. Slide the EtherFast Card Driver Disk into drive A. 3. Select Driver from disk provided by hardware manufacturer, then click 4. -
Page 56: Novell Netware 3.X Client Setup For Windows 98 Or 95
EtherFast ® 10/100 LAN Cards Novell NetWare 3.x Client Setup for Windows 98 or 95 The instructions below explain how to set up the regular Novell NetWare 3.x client for use on a Windows 98 or 95 PC. If you are installing NetWare’s Client32 software instead, follow the instructions on page 38. -
Page 57: Windows 98 Or 95 Client For Windows Nt
Windows 98 or 95 Client for Windows NT If you are installing the EtherFast 10/100 Card in a Windows 95 or 98 PC that you plan on logging into a NT domain server, follow the directions below. 1. Follow the Windows 95 setup instructions or the Windows 98 setup instructions 2. -
Page 58: Starting Over In Windows 95, 98 Or 2000
EtherFast ® 10/100 LAN Cards Starting Over in Windows 95, 98 or 2000 If you experience installation difficulties, you may need to re-install all of the Windows networking components from scratch. The instructions below explain how to give your PC a clean sweep so that you can start the EtherFast Card’s software installation over. - Page 59 4. Remove any instance of the name Linksys in the box. This includes IPX/SPX…Linksys, NetBEUI…Linksys, and TCP/IP…Linksys. Also remove Client for Microsoft Networks, Client for NetWare Networks, and File and Printer Sharing for Microsoft Networks. In some cases, removing one of these components may in turn automati- cally remove other components as well.
- Page 60 EtherFast ® 10/100 LAN Cards 6. When you are done removing all the unnecessary components, click OK. When asked to restart, click No. 7. Return to the Windows Control Panel. Double-click on the System Icon. The System Properties window will appear. Click on the Device Manager Tab.
- Page 61 Starting Over in Windows 2000 1. Click the Start button, choose Settings, choose Control Panel, then dou- ble-click the System icon.The System Properties window will open. 2. Choose the Hardware tab. 3. Click the Device Manager button. The Device Manager window will open.
- Page 62 EtherFast ® 10/100 LAN Cards 5. Right-click on LNE100TX Fast Ethernet Adapter. A menu box should open (below). 6. First, choose Disable. 7. When asked if you want to Disable the device, click Yes. 8. Right-click on the LNE100TX Fast Ethernet Adapter again. This time, select Uninstall...
-
Page 63: Manually Installing The Network Components In
Manually Installing the Network Components in Windows 95 & 98 There may be times when you might need to manually install missing Windows networking components. 1. Click on Start, Settings, then Control Panel. 2. Double-click the Network icon. The Network window appears. 3. - Page 64 EtherFast ® 10/100 LAN Cards IPX/SPX-compatible Protocol Click on the Add button. Choose Protocol and click on the Add button. Select Manufacturer and choose Microsoft. Under the Network Protocol box, highlight IPX/SPX-compatible protocol. Click OK .The computer will begin copying files to your system. When the installation is complete, you will be asked if you want to reboot.
-
Page 65: Installing And Configuring Wake-On-Lan
PME and RWU-high. Consult the motherboard documentation that came with your PC to find out which type of WOL interface your computer will use to communicate with the network card. In some cases, you may need to enable the WOL support in your PC’s BIOS. - Page 66 EtherFast ® 10/100 LAN Cards Setting Up Your EtherFast LAN Card for Wake-On- LAN Use 1. Turn off your PC and remove the power cable from the wall. Use the picture below to locate where the WOL wire plugs into your EtherFast LAN Card. 2.
- Page 67 Sending a Magic Packet In order to use WOL you need to know the MAC address of the card you wish to “wake”. If you don’t know the MAC address of the PC you are on, turn to page 49 to learn how to run the EtherFast Card’s diagnostic program. 1.
-
Page 68: About Plug-And-Play Pci Technology
EtherFast ® 10/100 LAN Cards About Plug-and-Play PCI Technology The EtherFast 10/100 LAN Card is designed to run in a 32-bit desktop com- puter equipped with PCI expansion slots. The card is built to the PCI 2.1 standard. Short for Peripheral Components Interconnect, PCI is a technology that allows special Plug-and-Play expansion cards to be automatically configured by a computer’s BIOS (Basic Input/Output System) once they have been installed. -
Page 69: Linux, Open Source And Beta Operating Systems
Linksys EtherFast Series No Changes Allowed Your PC may not allow you to change the IRQ value(s) of the PCI slot(s). In this case, you will ONLY be able to use the IRQ and I/O values that have been pre-assigned to each slot. The popular BIOS from Phoenix, for example, does not generally allow you to modify BIOS-assigned IRQ settings. -
Page 70: Twisted Pair Cabling
EtherFast ® 10/100 LAN Cards Twisted-Pair Cabling There are different grades, or categories, of twisted-pair cabling. Category 5 is the most reliable and is highly recommended. Category 3 is a good second choice. Straight-through cables are used for connecting computers to a hub. Crossover cables are used for connecting a hub to another hub (there is an exception: some hubs have a built-in uplink port that is crossed internally, which allows you to link or connect hubs together with a straight-through... -
Page 71: Crimping Your Own Network Cables
Linksys EtherFast Series Crimping Your Own Network Cables • • S S t t r r a a i i g g h h t t - - T T h h r r o o u u g g h h C C a a b b l l i i n n g g •... -
Page 72: Specifications
EtherFast 10/100 LAN Cards ® Specifications Model Numbers: System: Standards: Protocol: Ports: Speed: Full Duplex Half Duplex Cabling: Topology: LED Status Lights: Environmental Dimensions: Unit Weight: Power: Certifications: Operating Temperature: Storage Temperature: Operating Humidity: Storage Humidity: LNE100TX v4 LNE100TXu v4 (LAN Card & Cable) LNE10005 v4 (LAN Card 5-Pack LNE10010 v4 (LAN Card 10-Pack) LNE10020 v4 (LAN Card 20-Pack) -
Page 73: Customer Support
Customer Support For help with the installation or operation of your EtherFast 10/100 LAN Card, contact Linksys Customer Support at one of the phone numbers or Internet addresses below. Customer Support Email FTP Site 800-326-7114 949-261-1288 949-261-8868 support@linksys.com http://www.linksys.com ftp.linksys.com Linksys EtherFast Series... - Page 74 h t t p : / / w w w. l i n k s y s . c o m © Copyright 2000 Linksys, All Rights Reserved. Printed in the USA.