Bosch Professional GTA 2500 W Original Instructions Manual
Hide thumbs
Also See for Professional GTA 2500 W:
- Original instructions manual (188 pages) ,
- Original instruction (119 pages) ,
- Original instructions manual (180 pages)
Advertisement
Quick Links
OBJ_BUCH-854-002.book Page 1 Sunday, January 4, 2009 12:44 PM
Robert Bosch GmbH
Power Tools Division
70745 Leinfelden-Echterdingen
Germany
www.bosch-pt.com
1 609 929 S19 (2009.01) PS / 180 UNI
GTA 2500 W Professional
de Originalbetriebsanleitung
el Πρωτότυπο οδηγιών χρήσης
en Original instructions
tr Orijinal işletme talimat
fr Notice originale
pl Instrukcją oryginalną
es Manual original
cs Původní návod k používání
pt Manual original
sk Pôvodný návod na použitie
it
Istruzioni originali
hu Eredeti használati utasítás
nl Oorspronkelijke
ru Оригинальное руководст-
gebruiksaanwijzing
во по эксплуатации
da Original brugsanvisning
uk Оригінальна інструкція з
sv Bruksanvisning i original
експлуатації
no Original driftsinstruks
ro Instrucţiuni originale
fi
Alkuperäiset ohjeet
bg Оригинална инструкция
sr Originalno uputstvo za rad
sl Izvirna navodila
hr Originalne upute za rad
et Algupärane kasutusjuhend
lv Instrukcijas oriģinālvalodā
lt
Originali instrukcija
Advertisement

Related Manuals for Bosch Professional GTA 2500 W


Summary of Contents for Bosch Professional GTA 2500 W
- Page 1 OBJ_BUCH-854-002.book Page 1 Sunday, January 4, 2009 12:44 PM Robert Bosch GmbH Power Tools Division 70745 Leinfelden-Echterdingen GTA 2500 W Professional Germany www.bosch-pt.com 1 609 929 S19 (2009.01) PS / 180 UNI de Originalbetriebsanleitung el Πρωτότυπο οδηγιών χρήσης sr Originalno uputstvo za rad en Original instructions tr Orijinal işletme talimat...
- Page 2 OBJ_BUCH-854-002.book Page 3 Sunday, January 4, 2009 12:35 PM Bosch Power Tools 1 609 929 S19 | (4/1/09)
- Page 3 2x M10 x 29 mm 2x M10 x 50 10x M10 4x M8 x 45 4x M8 8x M6 x 45 8x M6 5x M10 4x M8 4x M8 x 50 8x M6 1 609 929 S19 | (4/1/09) Bosch Power Tools...
- Page 4 OBJ_BUCH-854-002.book Page 5 Sunday, January 4, 2009 12:35 PM M8 x 50 M10 x 100 Bosch Power Tools 1 609 929 S19 | (4/1/09)
- Page 5 OBJ_BUCH-854-002.book Page 6 Sunday, January 4, 2009 12:35 PM M10 x 29 M10 x 50 M10 x 100 1 609 929 S19 | (4/1/09) Bosch Power Tools...
- Page 6 OBJ_BUCH-854-002.book Page 7 Sunday, January 4, 2009 12:35 PM M6 x 45 M10 x 55 Bosch Power Tools 1 609 929 S19 | (4/1/09)
- Page 7 OBJ_BUCH-854-002.book Page 8 Sunday, January 4, 2009 12:35 PM 1 609 929 S19 | (4/1/09) Bosch Power Tools...
- Page 8 OBJ_BUCH-854-002.book Page 9 Sunday, January 4, 2009 12:35 PM Bosch Power Tools 1 609 929 S19 | (4/1/09)
- Page 9 OBJ_BUCH-854-002.book Page 10 Sunday, January 4, 2009 12:35 PM 10 | 1 609 929 S19 | (4/1/09) Bosch Power Tools...
- Page 10 OBJ_BUCH-854-002.book Page 11 Sunday, January 4, 2009 12:35 PM | 11 Bosch Power Tools 1 609 929 S19 | (4/1/09)
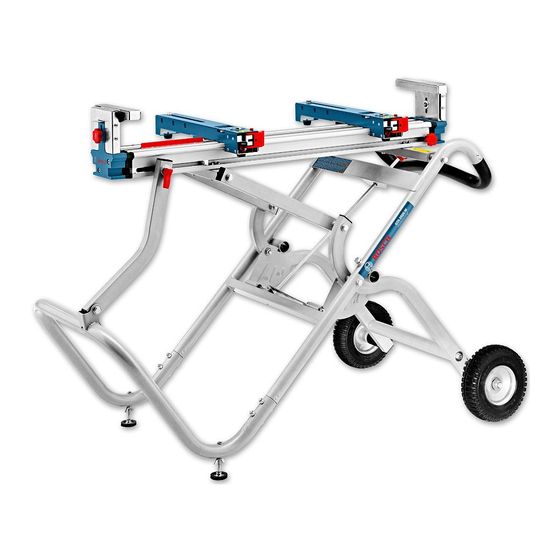
- Page 11 The attachment sets for the power tool must always be firmly locked. Loose connections can lead to insta- bility and inexact sawing. 1 609 929 S19 | (4/1/09) Bosch Power Tools...
- Page 12 Intended Use 24 Lever for locking the attachment set The saw stand is intended exclusively for mount- 25 Stop ing the following stationary Bosch saws (as of 26 Movable nut 2008.11): 27 Nut for adjustment of lock 9 – GCM 8 S 3 601 L16 0..
- Page 13 Note: Do not over-tighten the nuts. Parts bolted – Lock nut together must move freely. Additionally required tools (not in delivery scope): – Phillips screwdriver – Open-end spanner (10 mm, 8 mm, 6 mm) – Adjustable spanner 1 609 929 S19 | (4/1/09) Bosch Power Tools...
- Page 14 – Close lever 24 again. the power tool. – Loosen locking knob 10 and adjust the height of the workpiece support 12 so that the workpiece rests level. – Retighten the locking knobs again. Bosch Power Tools 1 609 929 S19 | (4/1/09)
- Page 15 – Turn the lock in clockwise direction until the er side of the locking plates 21. lever for locking can be firmly closed again. – Close the lock 3. – Remove the slotted screwdriver and check the adjustment again. 1 609 929 S19 | (4/1/09) Bosch Power Tools...
- Page 16 Dublin 24 carried out by an authorised customer services Tel. Service: +353 (01) 4 66 67 00 agent for Bosch power tools. Fax: +353 (01) 4 66 68 88 In all correspondence and spare parts orders, Australia, New Zealand and Pacific Islands please always include the 10-digit article Robert Bosch Australia Pty.