Advertisement
Quick Links
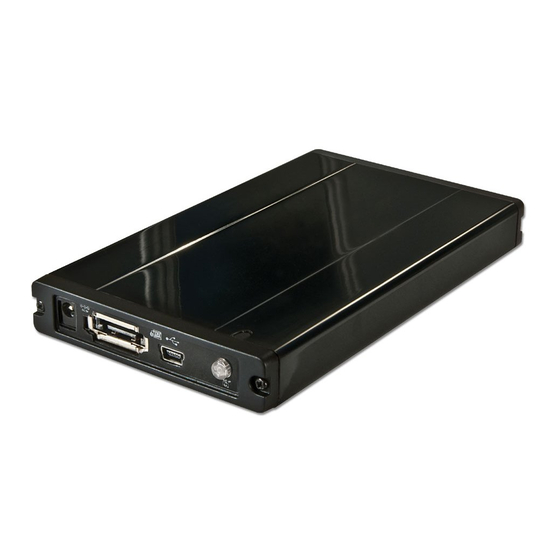
USB & eSATA HDD Enclosure
Installation Guide
Installationsanleitung
Manuel Utilisateur
Manuale d'uso
LINDY No. 42792
www.LINDY.com
For Home and Office Use
Tested to Comply with FCC Standards
© LINDY ELECTRONICS LIMITED & LINDY-ELEKTRONIK GMBH - FIRST EDITION (JULY 2009)
OTB – One-Touch-Backup Information
ENGLISH
To use the One-Touch-Backup (OTB) function you have to install
the software from the included CD and then select the folders to
be backed up in advance! The OTB is then started by pressing the
push button on the enclosure.
Please Note: The OTB function does not work if the enclosure is
connected via eSATA!
Deutsch
Dieses Festplattengehäuse unterstützt die OTB Funktion. Der
One-Touch-BackUp wird durch Drücken des Knopfes am Gehäu-
se gestartet. Beachten Sie aber, dass Sie vorher die Software von
der beiliegenden CD installiert haben müssen und die zu sichern-
den Verzeichnisse ausgewählt haben müssen!
Die OTB Funktion steht nur bei Anschluss über die USB Schnitt-
stelle zur Verfügung!
Français
Ce boîtier supporte la fonction OTB (One-Touch-Backup ou sau-
vegarde automatique des données via un bouton à pres-
ser).Attention, pour ce faire : vous devrez installer d'abord installer
le logiciel fourni sur CD, puis sélectionner les répertoires à sauve-
garder.
La fonction OTB ne fonctionne qu'avec l'interface USB !
Italiano
Per utilizzare la funzione One-Touch-Backup (OTB) è nesessario
installare il software sul CD e selezionare in anticipo le cartelle da
salvare! La funzione OTB verrà quindi avviata premendo il tasto
sull'alloggiamento.
N.B.: la funzione OTB non funziona se l'alloggiamento è
connesso via eSATA!
INSTALLATION
ENGLISH
Unscrew and remove the plastic end cover, at the end of the
housing with the connectors. Attach your Hard Disk to the PCB
and fix it with the 4 screws supplied.
Slide the PCB back into the housing and screw the end cover
back into position.
Deutsch
English
Lösen Sie die beiden Schrauben auf der Seite der Kabelanschlüs-
Deutsch
se und ziehen Sie die Endkappe mit der Platine aus dem Gehäu-
se. Setzen Sie Ihre Festplatte vorsichtig auf den SATA Anschluss
Français
und schrauben Sie sie mit den 4 beiliegenden Schrauben auf die
Italiano
Platine. Schieben Sie die Platine mit Endkappe wieder vorsichtig
in das Gehäuse hinein und schrauben Sie die beiden Schrauben
wieder fest.
Français
Dévissez et retirez la façade en plastique. Connectez votre disque
dur à la carte intégrée et fixez le à l'aide des 4 vis fournies.
Glissez avec précaution la carte intégrée dans le boîtier et refer-
mez la façade en la revissant.
Italiano
Svitare
all'alloggiamento. Collegare l'Hard Disk e fissarlo con le 4 viti
incluse nella fornitura.
Far scorrere l'Hard Disk nell'alloggiamento e riavvitare il frontalino
nella sua posizione originale.
OPERATION
Power Requirement
Modern 2.5" drives with low power requirements can normally be
powered by two of your computer's root USB ports using the
supplied Dual USB Power cable.
If you want to connect this enclosure to non-powered USB ports or
a bus powered USB hub an optional regulated 5VDC power sup-
ply has to be connected to the DC input of the enclosure.
If you want to connect this enclosure by eSATA the supplied Dual
USB Power cable may provide enough power to the HDD, but it is
recommended that an optional regulated 5VDC power supply is
connected to the DC input of the enclosure.
Driver Installation
Modern operating systems such as Windows 7, Vista, XP, 2000,
Mac OS X and Linux already include the necessary drivers.
Never disconnect the enclosure whilst data transfer is in
progress
HDD Partitioning
If you use a brand new hard drive it may not be formatted or have
no partition and so your operating system will not show a drive
letter. Use the partitioning program from your operating system
(FDISK or similar). In Windows, Right click on My Computer and
select Manage. Then click Disk Management. On the bottom
right side the new drive should now be shown without a drive
letter. Right click on the grey field to the left of the drive and select
Initialize Disk. Once completed you can right click on the new
drive, choose to format it and change drive letters according to
your requirements.
Find more information on this topic from the HELP section of your
operating system.
e
rimuovere
il
frontalino
in
plastica
in
fondo
(ENGLISH)
Advertisement

Related Manuals for Lindy 42792


Summary of Contents for Lindy 42792
- Page 1 Far scorrere l’Hard Disk nell’alloggiamento e riavvitare il frontalino nella sua posizione originale. www.LINDY.com For Home and Office Use Tested to Comply with FCC Standards © LINDY ELECTRONICS LIMITED & LINDY-ELEKTRONIK GMBH - FIRST EDITION (JULY 2009) OTB – One-Touch-Backup Information OPERATION (ENGLISH) ENGLISH...
- Page 2 Cliccare col tasto destro su questo campo e selezionare Inizializza disco. Seguire la configurazione guidata, formattare il disco e assegnare una lettera. LINDY No.42792 For Home and Office Use Potrete trovare informazioni su questa operazione nella guida del www.lindy.com...