
Related Manuals for Uniden UM255


Summary of Contents for Uniden UM255
- Page 1 UM255 27MHz Radio AM-Marine / AM-CB For more exciting new products please visit our website: Australia: www.uniden.com.au...
-
Page 2: Table Of Contents
Table of Contents Table of Contents Table of Contents ....................2 (this page) Introduction ..........................3 Features..........................3 Manual overview ........................3 Conventions .........................3 Getting Started ...........................4 What's Included ........................... 4 Parts of the Radio ..........................5 Using Your Radio ........................8 Turning on the Radio ..................... -
Page 3: Introduction
• 4 Watts Maximum TX Output Power • 27MHz Dual Band: The UM255 can operate in the 27MHz AM Marine band for Inshore Boating Radio Services, or the 27MHz AM CB band •... -
Page 4: Getting Started
Getting Started Getting Started What's Included CHANNEL UM255 Radio DC Power Cable Mounting Bracket and knobs Microphone Hanger and Mounting Hardware... -
Page 5: Parts Of The Radio
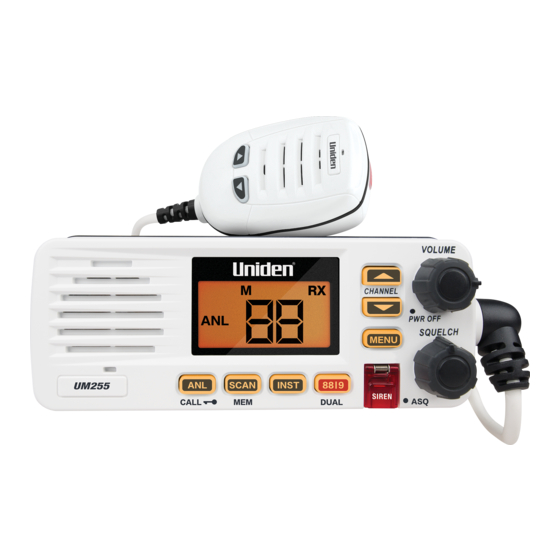
Getting Started VOLUME-PWR Parts of the Radio CHANNEL UP & (power) knob CHANNEL DOWN LCD Display (turn clockwise to button increase volume) CHANNEL SIREN ANL-CALL INST SQUELCH-ASQ 88|9-DUAL SCAN-MEM knob (turn clockwise to decrease channel noise) MENU Table 1 - Front panel button functions Button Press to... - Page 6 Getting Started Parts of the Radio Heat sink Power Connector Antenna Connector (SO238) PA Connector Speaker Connector Table 2 - Rear panel connector functions Connector Connects to For details, see Antenna connector External AM antenna with Connecting the radio, a male PL259 (SO238) page 16.
- Page 7 Getting Started Parts of the Radio 88 | 9 - DUAL WATCH Button (PUSH-TO-TALK) Button CHANNEL UP & DOWN Buttons Table 3 - Microphone button functions Button Press to... Press and hold to... Cancel scanning and stay on a Talk on a channel. (PUSH TO TALK) channel.
-
Page 8: Using Your Radio
When it powers on, the radio selects the last channel used. Setting the Band Mode (AM Marine / AM CB) The UM255 can operate in the Australian 27MHz AM Marine band for Inshore Boating Radio Services, or the Australian 27MHz AM CB band. -
Page 9: Enabling The Auto Squelch (Asq)
In AM Marine Band mode the UM255 AM radio uses the Inshore Boating Radio Service Band channels. In AM CB Band mode the UM255 AM radio uses the AM-CB Band channels (see Channels and Frequencies, page 22). Select the desired channel. Listen to make sure there is no activity on the channel. -
Page 10: Instant (Priority) Channel
Using Your Radio Instant (Priority) Channel Programmable one-touch Instant channel button. Press INST button to go to the Instant (Priority) Channel. To set the Instant (Priority) channel: First press CHANNEL UP or CHANNEL DOWN to select a desired channel and then press and hold the INST button to store the channel as the Instant (Priority) channel. -
Page 11: Scanning (Open Scan /Group Scan)
Using Your Radio Scanning The UM255 has a scanning feature that allows you to search for active channels automatically. Furthermore, the UM255 is designed to have two types of scanning; Open Scanning (OS) and Group Scanning (GS), to give you flexibility and allow you to use the radio more effectively. -
Page 12: Menu
Using Your Radio MENU Menu Order List Display Brightness BRIGHT OS/GS SCAN SCAN RF Gain RF GAIN PA Mode PA MODE Call Tone CALL TONE Roger Beep ROGER BEEP Key Tone KEY TONE SP Mode SP MODE Contrast CONTRAST MENU: Display Brightness Press MENU one time, the Screen Brightness setting flashes on the display. -
Page 13: Menu: Pa Mode
Using Your Radio MENU: PA MODE An optional external PA Speaker is required to use this feature. PA mode redirects the PTT audio to an optional external PA speaker for public broadcast. Press MENU four times, the PA setting flashes on the display. Press CHANNEL UP or CHANNEL DOWN button to select PA ON or OFF. -
Page 14: Menu: Key Tone
UM255 stays in the PA mode. 2. Continuous Siren: Lift the siren cover and press and hold the SIREN button until the end of the 3 second display count down. The SIREN icon flashes and the UM255 emits a siren tone continuously. -
Page 15: Installing The Hardware
Installing the Hardware Mounting the radio The UM255 can sit angled in the mounting bracket so it can easily accommodate the best location. First, determine the best place to mount the radio. For optimum performance, find a location that can: •... -
Page 16: Installing An Optional Flush Mount Bracket
Connecting the Radio To operate correctly, your UM255 requires two electrical connections: • providing it with power from the boat’s electrical system • connecting a 27MHz AM marine antenna to the antenna connector... - Page 17 2. Connect the RED wire of the included power cable to the POSITIVE (+) side of your power source. 3. Connect the power cable to the power connector on the back of the UM255. (The power connector only fits one way.) 4.
-
Page 18: Connecting Accessories
Connecting to an external PA speaker You can use an external PA speaker to monitor the radio from a different part of your boat or in a noisy environment. The UM255 supports an external PA speaker with the following specifications: •... -
Page 19: Maintenance And Troubleshooting
Maintenance and Troubleshooting Maintenance and Troubleshooting Due to its rugged design, the UM255 requires very little maintenance. However, it is a precision electronic instrument, so you should follow a few precautions: • If the antenna has been damaged, you should not transmit except in the case of an emergency. -
Page 20: Specifications
Specifications Specifications Table 4 - Radio specifications (All specifications are subject to change without notice.) General Controls Volume-Pwr, Squelch-ASQ Status Indicators Transmit, Receive, Scan mode, Dual Watch mode, RF Gain on, Roger Beep on, Memory channel, Squelch, Auto Squelch, PA and Channel Display Display LCD (Dot Matrix) Buttons... - Page 21 Specifications General 50 Ω nominal Antenna Impedance 2 kΩ condenser mic element with coiled cord Microphone 45mm, 8 Ω, 2W Speaker Operating Temperature 0 °C to + 50 °C Range Transmitter Power Output 4 watt Frequency Range 26.965 to 27.980 MHz Receiver Frequency Range 26.965 to 27.980 MHz...
-
Page 22: Channel And Frequencies
Specifications Channel and Frequencies Table 5 - Australia 27MHz AM Marine Channels & Frequencies Ch No. Freq. (MHz) 27.680 Commercial, Calling ship-ship, shore-shore 27.720 Pro. Fishing, Calling ship-ship, shore-shore 27.820 Pro. Fishing, Calling ship-ship, shore-shore 86 (*1) 27.860 Distress, Safety & Calling (supp. to 27.880) 88 (*1) 27.880 Distress, Safety &... -
Page 23: Regulations And Safety Warnings
Regulations and Safety Warnings Antenna Selection and Installation Your UM255 has been designed to accommodate all of the popular marine 27MHz- (HF-AM) antennas. However, the selection and the proper installation of the antenna is the responsibility of the user or installer. -
Page 24: Two Year Limited Warranty
Accessories 1 Year If a warranty claim is made, this warranty will not apply if the Product is found by Uniden to be: (A) Damaged or not maintained in a reasonable manner or as recommended in the relevant Uniden Owner’s Manual;... -
Page 25: Mounting Bracket Template
Mounting Bracket Template 17.5 mm 7 mm 43 mm 5.5 mm 7 mm... - Page 28 © 2020 Uniden Australia Pty Limited Printed in PRC...