Table of Contents
Advertisement
Quick Links
Advertisement
Table of Contents

Related Manuals for Transcend Transcend PhotoBank TS40GPB ts40gpb ts40gpb


Summary of Contents for Transcend Transcend PhotoBank TS40GPB ts40gpb ts40gpb
- Page 1 PhotoBank User’s Manual...
-
Page 2: Table Of Contents
Introduction Package Contents ... 1 Features ... 1 System Requirements ... 1 Product Overview... 2 Using the PhotoBank in Stand-Alone Mode System Information... 3 Copying Files from Memory Card to PhotoBank... 3 Copying Files from PhotoBank to Memory Card... 4 Erasing the Memory Card... -
Page 3: Introduction
Thank you for purchasing Transcend’s PhotoBank, a small device designed for fast and easy data storage. It supports multi types of storage media: CompactFlash™, Microdrive™, SmartMedia™, Secure Digital, miniSD (with adapter), MultiMediaCard™, RS-MMC (with adapter), Memory Stick® / Memory Stick PRO®, Memory Stick Duo® (with adapter), Memory Stick PRO Duo®... -
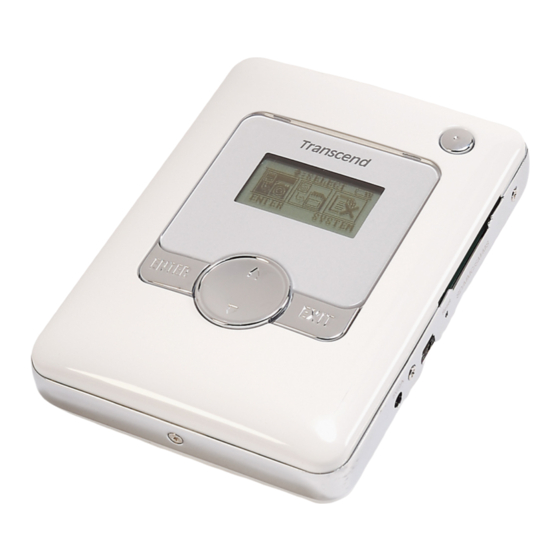
Page 4: Product Overview
Product Overview Power Button LCD Screen CF Type I/II Slot SM/ MMC/ SD /MS Card Slot Reset Button USB Connector Select Button Enter Button Exit Button Power DC Jack Battery Cover... -
Page 5: Using The Photobank In Stand-Alone Mode
Using the PhotoBank in Stand-Alone Mode System Information Press and hold the Power Button for a few seconds to power on the PhotoBank. Press the Exit Button to show the system information. Copying Files from Memory Card to PhotoBank 1. Press and hold the Power Button for a few seconds to power on the PhotoBank. 2. -
Page 6: Copying Files From Photobank To Memory Card
etc.) 7. Transfer is complete. ∗To power off the PhotoBank, press and hold the Power Button for a few seconds until the LCD turns off. Copying Files from PhotoBank to Memory Card Press and hold the Power Button for a few seconds to power on the PhotoBank. Insert the memory card into the PhotoBank. -
Page 7: Erasing The Memory Card
During data transfers from the HDD to the memory card, please do not remove the memory card until the procedure has completed. (All files in the folder will be transferred to the memory card in the root directory using the same folder name.) Transfer is complete. -
Page 8: Deleting Folders In Photobank
When deleting all the data from the memory card, please do not remove the memory card before the procedure is complete. Work is complete. Deleting Folders in Photo Bank Press and hold the Power Button for a few seconds to power on the PhotoBank. Press the Select Button until the third icon is selected and then press the Enter Button. -
Page 9: Charging The Battery
When deleting a folder from the memory card, please do not remove the memory card before the procedure is complete. Deletion complete. Charging the Battery PhotoBank uses a high capacity Li-ion rechargeable battery (2200mAh). To charge the battery, please plug the AC adapter (Output Power: DC 5V 2A) to the Power DC Jack. While the battery is charging, the LCD Screen will display the charging percentage. - Page 10 Oceania ceania Slide down the latch found on the back of the adapter, and PLUG A will release. Slide down the latch found on the back of the adapter, and PLUG A will release. Ensure that the plug locks into a 90 angle. Ensure that the plug locks into a 90 angle.
-
Page 11: Adapter Configuration By Country
Country Volt Code Oceania Australia 240/250 Fiji New Zealand Tahiti Africa Egypt Kenya Mauritius Morocco 115/127/220 Nigeria R.S.A. 220/230/250 Zambia Asia Bangladesh Brunel Hong Kong India Indonesia 127/230 Japan 50/60 Korea 100/220 A.B.C Macao 115/127/220 Mainland China 110/200 A.B.C.D Malaysia Nepal Parkistan 220/230... -
Page 12: Driver Installation For Windows 98/98Se
Connecting to the Computer Driver Installation for Windows 98/98SE Power on the computer. Verify the USB port is enabled and working properly. *Note: If you are using Windows 98/98SE, please don’t connect your PhotoBank to the computer before the driver is installed. Insert the Driver CD into the CD-ROM drive. -
Page 13: Disconnecting Photobank In Windows 98/98Se
Manager in the System Properties window. Disconnecting PhotoBank in Windows 98/98SE Locate the green arrow icon on the icon. The Stop USB Mass Storage Device pop-up menu will appear. disconnect your PhotoBank. An Information dialogue window will appear. Select OK to continue. Your PhotoBank is now ready to be disconnected from your computer. -
Page 14: Uninstall Driver
To uninstall the driver for the PhotoBank, run Add/Remove Programs from the Settings/Control Panel. process. Using in Windows Me/2000/XP Power on the computer. Verify the USB port is enabled and working properly. Using the included USB cable, connect the PhotoBank to the USB port of your computer. -
Page 15: Using The Photobank In Mac Os
2. The Stop USB Mass Storage Device pop-up menu will appear. Select to disconnect your PhotoBank. 3. The Safe To Remove Hardware window will appear. Select OK. 4. Your PhotoBank is now ready to be removed. *Note: If you don’t follow the above steps to remove the PhotoBank in Windows 2000, the Unsafe Removal of Device message will appear. -
Page 16: Changing The Battery
disk icon into the trashcan. After the disk icon disappears, you can disconnect the PhotoBank. Changing the Battery 1. Remove the screw a nd then the battery cover. 2. Unplug the battery wire from the connector. 3. Replace the battery. 4. -
Page 17: Updating The Firmware
Setup the Firmware Upgrade Tool 1. Power on the computer. Verify the USB port is enabled and working properly 2. Insert the Driver CD into the CD-ROM drive. Run the Setup.exe program located within folder “D:\Firmware\Upgrade” of the Driver CD (Where “D” is the CD-ROM drive letter). -
Page 18: Uninstall The Firmware Upgrade Tool
Uninstall the Firmware Upgrade Tool To uninstall the Firmware Upgrade Tool, run Add / Remove Programs from the Settings / Control Panel. Please select the TRANSCEND Platform Device Manager and follow the on-screen instructions to complete the process. -
Page 19: Troubleshooting
WARNING Do not try to open the case of the PhotoBank else you will void the warranty. If a fault occurs, check the points listed below first. If you are unable to solve the problem with this information, please consult your dealer or service center. Q: While copying data from memory card to HDD or reversely, the PhotoBank always displays “Operation Error”. -
Page 20: Warning
Any unauthorized attempt to disassemble the PhotoBank will void the limited warranty. Power Supply ········································ DC 5V from USB port Storage media ······································· 1.8” HDD Slots for memory cards ·························· 1. CF Card Type I / II LCD Indicators ······································ Black and White with blue back light Operating Temperature ·························... -
Page 21: Photobank Limited Warranty
It’s all part of our commitment to Customer Satisfaction. All Transcend Information, Inc. (Transcend) products are warranted and tested to be free from defects in material and workmanship and to conform to the published specifications. During the warranty period should this Transcend PhotoBank fail under normal use in the recommended environment due to improper workmanship or materials, Transcend will repair the product or replace it with a comparable one.