Table of Contents
Advertisement
Available languages
Available languages
Advertisement
Chapters
Table of Contents

Related Manuals for Saeco 10001552


Summary of Contents for Saeco 10001552
- Page 1 Operation and maintenance manual Before using the machine, please read the attached operating instructions. Carefully read the safety rules Mode d'emploi Veuillez lire attentivement le mode d'emploi (notamment les consignes de sécurité) avant d'utiliser l'appareil. FOR HOUSEHOLD USE ONLY...
-
Page 2: Important Safeguards
IMPORTANT SAFEGUARDS When using electrical appliances, basic safety precautions should always be followed to reduce the risk of fire, electric shock, and/or injury to persons, including the following: 1 Read all instructions and information in this instruction book and any other literature included in this carton referring to this product before operating or using this appliance. - Page 3 This appliance is for household use only. Any servicing, other than cleaning and user maintenance, should be performed by an authorized service centre. Do not immerse machine in water. To reduce the risk of fire or electric shock, do not disassemble the machine. There are no parts inside the machine serviceable by the user.
-
Page 4: Table Of Contents
CONTENTS GENERAL INFORMATION ... 3 APPLIANCE ... 4 ... 4 ACCESSORIES INSTALLATION ... 5 ... 5 STARTING THE MACHINE ... 6 SETTING THE LANGUAGE “ ” ... 7 AQUA PRIMA WATER FILTER DISPLAY ... 8 OPTI DOSE INDICATES THE COFFEE DOSE PER CUP ADJUSTMENTS ... -
Page 5: General Information
GENERAL INFORMATION The coffee machine is suitable for preparing espresso coffee using coffee beans, and it is equipped with a device to dispense steam and hot water. The machine is designed for domestic use only, and is not suitable for heavy or professional use. Warning: no liability is assumed for any damage caused by: •... -
Page 6: Appliance
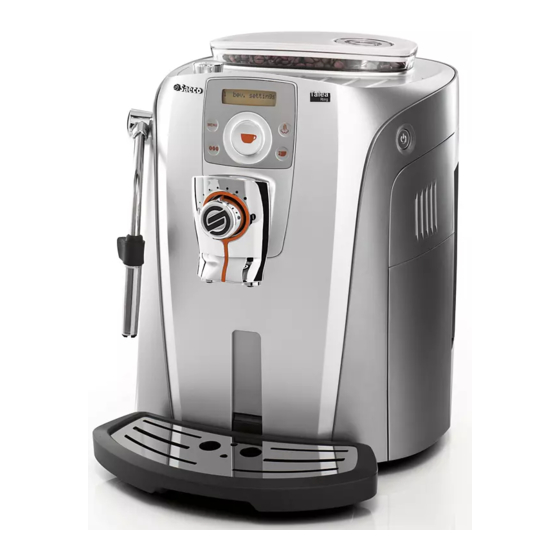
APPLIANCE Cup stacking surface Control panel SBS knob Dispensing head Hot water / steam knob Hot water / steam spout Water tank “Milk Island” connection ACCESSORIES “Aqua Prima” Ground coffee measuring scoop Grinder adjustment key Coffee bean hopper Socket for power cable Water hardness tester Coffee bean hopper cover Compartment for pre-... -
Page 7: Installation
STARTING THE MACHINE Make sure that the main power button is not pressed in the “ON” position. Remove the coffee bean hopper cover. Fill the hopper with coffee beans. Fill the tank with fresh drinking water. Do not exceed the “max” level indicated on the water tank. -
Page 8: Setting The Language
INSTALLATION SETTING THE LANGUAGE This allows you to adjust the parameters of the beverages to the typical parameters of the country where the machine is used. This is why some languages are differentiated also by country. language English Talea Ring The machine starts and displays all the messages in the selected language. -
Page 9: Aqua Prima" Water Filter
“AQUA PRIMA” WATER FILTER To improve the quality of the water you use, and guarantee longer machine life at the same time, it is Remove the “Aqua Prima” water date of the current month. Place a container beneath the steam/hot water spout. filter Press again. -
Page 10: Display
DISPLAY Accessing the programming menu Click wheel Select the coffee bean dose or the quantity of pre-ground coffee • Press the button twice to make 2 cups. selected espresso order to grind the second serving of coffee. Coffee dispensing is then restarted and completed. (OPTI-DOSE) INDICATES THE GROUND COFFEE QUANTITY It is possible to choose three options (strong, medium and mild) by pressing the... -
Page 11: Adjustments
COFFEE INTENSITY The SBS system has been carefully designed to give your coffee the intense taste you desire. Simply turn the dial and you will notice that the coffee goes from mild intensity to strong intensity. SBS – SAECO BREWING SYSTEM SBS adjusts the intensity of the brewed coffee. -
Page 12: Beverage Dispensing
BEVERAGE DISPENSING COFFEE BREWING CAN BE STOPPED AT ANY TIME BY PRESSING THE BUTTON AGAIN. THE STEAM SPOUT MAY REACH HIGH TEMPERATURES: DANGER OF SCALDING. DO NOT TOUCH IT WITH BARE HANDS. Check that all the containers are clean. To carry out this operation, follow the instructions in the “Cleaning and Maintenance”... -
Page 13: Dispensing Beverages With Ground Coffee
DISPENSING BEVERAGES WITH GROUND COFFEE The machine allows you to use pre-ground and decaffeinated coffee. Pre-ground coffee must be poured into the appropriate compartment positioned next to the coffee bean hopper. Only use coffee ground for espresso machines and never coffee beans or instant coffee. WARNING: ONLY PUT PRE-GROUND COFFEE INTO THE COMPARTMENT WHEN YOU WISH TO DISPENSE THIS TYPE OF BEVERAGE. -
Page 14: Hot Water Dispensing
BEVERAGE DISPENSING HOT WATER DISPENSING DISPENSING MAY BE PRECEDED BY SHORT SPURTS OF HOT WATER AND SCALDING IS POSSIBLE. THE HOT WATER/STEAM SPOUT MAY REACH HIGH TEMPERATURES: DO NOT TOUCH IT WITH BARE HANDS. USE THE APPROPRIATE HANDLE ONLY. Place a container beneath the steam/hot water spout. -
Page 15: Dispensing Steam
DISPENSING STEAM DISPENSING MAY BE PRECEDED BY SHORT SPURTS OF HOT WATER AND SCALDING IS POSSIBLE. THE HOT WATER/STEAM SPOUT MAY REACH HIGH TEMPERATURES: DO NOT TOUCH IT WITH BARE HANDS. USE THE APPROPRIATE HANDLE ONLY. Place a container with the beverage to be warmed up beneath the steam spout. -
Page 16: Making Cappuccino
BEVERAGE DISPENSING MAKING CAPPUCCINO DISPENSING MAY BE PRECEDED BY SHORT SPURTS OF HOT WATER AND SCALDING IS POSSIBLE. THE HOT WATER/STEAM SPOUT MAY REACH HIGH TEMPERATURES: DO NOT TOUCH IT WITH BARE HANDS. USE THE APPROPRIATE HANDLE ONLY. Fill 1/3 of the cup with cold milk. Turn the knob to the position. -
Page 17: Milk Island (Optional)
This device, which may be purchased separately, enables you to easily and comfortably prepare delicious cappuccinos. Warning: before using the Milk Island, read the manual and all precautions carefully for correct use. Important note: the quantity of milk in the carafe must never be below the “MIN” minimum level nor exceed the “MAX”... -
Page 18: Beverage Programming
BEVERAGE PROGRAMMING Every beverage can be programmed according to your individual tastes. 1. PROGRAMMING FOR SELF-LEARNING You can program the quantity of coffee and/or milk you wish to be dispensed into the cups when you press the button for any beverage. Select the type of beverage you want to program, then press and hold the (for example): programming... - Page 19 Check that the water and coffee bean container are full; place the cup under the dispensing head. espresso Select the beverage to program. Press the espresso Change the coffee quantity by navigating the click wheel with your prebrew: normal espresso Press the button to select the prebrew setting.
-
Page 20: Programming The Machine
PROGRAMMING THE MACHINE Some of the machine’s functions can be programmed to customize operations according to your individual preferences. 1 Press the bev. settings Beverage setting (see page 16) 2 mach. settings Machine settings (see page 19) maintenance Maintenance (see page 22) bev. -
Page 21: Machine Settings
MACHINE SETTINGS To change the machine’s operation settings, press the language English set the menu language. 2.2 water hardn. set the water hardness. 2.3 acoust.alert set/activate the acoustic alarms. To exit any level of “mach. settings” without saving the changes made, press the “LANGUAGE”... -
Page 22: Water Hardness" Menu
PROGRAMMING THE MACHINE “WATER HARDNESS” MENU > mach. settings > water hardn. With the “Water hardness” function you can adapt your machine to the degree of hardness of the water you use, so that the machine will request descaling at the right moment. Hardness is expressed on a scale from 1 to 4. -
Page 23: Filter Alarm" Menu
“FILTER ALARM” MENU > mach. settings > filter alarm 2 mach. settings “RINSE” MENU > mach. settings > rinsing The rinse setting cleans the internal circuits in order to guarantee that the beverages are only made with fresh water. The function is enabled as default by the manufacturer. 2 mach. -
Page 24: Maintenance
MAINTENANCE MAINTENANCE To access the machine’s maintenance programs, press the press the descaling “WATER FILTER” MENU > maintenance > filter maintenance Litres remaining > maintenance > filter > litres left maintenance filter filter filter button and select “maintenance” and group wash wash the Brew Group. - Page 25 Filter state > maintenance > filter > status maintenance Select by navigating the click It is possible to set: - on - off Press the button to save. Load filter > maintenance > filter > activate maintenance Place a container beneath the steam spout.
-
Page 26: Descaling" Menu
MAINTENANCE “DESCALING” MENU > maintenance > descaling maintenance Litres remaining > maintenance > descaling > litres left To display how many litres of water can still be used before the machine requests a descaling cycle. maintenance Descaling cycle > maintenance > descaling > execute now To perform the automatic descaling cycle. - Page 27 Note: before beginning the descaling cycle make sure that: 1. a large enough container is positioned under the water spout; 2. THE “AQUA PRIMA” FILTER HAS BEEN REMOVED. maintenance Descaling is carried out at a controlled temperature. If the machine is cold, you must wait until it has reached the right temperature;...
- Page 28 MAINTENANCE descaling cycle please wait The machine begins to dispense the descaling solution through the hot water spout. The dispensing occurs at predetermined intervals, in order to allow the solution to be more effective. Insert the tank with fresh drinking water. rinse cycle ok to start Rinse the machine’s circuits by...
-
Page 29: Group Washing
Group washing > maintenance > group wash To clean the machine’s internal circuits used for brewing coffee. To wash the Brew Group, simply clean with water as shown on page 31. This wash completes maintenance of the Brew Group. We recommend using Saeco tablets, which can be purchased separately at your dealer’s. -
Page 30: Programming The Machine
PROGRAMMING THE MACHINE ENERGY SAVING To adjust the energy saving parameters, press the TURN OFF DELAY > energy saving > t-off delay By default, the off delay time is set at 180 minutes. energy saving button and select “energy saving” and press the energy saving Set the time which must pass before the machine enters energy saving mode. -
Page 31: Special Functions
SPECIAL FUNCTIONS This menu allows you to access special functions present on the machine. Press the button to access and select “special funct.”and press the RESTORE SETTINGS > special funct. > factory set. The function for restoring all the factory settings is contained in this menu. This function is particularly important for restoring the basic parameters. -
Page 32: Cleaning And Maintenance
CLEANING AND MAINTENANCE GENERAL MACHINE CLEANING The cleaning described below must be performed once a week. Note: if water remains in the tank for several days, do not use it. WARNING! Never immerse the machine in water. If you remove grounds with the machine off or when not signaled on the display, the count of the grounds emptied into the drawer is not reset. -
Page 33: Cleaning The Brew Group
CLEANING THE BREW GROUP The Brew Group must be cleaned at least once a week. Wash the Brew Group with warm water. WARNING! Do not wash the Brew Group with detergents that can compromise its correct operation. Do not wash in the dishwasher. Open the service door and remove the coffee grounds drawer. -
Page 34: Error Codes
ERROR CODES GUIDE MESSAGE THAT APPEARS out of service (xx) restart to fix… close coffee bean lid fill container wth coffee insert the brew group insert grounds drawer empty grounds empty grounds drawer close door fill the water tank. empty drip tray change the filter carafe missing milk island missing... -
Page 35: Troubleshooting
ROBLEMS The machine does not turn on. Hot water or steam is not dispensed. Coffee has little crema. The Brew Group does not come out. Coffee is not brewed. Coffee is brewed slowly. Coffee leaks out of the dispensing head. Please contact the service centre for any problems not covered in the above table or when the suggested solutions do not solve the problem. -
Page 36: Safety Rules
SAFETY RULES IN CASE OF EMERGENCY IMMEDIATELY UNPLUG THE CORD FROM THE OUTLET. ONLY USE THE APPLIANCE • Indoors. • For preparing coffee, hot water and for frothing milk. • For domestic use. • By adults in non altered psycho-physical conditions. PRECAUTIONS FOR THE USE OF THE MACHINE •... -
Page 37: Replacement Parts
DANGERS • The appliance must not be used by children and persons who have not been informed of its operation. • The appliance is dangerous to children. When left unattended, unplug from the electrical outlet. • Keep the coffee machine packaging out of the reach of children. •... -
Page 38: Technical Data
TECHNICAL DATA TECHNICAL DATA Nominal voltage Power rating Power supply Shell material Size (w x h x d) Weight Cable length Control panel Water tank Coffee bean hopper capacity Pump pressure Boiler Coffee grinder Quantity of ground coffee Grounds drawer capacity Safety devices Subject to engineering and manufacturing changes due to technological developments. - Page 40 Lors de l’utilisation d’appareils électriques, il est important de prendre les précautions suivantes, afin d’éviter les décharges électriques, les courts circuits et les accidents corporels. 1 Lire toutes les instructions et les indications données dans cette brochure, ainsi que toute autre information indiquée sur l’emballage, avant de mettre la machine en marche.
- Page 41 PRÉCAUTIONS Cette machine est réservée à un usage domestique. Tout entretien, en dehors du nettoyage et de l’entretien usuel par l’usager, doit être fait par un centre de service autorisé. Ne pas plonger la base dans l’eau. Pour éviter les courts- circuits et les décharges électriques, ne pas démonter la base.
- Page 42 TABLE DES MATIÈRES GÉNÉRALITÉS ... 3 APPAREIL ... 4 ... 4 ACCESSOIRES MISE EN PLACE ... 5 ... 5 MISE EN MARCHE DE LA MACHINE ... 6 SÉLECTIONNER LA LANGUE « » ... 7 FILTRE AQUA PRIMA AFFICHEUR ... 8 OPTI DOSE INDICATION DE LA QUANTITÉ...
-
Page 43: Généralités
GÉNÉRALITÉS Cette machine à café est prévue pour la préparation de café expresso avec du café en grains et dispose d’un dispositif pour la distribution d’eau chaude et de vapeur. Au design elegant, cet appareil a ete conçu exclusivement pour un usage domestique et n’est donc pas indique pour un fonctionnement continu de type professionnel. -
Page 44: Appareil
APPAREIL Plaque pour poser les tasses Tableau de commande Distributeur Bac d’égouttement + Bouton robinet eau- chaude/vapeur Tuyau de distribution de l’eau chaude/vapeur Réservoir d’eau Raccord « Milk Island » ACCESSOIRES Filtre « Aqua Prima » Clé pour régler la mouture Réservoir à... -
Page 45: Mise En Place
MISE EN MARCHE DE LA MACHINE S’assurer que l’interrupteur général ne soit pas actionné. Retirer le couvercle du réservoir à café. Remplir le réservoir avec du café en grains. Remplir le réservoir avec de l’eau fraîche et potable, en veillant à ne jamais dépasser le niveau maximal marqué... -
Page 46: Sélectionner La Langue
MISE EN PLACE SÉLECTIONNER LA LANGUE Lors de la première mise en marche de la machine, il faut sélectionner la langue souhaitée ; cela permet d’adapter les paramètres des boissons à ceux du Pays d’utilisation. C’est pourquoi certaines langues sont différenciées aussi en fonction du pays. language English Talea Ring... -
Page 47: Filtre « Aqua Prima
FILTRE « AQUA PRIMA » Pour améliorer la qualité de l’eau utilisée, tout en garantissant la longévité de l’appareil, il est conseillé régler la date sur le mois en cours. Placer un récipient sous la buse de distribution de l’eau chaude/ vapeur filtre Appuyer à... -
Page 48: Afficheur
AFFICHEUR Accéder au menu de programmation Disque de sélection Sélectionner la quantité de café à moudre ou prémoulu • Pour obtenir 2 tasses, appuyer 2 fois sur la touche Cette opération est possible jusqu’à ce que le café de la première sélection soit moulé. sélectionné... -
Page 49: Réglages
DENSITÉ DU CAFÉ Le dispositif SBS a été spécialement conçu pour permettre de donner la densité et l’intensité de goût SBS – SAECO BREWING SYSTEM Pour régler la densité du café distribué. Le réglage peut également être effectué durant la distribution du café. Ce réglage a un effet immédiat sur la distribution sélectionnée. -
Page 50: Distribution De La Boisson
DISTRIBUTION DE LA BOISSON LA DISTRIBUTION DE CAFÉ PEUT ÊTRE INTERROMPUE À TOUT MOMENT EN APPUYANT DE NOUVEAU SUR LA TOUCHE LA VAPEUR PEUT ATTEINDRE UNE TEMPÉRATURE ÉLEVÉE : RISQUE DE BRÛLURES. ÉVITER TOUT CONTACT DIRECT AVEC LES MAINS. entretien » (voir page 30). Pour la préparation de 2 tasses, la machine distribue le premier café... -
Page 51: Distribution De La Boisson Avec Du Café Moulu
DISTRIBUTION DE LA BOISSON AVEC DU CAFÉ MOULU La machine permet d’utiliser du café prémoulu ou décaféiné moulu.Verser le café prémoulu dans le compartiment prévu à cet effet à côté du réservoir à café en grains. Ne verser que du café moulu pour machines à... -
Page 52: Distribution Deau Chaude
DISTRIBUTION DE LA BOISSON DISTRIBUTION D’EAU CHAUDE AU DÉBUT DE LA DISTRIBUTION, FAIRE ATTENTION AU RISQUE DE BRÛLURES CAR IL PEUT Y AVOIR DES ÉCLABOUSSURES D’EAU CHAUDE. LA BUSE POUR LA DISTRIBUTION DE L’EAU CHAUDE/ VAPEUR PEUT ATTEINDRE DES TEMPÉRATURES ÉLEVÉES : ÉVITER DE LA TOUCHER DIRECTEMENT AVEC LES MAINS, UTILISER EXCLUSIVEMENT LA POIGNÉE PRÉVUE À... -
Page 53: Distribution Vapeur
DISTRIBUTION VAPEUR AU DÉBUT DE LA DISTRIBUTION, FAIRE ATTENTION AU RISQUE DE BRÛLURES CAR IL PEUT Y AVOIR DES ÉCLABOUSSURES D’EAU CHAUDE. LA BUSE POUR LA DISTRIBUTION DE L’EAU CHAUDE/ VAPEUR PEUT ATTEINDRE DES TEMPÉRATURES ÉLEVÉES : ÉVITER DE LA TOUCHER DIRECTEMENT AVEC LES MAINS, UTILISER EXCLUSIVEMENT LA POIGNÉE PRÉVUE À... -
Page 54: Distribution Cappuccino
DISTRIBUTION DE LA BOISSON DISTRIBUTION CAPPUCCINO AU DÉBUT DE LA DISTRIBUTION, FAIRE ATTENTION AU RISQUE DE BRÛLURES CAR IL PEUT Y AVOIR DES ÉCLABOUSSURES D’EAU CHAUDE. LA BUSE POUR LA DISTRIBUTION DE L’EAU CHAUDE/ VAPEUR PEUT ATTEINDRE DES TEMPÉRATURES ÉLEVÉES : ÉVITER DE LA TOUCHER DIRECTEMENT AVEC LES MAINS, UTILISER EXCLUSIVEMENT LA POIGNÉE PRÉVUE À... -
Page 55: Milk Island (En Option)
Cet accessoire, que l’on peut acheter à part, permet de préparer très facilement et en toute commodité d’excellents cappuccinos. Attention : avant d’utiliser le Milk Island consulter le manuel correspondant contenant toutes les précautions pour une utilisation correcte. Remarque importante : la quantité de lait dans la carafe ne doit pas être inférieure au niveau minimal «... -
Page 56: Programmation Boisson
PROGRAMMATION BOISSON L’utilisateur peut programmer chaque boisson selon son goût personnel. 1. PROGRAMMATION POUR REGLAGES PERSONNELS La quantité de café qui est distribuée dans la tasse chaque fois que l’on appuie sur le bouton peut être programmée rapidement pour toutes les boissons. Après avoir sélectionné... - Page 57 réservoir à café en grains soient pleins ; mettre la tasse sous le distributeur. expresso Sélectionner la boisson à appuyant sur expresso faisant glisser le doigt sur le appuyant sur la touche pré-inf. normale expresso Appuyer sur la touche pour sélectionner le paramètre pré- infusion.
-
Page 58: Programmation Machine
PROGRAMMATION MACHINE personnelles. 1 Appuyer sur la touche 2 Faire glisser le doigt sur le disque pour : rég. boissons Réglage des boissons (voir page 16) rég. machine Réglage de la machine (voir page 19) entretien Entretien (voir page 22) rég. -
Page 59: Réglage De La Machine
RÉGLAGE DE LA MACHINE sélectionner « rég. machine » et appuyer sur la touche sélection pour : français sélectionner la langue des menus. dureté eau choisir le degré de dureté de l’eau. 2.3 alertes son. activer les alertes sonores Pour quitter la fonction « rég. machine » à n’importe quel touche . -
Page 60: Menu « Dureté De L'eau
PROGRAMMATION MACHINE MENU « DURETÉ DE L’EAU » > rég. machine > dureté eau puisse demander de faire un cycle de détartrage au moment voulu. La dureté est exprimée avec une échelle de 1 à 4. La machine est préréglée sur 3. Plonger dans l’eau la bande de test fournie avec le kit pendant une de l’eau. -
Page 61: Menu « Alerte Filtre
MENU « ALERTE FILTRE » > rég. machine > al. filtre rég. machine MENU « RINÇAGE » > rég. machine > rinçage effectuée uniquement avec de l’eau fraîche. Cette fonction est activée par défaut par le fabricant. rég. machine Remarque : ce rinçage doit être fait après la phase de chauffage à chaque mise en marche de la machine. al. -
Page 62: Entretien
ENTRETIEN ENTRETIEN Pour accéder aux programmes d’entretien de la machine, appuyer sur la touche « entretien » et appuyer sur la touche détart. gestion du détartrage. MENU « FILTRE À EAU » > entretien > filtre entretien Litres restants > entretien > filtre > litres rest. entretien . - Page 63 État du filtre > entretien > filtre > état entretien Sélectionner en glissant le doigt sur le disque de sélection. Il est possible de régler : - activé - désactivé Mémoriser en appuyant sur La charge du filtre > entretien > filtre > charge entretien Placer un récipient sous la buse de vapeur.
-
Page 64: Menu « Détartrage
ENTRETIEN MENU « DÉTARTRAGE » > entretien > détart. Pour gérer le détartrage des circuits de la machine. entretien Litres restants > entretien > détart. > litres rest. de détartrage. entretien Cycle de détartrage > entretien > détart. > exéc. maintenant Cette fonction permet d’exécuter le cycle automatique de détartrage. - Page 65 2. QUE LE FILTRE « AQUA PRIMA » NE SOIT PLUS DANS LE RÉSERVOIR À EAU . entretien Le détartrage a lieu à une température contrôlée. Si la machine est froide, attendre qu’elle arrive à la juste température ; dans le cas contraire, procéder comme suit pour refroidir la chaudière : S’il est nécessaire de chauffer la chaudière, la machine exécute ce processus de façon autonome ;...
- Page 66 ENTRETIEN cycle détart. veuil. patienter La machine commence à distribuer la solution détartrante dans la buse de distribution de l’eau chaude. La distribution a lieu à des intervalles préétablis pour permettre à la Remettre le réservoir contenant de l’eau froide potable dans la machine.
-
Page 67: Lavage Du Groupe
Lavage du groupe > entretien > lav. groupe Cette fonction permet d’effectuer le nettoyage des circuits internes de l’appareil qui servent à la distribution du café. complète l’entretien du groupe de distribution. Il est conseillé d’utiliser des pastilles Saeco, que l’on peut acheter à... -
Page 68: Programmation Machine
PROGRAMMATION MACHINE ÉCONOMIE D’ÉNERGIE Pour régler les paramètres de l’économie d’énergie de la machine, appuyer sur la touche sélectionner « économie d’én. » et appuyer sur la touche doigt pour : RETARD ARRÊT > économie d’én., > ret. arrêt 4 economie d'én. . -
Page 69: Fonctions Spéciales
DES FONCTIONS SPÉCIALES Ce menu permet d’accéder aux fonctions spéciales prévues sur la machine. Pour ce faire, appuyer sur la touche glisser le doigt sur le disque de sélection pour : RÉTABLIR RÉGLAGES > fonct. spéc. > rég. prédéf. Ce menu contient la fonction pour rétablir toutes les valeurs réglées en usine. Cette fonction est particulièrement importante pour rétablir les paramètres de base. -
Page 70: Nettoyage Et Entretien
NETTOYAGE ET ENTRETIEN NETTOYAGE GÉNÉRAL DE LA MACHINE Le nettoyage décrit ci-dessous doit être fait au moins une fois par semaine. Remarque : ne pas utiliser de l’eau qui n’a pas été remplacée depuis plusieurs jours. ATTENTION ! Ne pas plonger la machine dans l’eau. Le comptage du marc déposé... -
Page 71: Nettoyage Du Groupe De Distribution
NETTOYAGE DU GROUPE DE DISTRIBUTION Le groupe de distribution doit être nettoyé au moins une fois par semaine. Laver le groupe de distribution à l’eau tiède. ATTENTION ! Ne pas laver le groupe de distribution avec des détergents qui pourraient affecter son fonctionnement. -
Page 72: Messages D'erreur
MESSAGES D’ERREUR MESSAGE QUI APPARAÎT hors service (xx) redémarrer pour résoudre… fermer couvercle café introduire café dans réservoir insérer groupe distrib. insérer tiroir à marc vider marc vider tiroir à marc fermer porte remplir le réservoir à eau vider bac d’égout. remplacer le filtre carafe absente milk island absente... -
Page 73: Problèmes - Causes - Remèdes
ROBLÈMES La machine ne s’allume pas La machine ne distribue ni eau chaude ni vapeur. Le café ne mousse pas. Le groupe de distribution ne peut pas être démonté. Le café ne coule pas. Le café coule lentement. Le café coule en dehors du distributeur. -
Page 74: Consignes De Sécurité
CONSIGNES DE SÉCURITÉ EN CAS D’URGENCE N’UTILISER L’APPAREIL • que dans des locaux fermés • que pour la préparation de café, d’eau chaude et de mousse de lait • Que par des adultes dotés d’une bonne constitution physique et mentale. MESURES DE PRÉCAUTION CONCERNANT L’UTILISATION DE L’APPAREIL •... - Page 75 DANGERS • Ne pas laisser les enfants se servir de l’appareil. Cette consigne vaut également pour les personnes qui ne connaissent pas le fonctionnement de l’appareil. • L’appareil peut représenter un danger pour les enfants. Si l’appareil est laissé sans surveillance, •...
-
Page 76: Données Techniques
DONNÉES TECHNIQUES DONNÉES TECHNIQUES Tension nominale Puissance nominale Alimentation Matériau du corps Dimensions (l x a x p) Poids Longueur du câble Tableau de commande Réservoir d’eau Capacité du réservoir à café Pression de la pompe Chaudière Moulin à café Quantité... - Page 80 Saeco International Group S.p.A. Via Torretta, 240 I-40041 Gaggio Montano, Bologna Tel: + 39 0534 771111 Fax: + 39 0534 31025 www.saeco.com The manufacturer reserves the right to change the features of the product without prior notice. Le producteur se réserve le droit d“apporter toutes modifications sans préavis. ©...