Table of Contents
Advertisement
Quick Links
Advertisement
Table of Contents

Related Manuals for Native Instruments Traktor Kontrol S2


Summary of Contents for Native Instruments Traktor Kontrol S2
- Page 1 Manual...
- Page 2 The information in this document is subject to change without notice and does not represent a commitment on the part of Native Instruments GmbH. The software described by this docu- ment is subject to a License Agreement and may not be copied to other media. No part of this...
- Page 3 D-10997 Berlin Germany www.native-instruments.de Native Instruments North America, Inc. 6725 Sunset Boulevard 5th Floor Los Angeles, CA 90028 www.native-instruments.com Japan Native Instruments KK YO Building 3F Jingumae 6-7-15, Shibuya-ku, Tokyo 150-0001 Japan www.native-instruments.co.jp © Native Instruments GmbH, 2013. All rights reserved.
-
Page 4: Table Of Contents
Table of Contents Table of Contents Welcome to the World of TRAKTOR KONTROL S2! ............11 What Is TRAKTOR KONTROL S2? ....................11 The TRAKTOR KONTROL S2 Documentation at a Glance .............. 12 1.2.1 Which Documents Are There? ..................12 1.2.2... - Page 5 Another Useful Tool for Synching ................63 Using the S2 with TRAKTOR DJ ................... 66 Key S2 Functions Using TRAKTOR DJ ................... 66 5.1.1 Browsing & Loading Tracks ..................67 5.1.2 Deck Volume Controls and Crossfader ............... 67 Traktor Kontrol S2 - Manual - 5...
- Page 6 The Rear Panel ........................... 94 6.2.1 MIC Section ....................... 95 6.2.2 OUTPUTS Section ....................... 95 6.2.3 POWER Section ......................96 The Front Panel ........................... 96 Types of Control Elements ......................97 6.4.1 Buttons ........................98 Traktor Kontrol S2 - Manual - 6...
- Page 7 Remix Deck Mode ....................... 112 Using the Transport Control Area ....................115 7.6.1 CUE and PLAY Button ....................115 7.6.2 SYNC Button ......................116 7.6.3 SHIFT Button ......................117 Using the Mixer ........................... 118 Traktor Kontrol S2 - Manual - 7...
- Page 8 8.2.3 Calibration ........................ 140 8.2.4 LEDs .......................... 141 Other Settings of Interest ......................141 8.3.1 Switching the Deck Flavors ..................141 8.3.2 Adjusting the Input Routing ..................142 The Setup Wizard ........................142 Traktor Kontrol S2 - Manual - 8...
- Page 9 USB and Driver Issues ....................154 10.2.3 Updating the Driver ....................154 10.2.4 USB-related Power Issues ..................154 10.2.5 Using the TRAKTOR KONTROL S2 with a Laptop ............155 10.3 Loose Jog Wheel Top Plate ......................156 10.4 TRAKTOR Crashes ........................156 10.5 Getting Help ..........................
- Page 10 Channel and Crossfader Quick Reference ..............172 13.2.3 Master Display Quick Reference ................172 13.3 FX Unit Quick Reference ......................173 13.4 Browsing, Loading and Copying Quick Reference ............... 173 Index ........................175 Traktor Kontrol S2 - Manual - 10...
-
Page 11: Welcome To The World Of Traktor Kontrol S2
What Is TRAKTOR KONTROL S2? Welcome to the World of TRAKTOR KONTROL S2! On behalf of the whole Native Instruments team, we are delighted that you have chosen TRAK- TOR KONTROL S2 as your DJ controller! What Is TRAKTOR KONTROL S2? TRAKTOR KONTROL S2 is a fully integrated hardware and software DJ performance system created by the makers of TRAKTOR. -
Page 12: The Traktor Kontrol S2 Documentation At A Glance
A Setup Guide is available on the product registration page. Find a link to the registration page on the registration flyer, which is included in your TRAKTOR KONTROL S2 product box. It will guide you through the software and hardware installation of your TRAKTOR KONTROL S2 sys- tem, from the very beginning to the first sound coming through your speakers. -
Page 13: Recommended Reading Order
The TRAKTOR KONTROL S2 Manual. The TRAKTOR 2 Manual. 1.2.3 In This Manual What you are reading now is the TRAKTOR KONTROL S2 Manual. This manual is structured as follows: ▪ Chapter ↑2, TRAKTOR KONTROL S2 Quick Overview quickly introduces you to the TRAK- TOR KONTROL S2 user interface and its main areas, both on the hardware side and soft- ware side. -
Page 14: System Requirements
▪ Finally, three appendixes provide you with additional information: ◦ Appendix A shows you how to integrate TRAKTOR KONTROL S2 with your studio or live setup in various configurations. - Page 15 Welcome to the World of TRAKTOR KONTROL S2! System Requirements To check the compatibility with several operating systems, please have a look at: http:// www.native-instruments.com/compatibility Traktor Kontrol S2 - Manual - 15...
-
Page 16: Traktor Kontrol S2 Quick Overview
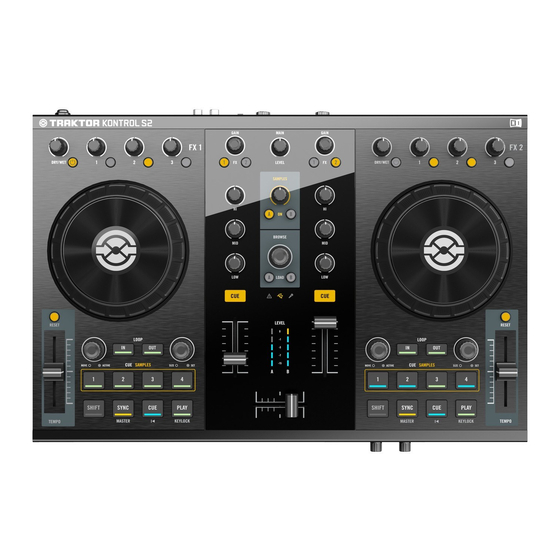
TRAKTOR KONTROL S2 Quick Overview TRAKTOR KONTROL S2 Quick Overview This mini-chapter will quickly introduce you to TRAKTOR KONTROL S2’s main areas and con- cepts both on your TRAKTOR KONTROL S2 hardware controller and in the TRAKTOR PRO software. To start off with, there are four virtual Decks in the TRAKTOR PRO software, and each of them can be operated in several modes: Track Deck mode, Remix Deck mode, and Live In- put mode, so you have a very flexible system on your hands. - Page 17 TRAKTOR KONTROL S2 Quick Overview Hardware controller and software side by side. (1) Decks: TRAKTOR KONTROL S2 provides you with two physical Decks. The Decks are the place where tracks (and Samples) are controlled. They can be seen as the equivalent to the good old vinyl or CD decks, but with a bunch of additional features and the flexibility of a com- puter-based system connected to them.
- Page 18 Decks and effect routing. See the TRAKTOR 2 Manual for further information. (3) Mixer: Sitting in the middle of your TRAKTOR KONTROL S2 controller, the Mixer receives the audio signals coming from all TRAKTOR software Decks A-D; there is one channel for each Track Deck A and B, and one combined channel, controlling both Remix Decks C and D, so basically you have a three-channel mixer.
-
Page 19: Preparing Your Music Library
You will learn here how to quickly import your music into the powerful Track Collection of TRAKTOR. If you prefer to start learning how to use TRAKTOR KONTROL S2 right away, skip this chapter and go on with the tutorials in chapter Tutorials, which make use of the demo tracks pro- ↑4,... -
Page 20: Importing Music Folders
Browser and then choose the option Analyze (Async) from the Right-click menu. Another quick way to analyze a track is to simply drag it into a Track Deck. A light blue bar at the bottom of TRAKTOR moving to the right indicates the analyzing progress. Traktor Kontrol S2 - Manual - 20... -
Page 21: Tracks Managed By Itunes
3.3.1 Playing Tracks Managed by iTunes You can browse your iTunes Library and playlists directly from your TRAKTOR KONTROL S2. By the way, this will be the opportunity to introduce you to browsing and loading from your hardware controller. For this, we will use the following control elements: ▪... -
Page 22: Importing A Selection Of Tracks From Itunes
Click the iTunes icon in the Browser Tree to open that node. Select the tracks to import into the Track Collection. Drag the selection onto the Track Collection icon in the Browser Tree. Traktor Kontrol S2 - Manual - 22... -
Page 23: Importing Itunes Playlists
Select the playlist to be imported. Drag the playlist onto the Playlists icon. Alternatively right-click (Windows) or [Ctrl]-click (Mac OS X) on the playlist and choose ► Import to Playlists in the contextual menu. Traktor Kontrol S2 - Manual - 23... -
Page 24: Tutorials
Prerequisites We assume here that your TRAKTOR KONTROL S2 system is already up and running. If it’s not the case, please follow the instructions in the separate Setup Guide and come back here when you’re done! -
Page 25: Quick-Loading A Track
Let’s load the track “Techno 1” from the included demo tracks on to Deck A. To select and load the track, we will use these control elements on your S2: ▪ Any of the two SHIFT buttons (one at the bottom of each Deck): Traktor Kontrol S2 - Manual - 25... - Page 26 Demo Tracks Playlist here, you can also open it from the Browser Tree's Explorer node): Release SHIFT and turn the BROWSE encoder to scroll through the Playlist and navigate to the track Techno Traktor Kontrol S2 - Manual - 26...
-
Page 27: Playing The Track
The track starts playing. The PLAY button lights up and the waveform starts moving in → TRAKTOR. Again, pressing the PLAY button on the right Deck would have started the playback on Track Deck B. Traktor Kontrol S2 - Manual - 27... -
Page 28: If You Don't Hear The Track
If You Don’t Hear the Track If the track is playing on the Deck but the audio coming through your amplification system sounds too low, or if there is no sound at all, check the following: Traktor Kontrol S2 - Manual - 28... - Page 29 0 dB. At the top center of the Mixer, the MAIN LEVEL knob should be turned at least part of ► the way to the right: Traktor Kontrol S2 - Manual - 29...
-
Page 30: Mixing In A Second Track
We assume here that you already followed the instructions in the previous tutorial (see chapter ↑4.1, Playing Your First Track). TRAKTOR KONTROL S2 now is in the following state: ▪ The track “Techno 1” is loaded on Deck A. The track is playing and audible. -
Page 31: Using Headphones To Prepare The Mix
Before mixing in the track playing on Deck B, we will use TRAKTOR’s automatic Sync feature to adjust its tempo to that of Deck A. This is done in just one step via the SYNC button: Traktor Kontrol S2 - Manual - 31... -
Page 32: Setting A Cue Point As Starting Point
Using a particular point in a track (for mixing in, triggering, etc.) is called “cue- ing.“ TRAKTOR KONTROL S2 lets you mark points for cueing — we call them Cue Points. This no- tably allows you to re-use these points at a later stage, or in a later session. - Page 33 With Quantize mode on, whenever you jump through the track (e.g., by pressing a CUE/REMIX SLOTS button), the playback jumps to the nearest position that preserves the beat matching, thus ensuring that the current sync doesn’t get lost when you jump through the track. Traktor Kontrol S2 - Manual - 33...
-
Page 34: Interlude: In Case The Left Track Has Reached Its End
4.2.6 Mixing In the Track by Using the Channel EQ and Filter Now would be a great time to audition some of TRAKTOR KONTROL S2’s EQs and filters: The EQ and FILTER knobs. Turn any of the EQ knobs on channel B to hear the effect on the cued track. -
Page 35: Doing Everything By Hand
A while simultaneously increasing that of chan- nel B. Complete the transition by gradually moving the crossfader all the way to the right. You just did your first mix with TRAKTOR KONTROL S2! → 4.2.7 Doing Everything by Hand You can also do your mix manually instead of using TRAKTOR’s sync and cueing facilities. - Page 36 BPM, which is displayed at the top of Track Deck B in TRAKTOR. Manually Cueing with the Jog Wheel You can use the jog wheel to manually seek through the track and find a nice bring-in point: Traktor Kontrol S2 - Manual - 36...
- Page 37 On the left Deck, move the jog wheel’s outer rim in the desired direction to temporarily ► bend the tempo and adjust the phase in order to cancel any minor offset. Your tracks now perfectly match. → Traktor Kontrol S2 - Manual - 37...
-
Page 38: Adjusting Levels
When you’re ready, you can bring the crossfader over from Deck B and slowly mix in the ► track in Deck A. You just did your first handmade mix with TRAKTOR KONTROL S2! → Don’t expect to be capable of manually matching beats right away. It requires intensive train- ing and can’t be fully explained here in detail. -
Page 39: The Practice
This meter shows you the pre-fader level of the signal on that channel, i.e. the absolute level of the signal before it is adjusted by the channel fader. To adjust this level, use the GAIN/FILTER encoder at the very top of the channel: Traktor Kontrol S2 - Manual - 39... - Page 40 The signals coming from all channels are mixed together according to the relative levels set by the channel faders and by the crossfader. This mix is then sent from TRAKTOR’s main output to the Main section. Below you see a picture of the S2's MAIN LEVEL knob. Traktor Kontrol S2 - Manual - 40...
- Page 41 TOR won’t repair it! Turn down TRAKTOR’s MAIN knob if clipping or limiting occurs. Should the level stay low on the MAIN level meters, check also the channel faders—they are probably set too low as well! Traktor Kontrol S2 - Manual - 41...
-
Page 42: Looping And Cueing
As always, we assume here that you already followed the instructions in the previous tutorials. TRAKTOR KONTROL S2 now is in the following state: ▪ The track “House 1” is loaded on Deck A. The track is playing and audible. - Page 43 Of course, you can also change the size of manually set Loops via the LOOP SIZE encoder as described above. When setting a Loop manually, the Loop size displayed in TRAKTOR’s Loop section might not always match the actual Loop size. Traktor Kontrol S2 - Manual - 43...
- Page 44 CUE/REMIX SLOTS button lights up, this time in green: you’ve just stored a Loop → that you can return to simply by pressing the same button again. The same button lit in green. Traktor Kontrol S2 - Manual - 44...
-
Page 45: Using Hotcues
A waveform with a Cue Point stored as Hotcue 2 and a Loop stored as Hotcue 3. If you make a mistake, or just decide you no longer want a particular Hotcue, you can quickly clear it: Traktor Kontrol S2 - Manual - 45... - Page 46 (see ↑4.2.6, Mixing In the Track by Using the Channel EQ Filter). When you’re about to fade out the previous track completely, release the Loop on the new track, and you’re done. Traktor Kontrol S2 - Manual - 46...
-
Page 47: Using Samples In Your Mix
Once you switch the CUE/REMIX SLOTS sections to Remix Deck mode, the buttons 1 to 4 con- trol the upper Sample Slots of Remix Decks C and D, instead of the Track Decks' Cue Points. Traktor Kontrol S2 - Manual - 47... -
Page 48: Loading A Sample From The Collection
As always, we assume here that you already followed the instructions in the previous tutorials. TRAKTOR KONTROL S2 now is in the following state: ▪ The track “Techno 2” is loaded on Deck B. The track is playing and audible. By the way, from now on we will use “Track Deck”... - Page 49 You can do this in the software too: simply drag and drop the sample from the list onto any Sample Slot. The Sample is now loaded and ready to play: ▪ In TRAKTOR, the Remix Deck C now holds the Sample in the upper Sample Cell of the first Sample Slot. Traktor Kontrol S2 - Manual - 49...
-
Page 50: Triggering The Sample
To change the Play Type of the Sample to One-shot mode, the Advanced Panel of the Remix Deck needs to be opened. Double-click repeatedly on the upper border of the Deck to cycle through the Deck Layouts until the Advanced Panel becomes visible. Traktor Kontrol S2 - Manual - 50... -
Page 51: Capturing A Sample From A Track Deck
If not, start its playback by pressing PLAY. (If the playback has reached the end of the track, press SHIFT to skip back to start.) To activate Remix Deck mode for the right Deck, press the right REMIX Mode button (la- beled “B”) below the Remix Knob. Traktor Kontrol S2 - Manual - 51... - Page 52 Sample Cell of the first Sample Slot on Remix Deck D underneath: We just exported the active Loop from Deck B to the upper Sample Cell of Deck D's first Sample Slot. Traktor Kontrol S2 - Manual - 52...
-
Page 53: Unloading A Sample
Adding FX Now that we have seen the basics of playing tracks and samples on the Decks and mixing them together, let’s see how to add effects — or “FX” in the TRAKTOR terminology. Traktor Kontrol S2 - Manual - 53... -
Page 54: Group Mode
As always, we assume here that you already followed the instructions in the previous tutorials. TRAKTOR KONTROL S2 now is in the following state: ▪ The track “Techno 2” is loaded on Deck B. The track is playing and audible. -
Page 55: Getting The Fx Unit Ready
As additional step, turn the DRY/WET knob fully counter-clockwise — we will use this knob later to progressively bring in the effects: Your FX Unit is now ready to process whatever you will send to it! → Traktor Kontrol S2 - Manual - 55... -
Page 56: Assigning Decks To The Fx Unit And Bringing In The Fx
FX individually by pressing the corresponding FX Buttons 1-3 be- low. Changing the FX in a Slot You can load another FX in each slot. Let’s switch the first FX slot to the Gater: Traktor Kontrol S2 - Manual - 56... -
Page 57: Single Mode
FX On button to cycle through all the available FX until you see an effect you’d like to try. Press the same FX On button (this time without SHIFT) to turn on the FX Unit globally. The FX On button lights up. Traktor Kontrol S2 - Manual - 57... -
Page 58: Storing A Snapshot Of An Fx Unit
▪ We played with Loops and jumped to Cue Points without losing the beat (see ↑4.4, Loop- ing and Cueing). ▪ We grabbed a sample from a track and it played in sync with the track (see ↑4.5, Using Samples in Your Mix). Traktor Kontrol S2 - Manual - 58... - Page 59 The track’s Beatgrid is not only important when a Track Deck is set as tempo master, but also when you want this Track Deck to be synchronized with the current tempo master, whichever it may be. Traktor Kontrol S2 - Manual - 59...
-
Page 60: Who's The Master
In TRAKTOR, click on the metronome icon at the top left of the window to show the Mas- ► ter Clock panel: The Master Clock panel in TRAKTOR. In the Master Clock panel, you see the activated AUTO button, meaning that we are in Auto mode. Traktor Kontrol S2 - Manual - 60... - Page 61 Deck Display in TRAKTOR lights up: Start the playback on Deck B and beat match the track on Deck B with that on Deck A (whether manually or via automatic Sync). Stop Deck A. Traktor Kontrol S2 - Manual - 61...
- Page 62 Set the Clock as tempo master by activating the MASTER button in the Clock panel. The Clock panel should now look like this: On your S2, activateSync on both Decks by pressing the SYNC buttons. Traktor Kontrol S2 - Manual - 62...
-
Page 63: Another Useful Tool For Synching
The SNAP (S) and QUANT (Q) buttons allow you to activate/deactivate Snap and Quantize mode, respectively. Depending on what you are about to do, you can decide to enable or disable them at any time. Here are a few examples: Traktor Kontrol S2 - Manual - 63... - Page 64 It can be a problem when the tempo is changed more drastically: kick sounds lose their power, vocals sound silly etc. To avoid this, TRAKTOR KONTROL S2 provides you with a Keylock feature that uncouples the tone from the tempo of a track: Load two tracks with quite different tempos on Deck A and B.
- Page 65 Key- lock is active on that Deck: In conclusion, there is no “correct” sync setting: it all depends on your DJ style and the kind of music your sets will consist of. Traktor Kontrol S2 - Manual - 65...
-
Page 66: Using The S2 With Traktor Dj
Using the S2 with TRAKTOR DJ The TRAKTOR KONTROL S2 is designed to work with the TRAKTOR DJ app on iOS devices. In this section we will describe the S2's key functions when using it with the TRAKTOR DJ app. -
Page 67: Browsing & Loading Tracks
Deck (if its volume control is turned up). You will notice that when you move the S2's crossfader, the corresponding crossfader in TRAK- TOR DJ moves simultaneously. Likewise with the channel faders. Traktor Kontrol S2 - Manual - 67... -
Page 68: Using The Filters
TRAKTOR DJ, and vice a versa counter clockwise. To reveal the Filter display of TRAKTOR DJ Deck: Touch your finger on the Filter section of a TRAKTOR DJ Decks Equalizer display. ► Traktor Kontrol S2 - Manual - 68... -
Page 69: Adjusting Channel Gain
Deck increases. Vice versa, turning the knob counterclockwise will cause the gain level of the track playing to decrease. Adjusting Channel A’s gain level. Pressing SHIFT + the GAIN/FILTER encoder again, will reset the gain value. Traktor Kontrol S2 - Manual - 69... -
Page 70: Using The Eq's
TRAKTOR DJ deck. → TRAKTOR DJ's Equalizer Display. The LOW EQ of Channel A being turned anti clockwise and the corresponding affect in TRAKTOR DJ's Equalizer. Traktor Kontrol S2 - Manual - 70... -
Page 71: Headphone Cueing
11. Now toggle the two buttons on and off. Notice that when both Cue buttons are off (unilluminated), there is no signal at all coming through the headphones. Traktor Kontrol S2 - Manual - 71... -
Page 72: Deck Control
You can use the S2's jog wheels to scratch, find cue points, manually adjust a tracks tempo, rewind, and seek or search through a track. Seek through a Track You can seek through a track playing in TRAKTOR DJ by: Traktor Kontrol S2 - Manual - 72... - Page 73 This may be the preferred DJ workflow for those who like to utilize manual beat matching. With SYNC mode and KEYLOCK off, you can Pitch Bend. Traktor Kontrol S2 - Manual - 73...
-
Page 74: Using The Transport Section
The left transport section controls TRAKTOR DJ's Deck A, and vice a versa the right-Deck B. Using the S2's transport section you can control: ▪ Playback (& Keylock) functions ▪ Cueing (& Restart) ▪ HotCues ▪ Loop Functions ▪ Move Functions Traktor Kontrol S2 - Manual - 74... -
Page 75: Play Buttons
▪ With two tracks playing, scratching one of the jog wheels (without a FLUX button engag- ed) and releasing out of time. ▪ With two tracks playing in Sync, and using Cue points out of time. Traktor Kontrol S2 - Manual - 75... -
Page 76: Flux Buttons
4 HotCue buttons (1-4). These RGB backlit buttons directly reflect TRAKTOR's cue button coloring: ▪ Blue: Cue point ▪ Green: Loop ▪ Yellow: Load ▪ Orange: Fade In/Out ▪ White: Grid Marker Traktor Kontrol S2 - Manual - 76... -
Page 77: Using Loops
You can use the S2 to perform Loop functions in TRAKTOR DJ by either manually engaging LOOP IN/OUT buttons, or by selecting a loop size with the Loop SIZE encoder and pressing to engage. Traktor Kontrol S2 - Manual - 77... - Page 78 Loop Slicer Mode Follow the instructions below to understand how to engage TRAKTOR DJ's Loop Slicer. Trigger a loop on your chosen deck, using either the Loop SIZE encoder or manually via LOOP IN/OUT buttons. Traktor Kontrol S2 - Manual - 78...
- Page 79 Hotcue buttons on the S2 will now be backlit green indicating that they can now be trig- gered individually whilst the Loop Slicer is engaged. Experiment by triggering the Hotcue buttons whilst in Loop Slicer mode. Traktor Kontrol S2 - Manual - 79...
-
Page 80: Using The Loop Move Encoders
TRAKTOR DJ. The de- fault mode of these encoders allows you Beatjump forwards or backwards in a tracks. Turning to the left moves backwards in the track, whereas to the right forward. Traktor Kontrol S2 - Manual - 80... - Page 81 Freeze mode takes the currently viewed section of the track playing, and allows you to trigger individual sections as cue points. These Freeze Mode cue points can be a section of a track, or down to a smaller component such as a hi-hat. Traktor Kontrol S2 - Manual - 81...
- Page 82 To the right zooms out-widening the track deck view, to the left zooms in to the track on a more micro level. At this level you can trigger individual kicks, snares, hi hats etc. Traktor Kontrol S2 - Manual - 82...
-
Page 83: Using Fx
Reveal a Deck's Effect Display You can use the S2 to reveal a Deck's Effect display in TRAKTOR DJ by: Pressing FX button 1, located at the top of channel section A or B. ► Traktor Kontrol S2 - Manual - 83... -
Page 84: Using The S2'S Fx Section
Press FX button at the top of Channel A to reveal TRAKTOR DJ's Effect display. In TRAKTOR DJ, if not already selected by default, ensure the Delay effect is selected in the left-most bank. Traktor Kontrol S2 - Manual - 84... - Page 85 With the effect still engaged, move the DRY/WET knob to the right. You will hear the amount of the Delay effect increase. This movement is mirrored on the Y axis within TRAKTOR DJ's Effects display. Traktor Kontrol S2 - Manual - 85...
- Page 86 3, so that all 3 FX buttons are engaged. All three FX buttons are now illuminated orange, and you will now hear that the track playing is affected by 3 of TRAKTOR DJ's effects. Traktor Kontrol S2 - Manual - 86...
- Page 87 Using the S2 with TRAKTOR DJ Using FX 10. Moving the DRY/WET knob will now control all three of the selected effect variables along TRAKTOR DJ's Y axis. Traktor Kontrol S2 - Manual - 87...
-
Page 88: Hardware Overview
6.1.1 Decks TRAKTOR KONTROL S2 provides you with two physical Decks. These Decks always control Track Decks A and B of the TRAKTOR PRO 2 software. However, there is a dedicated mode for controlling TRAKTOR's Remix Decks C and D with the... - Page 89 Hardware Overview Top Panel - Main Areas Deck A on your S2 controller. Traktor Kontrol S2 - Manual - 89...
- Page 90 Top Panel - Main Areas Equivalent elements on the controlled Deck in TRAKTOR. On your TRAKTOR KONTROL S2 controller, each Deck provides you with: ▪ a multi-function jog wheel with advanced transport functionality via its top plate (1) and outer rim (2).
-
Page 91: Mixer
S2, TRAKTOR's Decks C and D will always be operated in Remix Deck mode. 6.1.2 Mixer The Mixer is sitting in the middle of your TRAKTOR KONTROL S2 controller and of TRAKTOR PRO 2’s window. Traktor Kontrol S2 - Manual - 91... - Page 92 Deck. Additionally, there is a combined Remix Deck channel (2), controlling the volume of TRAKTOR's Remix Decks C and D. For this, you use the REMIX knob in the middle of the mixer. Traktor Kontrol S2 - Manual - 92...
-
Page 93: Fx Units
(4), which allows you to make seamless transitions between various channels. The Mixer of your TRAKTOR KONTROL S2 hardware controller has a few additional features not to be found on usual DJ mixers, though. For example, it includes a... -
Page 94: The Rear Panel
Hardware Overview The Rear Panel On the hardware side, the TRAKTOR KONTROL S2 also provides you with two FX Units (la- beled FX1 and FX2 on your controller), which allow you to control the corresponding FX Units in the software. -
Page 95: Mic Section
Use these sockets to connect your TRAKTOR KONTROL S2 to an amplification system (or master mixer) with unbalanced inputs. MAIN Outputs 1/2 1/4" sockets (1/2): Main outputs of TRAKTOR KONTROL S2 (line level, bal- anced). Use these sockets to connect your TRAKTOR KONTROL S2 to an amplification system (or master mixer) with balanced inputs. -
Page 96: Power Section
USB socket : Connect here your S2 to your computer with the included USB cable, or to your iOS device via the included Native Instruments iOS cable. If possible, do always use the USB cable provided with the S2 box to operate your unit. -
Page 97: Types Of Control Elements
Types of Control Elements Your TRAKTOR KONTROL S2 holds various types of control elements, which we will quickly describe here. Traktor Kontrol S2 - Manual - 97... -
Page 98: Buttons
SHIFT buttons (see below). All buttons of your TRAKTOR KONTROL S2 are equipped with LEDs that give you various info. Basically, the LED indicates the button’s current state, but its exact meaning varies for each button — for more info, please refer to the description of each button later in this reference chapter. -
Page 99: Knobs
All encoders have a step-by-step movement. Additionally, encoders have a “push” action available: pushing the encoder can trigger some other function. Traktor Kontrol S2 - Manual - 99... -
Page 100: Jog Wheels
▪ You can spin the jog wheel by (pressing and) turning its top plate. This makes the jog wheel a versatile element that gives you a very precise control, e.g. for scratching, seeking in a track, or browsing in lists. Traktor Kontrol S2 - Manual - 100... -
Page 101: Faders
Unit). 6.4.6 Meters and Indicators A meter. Indicators and meters are single- or multi-LED elements that provide you with real-time feed- back about various states and levels in the TRAKTOR KONTROL S2 system. Traktor Kontrol S2 - Manual - 101... -
Page 102: Switches
The RCA main output sockets on the rear panel of your S2. Sockets are to be found on the rear and front panels only. They allow you to plug various types of cables (USB, audio, MIDI, etc.) into your TRAKTOR KONTROL S2. Traktor Kontrol S2 - Manual - 102... -
Page 103: Hardware Control Reference
In this chapter, we describe actions on the TRAKTOR KONTROL S2. Of course, every action on your S2 is instantly mirrored in TRAKTOR! For an in-depth explanation of all features provided by the TRAKTOR software, please refer to the TRAKTOR 2 Manual. -
Page 104: Traktor's Deck Flavors: Track Decks Vs. Remix Decks
(one on each S2 Deck) act as “modifiers” for other control elements on your TRAKTOR KONTROL S2. In other terms, they allow you to access a secondary function when using other control elements simultaneously — much like the [Shift] key on your com- puter keyboard. -
Page 105: Using The Jog Wheels
When you press the jog wheel’s top plate, the Load button A below the BROWSE encoder lights up to indicate that you are manually controlling the playback position. The jog wheels also provide additional features: Traktor Kontrol S2 - Manual - 105... -
Page 106: Using The Tempo Unit
You can change the tempo fader's range in Preferences > Transport > Tempo. Both the tempo fader in the software Deck and the tempo fader on your S2 are affected by this set- ting. Traktor Kontrol S2 - Manual - 106... -
Page 107: Tempo Reset
S2. This notably resolves possible conflicts between the tempo fader and the Deck synchronization or Deck switching. To activate the Relative mode, open Preferences > TRAKTOR KONTROL S2 > S2 Control Op- tions > Tempo Faders. Please refer to section ↑8.2.1, S2 Control Options... -
Page 108: Using The Loop Section
Floating Loop between the previously set Floating Cue Point and this Loop Out Point. You can reuse the same Loop In Point for several Loops: simply set a new Loop Out Point, and the previous Loop In Point will be used for the new Floating Loop! Traktor Kontrol S2 - Manual - 108... -
Page 109: Loop Move Encoder
Section). The LOOP IN and LOOP OUT buttons can also have alternate functions when switched to Auto Loop mode. You can do this in Preferences > TRAKTOR KONTROL S2 > S2 Control Options > Loop Buttons. See section ↑8.2.1, S2 Control Options for more info. -
Page 110: Loop Size Encoder
Hence, if you plan to use the modified Loop later, don’t forget to store it! For example, you can do this by pressing an unlit CUE/REMIX SLOTS button (see section ↑7.5, Using the CUE/REMIX SLOTS Section). Traktor Kontrol S2 - Manual - 110... -
Page 111: Using The Cue/Remix Slots Section
Hotcue slot contains a Cue Point. Green Hotcue slot contains a Loop. Yellow Hotcue slot contains a Load Marker Orange Hotcue slot contains a Fade-In or Fade-Out Marker White Hotcue slot contains a Grid Marker Traktor Kontrol S2 - Manual - 111... -
Page 112: Remix Deck Mode
► controller: A for the left Deck, B for the right Deck. The Remix Deck mode button lights up, signalizing that the relevant CUE/REMIX SLOTS section is in Remix Deck mode. Traktor Kontrol S2 - Manual - 112... - Page 113 When capturing a Sample from the loaded track, as soon as the Sample is played live three times in the main mix, the sample is automatically saved to the Collection for later use! Traktor Kontrol S2 - Manual - 113...
- Page 114 Click on the Play Type button in the lower right of the Advanced Panel to switch between Loop and One-shot mode for a Sample. In One-shot mode, the whole Sample will be played once. The CUE/REMIX SLOTS button acts as follows: Traktor Kontrol S2 - Manual - 114...
-
Page 115: Using The Transport Control Area
Sample Slot and the button’s LED turns off. Using the Transport Control Area 7.6.1 CUE and PLAY Button The CUE and PLAY buttons. At the bottom of the Deck, the PLAY buttons are the usual transport controls for the Deck. Traktor Kontrol S2 - Manual - 115... -
Page 116: Sync Button
(another Deck or the Clock). The button is lit when synchronization is activated. Activating the synchronization disables the tempo fader if it is in the default Absolute mode. See section ↑7.3, Using the Tempo Unit for more info. Traktor Kontrol S2 - Manual - 116... -
Page 117: Shift Button
Beatgrid manually. This allows you to redefine the Grid of a track from your S2 on the fly, would the Beatgrid ever appear to be wrong or missing. Traktor Kontrol S2 - Manual - 117... -
Page 118: Using The Mixer
Using the Mixer Using the Mixer The Mixer, in the middle of your S2. This section describes the general handling of the Mixer on your TRAKTOR KONTROL S2. You will find in ↑13.1, Quick Reference a Quick Reference table summing up the basic functionality of each control element on the Mixer. -
Page 119: Gain/Filter Encoder
Thanks to the logical layout of the channels on the Mixer, you can quickly see what goes where: ▪ The left channel on TRAKTOR KONTROL S2 controls the signals coming from the left Track Deck (Deck A) in TRAKTOR. ▪ The right channel on TRAKTOR KONTROL S2 controls the signals coming from the right Track Deck (Deck B) in TRAKTOR. -
Page 120: Eq Knobs
Filters. 7.7.2 EQ Knobs The EQ knobs. Each channel boards an EQ section with the three usual knobs HI, for controlling high, medium and low frequency content of the signal, respectively. Traktor Kontrol S2 - Manual - 120... -
Page 121: Fx Assign Buttons
Unit. When activating both buttons on the same channel, FX Unit 1 and FX Unit 2 will process the channel’s signal in series. For a description of the FX Units on your S2, please refer to section ↑7.8, Using the FX Units. Traktor Kontrol S2 - Manual - 121... -
Page 122: Channel Fader And Channel Level Meter
To correct the channel level, adjust the GAIN/FILTER encoder at the very top of the chan- nel. For more info on how to set your levels correctly, see the tutorial in section ↑4.3, Ad- justing Levels. Traktor Kontrol S2 - Manual - 122... -
Page 123: Crossfader
Main Outputs on your S2. This is the last step for con- trolling the level on your S2, before your mix is sent to the outside world. Traktor Kontrol S2 - Manual - 123... -
Page 124: Headphones Cue Button
CUE MIX function. 7.7.8 Master Display The Master Display. The Master Display provides you with some vital information for your TRAKTOR KONTROL S2 system. Alert Indicator The Alert indicator. Traktor Kontrol S2 - Manual - 124... - Page 125 The Microphone indicator is lit when the separate microphone channel is active. Press the ENGAGE button on the controller’s front side to activate/deactivate the microphone channel. For more info on the MIC section, see chapter ↑6.2.1, MIC Section. Traktor Kontrol S2 - Manual - 125...
-
Page 126: Browse Encoder (Browse) And Load Buttons (A And B)
The Load buttons (labeled A and B). BROWSE encoder and the LOAD buttons are used to browse and load tracks or samples in TRAKTOR KONTROL S2. You will find a description of their operation in section ↑7.9, Brows- ing, and Loading. -
Page 127: Using The Fx Units
The left FX Unit on your S2. (1) FX On button (2) FX DRY/WET knob (3) FX Knob 1 (4) FX Knob 2 (5) FX Knob 3 (6) FX Button 1 (7) FX Button 2 (8) FX Button 3 Traktor Kontrol S2 - Manual - 127... -
Page 128: Single Mode And Group Mode
FX from FX list (as set in Preferences > Ef- fects > FX Pre-Selection). SHIFT + button: loads a predefined FX (as set in Preferences > TRAK- TOR KONTROL S2 > S2 Control Op- tions > Direct FX 1-3). Traktor Kontrol S2 - Manual - 128... -
Page 129: Browsing, And Loading
Browsing Tracks and Samples You can quickly select tracks and samples for loading via the BROWSE encoder, located in the center of the Mixer: Traktor Kontrol S2 - Manual - 129... - Page 130 Browser Tree. Release SHIFT and turn the BROWSE encoder to scroll through the tracks of the currently highlighted Playlist. You can see the items being scrolled in the TRAKTOR Browser: Traktor Kontrol S2 - Manual - 130...
-
Page 131: Native Traktor Mode Vs. Midi Mode
7.10 Native TRAKTOR Mode Vs. MIDI Mode Your TRAKTOR KONTROL S2 controller can be used in two modes: TRAKTOR mode and MIDI mode. 7.10.1 Native Traktor Mode This is the mode that you will be normally using with TRAKTOR, which gives you access to all the features explained in this manual. -
Page 132: Midi Mode
7.10.2 MIDI Mode The MIDI mode allows you to use your TRAKTOR KONTROL S2 as a regular MIDI controller. In MIDI mode, the TRAKTOR KONTROL S2 will transmit only MIDI data via the virtual MIDI port that the TRAKTOR KONTROL S2 driver will provide to the host computer’s operating sys- tem. -
Page 133: Customizing Traktor Kontrol S2
Decks, Mixer, transport controls, overall software layout, FX, Browser, file manage- ment, to mention a few. Since the customization of TRAKTOR KONTROL S2 is not supposed to take place in a live sit- uation, these settings are found in the software only. This also ensures you against accidental modification of the settings while playing. - Page 134 To display a particular page of settings, click on the page name in the left column. Adjust the settings according to your needs. Once you have modified the desired settings, click Close at the bottom of the Preferences window to confirm your modifications. Traktor Kontrol S2 - Manual - 134...
-
Page 135: Settings And Preferences For The S2 Control Elements
In this section, we will describe the available settings for the control elements sitting on the top panel of your TRAKTOR KONTROL S2 controller. The next section will present a few other settings of importance for your work with TRAKTOR KONTROL S2. - Page 136 Customizing TRAKTOR KONTROL S2 Settings and Preferences for the S2 Control Elements The settings for your TRAKTOR KONTROL S2. In this page, settings are grouped into four sections: S2 Control Options, Restore Default, Cali- bration and LEDs. Traktor Kontrol S2 - Manual - 136...
-
Page 137: S2 Control Options
Preferences, the S2 Control Options section allows you to adjust the way your TRAKTOR KONTROL S2 controller reacts to your actions. The fol- lowing paragraphs thoroughly describe each of the available settings. Direct FX 1-3 The three menus... - Page 138 Deck to another tempo, switching the Deck focus, or moving the tempo fader in the software): ◦ There is no more risk of any tempo jump when you touch the tempo fader. Traktor Kontrol S2 - Manual - 138...
-
Page 139: Restore Default
(default): When set to PGM the LED meters display the current PFL (pre-fader level) ▪ of deck A and B. 8.2.2 Restore Default Restore Default section holds only one element: the Restore button. Traktor Kontrol S2 - Manual - 139... -
Page 140: Calibration
TRAKTOR KONTROL S2 to its default settings. Click ► go back to the Preferences window without changing anything. Upon confirmation, all TRAKTOR KONTROL S2 settings will be restored to default. You → are now ready to start again with a fresh TRAKTOR KONTROL S2. -
Page 141: Leds
Preferences > Decks Layout > Deck Flavor. The Deck Flavor section allows you to select another flavor for each of the lower Decks C and D. In this section, each menu represents a Deck and is labeled accordingly. Traktor Kontrol S2 - Manual - 141... -
Page 142: Adjusting The Input Routing
Preferences of TRAKTOR. Using the Setup Wizard When setting up TRAKTOR KONTROL S2, the easiest way is to start the Setup Wizard. This allows you to choose from a set of basic Deck configurations and to forget about any audio routing settings —... - Page 143 2 Track Decks (default), 2 Track Decks + 2 Remix Decks, 4 Track Decks and 2 Track Decks + 2 Live Inputs. The Deck configurations are self-explanatory. Note that you can only control 2 Track Decks + 2 Remix Decks from TRAKTOR KONTROL S2. Select the desired Deck configuration in the menu and click Finish to confirm your ►...
- Page 144 Customizing TRAKTOR KONTROL S2 The Setup Wizard The Setup Wizard activates the selected Deck configuration, configures the audio routing → options accordingly and resets all other TRAKTOR settings to their default value. Traktor Kontrol S2 - Manual - 144...
-
Page 145: The S2 Audio Interface And Control Panel
In TRAKTOR: Open Preferences > Audio Setup to access the settings for the S2 audio interface. ► There, you can adjust the audio interface settings of the TRAKTOR KONTROL S2. You have two settings: Sample Rate : Choose a sample rate that is compatible with your music application and ▪... -
Page 146: Settings On Windows: The Control Panel
CPU. Settings on Windows: The Control Panel On Windows, the settings for the TRAKTOR KONTROL S2 audio interface are accessed via a little tool called TRAKTOR KONTROL S2 Control Panel. The Control Panel was installed during the TRAKTOR KONTROL S2 installation procedure. This section describes the TRAKTOR KON- TROL S2 Control Panel user interface. -
Page 147: Audio Settings Page
: Choose a sample rate that is compatible with your music application and ▪ suited to your computing power. A higher sample rate improves the audio quality, but also causes higher CPU load. By default, the sample rate is set to 44100 Hz (CD quality). Traktor Kontrol S2 - Manual - 147... - Page 148 ◦ Streaming: driver is working and processing audio data. ◦ Panic: driver stopped streaming. Too many USB I/O errors occurred in the interface communication. Output Latency : displays your system’s output latency in milliseconds. ▪ Traktor Kontrol S2 - Manual - 148...
-
Page 149: Diagnostics Page
The S2 Audio Interface and Control Panel Settings on Windows: The Control Panel Notice there is also an input latency when working with the TRAKTOR KONTROL S2. The out- put latency value does not represent the overall latency, from pressing a button on the control- ler to hearing the resulting effect at the output. - Page 150 System Performance Test Section Current Latency: Click on the Start button below to display the current latency value here. ▪ Maximum Latency: displays the highest value that was during the current measuring cy- ▪ cle. Traktor Kontrol S2 - Manual - 150...
-
Page 151: Using The S2 As Your Default Audio Output Interface
Using the S2 as your Default Audio Output Interface If you want to use the TRAKTOR KONTROL S2 for playback of all audio applications on your computer (not only for music software), you have to set it as your default audio interface. - Page 152 TRAKTOR KONTROL S2 in the Play alerts and sound effects through menu. Click the Output tab, and select TRAKTOR KONTROL S2 from the Choose a device for sound output list. Click the Input tab, and select TRAKTOR KONTROL S2 from the...
-
Page 153: Troubleshooting And Help
Basics This might sound obvious, but the first things to check are following: ▪ Make sure that the TRAKTOR KONTROL S2 is connected to the computer via the includ- ed USB cable. ▪ Check that the controller is turned on (ON/OFF switch on the rear panel must be engag- ed). -
Page 154: Usb And Driver Issues
If the USB indicator is flashing, there is no connection to the computer or there is a problem with the hardware driver. Please check the following points: ▪ The TRAKTOR KONTROL S2 is a USB 2.0 device and will not work on a USB 1.0/1.1 port. -
Page 155: Using The Traktor Kontrol S2 With A Laptop
The TRAKTOR KONTROL S2 may produce crackles or may not work at all. ▪ In case of failures, it is useful to check if TRAKTOR KONTROL S2 works if you discon- nect any other USB device from the computer. -
Page 156: Loose Jog Wheel Top Plate
10.4 TRAKTOR Crashes In case of a crash during runtime, please contact the Native Instruments technical support team and send them your crashlog. You will find the crashlog in the following folders: ▪ Windows: \My Documents\Native Instruments\Traktor 2\Crashlogs\ ▪... -
Page 157: Getting Help
Support button in the upper right ► corner. Here you will find direct links to the Native Instruments Online Knowledge Base and the Online Support Form. The Online Knowledge Base gathers useful information about your Native Instruments product and can be of great help to solve possible issues you may encounter when working with Native Instruments products. -
Page 158: Forum
The version number of your software is displayed in the About dialog for any Native Instruments application. This dialog can be opened by clicking on the NI logo in the upper right corner of the user interface. Alternatively, you can find the version num-... -
Page 159: Appendix A - Common Setups
TRAKTOR KONTROL S2 Basic Setup Appendix A – Common Setups This appendix shows you how to connect your TRAKTOR KONTROL S2 with your other gears in various setups. For a reference of each socket or control element to be found on the rear and front panel of the TRAKTOR KONTROL S2, please refer to section ↑6.2, The Rear Panel... - Page 160 Connect the included power supply to a power outlet using the appropriate adapter for your region. Connect the power cord plug to the Power Supply connector (labeled POWER) on the rear panel of your S2. Traktor Kontrol S2 - Manual - 160...
- Page 161 S2, and the other end to an available USB 2.0 port on your computer. The TRAKTOR KONTROL S2 is a USB 2.0 device and will not work on a USB 1.0/1.1 port. Traktor Kontrol S2 - Manual - 161...
- Page 162 Before you plug any audio cable, make sure to turn down all volume controls, both on ► your S2 and on your amplification system. This will avoid any possible audio artifacts that could damage your speakers and your ears! Traktor Kontrol S2 - Manual - 162...
- Page 163 On the rear panel of your S2, connect the Main Output 1/2's 1/4" sockets (balanced) or ► the RCA sockets (unbalanced) to your amplification system, depending on the type of in- puts supported by your amplifier or active speakers. Traktor Kontrol S2 - Manual - 163...
- Page 164 To set the headphone volume to minimum, turn the CUE VOL knob counter- clockwise until it reaches its end stop. Then, while playing music, slowly increase the head- phone volume by turning the CUE VOL knob clockwise until it reaches the desired listening level. Traktor Kontrol S2 - Manual - 164...
- Page 165 TOR settings to their default values. For more info on the Setup Wizard, please refer to section ↑8.4, The Setup Wizard. In the TRAKTOR software, we set the lower Decks C and D to Remix Decks: Traktor Kontrol S2 - Manual - 165...
- Page 166 ▪ The CUE VOL CUE MIX knobs on the S2 front panel respectively control the volume and the mix between the cued signal and the master signal in your headphones: Traktor Kontrol S2 - Manual - 166...
-
Page 167: Adding A Microphone
(MIC) located in the MIC section. Press the MIC ENGAGE button on the left side of the S2's front panel. Gradually bring up the volume with the mic's GAIN control on the rear panel of the S2. Traktor Kontrol S2 - Manual - 167... -
Page 168: Appendix B - Technical Information
Appendix B – Technical Information Technical Specifications Appendix B – Technical Information You will find here the technical specifications of your TRAKTOR KONTROL S2. 12.1 Technical Specifications Jacks and Sockets ▪ 1 input jack (MIC) for mono 6.3 mm (1/4 inch) phone plug ▪... -
Page 169: Appendix C - Quick References
This appendix provides you with Quick Reference tables summing up the basic functionality of each control element on your TRAKTOR KONTROL S2. This gives you a quick and concise overview of all basic functions of your controller. For more info on each control element, please refer to the descriptions in chapter ↑6, Hardware... - Page 170 Floating Cue Point as long as CUE is held depressed. Upon release, play- back stops and jumps back to Floating Cue Point. SHIFT + CUE: skips back to start of track (playback state left untouched). Traktor Kontrol S2 - Manual - 170...
-
Page 171: Mixer Quick Reference
↑7, Hardware Control Reference for more details on these control elements. 13.2.1 Main Section Quick Reference Control element Function MAIN LEVEL knob Adjusts the level of the signal sent to the Main Outputs of the S2. Traktor Kontrol S2 - Manual - 171... -
Page 172: Channel And Crossfader Quick Reference
USB indicator Lit if the driver is up and running. Flashing if there is no connection to the computer or a problem with the driver. MIC indicator Lit when a microphone input is enabled. Traktor Kontrol S2 - Manual - 172... -
Page 173: Fx Unit Quick Reference
(as set in Preferences > TRAK- TOR KONTROL S2 > S2 Control Op- tions > Direct FX 1-3). 13.4 Browsing, Loading and Copying Quick Reference See section ↑7.9, Browsing, and Loading for more details on these control elements. Traktor Kontrol S2 - Manual - 173... - Page 174 Turn: scrolls through the Playlist. SHIFT + turn: scrolls through the Browser Tree. SHIFT + press: expands/collapses folder nodes in the Browser Tree Push: activates/deactivates Browse mode. Push + turn: jumps through the Playlist by 10 steps. Traktor Kontrol S2 - Manual - 174...
-
Page 175: Index
[37] Audience [39] manually aligning Audio interface [145] [63] BROWSE encoder Audio Processing (Control Panel) [147] [130] Audio Settings (Control Panel) [147] Quick Loading Browsing from your S2 [129] Auto Loop (prefs) [138] Traktor Kontrol S2 - Manual - 175... - Page 176 Collection [19] [112] Storing a Cue or Loop Point Common setups [159] CUE/SAMPLES buttons [44] Compatibility [14] Cueing [32] [42] Connection Monitor (Control Panel) [150] Customizing TRAKTOR KONTROL S2 [133] Control Panel [146] Traktor Kontrol S2 - Manual - 176...
- Page 177 (Single mode) [57] [60] synchronization Effects [93] [57] tempo-synched [120] FX Assign buttons [121] [34] using when mixing in a track FX Unit [93] [56] assigning to channels [56] controlling DRY/WET knob [58] Traktor Kontrol S2 - Manual - 177...
- Page 178 Headphones Mix knob (CUE MIX) [31] [97] Keylock [64] Headphones socket (PHONES) [97] [164] Knowledge Base [157] Headphones Volume knob (CUE VOL) [97] HI knob [120] Hotcues [45] [45] clearing storing [32] [44] Traktor Kontrol S2 - Manual - 178...
- Page 179 Track Decks LOOP OUT button on Track Decks [108] Loop Out Point [108] Loop section [42] [108] on Track Decks Loop Size Display [43] Loop SIZE encoder [42] [110] on Track Decks Traktor Kontrol S2 - Manual - 179...
- Page 180 [148] MID knob [120] OUTPUTS Section MIDI mode [131] [95] BOOTH/MAIN Switch Mixer [91] [95] Level Knob channel [28] [92] [95] MAIN Outputs [93] [123] Main section [95] MAIN/BOOTH Outputs [124] Master Display Traktor Kontrol S2 - Manual - 180...
- Page 181 Quick-loading TRAKTOR KONTROL S2 page [25] Preferences button [133] tracks Preferences icon [133] Preparing the mix using headphones [31] Preview Play indicator [125] Process Buffer (Control Panel) [148] Processing State (Control Panel) [148] Traktor Kontrol S2 - Manual - 181...
- Page 182 Seeking through a track [105] Selecting [25] track Setting a Loop in a track [42] [108] Settings button (prefs) [146] Setup Wizard [142] SHIFT button [117] tapping Signal flow in channels [119] Single mode [128] Traktor Kontrol S2 - Manual - 182...
- Page 183 Tempo Reset [107] using automatic sync [31] Track System requirements [14] [27] info [24] loading [24] playing Track Collection [19] Track Deck [48] [91] concept Track Decks [16] [91] Tracks [91] Traktor Kontrol S2 - Manual - 183...
- Page 184 [88] main areas Using the S2 as default audio interface [151] Troubleshooting [153] Using the S2 with a laptop [155] [28] no audio Tutorials [24] Waveform [45] Types of Control Elements [98] Buttons Traktor Kontrol S2 - Manual - 184...