Table of Contents
Advertisement
Quick Links
Advertisement
Table of Contents

Related Manuals for Native Instruments TRAKTOR KONTROL D2


Summary of Contents for Native Instruments TRAKTOR KONTROL D2
- Page 1 Setup Guide...
- Page 2 The information in this document is subject to change without notice and does not represent a commitment on the part of Native Instruments GmbH. The software described by this docu- ment is subject to a License Agreement and may not be copied to other media. No part of this...
- Page 3 6725 Sunset Boulevard 5th Floor Los Angeles, CA 90028 www.native-instruments.com NATIVE INSTRUMENTS K.K. YO Building 3F Jingumae 6-7-15, Shibuya-ku, Tokyo 150-0001 Japan www.native-instruments.co.jp NATIVE INSTRUMENTS UK Limited 18 Phipp Street London EC2A 4NU www.native-instruments.com © NATIVE INSTRUMENTS GmbH, 2015. All rights reserved.
-
Page 4: Table Of Contents
Table of Contents Table of Contents Welcome to TRAKTOR KONTROL D2 ................6 This is Included in the Box ......................6 Document Conventions ....................... 6 Software Installation ....................8 Important Software Installation Information ................8 Installation on Mac OS X ......................9 2.2.1... - Page 5 Table of Contents Activating Your Product Offline ....................26 3.3.1 Start the Offline Activation ..................27 3.3.2 Create the Activation Request File ................28 3.3.3 Enter the Serial Number .................... 29 3.3.4 Transfer the Activation Request File ................30 3.3.5 Open the Activation Return File .................
-
Page 6: Welcome To Traktor Kontrol D2
• How to activate your TRAKTOR version using the SERVICE CENTER application. • How to connect the devices and get your TRAKTOR KONTROL D2 system up and running. • How to proceed once your TRAKTOR KONTROL D2 system is up and running. - Page 7 Welcome to TRAKTOR KONTROL D2 Document Conventions This light bulb icon indicates that a note contains useful extra information. This informa- tion may often help you to solve a task more efficiently, but does not necessarily apply to the setup or operating systems you are using; however, it's always worth a look.
-
Page 8: Software Installation
• Carefully review the installer screens and the suggested installation paths in order to avoid that any unwanted folders are created on your hard disk. • Moving any folders related to Native Instruments software after installation is not recom- mended. Future software updates rely on the directory locations set during initial installa- tion. -
Page 9: Installation On Mac Os X
Software Installation Installation on Mac OS X Installation on Mac OS X This section describes the process of installing the TRAKTOR software on Mac OS X. At the end of the installation process, you will need to restart your computer. Please save your work and close all applications before proceeding. - Page 10 Traktor Audio 10/6/2 Drivers: This installs the drivers for the TRAKTOR AUDIO 10, TRAKTOR AUDIO 6 and TRAKTOR AUDIO 2 audio interfaces by Native Instruments. If you do not intend to use any of these audio interfaces, you can deactivate the checkboxes.
-
Page 11: Enter Your Password
Audio 8/4/2 DJ Drivers: This installs drivers for the AUDIO 8 DJ, AUDIO 4 DJ and AUDIO 2 DJ audio interfaces by Native Instruments. If you do not intend to use any of these audio interfa- ces, you can deactivate the checkboxes. -
Page 12: Complete The Installation
Software Installation Installation on Mac OS X The Mac OS X password prompt. To proceed, enter your password and click OK. ► The selected components will be installed. → 2.2.4 Complete the Installation After the components have been installed, you need to restart your computer. TRAKTOR KNOTRL D2 - Setup Guide - 12... -
Page 13: Installation On Windows
Software Installation Installation on Windows The final screen of the installation program. Click Restart to restart your computer and complete the software installation. ► Your computer will immediately restart. → After your computer has restarted, start reading section ↑3, Product Activation with ►... -
Page 14: Confirm The Features To Install
Software Installation Installation on Windows Double-click the Traktor 2 Setup.exe file to start the installation procedure. Follow the on-screen instructions. 2.3.2 Confirm the Features to Install After you have accepted the software license agreement, the installer window displays the fea- tures available for installation. -
Page 15: Confirm The Application Installation Path
Software Installation Installation on Windows SERVICE CENTER: The SERVICE CENTER application is required for activation of the TRAKTOR software. This component will automatically be installed unless a newer version of SERVICE CENTER already exists on your computer. CONTROLLER EDITOR: The CONTROLLER EDITOR application allows you to configure your con- troller for use as a MIDI controller with applications other than the TRAKTOR software. -
Page 16: Select Your Hardware Drivers
Software Installation Installation on Windows The software installation path screen of the installation program. Click Next to proceed. ► 2.3.4 Select Your Hardware Drivers After defining or confirming the program's installation path, you will be presented with a driver selection screen. It is recommended to select all drivers from the driver selection screen unless you have a specific reason to deselect a driver (such as if the driver is already installed on your computer, or you are very sure you will never use the device with TRAKTOR). -
Page 17: Complete The Software Installation
Software Installation Installation on Windows The Hardware Drivers screen of the installation program. Click Next to proceed. ► 2.3.5 Complete the Software Installation Once you have selected the driver and confirmed your selection, you will be forwarded to the last screen of the installation program. TRAKTOR KNOTRL D2 - Setup Guide - 17... - Page 18 Software Installation Installation on Windows The final screen of the installation program. Click Finish to complete the installation and exit the installation program. ► Continue reading in section ↑3, Product Activation with SERVICE CENTER and follow the ► instructions for activating your product. TRAKTOR KNOTRL D2 - Setup Guide - 18...
-
Page 19: Product Activation With Service Center
(Windows) folder. Within this folder, a subfolder labeled SERVICE CENTER holds the corre- sponding application. Double-click the SERVICE CENTER application to start the activation procedure. It is necessary to activate your Native Instruments product in order to use its full functionality. TRAKTOR KNOTRL D2 - Setup Guide - 19... -
Page 20: Log In Into Your User Account
Log In Into Your User Account The log-in screen of SERVICE CENTER. Log in with your e-mail address and Native Instruments password. ► If you do not have a Native Instruments account yet, click on Create new User Account. ►... -
Page 21: Activate The Product
Activate the Product The product activation screen of SERVICE CENTER. Enter the software serial number in the number field. The software serial number is locat- ed on the registration flyer, which you can find in your TRAKTOR KONTROL D2 product box. Click Activate to proceed. -
Page 22: Finish The Online Activation
Product Activation with SERVICE CENTER Activating Your Product Online 3.1.4 Finish the Online Activation SERVICE CENTER confirming the product activation. SERVICE CENTER confirms that the product has been activated successfully. A search for up- dates will start automatically. • If updates for any of the activated products are available, the button in the bottom right corner of the screen reads Update. -
Page 23: Updating Your Product
Product Activation with SERVICE CENTER Updating Your Product Updating Your Product 3.2.1 Select Updates The product update screen of SERVICE CENTER. In SERVICE CENTER, click the Update tab to view a list of available updates. Select the updates you want to download by checking the checkboxes on the left. We rec- ommend downloading all preselected updates. -
Page 24: Download The Updates
Product Activation with SERVICE CENTER Updating Your Product The download will start. → 3.2.2 Download the Updates Depending on the file size and the speed of your internet connection, downloading the files may take a while. We strongly recommend that you always install the latest updates. The product update in progress. -
Page 25: Install Your Updates
Product Activation with SERVICE CENTER Updating Your Product 3.2.3 Install Your Updates SERVICE CENTER confirming all updates were downloaded, and offering to install the download file. After all files have been downloaded successfully, you can directly install the updates from the SERVICE CENTER: Click on Install... -
Page 26: Activating Your Product Offline
Activating Your Product Offline If the computer you want to use Native Instruments products on is permanently not connected to the internet, you can activate the products utilizing the Offline activation procedure. Note that you will need a second computer that is connected to the internet. -
Page 27: Start The Offline Activation
Product Activation with SERVICE CENTER Activating Your Product Offline 3.3.1 Start the Offline Activation The internet connection screen of SERVICE CENTER. Start SERVICE CENTER. If no internet connection is detected, you will be redirected to Internet connection screen pictured above. In the Continue without connection to the internet area at the bottom of the screen, click... -
Page 28: Create The Activation Request File
Product Activation with SERVICE CENTER Activating Your Product Offline 3.3.2 Create the Activation Request File The offline activation screen of SERVICE CENTER. On the Activate screen, click Create. The Activate screen will display fields in which to ► enter the serial number (see next step). TRAKTOR KNOTRL D2 - Setup Guide - 28... -
Page 29: Enter The Serial Number
Enter the Serial Number The product activation screen of SERVICE CENTER. Enter the software serial number in the number field. The software serial number is locat- ed on the registration flyer, which you can find in your TRAKTOR KONTROL D2 product box. Click Create to save the Activation Request File (ActivationRequestFile.html). -
Page 30: Transfer The Activation Request File
Follow the instructions on the SERVICE CENTER product activation web page. As a new Native Instruments user you will need to create a new account before you can log in. Transfer the Activation Return file back to your audio computer. -
Page 31: Open The Activation Return File
Product Activation with SERVICE CENTER Activating Your Product Offline 3.3.5 Open the Activation Return File The offline activation screen of SERVICE CENTER. On your audio computer, start SERVICE CENTER again. In the Continue without connec- tion to the internet area at the bottom of the screen, click Offline. Select the Activate tab and click... -
Page 32: Finish The Offline Activation
Product Activation with SERVICE CENTER Activating Your Product Offline 3.3.6 Finish the Offline Activation SERVICE CENTER confirming the product activation. After you have opened the Activation Return file, SERVICE CENTER confirms that the product has been activated successfully. Cick Exit to quit SERVICE CENTER. -
Page 33: Further Information
To obtain updates for your products, log in under http://www.native-instruments.com/up- dates using your Native Instruments user account information. Download all relevant up- dates from the Personal Update Manager to your internet computer, transfer them to your music computer utilizing portable storage media, and install them. -
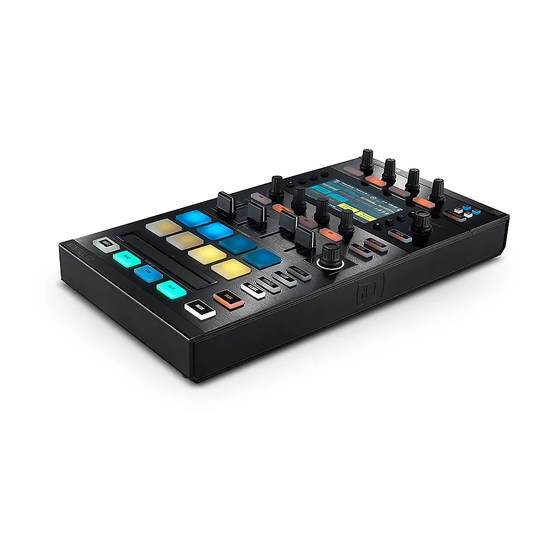
Page 34: Hardware Installation
Hardware Installation Hardware Installation You might want to add TRAKTOR KONTROL D2 to your TRAKTOR setup comprising an audio interface and an external DJ mixer. A typical basic setup including D2 may look like this: TRAKTOR KONTROL D2 basic setup With a second TRAKTOR KONTROL D2 controller you can enhance the full potential of TRAKTOR and your mixing abilities due to simultaneous control of all Decks and FX Units. -
Page 35: Important Hardware Installation Information
TRAKTOR KONTROL D2. Do not use the TRAKTOR KONTROL D2 with a power supply other than the one included in delivery. In case of loss or damage, make sure to purchase a replacement power supply ap- proved by Native Instruments for use with the D2. -
Page 36: Unfolding The Feet
Hardware Installation Unfolding the Feet Unfolding the Feet The TRAKTOR KONTROL D2 is equipped with rubber-padded foldable feet that raise the con- troller to standard mixer height, or at an angle for performance comfort. Unfold the rubber-padded feet underneath the D2. -
Page 37: Connecting To Your Computer
Hardware Installation Connecting to Your Computer Connecting to Your Computer To connect the TRAKTOR KONTROL D2 to your computer: Connect the device end (square plug) of the included USB cable to the USB socket on the rear panel of your D2. -
Page 38: Connecting The Power Supply
Connect the device end of your power supply to the input on the rear panel of the D2. Connect the plug of the power supply to a power outlet. The TRAKTOR KONTROL D2 is installed. → Continue reading with section ↑4.5, Final Preparations... -
Page 39: Final Preparations
Hardware Installation Final Preparations Final Preparations It is recommended that you follow the below order when preparing your TRAKTOR KONTROL D2 for use: Press the ON/OFF button located on the D2's rear panel to switch on the device. Switch on your mixer. Switch on the amplification system (active speakers or power amplifier with passive speakers). - Page 40 You have successfully assigned the D2 to control Decks B and D. → The TRAKTOR KONTROL D2 system is now ready for use. For further information on browsing, loading, and playing tracks please refer to the TRAKTOR KONTROL D2 Manual.
-
Page 41: What's Next
What's Next What's Next • For information on how to operate the TRAKTOR KONTROL D2 and how to use it with the TRAKTOR software, please refer to the TRAKTOR KONTROL D2 Manual. You can access the Manual via the Open Manual… entry from the Help menu in the TRAKTOR software. -
Page 42: Troubleshooting And Faq
If you hear clicks and/or drop-outs when a track is playing, you might need to increase the la- tency setting of your TRAKTOR KONTROL D2. To learn how to do this, please refer to the TRAKTOR KONTROL D2 Manual, which thoroughly describes the TRAKTOR KONTROL D2 Control Panel—the tool that allows you to adjust the audio interface settings. -
Page 43: Support
Support button in the upper right ► corner. Here you will find direct links to the Native Instruments Online Knowledge Base and the Online Support Form. The Online Knowledge Base gathers useful information about your Native Instruments product and can be of great help to solve possible issues you may encounter when working with Native Instruments products. -
Page 44: Forum
The version number of your software is displayed in the About dialog for any Native Instruments application. This dialog can be opened by clicking on the NI logo in the upper right corner of the user interface. Alternatively, you can find the version num-... -
Page 45: Product Returns
Please contact our Technical Support team prior to returning an item. If your product needs to be returned, they will assign you an RA (Return Authorization) number to expedite the process- ing of your return. Contact Native Instruments Technical Support http://www.native-instruments.com/support TRAKTOR KNOTRL D2 - Setup Guide - 45...