Advertisement
Quick Links
RFNP
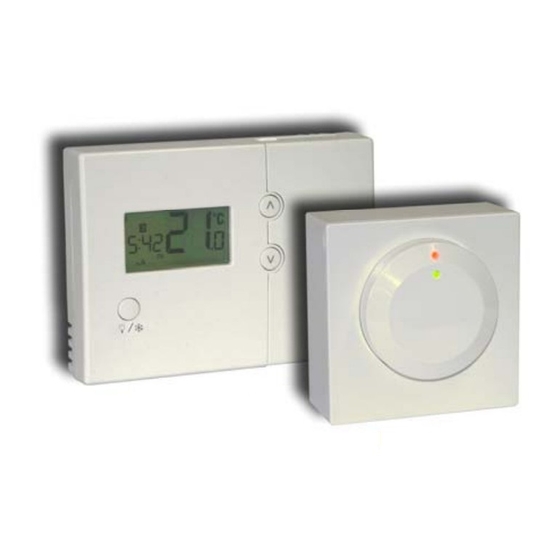
Radio-frequency thermostat
FOR RF SET
FOR RF
FOR RF SET
INTRODUCTION
INTRODUCTION
INTRODUCTION
This thermostat can replace any standard room thermostat, and is designed for use with gas or oil heating systems.
If you wish to control electric heating note that the current rating of the receiver is 3A resistive.
The transmitter is battery-powered and designed for wall mounting using the backplate supplied. A stand is supplied with
the set, if you wish to place the transmitter on a table-top.
The receiver requires a mains supply and provides a volt-free contact to switch any load up to 3A @ 230V 50Hz.
The transmitter can be installed—or should be located—wherever you would normally fit a room thermostat.
The receiver should be wall-mounted close to the boiler.
The transmitter and receiver communicate with 433 MHz radio frequency signals.
RADIO FREQUENCY COMMUNICATION
1. The factory default code for RF communication is 000. This should be changed if more than one control set is being
installed in any premises, or if unwanted operation occurs due to interference from any other radio frequency device.
See 'FUNCTION SETTINGS: RF address code setting' on page 2.
2. Ensure that different addresses are assigned to each thermostat set within the same installation. Note that there should
be a gap of at least one metre between receiver units to avoid RF interference.
3. During normal operation the transmitter sends signals at 10 minute intervals to ensure the receiver is in the correct
state. If for any reason a signal is 'missed' there will be a 10 minute delay until the next signal is sent. Alternatively you
can increase or decrease the temperature by pressing the up or down arrow keys, and this will prompt the transmitter to
send a new signal immediately.
FUNCTION AND WIRING OF THE RECEIVER
FUNCTION AND WIRING OF THE RECEIVER
FUNCTION AND WIRING OF THE RECEIVER
1. All wiring should be carried out by a skilled person. Disconnect power before wiring. The mains supply to the receiver
should be fused at 3 Amps.
2. Install the receiver adjacent to the heat source. The area should be free from any damp, or sources of electrical / mag-
netic interference (e.g. hi-fi speakers). The receiver should not be screened by any metal object(s).
3. If required, change the RF address code—see 'FUNCTION SETTING: RF address code setting' on the next page.
4. The receiver's red LED illuminates to confirm a mains supply is present. The green LED illuminates when the output is
on, following a demand signal being received from the transmitter.
WIRING INFORMATION:
WIRING INFORMATION:
WIRING INFORMATION:
Using the crimp connectors and insulating boots provided, connect wiring to the receiver as noted below. For conven-
tional heating installations, connections will be required to terminals 1— 4 only. Terminal 5 can be ignored.
Wiring:
Wiring:
Wiring:
1
N
Neutral
2
L
Live
3
COM
Switch input—common
4
NO
Switch output (On) Normally open
5
NC
Switch output (Off) normally closed
User Instructions
SET-
-
UP PLEASE SEE 'RF ADDRESS CODE SETTING' ON PAGE 2
UP PLEASE SEE 'RF ADDRESS CODE SETTING' ON PAGE 2
-
UP PLEASE SEE 'RF ADDRESS CODE SETTING' ON PAGE 2
Transmitter
Push button function
Push button function
Push button function
Key
Function
Increase setpoint temperature
Decrease setpoint temperature
Single press:
Turn on backlight for 5 seconds.
Press and hold:
Activate / deactivate Frost Protection
SET
Key for confirming function setting
SELECT Key for function selection
RESET
System reset
Receiver
1
1
1
Advertisement

Related Manuals for TFC RFNP


Summary of Contents for TFC RFNP
- Page 1 RFNP Radio-frequency thermostat Transmitter User Instructions Receiver FOR RF SET FOR RF SET- UP PLEASE SEE ‘RF ADDRESS CODE SETTING’ ON PAGE 2 UP PLEASE SEE ‘RF ADDRESS CODE SETTING’ ON PAGE 2 FOR RF SET UP PLEASE SEE ‘RF ADDRESS CODE SETTING’ ON PAGE 2...
- Page 2 FUNCTION SETTING: (buttons for function setting and system reset are under the transmitter cover ) You can adjust the way the transmitter works, by accessing the function menu: Note that the device will ‘time-out’ to normal running mode if no key is pressed for 15 seconds. RF ADDRESS CODE SETTING.