Table of Contents
Advertisement
Quick Links
Download this manual
See also:
Service Manual
Advertisement
Table of Contents

Related Manuals for Philips FWD410/77


Summary of Contents for Philips FWD410/77
- Page 1 Register your product and get support at www.philips.com/welcome FWD410 User manual...
-
Page 2: Table Of Contents
Contents 1 Important Safety Notice 2 Your DVD Mini Hi-Fi System Introduction What's in the box Overview of the main unit Overview of the remote control 3 Connect Place the unit Connect speakers Connect video cables Optional connections Connect power 4 Get started Prepare the remote control Turn on... -
Page 3: Important
1 Important Safety Know these safety symbols This 'bolt of lightning' indicates uninsulated material within your unit may cause an electrical shock. For the safety of everyone in your household, please do not remove product covering. The 'exclamation point' calls attention to features for which you should read the enclosed literature closely to prevent operating and maintenance problems. -
Page 4: Notice
Never look into the laser beam inside the unit. Notice device that are not expressly approved by Philips Consumer Lifestyle may void the user’s Disposal of your old product and batteries Your product is designed and manufactured which can be recycled and reused. -
Page 5: Copyright Notice
Information about the use of batteries: Caution Do not mix new and used batteries. Do not mix different brands of batteries. Observe correct polarity. Remove batteries from products that are not in use for a longer period of time. Store batteries in a dry place. Risk of injury: Wear gloves when handling leaking batteries. -
Page 6: Your Dvd Mini Hi-Fi System
2 Your DVD Mini Hi-Fi System Congratulations on your purchase, and support that Philips offers, register your product at www.philips.com/welcome. Introduction With this unit, you can: Watch video from DVD/VCD/SVCD or USB storage devices Enjoy audio from discs, USB storage... -
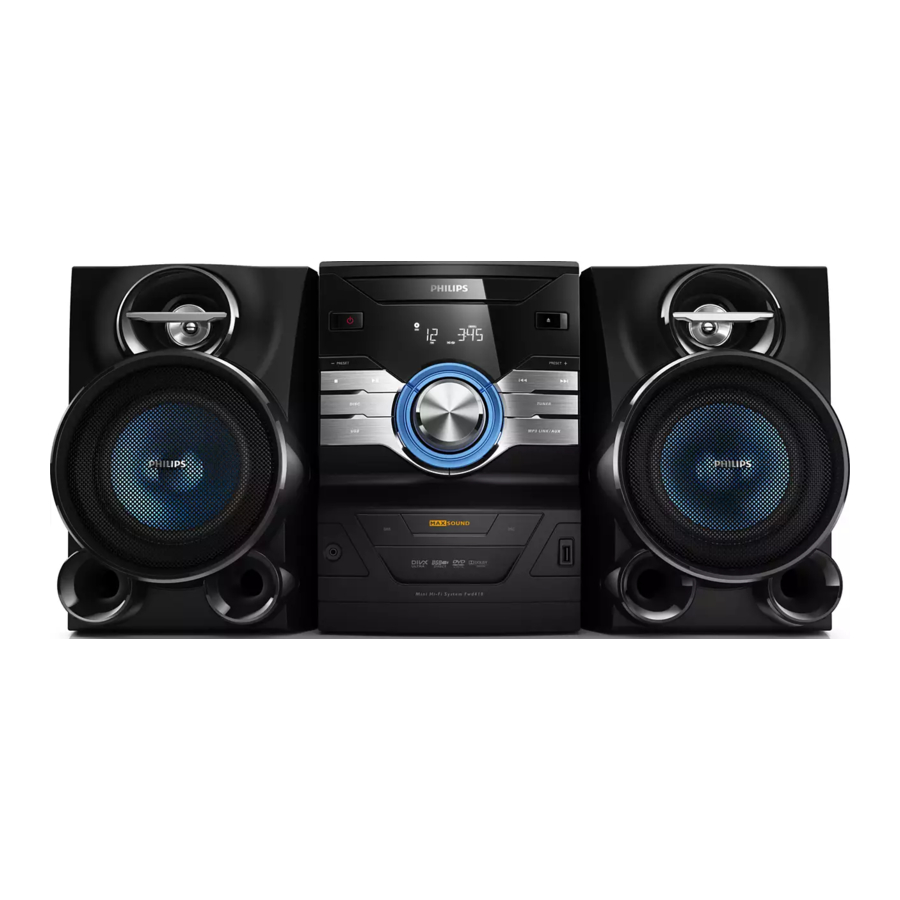
Page 7: Overview Of The Main Unit
Overview of the main unit Turn on the unit or switch to standby mode. b PRESET +/- Select a preset radio station. Stop play or erase a program. Start or pause play. -
Page 8: Overview Of The Remote Control
e Source selection keys DISC: Switch to disc source. USB: Switch to USB storage device. TUNER: Switch to FM radio. MP3 LINK/AUX: Switch to external MP3 or auxiliary device. f Volume knob Adjust volume. g MAX SOUND Turn on or off instant power boost for sound. - Page 9 d OK Search in a track or disc. Navigate left/right in a menu. Tune to a radio station. Navigate up/down in a menu. Rotate a picture. During video play, select a slow backward/forward mode. BACK Return to the previous menu. Skip to the previous/next track.
-
Page 10: Connect
3 Connect Place the unit Place the unit near the TV. distance from the TV and at an angle of approximately 45 degrees from the listening position. Note To avoid magnetic interference or unwanted noise, never place both the main set and speakers too close to any radiation devices. -
Page 11: Connect Video Cables
Connect video cables Select the best video connection that the TV can support. Option 1: Connect to the component video sockets (for a standard TV or Progressive Scan TV). Option 2: Connect to the video (CVBS) socket (for a standard TV). Option 1: Connect to the component video sockets Connect component video cables (not... -
Page 12: Connect Fm Antenna
Connect FM antenna For optimal reception, fully extend and adjust the position of the antenna. For better FM stereo reception, connect an outdoor FM antenna to the The unit does not support MW radio reception. Connect the supplied FM wire antenna to socket on the back of the unit. -
Page 13: Connect Power
Always follow the instructions in this chapter in If you contact Philips, you will be asked for the model and serial number of this apparatus. The model number and serial number are on the back of the apparatus. -
Page 14: Turn On
Turn on Press . » The unit switches to the last selected source. Switch to standby mode Press again to switch the unit to standby mode. » The backlight on the display panel turns off. » The power indicator beside the display panel turns on (red). -
Page 15: Play
Select ([Video Setup]). Select [Progressive] -> [On], and then press OK. » The progressive setup is complete. Note If a blank/distorted screen is displayed, wait for 15 seconds for the auto recovery. If no picture is displayed, turn off the progressive scan mode as follows: 1) Press to open the disc compartment. -
Page 16: Play From Usb Or Recored Discs
Select an audio language You can select an audio language for a DVD or DivX (Ultra) video. During disc play, press AUDIO. » The language options appear. If the selected audio channels is unavailable, the default disc audio channel is used. Note For some DVDs, the language can only be changed from the disc menu. -
Page 17: Play Control
Play control Select repeat play options During play, press REPEAT/PROGRAM repeatedly to select a repeat play option. To resume normal play, press REPEAT/PROGRAM repeatedly until [Repeat Off] is displayed. Search forward/backward During video/audio play, press ) repeatedly to select a search speed. To resume play at normal speed, press During play, press REPEAT A-B at where you want to set the starting point. -
Page 18: Picture View Options
Select a camera angle Note Some DVD discs contain alternate scenes, such as scenes recorded from different camera angles. For such discs, you can select from the available alternate scenes. During DVD play, press ANGLE repeatedly to select a camera angle. Picture view options Select a slide show play mode During photo play, press... -
Page 19: Program Radio Stations
[STEREO] is the default setting for tuner mode. In tuner mode, you can press RADIO repeatedly to switch between [STEREO] and [MONO]. The unit memorizes your setting even if you turn off the unit or turn to other sources. Program radio stations Note You can program a maximum of 40 preset radio stations. -
Page 20: Adjust Sound
7 Adjust sound Adjust volume level During play, press +/- to increase/ decrease the volume level. Select a sound effect Note You cannot use different sound effects at the same time. Boost sound power This feature allows you to give an instant boost to the sound power. -
Page 21: Adjust Settings
8 Adjust settings Press SETUP. » The following menu is displayed. Symbol Description [General Setup] [Audio Setup] [Video Setup] [Preference Setup] Select a setup page. Select an option and then press Select a setting and then press OK. To return to the previous menu, press ) or BACK. -
Page 22: Preference Setup
[4:3 Pan Scan] – For 4:3 screen TV: full- height display with the trimmed sides. [4:3 Letter Box] – For 4:3 screen TV: wide-screen display with black bars on the top and bottom of the screen. [16:9 Wide Screen] – For wide-screen TV: display ratio 16:9. -
Page 23: Other Features
Note If you forget the password, enter '0000' before you set a new password. [DivX Subtitle] Select a character set that supports the DivX subtitle. Note the movie is ‘Movie.avi’, then you will need to name the [Version Info] Display the software version of this apparatus. [Default] Reset all the settings to factory default, except for the password and parental settings. -
Page 24: Product Information
10 Product information Note Product information is subject to change without prior notice. Rated Output Power 4 X 40 W RMS + 1/0.5 dB 30 Hz - 16000 Hz Signal to Noise Ratio Aux Input 900mV RMS 22k ohm Disc Laser Type Semiconductor Disc Diameter... -
Page 25: Supported Disc Formats
Supported disc formats Digital Video Discs (DVDs) Video CDs (VCDs) Super Video CDs (SVCDs) Digital Video Discs + Rewritable (DVD+RW) Compact Discs (CDs) DivX(R) disc on CD-R(W): DivX 3.11, 4.x and 5.x Supported MP3-CD formats: ISO 9660 Max. title/album name: 12 characters Max. -
Page 26: Troubleshooting
If you encounter problems when using this apparatus, check the following points before unsolved, go to the Philips web site (www.Philips.com/support). When you contact Philips, ensure that your apparatus is nearby and the model number and serial number are available. - Page 27 Due to Digital Rights issues, the DRM- through an analog video connection (for example, composite and component connection). Transfer the video content Poor radio reception Increase the distance between the apparatus and your TV or VCR. Fully extend the FM antenna. Connect an outdoor FM antenna instead.
- Page 28 Specifications are subject to change without notice © 2011 Koninklijke Philips Electronics N.V. All rights reserved. FWD410_98_UM_V1.0...