
Related Manuals for Hunter NODE-BT


Summary of Contents for Hunter NODE-BT
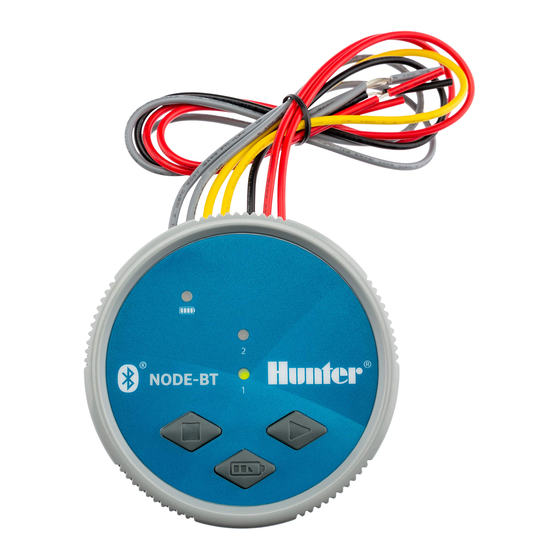
- Page 1 NODE-BT QUICK START GUIDE NODE-BT Bluetooth Enabled, Battery-Operated Controller ®...
- Page 2 Navigating the Controller Battery check LED 2-5. Active station indicator LEDs Manual station stop: Hold button to stop active station. Manual station start: Hold button to select station indicated by the station LED. Release button to activate. Battery check button Navigation des Steuergeräts LED-Anzeige für die Batterieprüfung 2-5.
- Page 3 Navigating the Controller Navigando nel programmatore LED di verifica della batteria 2-5. Indicatori LED delle stazioni attive Arresto manuale della stazione: tenere premuto il pulsante per arrestare la stazione attiva. Avvio manuale della stazione: tenere premuto il pulsante per selezionare la stazione indicata dal LED. Rilasciare il pulsante per attivare.
- Page 4 3. Secure the battery compartment by rotating clockwise until tightened. 4. Test power to the NODE-BT by pressing the battery check button on the front of the controller. Observe and check for the illuminated green LED. If the LED is red, the battery needs a replacement.
- Page 5 4. Testez l'alimentation du NODE-BT en appuyant sur le bouton de 2. Pil terminallerine bir veya iki adet 9 volt’luk alkalin pil takın. + vérification de la pile, qui se situe à l'avant du programmateur.
- Page 6 Connecting DC-Latching Solenoids 1. Attach the black leads from each solenoid to the single common wire (black lead) coming from the NODE-BT. Secure all wire connections with waterproof connectors. 2. Attach one red wire from each solenoid to the corresponding station wire (red lead) from the NODE-BT.
- Page 7 NODE-BT. Lunghezza dei cavi: Distancia del cableado: La distanza massima tra il solenoide e NODE-BT è di 30 m con una La distancia máxima del cable entre el solenoide y el NODE-BT es sezione minima dei cavi di 1 mm 100"...
- Page 8 Connecting DC-Latching Solenoids DC-Latching Solenoidlerinin Bağlanması 1. Her bir solenoiddeki siyah uçları NODE-BT’den çıkan tek ortak kabloya (siyah uç) bağlayın. Tüm kablo bağlantılarını su geçirmez konektörlerle sabitleyin. 2. Her bir solenoiddeki tek kırmızı kabloyu NODE-BT’den çıkan ilgili istasyon kablosuna (kırmızı uç) bağlayın.
- Page 9 Connecting Weather Sensor A Hunter Mini-Clik®, Freeze-Clik®, or Wired Rain-Clik® sensor can be connected to NODE-BT. The purpose of this sensor is to stop watering when weather conditions dictate. 1. Cut the yellow wire loop attached to the NODE-BT at approximately the middle of the loop.
- Page 10 à chacun des fils de la sonde météorologique. Vous instalado a até 30 m do NODE-BT utilizando fios com bitola pouvez fixer la sonde jusqu'à 30 m du NODE-BT à l'aide d'un fil mínima de 1 mm . Proteja todas as conexões dos fios com de calibre 1 mm...
- Page 11 3. Remove approximately ½" (1.3 cm) of insulation from each wire. Attach each gray wire to the soil sensor probe. You can mount the soil sensor up to 100' (30 m) from the NODE-BT using 18 AWG (1 mm ) minimum wire size. Secure wire connections with waterproof connectors.
- Page 12 Visite hunter.direct/soilclik para obtener la información completa sonda do sensor de solo. O sensor de solo pode ser instalado sobre la configuración. a até 30 m do NODE-BT utilizando fios com bitola mínima de 1 mm . Proteja as conexões com conectores à prova d'água.
- Page 13 2. Set the small open end of the tray holder on top of the solenoid. 3. Set NODE-BT controller into the large open end of the holder. Mounting alternatives: For mounting installations on non-Hunter valves, use the included universal adapter allowing vertical or horizontal controller mounting with the tray holder to PVC pipe, walls, or valve boxes.
- Page 14 Mounting the Controller to Solenoid Valve 1. Rosque el solenoide Hunter tipo “latch” de CC (P/N 458200) en 2. Collocare l'estremità aperta più piccola del supporto sulla parte la tapa de la válvula. superiore del solenoide. 2. Coloque el extremo abierto pequeño del soporte sobre el 3.
- Page 15 1. Hunter DC-latching solenoidi (P/N 458200) vanaya takın. 2. Tabla tutucunun küçük açık ucunu solenoidin üst kısmına ayarlayın. 3. NODE-BT kontrol ünitesini tutucunun büyük açık ucuna ayarlayın. Alternatif montajlar: Hunter dışındaki vanalara montaj işlemlerinde PVC borusuna, duvarlara veya vana kutularına tabla tutucu ile dikey veya yatay kontrol ünitesi montajına olanak tanıyan, ürünle birlikte sağlanan...
- Page 16 Requires Android 5.0 or above. 1. Be in range of the controller. 2. Turn on Bluetooth on the smartphone device. 3. Press the SCAN button and connect to a NODE-BT controller. Visit hunter. direct/nodebtios Visit hunter. direct/nodebtandroid Programmierung per App Laden Sie die kostenlose Hunter NODE BT App aus dem iTunes®...
- Page 17 Programação do app 3. Presione el botón BUSCAR y conéctese a un programador NODE-BT. Baixe o aplicativo gratuito Hunter NODE-BT para um smartphone por meio da iTunes Store® (dispositivos iOS)® ou do Google Play™ Visite hunter. direct/nodebtios Store (dispositivos Android™).
- Page 18 Irrigation Schedules Send full irrigation schedules to the controller by pressing the Schedule icon on the bottom tray and clicking the pencil icon to edit the program. 1. Programs: Use up to three programs (A, B, or C) for irrigation. 2.
- Page 19 Irrigation Schedules 3. Horas de arranque: Configure la HORA DE ARRANQUE 1 y las Programações de irrigação opcionales HORAS DE ARRANQUE 2 a 8. Confirme la selección Envie programações de rega completas ao controlador pressionando o ícone de programação na bandeja inferior e clicando no ícone de y presione Guardar.
- Page 20 8. Pump/Master Valve: Turn On to assign Station 1 to use as a pump or master valve for all programs. Station 1 will no longer be used for irrigation. Requires multi-station NODE-BT and normally closed master valve. 9. Set Manual Controller Run Time: Set a custom run time from 1 minute to 12 hours.
- Page 21 8. Pumpen-/Hauptventil: Aktivieren Sie diese Option, um La Estación 1 ya no se usará para el riego. Requiere un NODE-BT de Station 1 als Pumpen- oder Hauptventil für alle Programme múltiples estaciones y una válvula maestra normalmente cerrada.
- Page 22 La station 1 ne sera plus utilisée pour 8. Pompa/Master Valve: attivare per impostare la stazione 1 come l'arrosage. Nécessite un NODE-BT à plusieurs stations et une pompa o Master Valve per tutti i programmi.La stazione 1 non électrovanne principale normalement fermée.
- Page 23 300%, global ou por mês. Confirme e salve. ana vana olarak kullanmak için açın. İstasyon 1 sulama için artık kullanılamaz. Çok istasyonlu NODE-BT ve normalde kapalı ana 7. Atraso entre setores: defina todos os atrasos dos setores, de 10 vana gerektirir.
- Page 24 Zeile mit dem standardmäßigen Namen des Steuergeräts, um die Seriennummer, Firmware-Version, den Standort und den Zugangscode anzuzeigen. 1. Passen Sie Ihr NODE-BT individuell an: Geben Sie den Benutzernamen und den Standort ein und fügen Sie ein Bild hinzu. Bestätigen und speichern.
- Page 25 1. Personalizar seu NODE-BT: insira o apelido, a localização e adicione uma imagem. Confirme e salve. 2. Criar uma senha: selecione Ativar Senha para proteger seu dispositivo.
- Page 26 Resetting the Controller To downgrade firmware to the previous version: Hinweis: 1. Remove controller batteries . Durch das Wiederherstellen der Werkseinstellungen werden der Zeitplan und die Einstellungen dauerhaft gelöscht. 2. Wait one minute . 3. Press and Hold Start Button while re-inserting the batteries until Battery Check LED turns amber.
- Page 27 Resetting the Controller Pour rétablir les paramètres par défaut du programmateur : Nota: 1. Retirez les piles du programmateur. A reversão do firmware para uma versão anterior pode apagar a programação e as configurações. 2. Attendez une minute. Para restaurar o controlador para os padrões de fábrica: 3.
- Page 28 Sensor Alarm is detected (Soil sensor, Clik-Delay, or Rain/Clik sensor) Controller repeats cycles NODE-BT has more than one start time assigned Eliminate device start times as needed. to it. Each station has up to eight start times for each of the three programs.
- Page 29 2. This device must accept any interference received, including interference that may cause undesired operation. Changes or modifications not expressly approved by Hunter Industries could void the user’s authority to operate this device. If necessary, consult a representative of Hunter Industries Inc. or an experienced radio/television technician for additional suggestions.
- Page 30 Devices” without permission granted by the NCC, any company, enterprise, or user is not allowed to change frequency, enhance transmitting power or Hunter Industries declares that the irrigation controller complies with the alter original characteristic as well as performance to approved low-power standards of the European Directives of “electromagnetic compatibility”...
- Page 31 Notes...
- Page 32 The Bluetooth® word mark and logos are registered trademarks owned by Bluetooth SIG Inc. and any use of such marks by Hunter Industries is under license. iOS is a trademark or registered trademark of Cisco in the U.S. and other countries and is used under license. Apple, the Apple logo, iPhone, iPad, and iPod touch are trademarks of Apple Inc., registered in the U.S.