Table of Contents
Advertisement
This manual Contains the following Languages for Product Installation :
To better understand the installation process, check out the flash movie at our website
(www.zalman.co.kr).
※ Please read this manual thoroughly before installation.
※ The specifications of this product and its components may change without prior notice to improve the
performance thereof.
※ Warranty Period : 3 years, Including labor charge (Exclude S&H)
www.zalman.co.kr
English
●
Korean
●
www.zalmanusa.com
1
Advertisement
Table of Contents

Related Manuals for ZALMAN ZM80D-HP


Summary of Contents for ZALMAN ZM80D-HP
- Page 1 ● To better understand the installation process, check out the flash movie at our website (www.zalman.co.kr). ※ Please read this manual thoroughly before installation. ※ The specifications of this product and its components may change without prior notice to improve the performance thereof.
- Page 2 4. After installing this product on a VGA card(Video Graphics Card), the PCI slot adjacent to the AGP slot will be unusable. 5. If you plan to install this product on a recently released VGA card, check for compatibility at Zalman’s website (www.zalman.co.kr) before the installation.
-
Page 3: Table Of Contents
5) Compatibility with virtually all types of VGA cards, allows reinstallation when upgrading the VGA card. (Incompatible with VGA cards that do not have original heatsink holes measuring 3mm in diameter, or VGA cards on which the ZM80D-HP interferes with the card’s components.) 6) An Optional Fan (ZM-OP1, sold separately) can be attached to the heatsink directly without using a separate bracket. -
Page 4: Components
Thermal Grease 1 EA Thermal Grease 1 EA Thermal Tape 2 EA Optional Components ZM80D-HP Optional Fan (ZM-OP1) VGA RAM Heatsinks ● ● 80 mm Slim Fan 1 EA Fan Grill 1 EA Multi Connector 1 1 EA Frontside 4 EA... -
Page 5: Exploded View
Frontside Heatsink Frontside Heatsink Base Heatpipe A Bolt A Heatpipe B Frontside RAM Heatsink Backside RAM Heatsink Plate Spring Heatpipe Cover Rubber Ring Nipple Nut A Bolt B(8 mm) Backside Heatsink Base Sticker Backside Heatsink Bolt B(8 mm) www.zalman.co.kr www.zalmanusa.com... -
Page 6: Installation
6.1 Verifying the Computer Case’s Compatibility Compare your computer case with the cases in the diagram for compatibility. The ZM80D-HP cannot be used in systems in which the VGA Chipset faces upwards. Such cases should not be flipped up-side-down to “correct” this incompatibility. - Page 7 Note) If the Plate Spring separates from the base assembly, reinstall the Plate Spring onto the Frontside Heatsink Base (Refer to installation step 6.24) and restart installation from 6.5 step 3). Bolt D Bolt A Frontside Heatsink Base Plate Spring Heatsink Mounting Hole VGA Chipset www.zalman.co.kr www.zalmanusa.com...
- Page 8 ZM80D-HP 6.6 Assembling the Rubber Rings and Nipples 1) Slide the Rubber Ring onto each Bolt A protruding out of the back of the VGA card. 2) Screw a Nipple onto each Bolt A and tighten Bolt A with a screwdriver while holding the Nipple with one hand. While switching back and forth between each Bolt A, tighten one full turn at a time for each Bolt A until both are tightened.
- Page 9 6.11 Applying Thermal Grease on the Frontside Heatsink Base Evenly apply the Thermal Grease in the grooves of the Frontside Heatsink Base as shown in the diagram. Thermal Grease Apply Thermal Grease here Thermal Grease Thick Paper Frontside Heatsink Base www.zalman.co.kr www.zalmanusa.com...
- Page 10 ZM80D-HP 6.12 Installing the Heatpipe 1) Slide in Heatpipe A and Heatpipe B into the grooves of the Base Assemblies. 2) For general VGA cards, the end of the Heatpipes should protrude approximately 50 mm from the end of the Frontside Heatsink Base, and for Geforce 4 Ti or FX59 series, they should protrude approximately 30mm.
- Page 11 Evenly apply Thermal Grease on the Backside Heatsink Base as shown in the diagram. Thermal Grease Backside Heatsink Base 6.16 Applying the Thermal Grease on the Backside Heatsink Evenly apply the Thermal Grease into the heatpipe grooves of the Backside Heatsink. Backside Heatsink Groove for Heatpipe B Groove for Heatpipe A www.zalman.co.kr www.zalmanusa.com...
- Page 12 ZM80D-HP 6.17 Installing the Backside Heatsink 1) Place the Backside Heatsink between Heatpipe A and the Backside Heatsink Base. 2) Place Heatpipe A into the groove for Heatpipe A on the Backside Heatsink. 3) With Heatpipe A in its groove, position the Backside Heatsink so that Heatpipe B is inserted in its groove on the Backside Heatsink.
- Page 13 2) Slide in the Plate Link Assembly into the Channels on both of the Frontside and Backside Heatsinks, then tighten each Nipple. Bolt C(5 mm) To add an Optional Fan (ZM-OP1), refer to installation step 7. Plate Link Plate Link Assembly Plate Link Assembly Channel Bolt Head www.zalman.co.kr www.zalmanusa.com...
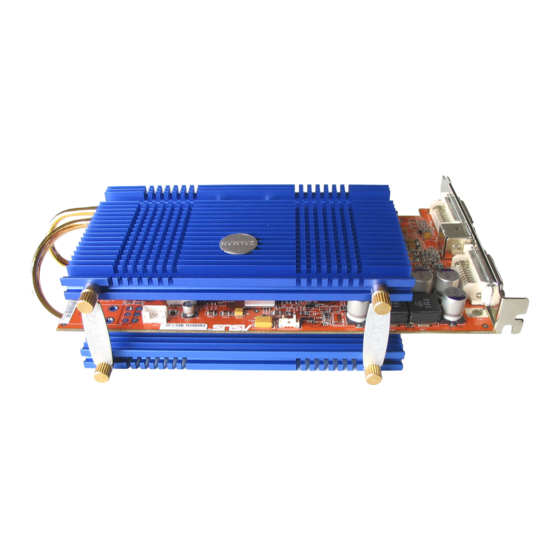
- Page 14 ZM80D-HP 6.22 Confirming Installation 1) The heatpipes installed on the VGA card should look exactly like the diagram below labeled (0). Check the diagram to make sure they have been correctly installed. Front Back 2) Make sure the Thermal Grease has been applied properly.
-
Page 15: Zm80D-Hp Optional Fan Installation
< Frontside Heatsink Base > < Backside Heatsink Base > 7. ZM80D-HP Optional Fan Installation 1)Assemble the Fan and the Fan Grill as shown in the diagram. Use Fan Screws to attach the Fan Grill to the Fan. Assemble the two Fan Bolts and Fan Nipples loosely. -
Page 16: Zalman Noise Prevention System
ZM80D-HP Zalman Noise Prevention System To build a noiseless computer, use Zalman’s Noiseless Power Supply (ZM400B-APF) CPU Coolers, Noiseless Northbridge Cooler (ZM-NB47J), Heatpipe HDD Cooler (ZM-2HC2), and Case Fan (ZM-F1) to achieve stable performance and maintain a noiseless environment. POWER SUPPLY...