Viper AS710R User Manual
Ride-on scrubbers
Hide thumbs
Also See for AS710R:
- User manual (19 pages) ,
- User manual (212 pages) ,
- User manual (268 pages)
Table of Contents
Advertisement
Electronic Service
Manuals
This electronic document is provided as a service to our customers.
We do not create the contents of the information contained in this docu-
ment. Should you have detailed questions pertaining to the information
contained in this document, you may contact Michco, or the manufac-
turer which provided the original information in this electronic deliver-
able. Michco's only part in this electronic deliverable was the electronic
assembly process. By providing this manual on line we are not guaran-
teeing parts availability.
You may contact Michco through the following methods:
Phone (517) 484-9312 or (800) 331-3339
2011 N. High St. -- Lansing, Michigan -- 48906
Fax: (517) 484-9836
Email: CustServe@Michco.com
Web site: www.Michco.Com
Parts Web site: www.FloorMachineParts.Com
Order Parts on Line at:
www.FloorMachineParts.Com
Directly to Parts & Service:
By Email:
Shop@Michco.com
By Fax: (517) 702-2041
By Voice: Use numbers above.
Serving the Cleaning Industry Since 1922
Notice: All copyrighted material remains property of original owners, all trademarks are property of respective owners.
Manuals are subject to Manufacturer's reproduction limitations. Originals or reproductions were provided by manufacturers
through a request. We make no warranty as to the correctness of information provided in this document and you assume
all risk. By placing these manuals on line we are not declaring our corporation to be an manufacturer authorized dealer or
provider, please check our web site for authorized manufacturers we represent.
Advertisement
Table of Contents

Related Manuals for Viper AS710R


Summary of Contents for Viper AS710R
- Page 1 Electronic Service Manuals This electronic document is provided as a service to our customers. We do not create the contents of the information contained in this docu- ment. Should you have detailed questions pertaining to the information contained in this document, you may contact Michco, or the manufac- turer which provided the original information in this electronic deliver- able.
- Page 2 Ride-on Scrubbers USER MANUAL READ USER MANUAL CAREFULLY BEFORE USE Please fill out & return your warranty card Model # Serial No.# VR10029 REV.02 2016-1-13...
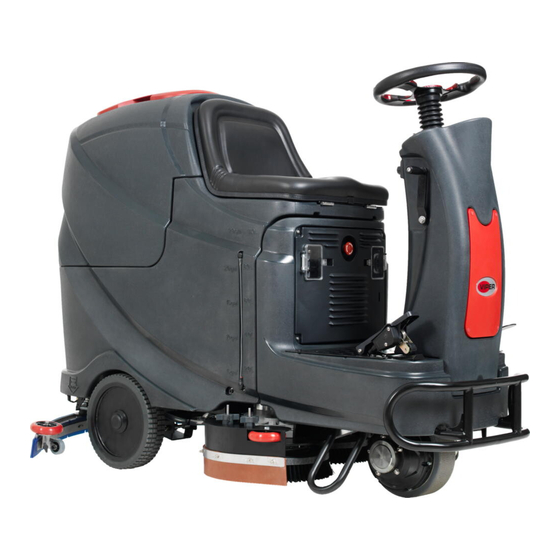
- Page 3 Machine destription Machine structure C1 -- Drain hose A1 --Seat (with Safety button) C2 -- Recovery tank turn latch A2 -- Recovery tank lid C3 -- Charging cable storage A3 -- Recovery tank C4 -- Clean water inlet A4 -- Solution tank C5 -- Squeegee lift lever A5 -- Squeegee C6 -- Drive pedal...
- Page 4 Figure A Figure B...
- Page 5 Figure C Figure D...
- Page 6 Figure Figure...
- Page 7 USER MANUAL SAFETY PRECAUTIONS This machine is intended for commercial use. It is constructed for use in an indoor environment and is not intended for any other use. Use only with recommended accessories. All operators shall read, understand and exercise the following safety precautions: 1) DO NOT OPERATE MACHINE: Unless trained and authorized.
-
Page 8: Machine Set Up & Installation
USER MANUAL WARNING Indicates a potential risk of injury or dangerous situation with risk of death for the operator. NOTED Indicates a remark related to important or useful functions. MACHINE SET UP & INSTALLATION UNPACKING MACHINE Be sure and check packing carton for any damage. Report immediately any damage to carrier. Check contents of package to ensure that the following items are included: 1, Machine 2, Squeegee assembly... -
Page 9: Machine Setup
USER MANUAL 3. Carefully place the four batteries into the compartment as shown in figure below. Place the battery brace at the front of the four batteries. 4. Connect battery cables to posts in numbered order as shown in the figure below. 5. -
Page 10: Installing And Adjusting The Squeegee
USER MANUAL Depress the rear, Depress the front, Brushes down Brushes up 5. Adjust the nut (A6) to properly position the splash guards. Never work without the brusher/pad perfectly installed. When cleaning or replacing the brushes, you should raise the brush head and rotate the reverse direction to “working”... -
Page 11: Machine Operation
USER MANUAL 3. Lightly depress the driver pedal (C6) to move and release it checking the machine forward or stop. 4. For more security, you need to press the Emergency-stop button (A15) to make the machine come to a sudden halt to check that the button is working, when you use the machine for the first time. -
Page 12: Battery Charging
USER MANUAL 5. Turn on the brush motor switch.(E3) 6. Depress the driver pedal slowly (C6) and hold steering wheel (A14) to go forward. The speed can be controlled by a dial (E6), turning left decreases speed, and turning right increases speed. -
Page 13: Machine Storage
USER MANUAL Charge the batteries when the red indicator (E11) is on. Batteries emit hydrogen. Explosion or fire can result from hydrogen. Keep sparks and open flames away! It is recommended to push the button(C2) to turn recovery tank open before charging. 1. -
Page 14: Scheduled Maintenance Table
USER MANUAL charger cable disconnected. All maintenance procedures must be performed by qualified personnel, or by authorized Service Center. This Manual describes only the most common maintenance. For additional maintenance procedures, contact your local Service Center. SCHEDULED MAINTENANCE TABLE Procedure After each use Weekly Every six mouths... - Page 15 USER MANUAL LED SCREEN DISPLAY INFORMATIONS STOP Machine doesn’t move and brush doesn’t work, vacuum motor can work 00012.3 Machine run hours is 12.3hours L0-18 Batteries voltage is lower than 18V U-25.5 Batteries voltage is 25.5V ERR-01 Squeegee is down and the machine is in reverse DRIVE MOTOR ERROR INDICATOR INFORMATION LED FLASH CODES EXAMPLE, ¤¤...
- Page 16 USER MANUAL Parameter Model AS710R Machine length/width/height 62*30*48inch Solution tank capacity 31gal Recovery tank capacity 31gal Rear wheels diameter 11.8inch Brush motor power 2x0.4HP Vacuum motor power 0.67HP Drive motor power 0.67HP Max. driver speed 3.75miles/h Sound level 69db(A) Batteries length/width/height(standard)
-
Page 17: Troubleshooting
USER MANUAL TROUBLESHOOTING Trouble Possible Cause Remedy The battery connector is disconnected Connect. The machine does not work, LED screen (E1 ) does not turns on The batteries are completely discharged Charge the batteries The machine does not work, The batteries are discharged Charge the batteries indicator light ( E11) is red The PCB or key board is broken...