Philips AVENT SCD730 User Manual
Hide thumbs
Also See for AVENT SCD730:
- Manual (84 pages) ,
- Quick start manual (2 pages) ,
- User manual (75 pages)
Table of Contents
Advertisement
Available languages
Available languages
Quick Links
Advertisement
Table of Contents

Related Manuals for Philips AVENT SCD730


Summary of Contents for Philips AVENT SCD730
- Page 1 SCD730/SCD731 SCD733/SCD734 SCD735 FR-NL...
- Page 2 English 6 Español 22 Nederlands 39 Português 56...
- Page 3 English...
-
Page 4: Preparing For Use
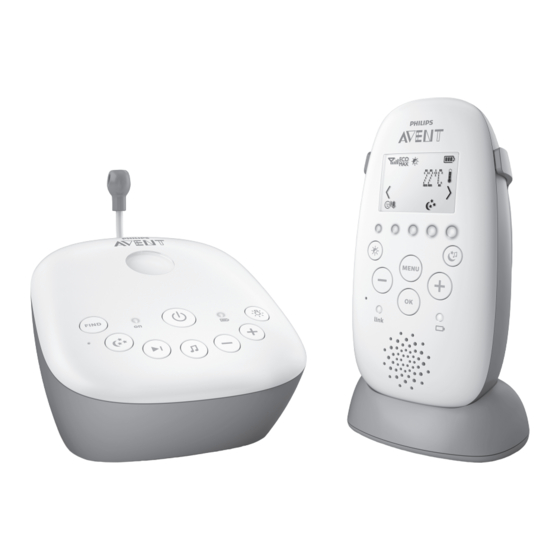
English Introduction Go to www.philips.com/welcome to register your product and to read the detailed user manual. Display of the parent unit (Fig. 1) Signal strength indicator 2 Eco Max indicator 3 Night dim mode symbol 4 Cry alert indicator 5 Mute symbol... -
Page 5: Using The Baby Monitor
English Using the baby monitor Positioning the baby monitor Keep the baby unit out of the reach of the baby. Never place the baby unit inside the baby’s bed or playpen. - Because the cord of the baby unit presents a potential strangulation hazard, make sure that the baby unit and its cord are at least 1 metre/3.5 feet away from your baby. -
Page 6: Functions And Feedback On The Baby Unit
English Dry materials Material thickness Loss of range Metal grilles or bars < 1cm (0.4in) 90-100% Metal or aluminium sheets < 1cm (0.4in) 100% Functions and feedback on the baby unit Nightlight The nightlight produces a soft glow that comforts your baby. 1 Press the button on the baby unit to switch the nightlight on or off. -
Page 7: Paging The Parent Unit
English 1 Press the projector on/off button to switch on the projector. The projector symbol appears on the display of the parent unit. 2 There are six different patterns. The first pattern fades in to full intensity in 2 seconds. It is projected for 8 seconds and then fades out for 2 seconds while the next pattern fades in. - Page 8 English soothing button. This screen allows you to operate the nightlight, the lullabies and the projector on the baby unit remotely. 1 To open the soothing menu, press the soothing button. 2 Use the + and - buttons to point the arrow to a soothing feature. 3 To switch on a soothing feature when it is off or to switch it off when it is on, press OK.
- Page 9 English 2 You can set the nightlight timer for 5 to 20 minutes or you can switch on the nightlight continuously. Press OK to confirm. The nightlight symbol appears on the display. If you set the nightlight timer, the nightlight switches off automatically. If you switch on the nightlight continuously, switch it off in the soothing menu or by pressing the button on the baby unit.
-
Page 10: Talk Function
English The current volume level appears on the display. 2 Press the + button to increase the volume or press the - button to decrease the volume. If no button is pressed for more than 2 seconds, the volume level indication disappears from the display and the volume setting is saved. -
Page 11: Baby Unit Battery Low Alert
English Baby unit battery low alert 1 When the baby unit runs on battery power and its batteries are low, the parent unit beeps and the text ‘Baby unit Change batteries’ appears on the display. 2 If you do not replace the batteries in time, the link with the baby unit will be lost. - Page 12 English 2 Use the + button to go to the next option or the - button to go to the previous option. The arrow on the display indicates in which direction you can navigate. 3 Press OK to confirm your selection. Note: Press the MENU button if you want to leave the menu without making any changes.
-
Page 13: Eco Max Mode
English The speaker of the parent unit only goes on if the baby makes loud sounds, for instance because it is crying. Eco Max mode Smart Eco is a standard feature on this baby monitor. It automatically reduces the DECT signal from the baby unit to save energy. To save even more energy, activate the Eco Max mode. -
Page 14: Room Temperature
English 2 Select 'Set Timer' in the feed timer submenu. Press OK to start setting the timer. 3 Set the hour and the minutes and press OK to confirm. 4 To start the feed timer, select 'xx:xx Start' in the feed timer submenu. Press OK to confirm. -
Page 15: Cry Alert
English 5 Choose one of the alert options. The options available are sound only, sound and vibration,vibration only and display only. Press OK to confirm. The temperature alert symbol appears on the display. 6 Select 'Temp Scale' in the temperature submenu. Press OK to confirm. 7 Select 'Celsius' or 'Fahrenheit' and press OK to confirm. -
Page 16: Warranty And Support
- When you press OK while the key lock is active, the second line on the display tells you what second step is necessary to unlock the buttons. Warranty and support If you need information or support, please visit www.philips.com/support or read the international warranty leaflet. - Page 17 English SCD730/SCD731/SCD733/SCD734/SCD735 ( EN ) < Sensitivity > < Eco Max > Turn On? > !No alert if… < Turn O ? < Cry Alert > Vibrate On? > < Vibrate O ? < Feed Timer > xx:yy Start? > <...
- Page 18 English Light Timer 5 minutes > > < 10 minutes < 15 minutes > < 20 minutes > < Continuous Lullaby Play no.1 > Song Timer 5 minutes > < Play no.12 > < 10 minutes > < ....> <...
- Page 19 Español...
-
Page 20: Preparación Para Su Uso
Español Introducción Visite www.philips.com/welcome para registrar su producto y leer el manual de usuario detallado. Pantalla de la unidad de padres (Fig. 1) Indicador de intensidad de señal 2 Indicador de Eco Max 3 Símbolo de modo de atenuación nocturna 4 Indicador de alerta de llanto 5 Símbolo de silenciamiento... -
Page 21: Uso Del Vigilabebés
Español Uso del vigilabebés Colocación del vigilabebés Mantenga el vigilabebés fuera del alcance del bebé. No coloque nunca la unidad del bebé en el interior de la cuna o del parque. - El cable de la unidad del bebé presenta posibles riesgos de estrangulación, por lo que debe asegurarse de que la unidad del bebé... -
Page 22: Funciones Y Reacciones De La Unidad Del Bebé
Español Materiales secos Grosor del material Pérdida de alcance Ladrillo, madera < 30 cm 5-35% contrachapada Hormigón armado < 30 cm 30-100% Rejillas o barras metálicas < 1 cm 90-100% Láminas de metal o < 1 cm 100% aluminio Funciones y reacciones de la unidad del bebé Luz nocturna La luz de compañía produce un resplandor suave que tranquiliza al bebé. -
Page 23: Localización De La Unidad De Padres
Español Proyector Puede tranquilizar al bebé encendiendo el proyector, que emite patrones de luces de colores que se proyectan en el techo. 1 Pulse el botón de encendido/apagado del proyector para encenderlo. El símbolo del proyector aparece en la pantalla de la unidad de padres. 2 Hay seis modelos diferentes. -
Page 24: Funciones Y Reacciones De La Unidad De Padres
Español Funciones y reacciones de la unidad de padres Menú de tranquilidad La unidad de padres dispone de un menú de tranquilidad independiente para todas las funciones de tranquilidad: luz de compañía, nana y proyector. Para abrir el menú de tranquilidad, pulse el botón de tranquilidad. Esta pantalla permite controlar la luz de compañía, las nanas y el proyector de la unidad del bebé... - Page 25 Español 1 Seleccione la función de luz de compañía y abra el menú de opciones de la misma. 2 Puede establecer el temporizador de la luz de compañía en un tiempo de entre 5 y 20 minutos, o puede encender la luz de compañía de forma continua.
- Page 26 Español 3 Puede establecer el temporizador del proyector en un tiempo de entre 5 y 20 minutos, o puede encender el proyector de forma continua. Pulse OK (Aceptar) para confirmar. El símbolo del proyector aparece en la pantalla. Si ajusta el temporizador del proyector, el proyector se apaga automáticamente.
-
Page 27: Función Talk (Intercomunicador)
Español Función TALK (Intercomunicador) 1 Si desea tranquilizar al bebé, pulse TALK en la unidad de padres y hable con claridad hacia el micrófono de la parte delantera desde una distancia de 15-30 cm (0,5-1 pie). Nota: Si ha aumentado el volumen de la nana en la unidad del bebé, el sonido también será... -
Page 28: Menú De La Unidad De Padres
Español 1 Si las pilas recargables están casi agotadas, el piloto de estado de las pilas parpadea en rojo rápidamente. 2 Si no conecta la unidad de padres a la red eléctrica, se apagará. Menú de la unidad de padres Navegación por el menú... -
Page 29: Modo Eco Max
Español Sensibilidad Esta opción del menú de la unidad de padres le permite ajustar la sensibilidad del micrófono de la unidad del bebé. La sensibilidad del micrófono determina el nivel de ruido que detecta la unidad del bebé. Por ejemplo, puede que quiera oír al bebé cuando llore, pero esté... -
Page 30: Temporizador De Alimentación
Español - En el modo Eco Max, no recibirá ninguna respuesta si la unidad de padres está fuera del alcance de la unidad del bebé. Puede comprobar la conexión pulsando cualquier botón de la unidad de padres. - El modo Eco Max no se puede activar si la sensibilidad del micrófono se establece en el nivel más alto. -
Page 31: Temperatura Ambiente
Español 4 Para iniciar el temporizador de alimentación, seleccione 'xx:xx Start' en el submenú del temporizador de alimentación. Pulse OK (Aceptar) para confirmar. El símbolo del temporizador aparece en la pantalla y el temporizador empezará la cuenta atrás. 5 Cuando el temporizador llega a 00:00, se activa la alerta del temporizador de alimentación, el símbolo del temporizador empieza a parpadear en la pantalla y el mensaje 'TIMER END' (Fin del temporizador) se desplaza por la pantalla. -
Page 32: Alerta De Llanto
Español 3 Utilice los botones + y - para establecer el intervalo de temperatura mínimo entre 10 °C (50 °F) y 19 °C (66 °F) y el intervalo de temperatura máximo entre 22 °C (72 °F) y 37 °C (99 °F). Pulse OK (Aceptar) para confirmar. 4 Seleccione 'Alert' en el submenú de temperatura. Pulse OK (Aceptar) para confirmar. -
Page 33: Garantía Y Asistencia
- Al pulsar OK mientras el bloqueo está activo, la segunda línea de la pantalla le indica el segundo paso necesario para desbloquear los botones. Garantía y asistencia Si necesita asistencia o información, visite www.philips.com/support o lea el folleto de garantía internacional. - Page 34 Español SCD730/SCD731/SCD733/SCD734/SCD735 ( ES ) < Sensibilidad > < Eco Máx > ¿Encender? > Sin alerta si fuera... ¿ok? < ¿Apagar? < Alerta de lloro > ¿Activar vibración? > < ¿Desactivar vibración? < Temporizador xx:yy ¿Inicio? > alimentación > < Ajuste temporizador >...
- Page 35 Español Luz tempor. 5 minutos > < 10 minutos > < 15 minutos > < 20 minutos > < Continuo Nana Nana n.1 Canción temp. 5 minutos > > < Nana n.2 < 10 minutos > > < ....> <...
- Page 36 Nederlands...
-
Page 37: Klaarmaken Voor Gebruik
Nederlands Introductie Ga naar www.philips.com/welcome om uw product te registreren en de gedetailleerde gebruiksaanwijzing te lezen. Display van de ouderunit (afb. 1) Signaalsterkte-indicator 2 Eco Max-indicator 3 Symbool van nachtdimmodus 4 Huilalarmindicator 5 Dempsymbool 6 Accustatusindicator 7 Navigatiepijl 8 Temperatuursymbool... -
Page 38: De Babyfoon Gebruiken
Nederlands De babyfoon gebruiken De babyfoon plaatsen Houd de babyunit buiten het bereik van uw baby. Plaats de babyunit nooit in het bedje of de box van de baby. - Het snoer van de babyunit kan wurgingsgevaar opleveren. Zorg er daarom voor dat de babyunit en het bijbehorende snoer zich op ten minste 1 meter afstand van uw baby bevinden. -
Page 39: Functies En Feedback Van De Babyunit
Nederlands Droge materialen Dikte van het materiaal Vermindering van bereik Gewapend beton < 30 cm 30-100% Metalen roosters of < 1 cm 90-100% stangen Metaal- of < 1 cm 100% aluminiumplaten Functies en feedback van de babyunit Nachtlampje Het nachtlampje produceert een zachte gloed die uw baby geruststelt. 1 Druk op de knop op de babyunit om het nachtlampje in of uit te schakelen. -
Page 40: De Ouderunit Oproepen
Nederlands Spot Door de projector in te schakelen, kunt u uw baby kalmeren met gekleurde lichtpatronen die op het plafond worden geprojecteerd. 1 Druk op de aan-uitknop voor de projector om de projector in te schakelen. Het projectorsymbool verschijnt op het display van de ouderunit. -
Page 41: Functies En Feedback Van De Ouderunit
Nederlands Functies en feedback van de ouderunit Kalmeringsmenu De ouderunit heeft een afzonderlijk kalmeringsmenu voor alle kalmeerfuncties: nachtlampje, slaapliedjes en projector. Druk op de kalmeringsknop om het kalmeringsmenu te openen. Met dit scherm kunt u het nachtlampje, de slaapliedjes en de projector op de babyunit op afstand bedienen. - Page 42 Nederlands 1 Kies de nachtlampfunctie en open het menu met opties voor het nachtlampje. 2 U kunt de nachtlamptimer instellen van 5 tot 20 minuten of het nachtlampje ononderbroken inschakelen. Druk op OK om uw keuze te bevestigen. Het symbool van het nachtlampje verschijnt op het display. Als u de nachtlamptimer instelt, gaat het nachtlampje na de ingestelde tijd automatisch uit.
- Page 43 Nederlands 3 U kunt de projectortimer instellen van 5 tot 20 minuten of de projector ononderbroken inschakelen. Druk op OK om uw keuze te bevestigen. Het projectorsymbool verschijnt op het display. Als u de projectortimer instelt, gaat de projector na de ingestelde tijd automatisch uit.
- Page 44 Nederlands Terugspreekfunctie 1 Als u uw baby wilt troosten, drukt u op de knop TALK (Spreken) op de ouderunit en spreekt u duidelijk in de microfoon aan de voorzijde op een afstand van 15 - 30 cm. Opmerking: Als u het volume voor het slaapliedje op de babyunit harder hebt ingesteld, zal het geluid van de terugspreekfunctie op de ouderunit ook harder zijn.
-
Page 45: Menu Van De Ouderunit
Nederlands 1 Als de oplaadbare batterijen bijna leeg zijn, knippert het batterijstatuslampje snel rood. 2 Als u de ouderunit niet op netspanning aansluit, schakelt deze uit. Menu van de ouderunit Navigeren in het menu Opmerking: Bepaalde menufuncties werken alleen wanneer de babyunit en de ouderunit met elkaar zijn verbonden. -
Page 46: Eco Max-Modus
Nederlands Gevoeligheid Met deze optie in het menu van de ouderunit kunt u de microfoongevoeligheid van de babyunit instellen. De gevoeligheid van de microfoon bepaalt bij welk geluidsniveau de babyunit actief wordt. Als uw baby huilt, wilt u dat natuurlijk horen, maar misschien wilt u het gebrabbel van uw kind niet horen. - Page 47 Nederlands - In de Eco Max-modus ontvangt u geen feedback wanneer de ouderunit zich buiten bereik van de babyunit bevindt. U kunt de verbinding controleren door op een willekeurige knop op de ouderunit te drukken. - De Eco Max-modus kan niet worden geactiveerd als de microfoongevoeligheid op het hoogste niveau is ingesteld.
- Page 48 Nederlands 5 Wanneer de timer 00:00 heeft bereikt, gaat de voedingstimerwaarschuwing af, begint het timersymbool op het display te knipperen en rolt het bericht 'TIMER END' (Einde timer) over het display. 6 Als u de timer wilt stoppen, kiest u in het submenu van de voedingstimer de optie 'Stop &...
- Page 49 Nederlands 7 Kies 'Celsius' of 'Fahrenheit' en druk op OK om uw keuze te bevestigen. De temperatuur verschijnt op het display in de ingestelde schaal. Als de temperatuur zich binnen het ingestelde bereik bevindt, heeft het temperatuuralarmsymbool twee segmenten. Als de temperatuur zich onder of boven het ingestelde bereik bevindt, heeft het temperatuuralarmsymbool op het display slechts één segment en knippert het.
-
Page 50: Garantie En Ondersteuning
- Wanneer u op OK drukt terwijl de vergrendeling actief is, ziet u op de tweede regel op het display wat de tweede stap is waarmee u de knoppen ontgrendelt. Garantie en ondersteuning Hebt u informatie of ondersteuning nodig, ga dan naar www.philips.com/support of lees de internationale garantieverklaring. - Page 51 Nederlands SCD730/SCD731/SCD733/SCD734/SCD735 ( NL ) < Gevoeligh. > < Eco Max > Insch.? > !Geen melding btn bereik, < Uitsch.? < Huilmelding > Trillen aan? > < Trillen uit? < Timer-feed > xx:yy start? > < Timer inst. > uur 00:00 00:30 min <...
- Page 52 Nederlands Timer licht 5 minuten > > < 10 minuten < 15 minuten > < 20 minuten > < Continu Slaapliedje Slaaplied 1 > Timer nummer 5 minuten > < Slaaplied 2 > < 10 minuten > < ....> <...
- Page 53 Português...
-
Page 54: Preparar Para A Utilização
Português Introdução Vá a www.philips.com/welcome para registar o seu produto e ler o manual do utilizador detalhado. Visor da unidade dos pais (fig. 1) Indicador da intensidade do sinal 2 Indicador Eco Max 3 Símbolo do modo de redução noturna da luz 4 Indicador do alerta de choro 5 Símbolo do corte de som... -
Page 55: Utilizar O Intercomunicador Para Bebé
Português Utilizar o intercomunicador para bebé Colocação do intercomunicador para bebé Mantenha o intercomunicador para bebé fora do alcance do bebé. Nunca coloque a unidade do bebé dentro do berço ou do parque do bebé. - Visto que o cabo da unidade do bebé representa um perigo potencial de estrangulamento, assegure-se de que a unidade do bebé... -
Page 56: Funções E Informações Da Unidade Do Bebé
Português Materiais secos Espessura do material Perda de alcance Madeira, estuque, cartão, < 30 cm 0-10% vidro (sem metal, fios ou chumbo) Tijolo, contraplacado < 30 cm 5-35% Betão reforçado < 30 cm 30-100% Grelhas ou barras de metal < 1 cm 90-100% Folhas de metal ou de <... -
Page 57: Enviar Aviso Sonoro Para A Unidade Dos Pais
Português 3 Para ajustar o nível de som da canção de embalar, prima os botões de volume + ou – na unidade do bebé. Nota: O volume do altifalante da unidade do bebé apenas pode ser definido durante a reprodução de uma canção de embalar. Se aumentar o volume para a canção de embalar, o som também será... -
Page 58: Luz De Estado Das Pilhas
Português Luz de estado das pilhas 1 A luz de estado das pilhas mantém-se acesa a verde quando a unidade do bebé está a ser alimentada pelas pilhas e estas têm energia suficiente. 2 A luz de estado das pilhas pisca rapidamente a vermelho quando as pilhas têm pouca carga e a unidade do bebé... - Page 59 Português 4 Para abrir o menu com opções para a funcionalidade, desloque a seta sobre o campo de opções e prima OK. Utilize os botões - e + para selecionar itens no campo de opções. 5 Para sair do menu de acalmar, prima o botão de acalmar. Luz de presença Esta funcionalidade de acalmar permite-lhe ligar ou desligar a luz de presença e definir o temporizador da luz de presença.
- Page 60 Português 1 Selecione a funcionalidade de projetor e abra o menu com as opções de projetor. 2 Para aceder às opções de projetor, direcione a seta para o campo de opções e prima OK. 3 Pode definir o temporizador do projetor para um período de 5 a 20 minutos ou pode ligar o projetor continuamente.
-
Page 61: Função "Talk" (Conversar)
Português Função "Talk" (Conversar) 1 Se quiser reconfortar o seu bebé, prima TALK (Conversar) na unidade dos pais e fale claramente para o microfone na parte frontal, a uma distância de 15 cm a 30 cm. Nota: Se aumentar o volume da canção de embalar na unidade do bebé, o som também será... -
Page 62: Menu Da Unidade Dos Pais
Português 1 Se as pilhas recarregáveis estiverem quase vazias, a luz do estado das pilhas pisca rapidamente a vermelho. 2 Se não ligar a unidade dos pais à alimentação, esta desliga-se. Menu da unidade dos pais Navegar no menu Nota: Algumas funções do menu funcionam apenas quando há uma ligação estabelecida entre a unidade do bebé... - Page 63 Português Sensibilidade Esta opção no menu da unidade dos pais permite-lhe definir a sensibilidade do microfone na unidade do bebé. A sensibilidade do microfone determina o nível de ruído que é captado pela unidade do bebé, por exemplo, quer ouvir o seu bebé quando ele chorar, mas ouvi-lo a palrar poderá...
-
Page 64: Temporizador Da Alimentação
Português - No modo Eco Max, não recebe informações quando a unidade dos pais estiver fora do alcance da unidade do bebé. Pode verificar a ligação premindo qualquer botão na unidade dos pais. - Não pode ativar o modo Eco Max se a sensibilidade do microfone estiver definida para o nível mais elevado. - Page 65 Português 5 Quando o temporizador alcançar 00:00, o alerta do temporizador da alimentação é ativado, o símbolo do temporizador pisca no visor e a mensagem "TIMER END" (Final da temporização) é apresentada no visor. 6 Para parar o temporizador, selecione "Stop & Reset" (Parar e repor) no submenu do temporizador da alimentação e prima OK para confirmar.
-
Page 66: Alerta De Choro
Português Se a temperatura se encontrar abaixo ou acima do limite definido, o símbolo de alerta da temperatura no visor tem apenas um segmento e pisca. A mensagem "TOO COLD" (Demasiado frio) ou "TOO HOT" (Demasiado quente) é apresentada no visor. Alerta de choro Pode definir um alerta de choro para o avisar que o bebé... -
Page 67: Garantia E Assistência
- Quando prime OK enquanto o bloqueio dos botões está ativo, a segunda linha no visor informa-o que é necessário um segundo passo para desbloquear os botões. Garantia e assistência Se precisar de informações ou assistência, visite www.philips.com/support ou leia o folheto da garantia internacional. - Page 68 Português SCD730/SCD731/SCD733/SCD734/SCD735 ( EN ) < Sensitivity > < Eco Max > Turn On? > !No alert if… < Turn O ? < Cry Alert > Vibrate On? > < Vibrate O ? < Feed Timer > xx:yy Start? > <...
- Page 69 Português Light Timer 5 minutes > > < 10 minutes < 15 minutes > < 20 minutes > < Continuous Lullaby Play no.1 > Song Timer 5 minutes > < Play no.12 > < 10 minutes > < ....> <...
- Page 70 Philips Consumer Lifestyle BV Tussendiepen 4, 9206 AD Drachten, the Netherlands Trademarks owned by the Philips Group. © 2018 Koninklijke Philips N.V. All rights reserved 4213.354.4259.1 (28/6/2018) >75% recycled paper >75% papier recyclé...