Panasonic RR-US430 Operating Instructions Manual
Panasonic corporation ic recorder operating instructions
Hide thumbs
Also See for RR-US430:
- Operating instructions manual (44 pages) ,
- Operating instructions manual (40 pages) ,
- Operating instructions manual (44 pages)
Table of Contents
Advertisement
The illustration shows RR-US470.
Dear customer
Thank you for purchasing this product.
For optimum perfor mance and safety, please read these
instructions carefully.
Before connecting, operating or adjusting this product, please read
the instructions completely. Please keep this manual for future
reference.
PP
P
PC
Operating Instructions
IC Recorder
RR-US490
Model No.
RR-US470
RR-US450
RR-US430
If you have any questions contact
In the U.S.A.:1-800-211-PANA(7262)
In Canada:1-800-561-5505
For U.S.A. only
The warranty can be found
on pages 40 and 41.
For Canada only
The warranty can be found
on pages 42 and 43.
RQT8824-MP
Advertisement
Table of Contents

Related Manuals for Panasonic RR-US430


Summary of Contents for Panasonic RR-US430
- Page 1 Please keep this manual for future reference. Operating Instructions IC Recorder RR-US490 Model No. RR-US470 RR-US450 RR-US430 If you have any questions contact In the U.S.A.:1-800-211-PANA(7262) In Canada:1-800-561-5505 For U.S.A. only The warranty can be found on pages 40 and 41. For Canada only The warranty can be found on pages 42 and 43.
-
Page 2: Instruction Flow Chart
Instruction flow chart Instruction flow chart Recording Playback Connecting IC Recorder to a computer for editing/saving USB cable (included) RR-US490 Dictation cord (included) Playback voice recording on computer Save on computer (backup) Edit voice recording etc. This unit RR-US470 Computer The correct instruction manual you should refer to For IC Recorder operation…... -
Page 3: Table Of Contents
Table of contents Preparation Instruction flow chart ... 2 Supplied accessories ... 4 Inserting batteries ... 4 Before use ... 5 Before operating, switch Hold off, Point 1 when finished, switch Hold on ... Recordings become audio files Point 2 and the files are stored in folders.. -
Page 4: Supplied Accessories
2008. These may be subject to change.) RR-US490 For the U.S.A. RR-US470 For Canada RR-US470 CD-ROM (Voice Editing Ver.2.0 Premium Edition) RR-US430 CD-ROM (Voice Editing Ver.2.0 Standard Edition) RR-US490 RR-US470 Dictation cord [K2KC2CB00001] All models USB cable [K2KZ4CB00012] Only for the U.S.A.: To order accessories, refer to “Accessory Purchases”... -
Page 5: Before Use
Before use Point Before operating, switch Hold off, when finished, switch Hold on. Remove the seal from the display before use. Hold function This function prevents accidental operation when you put the unit in your pocket or bag. It also prevents battery loss from accidental unit operation. -
Page 6: Point 2 Recordings Become Audio Files
79 hours 10 minutes 39 hours 134 hours File MEETING FOLDERS (A, B, C and S) DICTATION FOLDER RR-US450 RR-US430 19 hours 10 minutes 9 hours 40 minutes 38 hours 30 minutes 19 hours 30 minutes 66 hours 33 hours 20 minutes File... -
Page 7: Choose A Recording Method That Best Suits The Situation
As the dictation recording settings are all factory-set, dictation can be recorded quickly and simply. Use this mode when computer voice recognition software is to be used. page 14). (no zoom recording for RR-US430) H (Far) [OFF] A normal meeting Zoom [ON]... -
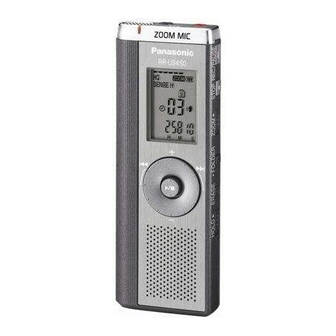
Page 8: Part Names
Part names 1Built-in microphone 2Recording indicator 3Record/ pause 4Stop Not on RR-US430 5Zoom 6Display blSpeaker bmUSB jack 7Folder/menu 8Erase bnExternal microphone jack 9Quick search dial bkHold Display (during recording) Microphone sensitivity Recording mode Recording level Battery indicator Folder File Recording elapsed time... -
Page 9: How To Use The Quick Search Dial
How to use the quick search dial Basic operations A: Dial: B: Joystick: Joystick operations (see above B for the confi rming operation) Playback ( pages 16 and 17) Password entry ( pages 20 and 21) C: Tilt the stick to left and Volume control D: Tilt the stick up and Turn the dial to right or left... -
Page 10: List Of Menus
List of menus 1 Press and hold [ FOLDER/ MENU] for 1 second or longer (while stopped) to display menus. 2 Turn [ ] and press [ q / g ] to confirm. Press [STOP] to stop an operation midway/cancel the setting. If an operation is not started within 60 seconds, unfinished settings are canceled. -
Page 11: Setting The Time
Setting the time When the year is flashing (e.g. “ Set Hold off Display the menu page 5) While stopped, press and hold [ for 1 second or longer. Set the time Turn [ ] and press [ q / g ] to confirm. (Press [STOP] after confirming 5.) Year Month →... -
Page 12: Recording
Recording Meeting recording Using different combinations of recording modes and microphone sensitivity levels, you can adjust audio quality according to recording situations. Select a Meeting Recording folder (A, B, C or S) Press [ FOLDER/ MENU]. Each time you press Select the microphone sensitivity level Press [ q / g ] to... -
Page 13: Dictation Recording
Dictation recording As the dictation recording settings are all factory-set, dictation can be recorded quickly and simply. Use this mode when computer voice recognition software is to be used. Select folder Press [ FOLDER/ MENU]. Each time you press. Stop and pause Press [STOP] to stop recording. -
Page 14: Other Recording Methods
Other recording methods g Zoom recording (recording target voice clearly) Not on RR-US430 Zoom recording enables you to clearly record sounds coming from the direction this unit is aimed at. It is suitable for recording lectures and interviews. Select Meeting Recording folders ( Do not block the zoom microphone ( Zoom recording can be switched on and off even when Hold is on. -
Page 15: Preventing Unnecessary Recording (Vas)
HOLD ERASE FOLDER ZOOM g Preventing unnecessary recording (VAS: Voice Activated System) Recording is automatically paused if there is no sound for more than 3 seconds. Display Select “ the menu Press Turn [ and hold press [ q / g ] to FOLDER/ confirm. -
Page 16: Playing
Playing Select the folder Press FOLDER/ MENU]. Each time you press g While a file is being played Adjusting the volume Tilt the joystick to [[ / ]]. (Volume range is 0 to 20. Factory setting is 13.) Moving forward Tilt the joystick to [o]. -
Page 17: Other Playing Methods
Other playing methods g Searching points for listening (fast forward and fast backward) Quick search Turn [ ] while playing. You can search forward/backward quickly without sound (except the operation beep). The fast forward and fast backward speed changes according to the dial turning speed. To return to normal playback, stop turning. -
Page 18: Playing Files Successively
Other playing methods g Playing files successively Files stored in the same folder are played successively. Display the menu Press and hold FOLDER/ MENU] for 1 second or longer. The unit plays all files in order from the selected one to the last one. When the last file finishes, playback stops automatically. -
Page 19: Organizing Files
Organizing files g Deleting (a file/ all files in a folder/ all folders except S/ all folders) Select a file or folder Display the deleting menu Turn [ Press [ERASE]. Selecting a file g Moving Preparation: Play the file to be moved ( Files can be moved both ways among folders A, B and C. -
Page 20: Security Functions
Security functions Security functions of this unit This unit has 2 security functions. 1Password set in this unit 2Authentication key set with Voice Editing (See Voice Editing Ver.2.0 Operating Instructions (PDF file).) Folder S and password Folder S is used to secure files. Once set, a password is necessary for playing files in this folder. The password is a 4-digit number. -
Page 21: Playback Using The Password
HOLD ERASE FOLDER ZOOM Playback using the password Select folder S 1Press FOLDER/ MENU]. 2Select “ ”. When the password matches, the security function using the password is suspended for 10 minutes. When the password is released and no operation is performed for 10 minutes, the password is automatically set and files in folder S become unplayable. -
Page 22: Recording To / From A Cassette Tape
Recording to / from a cassette tape Read the operating instructions for the connected equipment. g Recording to a cassette tape recorder etc. Select the file to copy and play g Recording from a cassette tape recorder etc. Start playing The recorded sound may differ from the original recording. -
Page 23: Using The Unit With A Computer
Selecting “Yes, I want to restart my computer now” automatically re-starts the computer and completes installation. ) is included for RR-US490, RR-US470 and RR-US450. ) is included for RR-US430. for the U.S.A. and for both countries occupy 1 CD-ROM only. - Page 24 Using the unit with a computer Connecting this unit to a computer with the USB cable You cannot operate the unit while it is connected to a computer. • Do not use any other USB connection cables except the supplied one. Align the jack orientation.
- Page 25 Starting Voice Editing 1Double-click the “Voice Editing” icon on the desktop. After double clicking, a dialog box for entering the authentication key appears. 2Enter the “authentication key”. • Enter an “authentication key” that has 1 to 128 characters. • We recommend that you use a phrase that is easy to remember for the “authentication key”.
- Page 26 Using the unit with a computer g System requirements (through page 29) You will need an IBM PC/AT computer with the following attributes or equivalent, and the following software and hardware in order to use this application. ® Microsoft Windows Microsoft ®...
- Page 27 60MB or more ( For the U.S.A. ) or 120MB or more ( • Additional free hard disk space may be necessary depending on the Windows being used. • Approximately 25MB of additional free hard disk space when installing Acrobat •...
- Page 28 Using the unit with a computer • The operating system must support the languages of the voice recognition, text-to-speech, and translation engines. • Before voice recognition, the speaker’s voice must be registered in a training process. Sound files of speakers whose voices have not been registered in training cannot be converted to text correctly. About Windows Vista •...
- Page 29 - SD Voice Editor Ver. 1. x Install Voice Editing Ver.2.0 Standard Edition when you use RR-US430. Previous versions do not work with RR-US430. Standard Edition can be installed on the same computer on which a previous version is already installed.
-
Page 30: Troubleshooting Guide
Troubleshooting guide Before requesting service, make the following checks. If you are in doubt about some of the check points, or if the remedies indicated in the chart do not solve the problem, refer to “Customer Services Directory” ( if you reside in the U.S.A., or refer to “Product information” ( Symptom “U01”... - Page 31 Symptom No sound from the speaker Cannot delete a file or folder. Cannot move a file. Cannot play A recording disappeared. Cannot set timer recording. Timer recording does not work. Files created through timer recording are shorter than periods set with the timer. Cannot use a battery that can be used on other equipment.
- Page 32 Troubleshooting guide Symptom Sound is distorted. Sound is distorted when listening to the recording in progress with earphones. Message appears when connecting to a computer. I hear noises. Voice Editing does not start or does not work correctly. I used the “Dictation cord” supplied with the unit, but microphone sensitivity did not improve.
-
Page 33: Specifications
Mass (Weight): With dry cell batteries; Approx. 62 g or 2.17 oz. (RR-US490/RR-US470)/61 g or 2.13 oz. (RR-US450)/60 g or 2.11 oz. (RR-US430) Without batteries; Approx. 39 g or 1.37 oz. (RR-US490/RR-US470)/38 g or 1.33 oz. (RR-US450)/37 g or 1.31 oz. (RR-US430) Operational temperature range: Memory capacity (MB means one million bytes. -
Page 34: Maintenance
Maintenance Do not use such solvents as benzine, paint thinner and alcohol for cleaning. • Solvents may cause casing to deform and coating to go off. • Wipe dust and fingerprints off using a soft, dry cloth. Soak the cloth in water, wring it thoroughly and use it for cleaning when the unit is very dirty. -
Page 35: Care And Use
Care and use To reduce risk of radio interference caused by headphone-, earphone- or microphone cables, only use adequate accessories with the cable length less than 3 m (9.8 ft.). g Unit • Avoid using or placing this unit near sources of heat. •... - Page 36 Care and use g Allergies Discontinue use if you experience discomfort with the earphones or any other parts that directly contact your skin. Continued use may cause rashes or other allergic reactions. g Listening caution You should use extreme caution or temporarily discontinue use in potentially hazardous situations. Even if your headphones or earphones are the open-air type designed to let you hear outside sounds, don’t turn up the volume so high that you can’t hear what’s around you.
- Page 37 Sound can be deceiving. Over time your hearing “comfort level” adapts to higher volumes of sound. So what sounds “normal” can actually be loud and harmful to your hearing. Guard against this by setting your equipment at a safe level BEFORE your hearing adapts. To establish a safe level: •...
-
Page 38: Product Service
Product service 1. Damage requiring service – The unit should be serviced by qualified service personnel if: (a) Objects or liquids have gotten into the unit; or (b) The unit has been exposed to rain; or (c) The unit does not operate normally or exhibits a marked change in performance; or (d) The unit has been dropped or the cabinet damaged. - Page 39 When shipping the unit carefully pack and send it prepaid, adequately insured and preferably in the original carton. Include a letter detailing the complaint and provide a day time phone number where you can be reached. IF REPAIR IS NEEDED DURING THE WARRANTY PERIOD THE PURCHASER WILL BE REQUIRED TO FURNISH A SALES RECEIPT/PROOF OF PURCHASE INDICATING DATE OF PURCHASE, AMOUNT PAID AND PLACE OF PURCHASE, CUSTOMER WILL BE CHARGED FOR THE REPAIR OF ANY UNIT RECEIVED WITHOUT SUCH PROOF OF PURCHASE.
-
Page 40: Limited Warranty (Only For U.s.a.)
Limited Warranty Panasonic Consumer Electronics Company, Division of Panasonic Corporation of North America One Panasonic Way Secaucus, New Jersey 07094 Panasonic Portable Audio Products Limited Warranty Limited Warranty Coverage If your product does not work properly because of a defect in materials or workmanship, Panasonic Consumer Electronics Company or Panasonic Puerto Rico, Inc. - Page 41 Limited Warranty Limits And Exclusions This warranty ONLY COVERS failures due to defects in materials or workmanship, and DOES NOT COVER normal wear and tear or cosmetic damage. The warranty ALSO DOES NOT COVER damages which occurred in shipment, or failures which are caused by products not supplied by the warrantor, or failures which result from accidents, misuse, abuse, neglect, mishandling, misapplication, alteration, faulty installation, set-up adjust ments,...
-
Page 42: Limited Warranty (Only For Canada)
Panasonic Canada Inc. warrants this product to be free from defects in material and workmanship and agrees to remedy any such defect for a period as stated below from the date of original purchase. Technics Audio Product Panasonic Portable / Clock Radio (without Tape, CD, MD) - Page 43 WARRANTY SERVICE FOR PRODUCT OPERATION ASSISTANCE, please contact: Our Customer Care Centre: FOR PRODUCT REPAIRS, please locate your nearest Authorized Servicentre at www.panasonic.ca : Link : "Servicentres IF YOU SHIP THE PRODUCT TO A SERVICENTRE Carefully pack and send prepaid, adequately insured and preferably in the original carton. Include details of the defect claimed, and proof of date of original purchase.
- Page 44 Trade Name: Panasonic Model No.: RR-US490/RR-US470/RR-US450/RR-US430 Responsible party: Panasonic Corporation of North America One Panasonic Way, Secaucus, NJ 07094 Support Contact: Panasonic Consumer Electronics Company 1-800-211-PANA (7262) This device complies with Part 15 of the FCC Rules. Operation is subject to the following two conditions: (1) This device may not cause harmful interference, and (2) this device must accept any interference received, including interference that may cause undesired operation.