Table of Contents
Advertisement
Quick Links
Advertisement
Table of Contents

Related Manuals for Britax Safe-N-Sound BS3700A-C20133 Series


Summary of Contents for Britax Safe-N-Sound BS3700A-C20133 Series
- Page 1 INSTRUCTION MANUAL CONVERTIBLE CHILD SEAT Birth to 2-3 years (approx) REARWARD FACING 12 months to 4 years (approx) FORWARD FACING Series No. BS3700A-C20133 IMPORTANT: KEEP THIS BOOKLET IN THE PLACE PROVIDED ON THE CHILD RESTRAINT Instructions for Installation & Use...
-
Page 2: Table Of Contents
CONTENTS CONTENTS FORWARD FACING QUICK START GUIDE - a shortened version of the manual • REARWARD FACING CHILD SEAT FEATURES - FORWARD FACING • FORWARD FACING SET UP MEET YOUR CHILD SEAT • GENERAL INFORMATION IMPORTANT INFORMATION AND WARNINGS • FORWARD FACING RECLINE POSITIONS SHOULDER HEIGHT MARKERS •... - Page 3 QUICK START GUIDE - REARWARD FACING QUICK START GUIDE - REARWARD FACING Hey, before you install me! Don't forget to note your serial number found on the seat to complete your warranty registration. Pull Attach Push Replace infant insert Remove infant insert Pull Pull...
- Page 4 QUICK START GUIDE - FORWARD FACING QUICK START GUIDE - FORWARD FACING Hey, before you install me! Don't forget to note your serial number found on the seat to complete your warranty registration. Pull Pull Attach Push Remove slack Lift Pull Store Press...
-
Page 5: Rearward Facing
Advanced SICT significantly reduces the risk of injury to your child. If in doubt about the method of installation, consult Britax Childcare or agent, or a child restraint fitter or, in New Zealand, to consult the agent for the vehicle. -
Page 6: Important Information And Warnings
• Regularly check the restraint components, straps and other fitments for correct and adjusters. function and condition. If faulty, cease using and seek repair by Britax. • Protect all webbing from abrasion and cutting by sharp corners and edges. •... - Page 7 Your child MUST be forward facing their shoulders are above the middle marker. Middle Height Marker Your child can be Britax recommends rearward facing using this restraint forward facing in rearward if their shoulders are facing as long as between the lower possible.
-
Page 8: Shoulder Height Markers
SHOULDER HEIGHT MARKERS SHOULDER HEIGHT MARKERS IMPORTANT: Follow this advice. Child Use (Forward Facing) Upper Height Marker Middle Height Marker Older Baby (Rearward Facing) Older Baby (Forward Facing) Middle Height Marker Lower Height Marker Middle Height Marker Lower Height Marker Newborn (Rearward Facing) Lower Height Marker Instructions for Installation &... -
Page 9: Outgrown Your Child Seat
OUTGROWN YOUR CHILD SEAT CHILD SEAT SUITABILITY GUIDE When your child has outgrown this seat, you can use: CHILD SEAT SUITABILITY GUIDE • A harnessed child seat with in-built harness These child restraints, when used correctly, allow the driver to meet the Australian Road Rules suitable for children approximately 6 in each state. -
Page 10: Rearward Facing
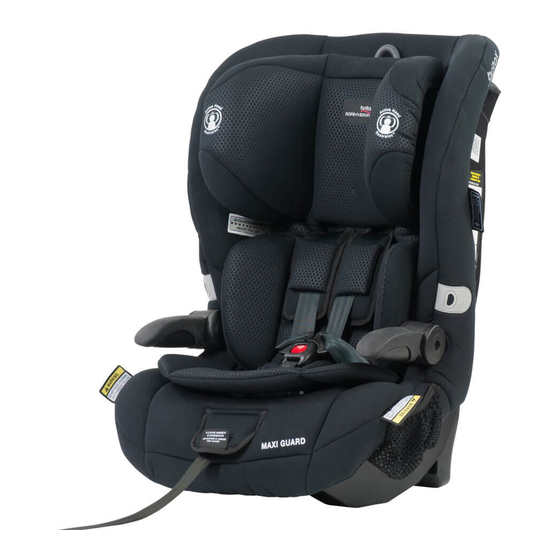
CHILD SEAT FEATURES - REARWARD FACING CHILD SEAT FEATURES - REARWARD FACING 1. Adjustable Headrest 22 21 2. Shoulder Height Markers 3. Shoulder Pads (If supplied) 4. Infant Insert (If supplied) Long or short 5. Harness Vehicle Seat 6. EZ Buckle (If supplied) Protector (If supplied) 7. -
Page 11: Set Up
SETUP - GENERAL INFORMATION FOR REARWARD FACING SETUP - CONVERT TO REARWARD FACING CHILD SEAT UPPER ANCHORAGE POINT CONVERT TO REARWARD FACING MODE: This child seat must be installed using the top tether. The top tether will need to attach to the appropriate upper anchorage point for both rearward and forward facing modes. -
Page 12: Installing Into Your Vehicle
SETUP - INSTALLING INTO YOUR VEHICLE SETUP - INSTALLING INTO YOUR VEHICLE FOR REARWARD FACING FOR REARWARD FACING INSTALLING INTO YOUR VEHICLE: Step 1. Press harness adjuster button. Choose the vehicle seat position. Step 5. Ensure child seat is against vehicle Step 2. - Page 13 SETUP - RECLINE ANGLE FOR REARWARD FACING SETUP - RECLINE ANGLE FOR REARWARD FACING REARWARD FACING LEVEL ANGULAR ADJUSTMENT OF INDICATOR: RESTRAINT Some vehicle seats have more rearward slope The Rearward Facing Level Indicator shows than others. The angle may be adjusted by when your child seat is installed at the correct placing a firm packing between the child seat angle for your vehicle.
- Page 14 SETUP - CLICKTIGHT FOR REARWARD FACING SETUP - CLICKTIGHT FOR REARWARD FACING HOW TO INSTALL CLICKTIGHT: Step 3. Lengthen vehicle seatbelt. Remove infant insert (if fitted). VEHICLE SEATBELT IMPORTANT - Ensure buckle tongues are Sash belt placed into buckle tongue holders prior to belt opening CLICKTIGHT frame.
- Page 15 SETUP - CLICKTIGHT FOR REARWARD FACING SETUP - CLICKTIGHT FOR REARWARD FACING Step 7. Remove any slack from the vehicle Step 9. Close CLICKTIGHT frame seatbelt. Pull Feed sash belt slack back into the seatbelt retractor. ALWAYS REMOVE SLACK FROM SEATBELT.
- Page 16 SETUP - TOP TETHER FOR REARWARD FACING SETUP - TOP TETHER FOR REARWARD FACING HOW TO INSTALL THE TOP TETHER: Step 5. Ensure slack is removed from the top tether straps by pulling Step 1. Press top tether adjuster button and Press top tether adjuster strap.
-
Page 17: Open Advanced Side Impact Cushion Technology
SETUP - OPEN ADVANCED SIDE IMPACT CUSHION SETUP - HEADREST AND SHOULDER HARNESS TECHNOLOGY FOR REARWARD FACING FOR REARWARD FACING OPEN ADVANCED SIDE IMPACT HOW TO USE - HEADREST AND CUSHION TECHNOLOGY: SHOULDER HARNESS: Step 1. Press top tether adjuster button and NOTE. - Page 18 SETUP - HEADREST AND SHOULDER HARNESS SETUP - HEADREST AND SHOULDER HARNESS FOR REARWARD FACING FOR REARWARD FACING Step 7. Place buckle tongues into buckle Step 10. Engage Buckle tongue holders. ENSURE BUCKLE IS ALWAYS Tongue CONNECTED DURING USE. Buckle ENSURE ALL HARNESS STRAPS ARE NOT TWISTED.
-
Page 19: Remove Child From Child Seat
SETUP - REMOVE CHILD FROM CHILD SEAT SETUP - REMOVE CHILD SEAT FROM VEHICLE FOR REARWARD FACING FOR REARWARD FACING REMOVING CHILD FROM SEAT: REMOVING CHILD SEAT FROM Press VEHICLE: Step 1. Press top tether adjuster button and Step 1. Press top tether adjuster button and Press Step 2. -
Page 20: Store Rebound Bar
SETUP - REMOVE CHILD SEAT FROM VEHICLE SETUP - STORE REBOUND BAR FOR REARWARD FACING FOR REARWARD FACING STORE REBOUND BAR: Remove infant insert (if fitted). Step 1. Press the grey release rebound bar button to unlock the rebound bar. IMPORTANT - Ensure buckle tongues are placed into buckle tongue holders prior to Step 2. -
Page 21: Forward Facing
CHILD SEAT FEATURES - FORWARD FACING CHILD SEAT FEATURES - FORWARD FACING Long or short Vehicle Seat Protector (If supplied) 1. Adjustable Headrest 7. CLICKTIGHT Button 2. Shoulder Height Markers 8. Harness Adjuster Button 13. REARWARD FACING BELT PATH (Blue) 20. -
Page 22: Set Up
SETUP - GENERAL INFORMATION SETUP - FORWARD FACING FOR FORWARD FACING RECLINE POSITIONS TRANSITION FROM REARWARD FORWARD FACING RECLINE FACING TO FORWARD FACING POSITIONS: MODE: When you convert your child seat to forward facing mode, there are four, simple to use If you are converting your seat from rearward forward facing recline positions you can choose facing to forward facing for more information... -
Page 23: Installing Into Your Vehicle
SETUP - INSTALLING INTO YOUR VEHICLE SETUP - INSTALLING INTO YOUR VEHICLE FOR FORWARD FACING FOR FORWARD FACING INSTALLING INTO YOUR VEHICLE: Step 1. Choose vehicle seat position. Step 3. Press harness adjuster button. Step 4. Place your hand under both shoulder Press harness straps, then pull shoulder Pull... - Page 24 SETUP - CLICKTIGHT FOR FORWARD FACING SETUP - CLICKTIGHT FOR FORWARD FACING HOW TO INSTALL CLICKTIGHT: IMPORTANT - Ensure buckle tongues are Step 3. Lengthen vehicle seatbelt. placed into buckle tongue holders prior to opening CLICKTIGHT frame. Step 1. To open CLICKTIGHT frame, twist and push the CLICKTIGHT button.
- Page 25 SETUP - CLICKTIGHT FOR FORWARD FACING SETUP - CLICKTIGHT FOR FORWARD FACING Step 6. Remove any slack from the vehicle Step 8. Close CLICKTIGHT frame seatbelt. Feed sash belt slack back into the seatbelt retractor. Pull ALWAYS REMOVE SLACK FROM SEATBELT.
-
Page 26: Top Tether
SETUP - TOP TETHER FOR FORWARD FACING SETUP - TOP TETHER FOR FORWARD FACING HOW TO INSTALL THE TOP TETHER: CAUTION: CHILDREN CAN BE INJURED OR RESTRAINTS Step 1. Press top tether adjuster button and AND TOP TETHER STRAP DAMAGED BY UNSECURED CARGO Press Step 2. -
Page 27: Headrest And Shoulder Harness
SETUP - HEADREST AND SHOULDER HARNESS SETUP - HEADREST AND SHOULDER HARNESS FOR FORWARD FACING FOR FORWARD FACING HOW TO USE - HEADREST AND SHOULDER HARNESS: Step 1. Press harness adjuster button. Step 5. Place buckle tongues into buckle tongue holders. Step 2. -
Page 28: Open Advanced Side Impact Cushion Technology
SETUP - HEADREST AND SHOULDER HARNESS SETUP - OPEN ADVANCED SIDE IMPACT CUSHION FOR FORWARD FACING TECHNOLOGY FOR FORWARD FACING OPEN ADVANCED SIDE IMPACT CUSHION TECHNOLOGY: Step 8. Engage Buckle NOTE. The SICT system should not be used if the child seat is in the centre ENSURE BUCKLE IS ALWAYS position. -
Page 29: Remove Child From Child Seat
SETUP - REMOVE CHILD FROM CHILD SEAT SETUP - REMOVE CHILD SEAT FROM VEHICLE FOR FORWARD FACING FOR FORWARD FACING REMOVING CHILD FROM CHILD HOW TO REMOVE SEAT FROM SEAT: VEHICLE: Step 1. Loosen shoulder harness straps by Press Step 1. Press top tether adjuster button and pressing the harness adjuster button. -
Page 30: Close Advanced Side Impact Cushion Technology
SETUP - REMOVE CHILD SEAT FROM VEHICLE SETUP - CLOSE ADVANCED SIDE IMPACT CUSHION FOR FORWARD FACING TECHNOLOGY FOR FORWARD FACING CLOSE ADVANCED SIDE IMPACT CUSHION TECHNOLOGY : Step 5. To open CLICKTIGHT frame, twist Step 1. Rotate clockwise to close. and push the CLICKTIGHT button. -
Page 31: Care & Maintenance
Clean the buckle if it is difficult to engage. See next page. when engaging the second harness tongue. To restore the harness buckle to good working Immediate repair is required if any of the above issues are observed. Contact Britax order it needs to be cleaned as follows: Customer Service 1300 303 330 A. -
Page 32: Remove Cover
CARE AND MAINTENANCE - REMOVE COVER CARE AND MAINTENANCE - REMOVE COVER TO REMOVE COVER FOR WASH: To remove cover: NOTE: There is no need to disconnect the Step 1. Lift headrest to the highest position. shoulder harness assembly straps from restraint. Open door at the back of the child Step 1. -
Page 33: Replace Cover
Step 1. Recline child seat to reveal hook at the lower front of the child seat and attach elastic loops. Step 2. Lift headrest to the highest position. ONLY USE BRITAX Open door at the back of the child SAFE-N-SOUND SEAT COVERS seat and attach elastic loops to hooks provided. -
Page 34: Accessories
(If supplied) The following instructions apply to accessories that may be supplied with this restraint at point of purchase. They are for comfort use only. If not, a variety of Britax Safe-n-Sound There are 3 types of infant inserts accessories are available from various retailers of Britax Safe-n-Sound products. -
Page 35: Installation Of Vehicle Upper Anchor Point
ACCESSORIES INSTALLATION OF VEHICLE UPPER ANCHOR POINT VEHICLE SEAT PROTECTOR Consult the vehicle owner’s handbook for location of anchorage fittings or anchorage points (If supplied) Long Vehicle and the possible use of spacers. Some vehicles may have an anchor fitting fitted by the Seat Protector vehicle manufacturer. - Page 36 IF THE CAR IS FITTED WITH A CHILD RESTRAINT UPPER ANCHORAGE POINT Extension Straps Length 300mm (Use Britax Safe-n-Sound part 0035 or 0291). UPPER ANCHORAGE FITTING Locate the upper anchorage point behind Length 600mm (Use Britax Safe-n-Sound part 0036 or 0290).
- Page 37 CAR INSTALLATION ACCESSORIES For vehicles other than Sedans - In Australia, consult your nearest child restraint fitting (From retailers of Britax Safe-n-Sound products) station or traffic authority for vehicle inspection to find the best, correct position for the placement of the upper anchorage point, and for the correct attachment bolt length and use of spacers.
-
Page 38: In Case Of Accident
Australian/New Zealand Standards committee CS/85, advise that this statement applies The Britax Safe-n-Sound Crash Exchange Program is a voluntary program designed to ensure whether a child was in the child restraint or not. A severe crash, we consider as being one our children are safe and that any seat that may have experienced a severe crash is taken out where the main body structure of the vehicle is distorted. -
Page 39: Warranty
For the full terms of the Warranty refer to the Britax website www.britax.com.au/service-support/warranty The Safe-n-Sound trademark and product names are the property of Britax Childcare Pty. Ltd. (Australia). The Britax trademarks are the property of Britax Childcare Holdings LTD, UK.