Table of Contents
Advertisement
Advertisement
Table of Contents

Related Manuals for Oster OGWT1603SE


Summary of Contents for Oster OGWT1603SE
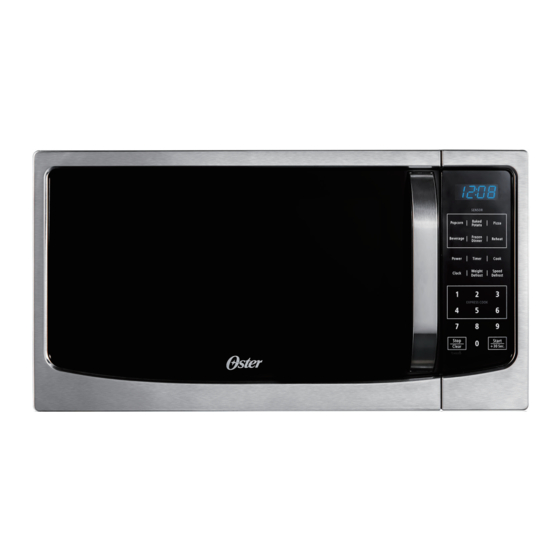
- Page 1 1.6 cu. ft. Countertop Microwave Model: OGWT1603SE GL N032718...
-
Page 2: Table Of Contents
TABLE OF CONTENTS IMPORTANT SAFETY INSTRUCTIONS........... PRECAUTIONS TO AVOID POSSIBLE EXPOSURE TO EXCESSIVE MICROWAVE ENERGY................INSTALLATION GUIDE................GROUNDING INSTRUCTIONS..............INSTALLING THE TURNTABLE............... PRODUCT DIAGRAM................CONTROL PANEL..................OPERATION INSTRUCTIONS..............ABOUT THE SENSOR FEATURES............SENSOR COOK SETTINGS..............COOKING UTENSILS GUIDE..............CLEANING AND CARE................SPECIFICATIONS.................. -
Page 3: Important Safety Instructions
IMPORTANT SAFETY INSTRUCTIONS READ ALL SAFETY INSTRUCTIONS BEFORE USING THIS MICROWAVE WARNING - to reduce the risk of burns, electric shock, fire, injury to persons, or exposure to excessive microwave energy, basic safety precautions should be followed, including the following: 1. - Page 4 IMPORTANT SAFETY INSTRUCTIONS (cont’d.) (3) If materials inside the microwave should ignite, keep microwave door closed, turn it off, and disconnect the power cord or turn off the power fuse at the circuit breaker panel. (4) Do not use the microwave cavity for storage purposes. Do not leave paper products, cooking utensils, or food in the cavity when not in use.
- Page 5 IMPORTANT SAFETY INSTRUCTIONS (cont’d.) Do not cover or block any openings on the microwave. Do not store or use this microwave outdoors. Do not use this microwave near water, for example, near a kitchen sink, in a wet basement, near a swimming pool, or similar location.
-
Page 6: Precautions To Avoid Possible Exposure To Excessive Microwave Energy
IMPORTANT SAFETY INSTRUCTIONS IMPORTANT SAFETY INSTRUCTIONS (cont’d.) (3) Connect the equipment into an outlet on a circuit different from that to which the receiver is connected. (4) Consult the dealer or an experienced radio/TV technician for help. 23. This microwave should be serviced only by qualified service personnel. For service and repair, please contact our Customer Support Center at 1-800-324-0340. -
Page 7: Installation Guide
INSTALLATION GUIDE 1. Make sure all packing materials are removed from inside the mcirowave door. 2. Check the microwave for damage, such as misaligned or bent door, damaged door seals and sealing surface, broken or loose door hinges and latches, and dents inside the cavity or on the door. If there are any damages, do not operate. - Page 8 GROUNDING INSTRUCTIONS (cont’d.) instructions are not completely understood, or if doubt exists as to whether the appliance is properly grounded, and either: 1) If it is necessary to use an extension cord, use only a 3-wire extension cord that has a 3-blade grounded plug, and 3-slot receptacle that will accept the plug on the appliance.
-
Page 9: Installing The Turntable
GROUNDING INSTRUCTIONS (cont’d.) RADIO OR TV INTERFERENCE Should there be any interference caused by the microwave oven to your radio or TV, check that the microwave oven is on a different circuit, relocate the radio or TV as far away from the oven as feasible, and check position and signal of receiving antenna. -
Page 10: Product Diagram
PRODUCT DIAGRAM 1. Door Lock System 2. Oven Window 3. Roller Ring 4. Shaft 5. Control Panel 6. Wave Guide (Do not remove) 7. Glass Tray... -
Page 11: Control Panel
CONTROL PANEL DISPLAY Cooking time, power, indicators and present time are displayed. SENSOR COOKING MENU Automatically adjusts the time, based on the type of food you are cooking. POWER Use to set microwave power levels. TIMER The timer function can be used even in the process of cooking to set the oven clock. -
Page 12: Operation Instructions
OPERATION INSTRUCTIONS SETTING THE CLOCK 1. Touch CLOCK once to select the 12 hour clock. 2. Enter the correct time by touching the number pads. 3. Touch CLOCK again. Note that this is a 12 hour clock. SETTING THE TIMER 1. - Page 13 OPERATION INSTRUCTIONS (cont’d.) NOTE: During cooking, you can check the power by touching POWER. Touch number 1、 Cooking 100% power Display PL10 PL- 9 PL- 1 PL- 8 PL- 7 PL- 6 PL- 5 PL- 4 PL- 3 PL- 2 B.
- Page 14 OPERATION INSTRUCTIONS (cont’d.) 1. Touch START/+30 Sec. in quick succession to set the cooking time (each touch for 30 seconds, up to 99 minutes and 99 seconds). The oven will start automatically with full power level. 2. +30 Sec. allows you to add an extra 30 seconds to the current cooking cycle in multiples of 30 seconds, up to 99 minutes and 99 seconds.
- Page 15 OPERATION INSTRUCTIONS (cont’d.) Converting Fractions of Pound to Ounces: Fractions of a Pound Ounces Fractions of a Pound Ounces Less than .03 .54 to .59 .03 to .09 .60 to .65 .10 to .15 .66 to .71 .16 to .21 .72 to .78 .22 to .27 .79 to .84...
-
Page 16: About The Sensor Features
OPERATION INSTRU OPERATION INSTRUCTIONS (cont’d.) SETTING CHILD LOCK The door lock prevents unsupervised operation by children. To set, touch and hold STOP/CLEAR for 3 seconds. “Loc” is indicated on the display for 3 seconds. To cancel, touch and hold STOP/CLEAR for 3 seconds. “Loc” indication disappears. -
Page 17: Sensor Cook Settings
OPERATION INST ABOUT THE SENSOR FEATURES (cont’d.) 2. Cover food with lid, or with vented plastic wrap. Never use tightly sealed plastic containers. 3. During cooking process, do not open the oven door. Doing so will cause inaccurate cooking since the steam from food is no longer contained within the oven cavity. -
Page 18: Cooking Utensils Guide
OPERATION INST SENSOR COOK SETTINGS (cont’d.) BEVERAGE Touch BEVERAGE repeatedly to choose the number of cups for beverage, then the oven will start automatically, the remaining cooking time will appear in the display. FROZEN DINNER Touch FROZEN DINNER once, the oven will start automatically. When the released steam is detected by the oven, the remaining cooking time will appear in the display. - Page 19 OPERATION INST COOKING UTENSILS GUIDE (cont’d.) Microwaveable plastic wrap — Use to retain steam. Leave a small opening for some steam to escape and avoid placing it directly on the food. Paper towels and napkins — Use for short-term heating and covering; these absorb excess moisture and prevent spattering.
-
Page 20: Cleaning And Care
OPERATION INST COOKING UTENSILS GUIDE (cont’d.) Plastic storage and food containers — Containers such as margarine tubs can melt in the microwave. Metal utensils — These can damage your oven. Remove all metal before cooking. NOTE: Should you wish to check if a dish is safe for microwaving, place the empty dish in the oven and microwave on HIGH for 30 seconds. -
Page 21: Specifications
CLEANING AND CARE (cont’d.) The roller ring may be washed in mild, soapy water or in a dishwasher. When removing the roller ring, be sure to replace it in the proper position. Remove doors from your microwave by combining a cup of water with the juice and skin of one lemon in a microwaveable bowl. -
Page 22: Warranty
® WARRANTY FOR OSTER COUNTERTOP MICROWAVE OGWT1603SE TWO-YEAR LIMITED WARRANTY For two years from the date of purchase, when this appliance is operated and maintained according to instructions attached to or furnished with the product, Guangdong Galanz Microwave Electrical Appliances Manufacturing Co., Ltd. (“GALANZ”) will pay for replacement parts and repair labor costs to correct defects in materials or workmanship, replace the appliance with an equivalent unit or a new unit, or refund the purchase price, solely at our option. - Page 23 © 2019 Sunbeam Products, Inc. All rights reserved. ® Oster logo is a registered trademark of Sunbeam Products, Inc. used under license. Distributed by Guangdong Galanz Microwave Electrical Appliances Manufacturing Co., Ltd., Huangpu, Zhongshan, Guangdong, 528429, China. For service, support and warranty information, call 1-800-324-0340.