Table of Contents
Advertisement
Quick Links
Download this manual
See also:
Instruction Manual
Advertisement
Table of Contents

Related Manuals for Westinghouse iGen1200


Summary of Contents for Westinghouse iGen1200
- Page 1 USER MANUAL FOR MODELS: iGen1200 Digital Inverter Generator 1000 Running Watts | 1200 Peak Watts...
-
Page 2: Igen Technical Specifications
3.5% for each 300 meter (1,000 foot) increase in altitude. A decrease in engine horsepower will decrease the power output of the generator. FOR YOUR RECORDS: Date of Purchase: Inverter Model Number: Purchased from Store/Dealer: Inverter Serial Number: HAVE QUESTIONS? Email us at service@wpowereq.com or call 1-855-944-3571 2 | Westinghouse Portable Power... -
Page 3: Product Registration
IMPORTANT: KEEP YOUR PURCHASE RECEIPT TO ENSURE TROUBLE-FREE WARRANTY COVERAGE. PRODUCT REGISTRATION To ensure trouble-free warranty coverage, it is important you register your Westinghouse inverter. You can register your generator by either: 1. Filling in the product registration form below and mailing to:... -
Page 4: Table Of Contents
Adding Gasoline to the Fuel Tank ....14 Starting iGen1200 ......15 Stopping the Inverter . -
Page 5: Safety
NOTE: Indicates a procedure, practice or condition that should be followed in order for the generator to function in the manner intended. Read Manufacturer’s Instructions Read Safety Messages Before Proceeding Wear Personal Protective Equipment (PPE) Westinghouse Portable Power | 5... -
Page 6: General Safety Rules
Always disconnect tools or appliances Always remove any tools or other service equipment used from the inverter before starting. during maintenance from the inverter before operating. 6 | Westinghouse Portable Power... -
Page 7: Unpacking
Spark Plug Socket Wrench (1) Avoid cutting on or near staples Owner Manual (1) to prevent personal injury. Quick Start Guide (1) Warranty Information (1) Funnel (1) .37 QT/.35 L Bottle of 10W-30 Oil (1) Westinghouse Portable Power | 7... -
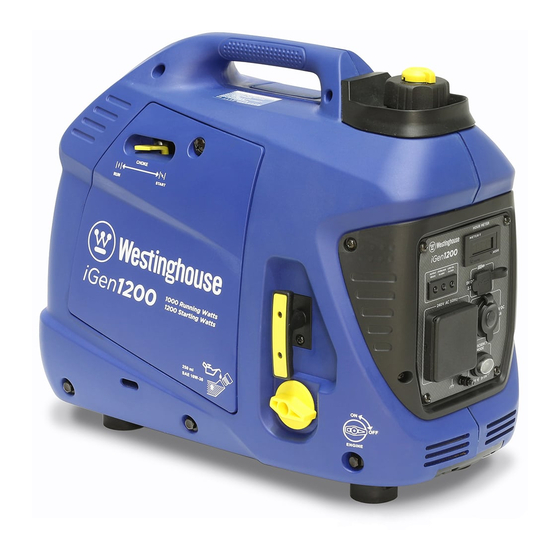
Page 8: Features
FEATURES BASIC INVERTER FEATURES IGEN1200 Fuel Cap and Vent: Open the vent to run the Engine Service Panel: Remove the panel to access engine and close the vent when the engine is off. the engine and oil for maintenance. Control Panel: Contains the reset breaker, Muffler and Spark Arrestor: Avoid contact until the outlets and warning lights. -
Page 9: Control Panel Features Igen1200
FEATURES CONTROL PANEL FEATURES IGEN1200 120-Volt, 20-Amp Duplex Outlet (NEMA 5-20R): Ground Terminal: The ground terminal is used to The outlet is capable of carrying a maximum of externally ground the inverter. 20 amps. Output Ready LED: Indicates the inverter is ready to USB Duplex: 5V DC that come in 1 amps and be used. -
Page 10: Operation
• If the inverter is located close to a building, make sure period. it is not located near any windows, doors and/or vents. Grounding the iGen1200 Inverter Consult with your local municipalities for your grounding codes. WARNING... -
Page 11: Powercord
Using Extension Cords Westinghouse Portable Power assumes no responsibility for the content within this table. The use of this table is the responsibility of the user only. This table is intended for reference only. The results produced by using this table are not guaranteed to be correct or applicable in all situations as the type and construction of cords are highly variable. -
Page 12: Power Output And Demand
Keep the unit level during transport to minimize the possibility of fuel leakage or, if possible, drain out the fuel prior to transport. If the generator has been operating, allow the unit to cool down before loading it onto the transport vehicle. 12 | Westinghouse Portable Power... -
Page 13: Initial Oil Fill
Figure 4. Figure 1). Figure 1: Engine Service Panel 2. Clean the area around the oil fill/drain plug and re- move plug (See Figure 2). Figure 4: Engine Oil Correct Level Figure 2: Oil Fill/Drain Plug Westinghouse Portable Power | 13... -
Page 14: Adding/Checking Engine Fluids And Fuel
The owner of the inverter is responsible to ensure the proper oil level is maintained during the operation of the generator. Failure to maintain the proper oil level can result in engine damage. Figure 5: Maximum Gasoline Fill Level 14 | Westinghouse Portable Power... -
Page 15: Starting Igen1200
2. Turn the fuel tank vent on top of the gas cap to the ON position (see Figure 6). Figure 10: Move choke lever to RUN 7. Plug in electronic devices. Figure 6: fuel tank vent Westinghouse Portable Power | 15... -
Page 16: Stopping The Inverter
3. As a load is applied, the inverter will sense the load and engine RPM will increase according to the load applied. 4. To run the inverter at maximum power and RPM, press the efficiency mode switch to the OFF position. 16 | Westinghouse Portable Power... -
Page 17: Maintenance
Air Filter Check Clean* Replace Spark Plug Check/Clean Replace Spark Arrestor Check/Clean Valve Clearance** Check/Adjust *Service more frequently if operating in dry and dusty conditions **Recommend to have service done by authorized Westinghouse service dealer Westinghouse Portable Power | 17... -
Page 18: Engine Oil Maintenance
8. Using the supplied oil funnel, slowly add engine oil to the engine. Stop frequently to check the oil level and avoid overfilling. 9. Continue to add oil until the oil is at the correct level. 10. Replace oil fill/drain plug when you have finished. 18 | Westinghouse Portable Power... -
Page 19: Changing Engine Oil
7. Allow oil to completely drain. Figure 17: Unclip air cleaner cover 8. Fill crankcase with oil following the steps outlined in Adding Engine Oil on page 18. 9. Dispose of used engine oil properly. Westinghouse Portable Power | 19... -
Page 20: Draining The Float Bowl
9. Return the air filter element to its position in the air 5. Install the engine service panel. cleaner housing. 10. Install the air cleaner cover, making sure the tabs lock into place. 11. Install the engine service panel. 20 | Westinghouse Portable Power... -
Page 21: Spark Plug Maintenance
5. Clean area around the spark plug. 6. Using the spark plug socket wrench provided, remove the spark plug from the cylinder head (see Figure 21). Figure 21: Remove spark plug with socket wrench Westinghouse Portable Power | 21... -
Page 22: Cleaning The Spark Arrestor
106 in-lb (12 N•m). 8. Recheck the valve lash after tightening the jam nut. 9. Perform this procedure for both the intake and ex- haust valves. 10. Install the rocker arm cover, gasket and spark plug. 22 | Westinghouse Portable Power... -
Page 23: Cleaning The Inverter
8. Move the inverter to a clean, dry place for storage. lines, fuel passages and the engine. This corrosive buildup restricts the flow of fuel, preventing an engine from starting after a prolonged storage period. Westinghouse Portable Power | 23... -
Page 24: Troubleshooting
2. Clean the air filter (see page 19). erratic; does not hold a 3. Applied loads maybe cycling on and off 3. As applied loads cycle, changes in steady RPM. engine speed may occur; this is a normal condition. 24 | Westinghouse Portable Power... -
Page 25: Exploded And Engine Views
SCHEMATIC Black Blue Green Brown Br/R Brown red Yellow green Bl/W Black white White Yellow Bl/R Black red Pink Westinghouse Portable Power | 25... -
Page 26: Igen1200 Exploded View
EXPLODED VIEW 26 | Westinghouse Portable Power... - Page 27 EXPLODED VIEW PART NO PART DESCRIPTION PART DESCRIPTION BRACKET,ENGINE 150524 OIL DRAIN 120505 BOLT M6X12 150523 FUEL TANK CAP SOMP ISOLATING, ENGINE 150525 FUEL INDICATOR ISOLATOR FILTER BASEBOARD 100539 ENCLOSURE, RIGHT HEXAGON BOLTS WITH 100534 INSPECTION COVER FLANGE M6...
-
Page 28: Igen1200 Engine View
ENGINE VIEW NOTE: Parts with no number are not stocked by the manufcturer. Please call our service team if you have questions. 28 | Westinghouse Portable Power... - Page 29 ENGINE VIEW PART NO PART DESCRIPTION PART DESCRIPTION NUT M5 TUBE, FUEL, INLET TUBE, AIR CLEANER SWITCH ASSEMBLY, OIL LEVEL TUBE, AIR CLEANER HOSE CLIP SEAT, OIL INLET 140528 GASKET, AIR CLEANER WIRE CLIP 140524 CARBURETOR ASSY 180577 DIPSTICK...
-
Page 30: Full Generator Specifications
Fuel Tank Capacity (Gallons/Liters) .8 gal. (3 L) Run Time at %25 Load (hrs.) 9 hrs. 02282018KD ©2018 Westinghouse Portable Power Specifications are subject to change without notice Westinghouse Portable Power 777 Manor Park Dr., Columbus, OH 43228 30 | Westinghouse Portable Power... - Page 31 Westinghouse Portable Power | 31 Version 6.15.18KD...