Sony DVDirect VRD-MC3 Operating Instructions Manual
Video recordable dvd drive
Hide thumbs
Also See for DVDirect VRD-MC3:
- Operating instructions manual (85 pages) ,
- Quick start manual (2 pages) ,
- Specifications (2 pages)
Table of Contents
Advertisement
IT
Video Recordable
DVD Drive
Operating Instructions
VRD-MC3
© 2006 Sony Corporation
Recording videos
from HDD camcorders ...........................
Recording videos
from DVD camcorders............................
Recording videos
from DV camcorders ..............................
Recording videos
from miscellaneous video devices .........
Recording photos
from memory cards ................................
Recording photos
from HDD camcorders ...........................
JP
FR
DE
ES
IT
CS
Advertisement
Table of Contents

Related Manuals for Sony DVDirect VRD-MC3


Summary of Contents for Sony DVDirect VRD-MC3
-
Page 1: Operating Instructions
Video Recordable DVD Drive Operating Instructions VRD-MC3 © 2006 Sony Corporation Recording videos from HDD camcorders ... Recording videos from DVD camcorders... Recording videos from DV camcorders ... Recording videos from miscellaneous video devices ... Recording photos from memory cards ... -
Page 2: Safety Regulations
Declaration of Conformity Trade Name: SONY Model No.: VRD-MC3 Responsible Party: Sony Electronics Inc. Address: 16530 Via Esprillo, San Diego, CA 92127 U.S.A. Telephone No.: 858-942-2230 This device complies with Part 15 of the FCC Rules. -
Page 3: Compliance Statements
CE Sicherheitsbestimmungen Diese Ausrüstung erfüllt die Europäischen EMC-Bestimmungen für die Verwendung in folgender / folgenden Umgebung (en): • Wohngegenden • Gewerbegebiete • Leichtindustriegebiete (Diese Ausrüstung erfüllt die Bestimmungen der Norm EN55022, Klasse B.) CAUTION: The mains plug on this equipment must be used to disconnect mains power. -
Page 4: Table Of Contents
Table of Contents Safety Regulations ... 2 Compliance Statements ... 3 Introducing DVDirect Introduction ... 7 Features ... 8 Package Contents ... 9 Parts and Controls ... 10 Turning the Power On/Off ... 14 Auto Setup Navigation ... 15 Inserting a Disc ... 17 Inserting a Memory Card ... - Page 5 Using the DVDirect With a Computer System Requirements ...70 Setting Up the Computer ...71 Installing the Software ...71 Connecting the DVDirect to a Computer ...72 Disconnection ...73 Using Memory Card Slots ...73 Using the Bundled Software ...74 Launching “Nero StartSmart” ...74 Notes on Using Other Software With the DVDirect ...74 Additional Information...
- Page 6 • Manufactured under license from Dolby Laboratories. Dolby and the double-D symbol are trademarks of Dolby Laboratories. • Memory Stick and the memory stick logo are trademarks, or registered trademarks of Sony Corporation. ❑ Our product warranty is valid only when the supplied accessories (including software) are used in the specified or recommended system environment, in accordance with the documentation, and applies only to this DVDirect.
-
Page 7: Introducing Dvdirect
Introducing DVDirect Introduction Burning video DVDs ❑ You can record videos from connected video cameras and AV devices directly onto DVDs without using a computer. ❑ You can burn the entire contents of your HDD, DVD, or DV camcorder onto a DVD with one touch of the record button. -
Page 8: Features
Create a DVD using photos taken with an HDD camcorder Available functions: Recording Photos Stored on an HDD Camcorder * In this manual, “HDD camcorder” refers to the Sony HDD Handycam ® the Sony DVD Handycam . The functions available when a camera is connected via USB cable as described in this manual apply only when the Sony HDD Handycam For details, see page 23 and 49. -
Page 9: Package Contents
Package Contents Please confirm that the package contains the following items. If any of these items are missing or damaged, please contact your dealer. • DVDirect • Hi-Speed USB cable (for PC/Printer connection) • AC adaptor • AC power cord •... -
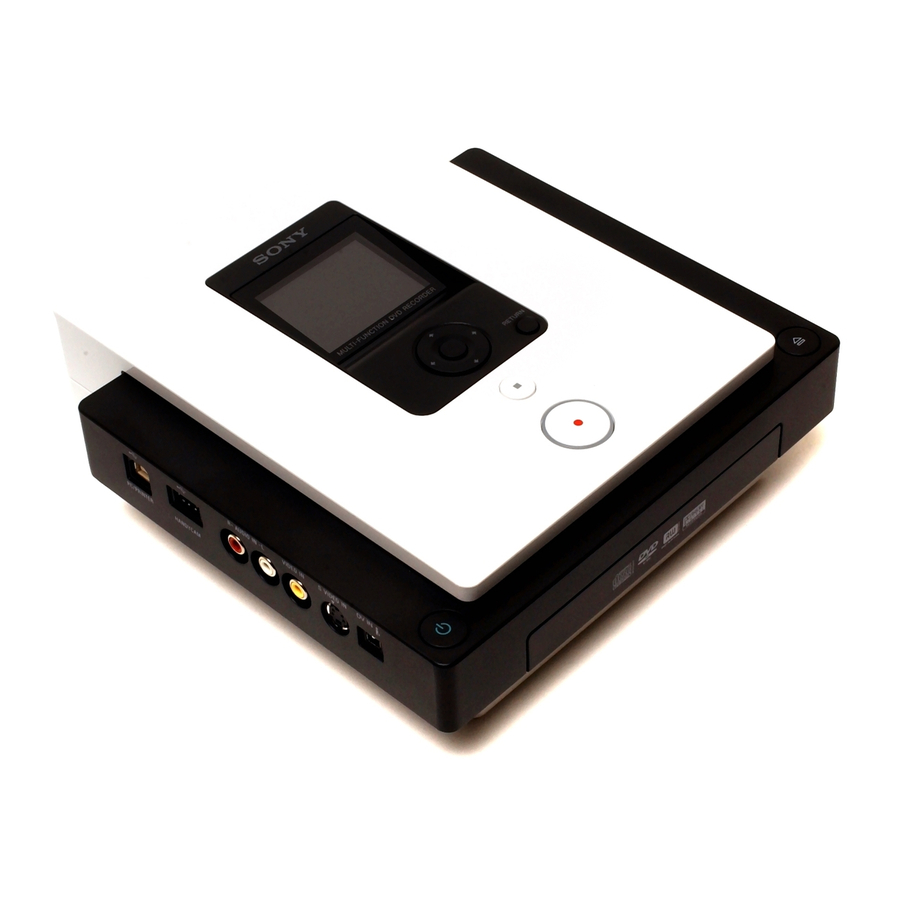
Page 10: Parts And Controls
Parts and Controls Front and rear A 1 (Power) button Turns the DVDirect on or off. B Emergency eject hole If you cannot open the disc tray with the then insert a thin, elongated object into this hole to eject the disc tray manually. C Top panel The buttons and display for operating the DVDirect are located here (page 11). -
Page 11: Display Window
Top panel A Display window Displays a menu screen, images from a playback device, or photos from a memory card. B Mm<,cursor / (Select) button Selects a function. C RETURN button This returns the display to the main menu screen or to the previous screen when navigating menus. - Page 12 B USB connector (Type A) Connect the USB cable here when connecting a HDD or DVD camcorder. Note Only Sony HDD or DVD camcorder input is supported. C AUDIO IN L/R connectors Connect the audio plugs of an AV cable...
- Page 13 Right side panel A Memory card LED Lights amber when accessing the memory card. B Memory Stick Duo slot Insert a “Memory Stick Duo” here. C Multi memory card slot Insert a “Memory Stick,” SD Card, or xD-Picture Card here. D CompactFlash card slot Insert a CompactFlash card here.
-
Page 14: Turning The Power On/Off
Introducing DVDirect Turning the Power On/Off Connect the supplied AC power cord to the AC adaptor. Insert the power plug of the AC adaptor into the DVDirect’s DC IN connector. Insert the power plug of the AC power cord into a power outlet. Notes •... -
Page 15: Auto Setup Navigation
Auto Setup Navigation After the power is turned on, the DVDirect automatically detects inserted memory cards and DVD discs and input signals from connected devices. A message indicating how to prepare for recording then appears in the display window. By following this message, you can automatically move on to the recording procedure you intended without complicated button operations. - Page 16 Press M or m to select the desired operation, and press the DV Camcorder/Video , DVD: Create a video DVD from a digital video camcorder HDD/DVD Camcorder , DVD: Create a video DVD from an HDD or DVD camcorder Photo , DVD: DVD Video Preview: Photo View/Print: Setup:...
-
Page 17: Inserting A Disc
Inserting a Disc To insert a disc, perform the following while the DVDirect is turned on. Press the The disc tray ejects. Place the disc in the disc tray with its label facing up, and press (Eject) button again. Notes •... - Page 18 When a new disc is inserted When a new disc is inserted, the disc will be formatted automatically. If the new disc inserted is a DVD+R disc, a message prompting you to select an input source appears. To continue with operations, press M or m to select a source to record from, and press the (Select) button.
-
Page 19: Inserting A Memory Card
Inserting a Memory Card Insert the memory card into its corresponding memory card slot. Memory Stick Duo Memory Stick Duo Push the “Memory Stick Duo” into the slot until you hear a click. To remove, push the “Memory Stick Duo” and pull out. -
Page 20: Creating A Video Dvd
Creating a Video DVD Creating a Video DVD You can use the DVDirect as a stand-alone DVD recorder to burn videos directly onto DVDs from a connected HDD, DVD, or DV camcorder or video device such as a VCR or DVR. You can play the created video DVD on other DVD devices or the DVD drives of computers. - Page 21 DVD camcorder The entire video content of the camera’s 8-cm disc is recorded onto a 12-cm disc. DV camcorder The entire content of the videotape is recorded onto a single disc. The DVDirect controls the camera during the entire process, and completes creation of the video DVD.
- Page 22 Consolidation Recording (page 39) This mode allows you to record the contents of multiple 8-cm discs from a DVD camcorder onto the corresponding number of 12-cm discs. Normal Video Recording (page 42) This mode allows you to create a video DVD using the (Record) and (Stop) buttons on the DVDirect and the play, pause, and stop buttons on the device connected to the DVDirect.
-
Page 23: Supported Camcorders/Video Devices And Recording Modes
VIDEO (analog input) Camcorders equipped with HD (AVCHD) format are not supported. Operation compatibility is confirmed with Sony DV, D8, and HDV camcorders only. Only tapes recorded in DV format are supported. Notes on presetting camcorders • The “USB SPEED” setting on HDD and DVD camcorders must be set to “AUTO.”... - Page 24 Notes on time required for recording When recording from an HDD or DVD camcorder connected via USB cable, the length of time required depends on the REC mode (HQ, SP, or LP) used to shoot the video and the number of scenes the video contains. In general, videos shot in higher image quality modes take longer to be recorded onto a disc.
-
Page 25: Writable Discs That Can Be Used For Creating Video Dvds
Writable Discs That Can Be Used for Creating Video DVDs Compatible disc types for recording differ as follows, depending on the type of video device and connection interface you are using. Type of Device Interface DVD-R Sony HDD camcorder Sony DVD camcorder DV camcorder... -
Page 26: About Created Video Dvds
About Created Video DVDs Titles and chapters The contents of a DVD consist of sections, called titles, and smaller sub- sections, called chapters. When you create a video DVD with the DVDirect, titles and chapters are created as follows: For discs created through normal video recording or recording from DV camcorders connected via DV (i.LINK) cable Titles are created between the points where you start and stop a recording on the DVDirect. - Page 27 DVD menus A DVD menu is displayed each time a DVD is inserted into a DVD player and serves as a title page or table of contents for the video DVD. You can create DVDs that display thumbnail images of titles in their menu screens.
-
Page 28: One Touch Recording Through Hdd Camcorder Control (Dvd Burn)
One Touch Recording Through HDD Camcorder Control (DVD BURN) You can create video DVDs from your HDD camcorder simply by pressing the camera’s [DVD BURN] button. Press the 1 (Power) button to turn on the DVDirect. A message prompting you to insert a disc appears in the display window. Insert a disc (page 17). - Page 29 Touch [DVD BURN] on the camera’s LCD screen, or press the DVD BURN button on the camera or Handycam Station. 60min USB SELECT BURN PictBridge PRINT Recording starts, and the progress appears in the display window. When all of the content of the HDD camcorder is recorded, recording automatically stops and the button to go back to the main menu.
- Page 30 Press the A message asking whether to finalize the disc just recorded on appears. Select whether to finalize the disc. For details on finalizing discs, see “What is ‘finalize disc’?” (page 66). To finalize the disc: Select [Yes] and press the appear, so select [Yes] and press the finalization will begin, and the process may take a few minutes.
-
Page 31: One Touch Recording (Full Recording)
One Touch Recording (Full Recording) When an HDD, DVD, or DV camcorder is connected to the DVDirect, you can use Full Recording to record the video contents of the camera onto a disc with a single touch of a button. Press the 1 (Power) button to turn on the DVDirect. - Page 32 When using a DV camcorder Connect the camera’s DV connector to the DVDirect’s DV IN connector using a DV (i.LINK) cable (not supplied). DV (i.LINK) cable (not supplied) After connecting the camera, skip to step 6. Touch [HDD] (for an HDD camcorder) or [ COMPUTER] (for a DVD camcorder) on the camera’s LCD screen.
- Page 33 Press < or , to switch the recording mode. Pressing < or , switches the recording mode displayed at the top right of the display window. For Full Recording, press < or , until [Full] displays. The following appears in the DVDirect’s display window DV camcorder Type of input Recording mode...
- Page 34 When using an HDD camcorder When the contents of the HDD camcorder do not fit onto a single disc, a disc will be finalized once it becomes full, and a message will appear in the display window. Remove the completed disc, and insert a blank disc. Recording will resume automatically.
-
Page 35: Incremental Recording
Incremental Recording After the video contents of an HDD camcorder are recorded onto a disc, additional video taken with the same HDD camcorder can be recorded onto a disc without recording the previous contents again. Press the 1 (Power) button to turn on the DVDirect. A message prompting you to insert a disc appears in the display window. - Page 36 Press < or , to switch the recording mode. Pressing < or , switches the recording mode displayed in the top right of the display window. For Incremental Recording, press < or , until [Incremental] displays. Press the Recording begins for the portion of the camera’s video content recorded after the previous burning to disc.
- Page 37 Press the (Eject) button. A message asking whether to finalize the disc just recorded on appears. Select whether to finalize the disc. For details on finalizing discs, see “What is ‘finalize disc’?” (page 66). To finalize the disc: Select [Yes] and press the appear, so select [Yes] and press the finalization will begin, and the process may take a few minutes.
- Page 38 To stop recording You cannot stop while recording is in progress. You can only stop recording by pressing the Note on Incremental Recording Always use the 1 (Power) button to turn off the DVDirect after Incremental Recording is finished. If you turn off the power by pulling out the AC power cord, the DVDirect will not be able to detect newly taken video properly, and Incremental Recording will not be possible the next time you attempt to perform it.
-
Page 39: Consolidation Recording
Consolidation Recording When you have multiple 8-cm discs containing video taken with a DVD camcorder, you can consolidate and record the video onto the corresponding number of 12-cm discs. Press the 1 (Power) button to turn on the DVDirect. A message prompting you to insert a disc appears in the display window. Insert a disc (page 17). - Page 40 Once you touch [ camera, and the display window on the DVDirect changes. Note Depending on the DVD camcorder you are using, the above USB SELECT screen may not appear automatically and settings configuration for USB connection may be required beforehand.
- Page 41 Press the (Eject) button. A message asking whether to finalize the disc just recorded on appears. Select whether to finalize the disc. For details on finalizing discs, see “What is ‘finalize disc’?” (page 66). To finalize the disc: Select [Yes] and press the appear, so select [Yes] and press the finalization will begin, and the process may take a few minutes.
-
Page 42: Normal Video Recording
Normal Video Recording To burn video from a video device such as a VCR or DVR onto a disc, connect the device to the DVDirect via an S-video or AV cable. Operate the video device to play back the portion you want to record, and use the (Stop) buttons on the DVDirect to record. - Page 43 For AV cables: Connect the video device’s audio/video output connectors to the DVDirect’s AUDIO IN/VIDEO IN connectors using the AV cable (not supplied). To audio/video output AV cable (not supplied) Hint The connectors on a video device differ depending on the device. Refer to the operating instructions for your device, and use the appropriate AV cable.
- Page 44 Operate the camera or video device to start playback of video. The following appears in the DVDirect’s display window. Hint The DVDirect detects and selects video input signals automatically when you play back video from the connected video device. You can view the video playback in the display window with the selected input source displayed in the top left.
- Page 45 Press the (Stop) button to stop recording. Wait a moment until the display window changes. To record additional video, repeat steps 5 to 7. When you are finished recording, press the RETURN button to go back to the main menu, and press the A message asking whether to finalize the disc just recorded on appears.
-
Page 46: Previewing A Video Dvd
Previewing a Video DVD You can play back and check a video DVD burned with the DVDirect in the display window on the top of the unit. Notes • Sound cannot be heard when previewing the disc on the DVDirect. •... - Page 47 When a disc that has not been finalized is inserted: The last title on the disc starts to play automatically. Press < or , to select the title you want to view. To stop playback, press (Stop) button. Hints • When a DVD+RW disc is inserted, the video titles appear in the display window, as in the case of finalized discs.
-
Page 48: Creating/Viewing A Photo Dvd
Creating/Viewing a Photo DVD Creating a Photo DVD You can easily record photos taken with your digital camera from a memory card onto a DVD. You can also create a slideshow DVDs. Still images stored on an HDD camcorder can also be recorded onto a disc. Notes •... -
Page 49: Supported Memory Cards And Camcorders
DVDs. Supported Memory Cards and Camcorders The recording methods available differ as follows, depending on the type of camera or storage device connected to the DVDirect. Type of device Sony HDD camcorder Memory card (“Memory Stick Duo,” “Memory Stick,” SD Card,... -
Page 50: About Created Photo Dvds
My Computer WinXP(C:) VRD_MC1(D:) AUDIO_TS DCIM 100VRDMC VIDEO_RM VIDEO_TS Sony MemoryStick - MG(...E:) Control Panel Hint File names are automatically created when the photo DVD is created. Title 1 Chapter 3 10 Photos 5 6 7 8 9 10 5 6 7 8 9 10... -
Page 51: Recording Photos Stored On A Memory Card
Recording Photos Stored on a Memory Card Press the 1 (Power) button to turn on the DVDirect. A message prompting you to insert a disc appears in the display window. Insert a disc (page 17). The DVDirect starts reading the inserted disc. Insert the memory card into its corresponding memory card slot (page 19). - Page 52 During recording, the progress appears in the display window, and the (Record) button remains lit. Note Do not insert another memory card while recording onto a disc is in progress. Doing so may cause a writing error. When all of the photos are recorded onto the disc, recording automatically stops, and the back to the main menu.
- Page 53 To not finalize the disc: Select [No] and press finalization. This disc is not completed yet, and it cannot be played with other DVD players or DVD drives of computers. Select whether to create a slideshow. Press to select whether to create a slideshow, and press the M or m (Select) button.
-
Page 54: Recording Photos Stored On An Hdd Camcorder
Recording Photos Stored on an HDD Camcorder Press the 1 (Power) button to turn on the DVDirect. A message prompting you to insert a disc appears in the display window. Insert a disc (page 17). The DVDirect starts reading the inserted disc. Press the RETURN button to display the main menu. - Page 55 Touch [HDD] on the camera’s LCD screen. 60min USB SELECT BURN PictBridge PRINT Once you touch [HDD], the DVDirect detects the connected camera, and the display window on the DVDirect changes. Press the (Record) button to start recording. During recording, the progress appears in the display window, and the (Record) button remains lit.
- Page 56 Press the A message asking whether to finalize the disc just recorded on appears. Hint This message will not appear when using a DVD+RW disc. Select whether to finalize the disc. For details on finalizing discs, see “What is ‘finalize disc’?” (page 66). To finalize the disc: Select [Yes] and press appear, so select [Yes] and press the...
- Page 57 Notes • When a slideshow is created on a disc, you cannot record additional photos onto such discs. • It takes a few minutes to complete finalizing for a photo backup DVD. The amount of time it takes to complete a slideshow DVD depends on the number and size of the photos.
-
Page 58: Viewing And Printing Photos
Viewing and Printing Photos You can view and check the photos recorded on DVDs or stored on memory cards in the display window on the top panel of the DVDirect. You can also print these photos by connecting the DVDirect to a PictBridge-compatible printer. - Page 59 Press M, m, <, or , to move the selection cursor to the photo you want to view or print, and press the A larger display of the selected photo appears in the display window. Hint You can also print images directly from the thumbnail display screen. To do this, skip to step 6 after moving the cursor to the photo you want to print.
- Page 60 Connect your printer to the DVDirect using the supplied USB cable. The printer starts printing. The message [Printing] will disappear when printing is finished. Hint To continue printing other photos, press M, m, <, or , to scroll and display the photo you want to print, and then press the Notes on viewing and printing photos •...
-
Page 61: Setup
Setup Using the Setup Menu You can change the various settings for creating discs in the Setup menu screen. The following procedure displays the Setup menu. Press the 1 (Power) button to turn on the DVDirect. The display window turns on. Press the RETURN button. -
Page 62: Rec Quality
Move the cursor by pressing and press the Rec Quality Select the recording quality to use when creating a video DVD. This setting only applies to Full Recording (DV camcorder) and Normal Video Recording modes. Rec Quality Auto Stop Timer Select the preset time used to stop recording automatically when creating a video DVD. -
Page 63: Auto Chaptering
Auto Chaptering Specify a time interval at which to create chapter marks automatically on a video DVD. This setting only applies to Full Recording (DV camcorder) and Normal Video Recording modes. Setting Default setting 5min 10min 15min DVD Menu Select the type of menu to apply to a video DVD created with the DVDirect. Setting Default setting Menu 1 to 4... -
Page 64: Slideshow Creation
Slideshow Creation Select whether to display a message prompting slideshow creation when you press the (Eject) button after recording for a photo DVD. Setting Default setting Feature PC Connect Select whether to use the DVDirect as a DVD/CD drive for your computer. Setting Default setting Not use... - Page 65 The following message appears. Press to select [Yes], and press the M or m The following message appears. Finalize Select Press to select [OK], and press the M or m The DVDirect starts finalization. For video DVDs The following message appears. (Select) button.
- Page 66 For photo DVDs The following message appears. To complete the disc as a photo backup DVD, select [No]. To complete the disc as a slideshow DVD, select [Yes]. Notes • It takes a few minutes to complete finalizing for a video DVD or photo backup DVD. •...
-
Page 67: Erase Disc
Do not finalize the disc • when you want to add videos to the same disc with the DVDirect later. • when you want to add photos to the same disc with the DVDirect later. • when you are not finished creating the disc (not yet playable on other DVD devices). -
Page 68: System
The following message appears. Press M or m The following message appears. Press M or m The DVDirect starts erasing. After erasing is completed, the disc can be ejected. System You can check the system software version of the DVDirect. Press to select [System], and press the software version in the display window. -
Page 69: Color System
Color System Displays the color system used to create discs with the DVDirect. A created disc cannot be played if there is a difference between the color system of the disc and that of the DVD player. Note The appropriate color system is preset or the setting way not be selectable depending on the country or region of use. -
Page 70: Using The Dvdirect With A Computer
Using the DVDirect With a Computer System Requirements When using the DVDirect with your computer (PC Mode), the computer system should meet the following requirements. ❑ CPU: Pentium III, 800 MHz or higher (Pentium 4, 2 GHz or higher recommended) ❑... -
Page 71: Setting Up The Computer
Setting Up the Computer Installing the Software Insert the supplied software disc into a drive on the computer. The installer will start automatically. Note If the “Language Selection” screen appears, click a language button, and then click [Application Install] to continue installation. Click [Nero 7 Essentials] to install the software. -
Page 72: Connecting The Dvdirect To A Computer
Connecting the DVDirect to a Computer Note Before using the DVDirect with a computer, set [PC Connect] in the Setup menu (page 64) to [Use], Please note that this is not the default setting. Connect the DVDirect to a power source using the AC adaptor (page 14). -
Page 73: Disconnection
Disconnection The disconnection procedure varies depending on your OS. When your computer detects the DVDirect successfully, Windows task bar. If you want to disconnect the DVDirect, you must first stop it by clicking this icon. Click on the task bar, and select to disconnect the DVDirect in the shortcut menu. -
Page 74: Using The Bundled Software
• Using software other than the bundled software (such as commercially available software, shareware, or freeware) to write data to disc with the DVDirect is not under warranty, and Sony provides no customer service for such use. • Make sure that the bundled writing software and other writing software do not coexist on your computer. -
Page 75: Additional Information
Additional Information About Discs Compatible Writable Discs The following writable discs are compatible with the DVDirect. Disc type Logo DVD+R DVD+R DL (Double layer) DVD+RW DVD+RW High speed DVD-R DVD-R DL (Dual layer) DVD-RW CD-R CD-RW CD-RW High speed CD-RW ultra speed CD-RW ultra speed plus... -
Page 76: Recommended Writable Discs
Disc diameters Note Only round discs should be used with the DVDirect. Never use odd-shaped discs (stars, hearts, card shape, etc.), as they may damage the DVDirect Recommended Writable Discs We strongly recommend that you only use discs for which operation has been guaranteed. -
Page 77: Precautions On Writing/Playing Discs
About playback/reading compatibility CD-R and CD-RW discs created with the DVDirect can be read on most CD- ROM drives. However, some older CD-ROM drives cannot read CD-RW discs. In addition, CD-R music discs created and finalized with the DVDirect can be played on most CD players, but there are some CD players and automobile CD players that do not support or guarantee playback of CD-R discs. - Page 78 * Region Playback Control (RPC) standard. Do not attempt to make unauthorized changes to the region code. Any problems resulting from doing so are not covered by the warranty. Hint • You can change the region code of the DVDirect from it’s properties dialog box which is accessible from the Device Manager.
-
Page 79: About Memory Cards
About Memory Cards About “Memory Stick” A “Memory Stick” is a compact, portable IC recording medium. The types of “Memory Stick” that can be used with the DVDirect are listed in the table below. However, proper operation is not guaranteed for all “Memory Stick”... -
Page 80: About The Compactflash/Sd/Xd-Picture Cards
Notes on using “Memory Stick” • If you slide the write-protect switch to LOCK with a fine-tipped object, you cannot record, edit, or delete images. Terminal Memo area “Memory Stick” • The position and shape of the write-protect switch may differ depending on the “Memory Stick”... -
Page 81: Precautions
Precautions Operation and storage conditions Avoid using or storing the DVDirect in hot or humid locations, or places where it might be subject to severe vibration or direct sunlight. Transportation • Please repack the DVDirect in its original carton when shipping by itself. •... -
Page 82: Support Overview
• Compatible discs • Supported camcorders • Operating instructions • Others Accessing the user support web site Sony Storage Support web sites (As of August, 2006) http://sony.storagesupport.com/ * Information in English only. About the Bundled Software Detailed information about the supplied software is available on the web site of the software manufacturer. -
Page 83: Specifications
Product purchased in China:* http://www.sony.com.cn/ed/cp Product purchased in Singapore: http://www.sony-asia.com/storage/ Product purchased in Taiwan:* http://www.sony.com.tw/ds/ Product purchased in Korea:* http://www.sony.co.kr/cp Product purchased in Brazil: http://www.sony.com.br/eletronicos Product purchased in the Middle East: http://www.sony-mea.com/ * Local Web sites for computer peripheral products... - Page 84 You cannot use the DVDirect by connecting it to a computer with an i.LINK connector. Multi card slot For Sony HDD or DVD camcorder (excluding camcorders supporting AVCHD format) connection only. General Power...
- Page 88 P/N 7819901750 Sony Corporation Printed in China...