Table of Contents
Advertisement
Available languages
Available languages
STANLEY® and the STANLEY® logo are trademarks of Stanley Black & Decker, Inc.
93904-KP
93904_16ANR029_Stanley 1900PSI ENG-FR-SP.indd 1
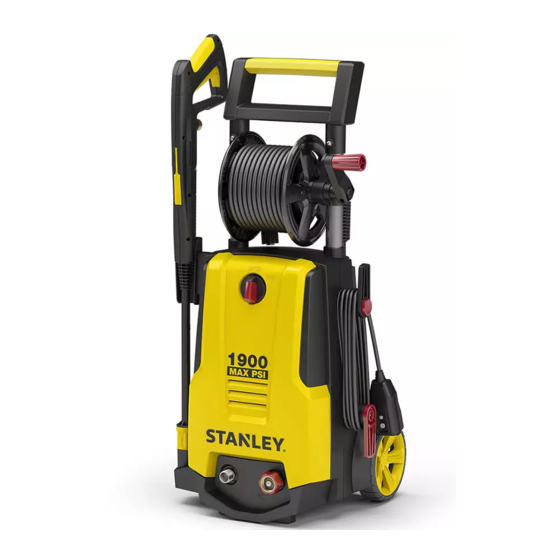
1900 PSI
ELECTRIC PRESSURE
WASHER
ASSEMBLY, CARE AND
USE INSTRUCTIONS
Model SHP 1900
IMPORTANT:
RETAIN THESE INSTRUCTIONS AND ATTACH
RECEIPT TO MANUAL FOR FUTURE REFERENCE.
READ CAREFULLY
ALWAYS WEAR EYE PROTECTION TO
PREVENT INJURY TO EYES WHEN
OPERATING THE POWER WASHER.
Questions, problems, missing parts?
Before returning to your retailer, call our
customer service department at 1-866-508-1330,
8 a.m. - 5:00 p.m., CST, Monday - Friday.
www.stanleypressurewashers.com
© 2016 Stanley Black & Decker, Inc.
or an affiliate thereof and are used under license.
16/12/23 下午1:02
Advertisement
Chapters
Table of Contents

Related Manuals for Stanley SHP 1900


Summary of Contents for Stanley SHP 1900
- Page 1 8 a.m. - 5:00 p.m., CST, Monday - Friday. www.stanleypressurewashers.com © 2016 Stanley Black & Decker, Inc. STANLEY® and the STANLEY® logo are trademarks of Stanley Black & Decker, Inc. 93904-KP or an affiliate thereof and are used under license.
-
Page 2: Table Of Contents
Limited Warranty ....................16 Replacement Parts List ..................17 PRODUCT SPECIFICATIONS PRODUCT SPECIFICATIONS SPECIFICATIONS Max PSI Max GPM Model (lbs/sq. in.) (Gal/per min) Cold Water Volts Amps Weight (lbs.) SHP 1900 1900 24.9 ✔ 93904_16ANR029_Stanley 1900PSI ENG-FR-SP.indd 2 16/12/23 下午1:02... -
Page 3: Package Contents
PACKAGE CONTENTS PACKAGE CONTENTS PACKAGE CONTENTS (Hose reel for storage only) PW909SHP1900 PART DESCRIPTION QUANTITY PART DESCRIPTION QUANTITY Power Washer Unit High/Low Lance Nozzle Soft PVC High Pressure Turbo Lance Nozzle Hose Spray Gun Trigger Lock Nozzle Cleaning Wire Spray Gun Spray Gun Holster O-Ring Replacement Kit Nozzle Tray... -
Page 4: Safety Information
SAFETY INFORMATION SAFETY INFORMATION SAFETY INFORMATION Please read and understand this entire manual before power tool carefully and only when you are alert. attempting to assemble, operate, or install the product. 10. Watch your balance and footing while using your power washer. - Page 5 SAFETY INFORMATION SAFETY INFORMATION SAFETY INFORMATION IMPORTANT: Store the power washer indoors to components are properly and securely connected. prevent the water in the unit from expanding under allow the power washer pump to run for NEVER freezing conditions. When the water freezes and more than one minute after you have turned off expands, your power washer will be damaged and the water supply.
-
Page 6: Assembly Instructions
PREPARATION PREPARATION PREPARATION Before beginning assembly of product, make sure all parts are present. Compare parts with package Tools Required for Assembly (not included): Phillips contents list and hardware contents list. If any part is screwdriver missing or damaged, attempt to assemble the DO NOT product. - Page 7 ASSEMBLY INSTRUCTIONS Soft PVC High Pressure Hose Assembly Screw Soft PVC high pressure hose (B) clockwise onto bottom left, when facing the unit, front of power washer unit (A). Pull back collar and insert o-ring post into water outlet far enough so collar can thread onto outlet threads until hand tight.
- Page 8 ASSEMBLY INSTRUCTIONS Unlocked Locked Locking Spray Gun (before Lance installation) High/Low Nozzle Lance and Turbo Nozzle Lance To lock trigger of spray gun (I), point gun away Installation from you and turn dial to lock (“3” and “9” position). While the spray gun (I) is in the locked position, insert Squeeze or pull trigger to make sure it is locked.
-
Page 9: Operating Instructions
ASSEMBLY INSTRUCTIONS Attach garden hose to the garden hose adapter (K). Garden Hose Adapter Installation Attach collar of garden hose adapter (K) directly to power washer water inlet (A). Hand tighten. Note: Flush out garden hose before connecting to garden hose adapter. You have now completed assembly and are ready to begin using your electric power washer. - Page 10 OPERATING INSTRUCTIONS OPERATING INSTRUCTIONS OFF/0 OFF/0 ON/I ON/I • Turn the power switch to the “ON” (|) position. The unit will turn on for 1 - 2 seconds and shut off. This is a normal function of the auto start feature.
- Page 11 OPERATING INSTRUCTIONS OPERATING INSTRUCTIONS IMPORTANT: When applying detergent using low OUT position pressure spray, the variable spray head must be set for the “Pencil Stream”. This is when the metal blades in front of the nozzle are wide open so the detergent spray is not constricted.
- Page 12 OPERATING INSTRUCTIONS OPERATING INSTRUCTIONS OPERATING INSTRUCTIONS Operation Tips • If you hear the motor run intermittently when the trigger is not being squeezed, that is normal. The pump is priming itself so it is ready to operate when the trigger is squeezed. Turn off the power washer if not being used after five minutes.
-
Page 13: Care And Maintenance
CARE AND MAINTENANCE Detergents Cleaning Nozzles • Use detergents designed for power washers. These • A clogged or partially clogged nozzle can cause can be purchased online at our website www. significant reduction of water pressure coming out stanleyypressurewashers.com. Hardware stores or of the nozzle and/or cause the unit to pulsate while home centers also have power washer detergents spraying. - Page 14 OPERATING INSTRUCTIONS OPERATING INSTRUCTIONS CARE AND MAINTENANCE Storage • When your pressure washing session has been • Remove high pressure hose from spray gun. completed, turn off the power switch located on • Remove lance from the gun. Place the gun in the the front of the power washer.
-
Page 15: Troubleshooting
TROUBLESHOOTING If you have any questions regarding the product, please call customer service at 1-866-508-1330. PROBLEM CORRECTIVE ACTION Unit will not turn on. 1. The GFCI module on the end of the power cord must be plugged directly into an outlet. -
Page 16: Limited Warranty
CARE AND MAINTENANCE LIMITED WARRANTY The Warranty of this product is coverd by A.R.North America. This product has a 2 (two) year warranty. Please read the following carefully to understand what each warranty entails: This product is under warranty to the original retail consumer against defects in material and workmanship for a period 1(one) year and is a complete “bumper to bumper”... -
Page 17: Replacement Parts List
A.R. North America, Inc. STANLEY® and the STANLEY® logo are trademarks of 140 81 Avenue North East Fridley, MN 55432 Stanley Black & Decker, Inc. or an affiliate thereof Made in China and are used under license. 93904_16ANR029_Stanley 1900PSI ENG-FR-SP.indd 17... - Page 18 1-866-508-1330, de 8 h à 17 h (HNC) du lundi au vendredi. www.stanleypressurewashers.com © 2016 Stanley Black & Decker, Inc. STANLEY® and the STANLEY® logo are trademarks of Stanley Black & Decker, Inc. 93904-KP or an affiliate thereof and are used under license. 93904_16ANR029_Stanley 1900PSI ENG-FR-SP.indd 18...
-
Page 19: Spécifications Du Produit
Liste des pièces de rechange ................34 SPÉCIFICATIONS DU PRODUIT SPÉCIFICATIONS Modèle Débit Eau froide Volts Poids maximum maximum (kg) (k/cm2) (Litre/min) (lb) (lb/po2) (Gal./min) SHP 1900 5561 4.92 11.3 ✔ (1900) (1.3) (24.9) 93904_16ANR029_Stanley 1900PSI ENG-FR-SP.indd 19 16/12/23 下午1:02... -
Page 20: Contenu De L'emballage
CONTENU DE L'EMBALLAGE CONTENU DE L'EMBALLAGE (Enrouleur, pour rangement uniquement) PW909SHP1900 PIÈCE DESCRIPTION QUANTITÉ PIÈCE DESCRIPTION QUANTITÉ Laveuse à pression Verrou de la gâchette de pistolet pulvérisateur PVC souple Tuyau à haute pression Pistolet pulvérisateur Tige de nettoyage de la Kit de remplacement de buse joint torique... -
Page 21: Consignes De Sécurité
SAFETY INFORMATION CONSIGNES DE SÉCURITÉ CONSIGNES DE SÉCURITÉ Assurez-vous de lire et de comprendre l’intégralité du 10. Toujours garder une position stable et sûre présent manuel avant de tenter d’assembler, d’utiliser ou pendant l'utilisation de la laveuse à pression. Les d’installer le produit. - Page 22 SAFETY INFORMATION CONSIGNES DE SÉCURITÉ CONSIGNES DE SÉCURITÉ 25. Utiliser des équipements de protection qui débrancher le tuyau à haute pression NE JAMAIS protégeront les yeux, les poumons et la peau de la laveuse à pression pendant que le système est contre l'exposition au détergent.
-
Page 23: Instructions D'assemblage
PRÉPARATION ASSEMBLY INSTRUCTIONS PRÉPARATION Avant de commencer l'assemblage de l'appareil, Outil nécessaire pour l'assemblage (non compris) : assurez-vous que toutes les pièces sont dans Tournevis cruciforme l'emballage. Comparez les pièces à la liste des pièces et du matériel. Dans le cas où une pièce est manquante ou endommagée, d'assembler N'ESSAYEZ PAS... - Page 24 INSTRUCTIONS D’ASSEMBLAGE Assemblage du PVC souple tuyau à haute pression Vissez le PVC souple tuyau à haute pression (B) dans le sens horaire sur le raccord situé en bas à gauche, sur la face avant (A) de l’appareil. Retirez le collier vers l'arrière et insérez l'embout dans la sortie d'alimentation en eau suffisamment profondément de sorte que le collier puisse être vissé...
- Page 25 ASSEMBLY INSTRUCTIONS INSTRUCTIONS D'ASSEMBLAGE Déverrouillage Verrouillage Pistolet de pulvérisation de blocage (avant l’installation de la Lance) Installation de la lance à buse HP et BP et de la lance À verrouillage gâchette du pistolet de pulvérisation à buse Turbo (I), pointer le pistolet. à vous et tourner à composer à Alors que le pistolet pulvérisateur (I) est verrouillé, verrou (position“3”...
-
Page 26: Mode D'emploi
INSTRUCTIONS D’ASSEMBLAGE Fixer un tuyau d’arrosage à l’adaptateur de tuyau d’ar- Installation de l'adaptateur de tuyau d’arrosage rosage (K). Raccordez l’adaptateur du tuyau d’arrosage (K) dans l’embout d’alimentation en eau de la laveuse à pression (A). Serrez à la main. Remarque : Rincez le tuyau d’arrosage avant de le raccorder à... - Page 27 OPERATING INSTRUCTIONS MODE D'EMPLOI OFF/0 OFF/0 OFF/0 OFF/0 ON/I ON/I ON/I ON/I • Placez l’interrupteur à la position « ON » (|). L'appareil se met en marche pendant une à deux secondes et s'arrête. Il s'agit du fonctionnement normal du mode de mise en marche automatique. Appuyez sur la gâchette du pistolet pulvérisateur pour commencer le lavage à...
- Page 28 OPERATING INSTRUCTIONS MODE D’EMPLOI IMPORTANT : Lorsque vous appliquez le détergent Position OUT OUT position avec le jet à basse pression, la buse à jet variable doit être réglée à jet étroit. À ce moment-là, les lames métalliques au devant de la buse sont grandes ouvertes afin que le jet de détergent ne soit pas Position OUT OUT position...
- Page 29 OPERATING INSTRUCTIONS MODE D’EMPLOI MODE D'EMPLOI Conseils d'utilisation • Il est normal d'entendre le moteur tourner par intermittence, même lorsque la gâchette n'est pas enfoncée. C'est la pompe qui s'amorce pour être en mesure de fonctionner lorsqu'on appuie sur la gâchette. Éteignez la laveuse à...
-
Page 30: Entretien Et Maintenance
ENTRETIEN ET MAINTENANCE Détergents Nettoyage des buses • Utilisez un détergent conçu pour les laveuses à • Une buse obstruée ou partiellement obstruée peut pression. Vous pouvez l’acheter en ligne à l’adresse provoquer une importante réduction de la pression www.stanleypressurewashers.com. Les quincailleries d’eau à... - Page 31 OPERATING INSTRUCTIONS MODE D’EMPLOI ENTRETIEN ET MAINTENANCE Entreposage • Retirez le flexible à haute pression du pistolet • Lorsque le lavage à pression est terminé, éteignez pulvérisateur. l’interrupteur qui se trouve à l’avant de l'appareil. • Retirez la lance du pistolet. Placez le pistolet dans le Débranchez le cordon d'alimentation de la prise.
-
Page 32: Dépannage
DÉPANNAGE Pour toute question concernant le produit, communiquez avec le service à la clientèle au 1-866-508-1330. PROBLÈME MESURE CORRECTRICE L’appareil ne se met pas 1. Le disjoncteur de fuite de terre à l’extrémité du cordon d'alimentation doit être branché en marche. directement dans une prise. -
Page 33: Garantie Limitée
GARANTIE LIMITÉE La garantie de ce produit est couvert par A.R.North America. Ce produit a une garantie de 2 (deux) ans. S’il vous plaît lire attentivement ce qui suit pour comprendre ce que chaque garantie implique: Ce produit est sous garantie pour le consommateur au détail original contre les défauts de matériaux et de fabrication pour une période d’un (1) an et est un «pare-chocs à... -
Page 34: Liste Des Pièces De Rechange
A.R. North America, Inc. STANLEY® and the STANLEY® logo are trademarks of 140 81 Avenue North East Fridley, MN 55432 Stanley Black & Decker, Inc. or an affiliate thereof Made in China and are used under license. 93904_16ANR029_Stanley 1900PSI ENG-FR-SP.indd 34... - Page 35 © 2016 Stanley Black & Decker, Inc. STANLEY® and the STANLEY® logo are trademarks of Stanley Black & Decker, Inc. 93904-KP or an affiliate thereof and are used under license. 93904_16ANR029_Stanley 1900PSI ENG-FR-SP.indd 35...
-
Page 36: Especificaciones Del Producto
Lista de piezas de repuesto ....................51 ESPECIFICACIONES DEL PRODUCTO ESPECIFICACIONES Modelo Máx. PSI Máx. GPM Agua fría Voltios Amperios Peso (kg) (lb) (kg/cm (Litro/min) (lb/pulgada (gal/por min) SHP 1900 5561(1900) 4.92 (1.3) 11.3 (24.9) ✔ 93904_16ANR029_Stanley 1900PSI ENG-FR-SP.indd 36 16/12/23 下午1:02... -
Page 37: Contenido Del Paquete
CONTENIDO DEL PAQUETE CONTENIDO DEL PAQUETE Carrete de manguera para almacenamiento PW909SHP1900 únicamente PIEZA DESCRIPCIÓN CANTIDAD PIEZA DESCRIPCIÓN CANTIDAD Unidad de la lavadora a presión Bloqueo del gatillo de la pistola rociadora PVC suave Manguera de presión alta Pistola rociadora Alambre de limpieza de boquilla Kit de recambio de junta tórica Adaptador de manguera de... -
Page 38: Información De Seguridad
SAFETY INFORMATION INFORMACIÓN DE SEGURIDAD INFORMACIÓN DE SEGURIDAD Lea y comprenda este manual completo antes de intentar 9. NO utilice la lavadora a presión cuando se encuentre montar, operar o instalar el producto. bajo la influencia del alcohol o de drogas. Utilice esta herramienta a presión cuidadosamente y solo cuando Este manual contiene información relacionada con la esté... - Page 39 SAFETY INFORMATION INFORMACIÓN DE SEGURIDAD INFORMACIÓN DE SEGURIDAD 24. Solo use el detergente formulado específicamente para 29. NUNCA utilice para la lavadora a presión un suministro lavadoras a presión y siga las instrucciones en la etiqueta de agua que exceda los 150 PSI máximo. del detergente.
-
Page 40: Instrucciones De Montaje
PREPARACIÓN PREPARATION PREPARACIÓN Antes de comenzar el montaje del producto, asegúrese de Herramientas requeridas para el montaje (no incluidas): que todas las piezas estén presentes. Compare las piezas con Destornillador Phillips la lista de contenido del paquete y la lista de aditamentos. Si alguna pieza falta o está... - Page 41 INSTRUCCIONES DE MONTAJE Montaje de la PVC suave manguera de presión alta Atornille la PVC suave manguera de presión alta (B) hacia la derecha en la parte inferior izquierda, estando frente a la unidad de la lavadora a presión (A). Tire hacia atrás el collarín e inserte la varilla del empaque de anillo en la salida de agua lo suficiente para que el collarín se pueda enroscar en la salida hasta que esté...
- Page 42 INSTRUCCIONES DE MONTAJE Desbloquear Bloquear Pistola de cierre (antes de la instalación de la lanza) Instalación de la lanza de la boquilla turbo y lanza de Cerradura de gatillo de pistola (I), apunte la pistola lejos de boquilla Alta/baja usted y gire a la cerradura (posición “3” y “9”). Apretar Mientras la pistola rociadora (I) está...
-
Page 43: Instrucciones De Operación
INSTRUCCIONES DE MONTAJE Instalación del adaptador de manguera de jardín Conecte la manguera al adaptador de manguera de Acople el collarín del adaptador de la manguera de jardín jardín (K). (K) directamente a la entrada de agua de la lavadora a pre- sión (A). - Page 44 OPERATING INSTRUCTIONS INSTRUCCIONES DE OPERACIÓN OFF/0 OFF/0 OFF/0 OFF/0 ON/I ON/I ON/I ON/I • Gire el interruptor de alimentación a la posición “ON” (|). La unidad se encenderá durante 1 o 2 segundos y se apagará. Este es un procedimiento normal de la función de arranque automático.
- Page 45 OPERATING INSTRUCTIONS INSTRUCCIONES DE OPERACIÓN Posición OUT Cuando aplique detergente con el rociado IMPORTANTE: OUT position (hacia afuera) de presión baja, la cabeza de rociado variable se debe establecer para “Flujo de lápiz”. Esto ocurre cuando las aspas de metal en la parte delantera de la boquilla se abren Posición OUT completamente para que el rociado de detergente no se (hacia afuera)
- Page 46 OPERATING INSTRUCTIONS INSTRUCCIONES DE OPERACIÓN INSTRUCCIONES DE OPERACIÓN Consejos para la operación • Si escucha que el motor funciona de forma intermitente cuando no se aprieta el gatillo, eso es normal. La bomba se está purgando para que esté lista para funcionar cuando se apriete el gatillo.
-
Page 47: Cuidado Y Mantenimiento
CUIDADO Y MANTENIMIENTO Limpieza de las boquillas Detergentes • Utilice detergentes diseñados para lavadoras a presión. • Una boquilla obstruida o parcialmente obstruida puede Estos se pueden comprar en línea en nuestro sitio web ocasionar una reducción significativa de la presión del www.stanleypressurewashers.com. - Page 48 OPERATING INSTRUCTIONS INSTRUCCIONES DE OPERACIÓN CUIDADO Y MANTENIMIENTO • Retire la manguera de presión alta de la pistola rociadora. Almacenamiento • Cuando termine la sesión de lavado a presión, apague • Retire la lanza de la pistola. Coloque la pistola en el soporte el interruptor de alimentación ubicado en la parte al lado.
-
Page 49: Solución De Problemas
SOLUCIÓN DE PROBLEMAS Si tiene alguna pregunta sobre el producto, llame a Servicio al cliente al 1-866-508-1330. PROBLEMA ACCIÓN CORRECTIVA La unidad no enciende. 1. El módulo del GFCI en el extremo del cable de alimentación se debe conectar directamente a una toma de corriente. -
Page 50: Garantía Limitada
GARANTÍA LIMITADA La garantía de este producto está cubierto por A.R.North América. Este producto tiene una garantía de 2 (dos) años. Por favor lea lo siguiente para entender lo que implica cada uno de garantía: Este producto está en garantía al consumidor minorista original contra defectos de material y mano de obra durante un período de 1 (un) año y es un “parachoques a parachoques”... -
Page 51: Lista De Piezas De Repuesto
A.R. North America, Inc. STANLEY® and the STANLEY® logo are trademarks of 140 81 Avenue North East Fridley, MN 55432 Stanley Black & Decker, Inc. or an affiliate thereof Hecho en China and are used under license. 93904_16ANR029_Stanley 1900PSI ENG-FR-SP.indd 51... - Page 52 93904_16ANR029_Stanley 1900PSI ENG-FR-SP.indd 52 16/12/23 下午1:02...