Table of Contents
Advertisement
Advertisement
Table of Contents

Related Manuals for Axis T8415


Summary of Contents for Axis T8415
- Page 1 AXIS T8415 Wireless Installation Tool Installation Guide...
- Page 2 Every care has been taken in the preparation of this Electromagnetic compatibility (EMC) This equipment has been designed and tested to fulfill document. Please inform your local Axis office of any inaccuracies or omissions. Axis Communications AB cannot applicable standards for: be held responsible for any technical or typographical errors •...
- Page 3 Korea 이 기기는 가정용(B급) 전자파적합기기로서 주로 가정에서 사용하는 것을 목적으로 하며, 모든 지 Por medio de la presente Axis Communications AB declara 역에서 사용할 수 있습니다. 적절히 접지된 STP que el este producto cumple con los requisitos esenciales (shielded twisted pair) 케이블을 사용하여 제품을...
- Page 4 • report problems to Axis support staff by logging in to Directive 2012/19/EU on waste electrical and electronic your private support area equipment (WEEE) is applicable in the European Union •...
-
Page 5: Hazard Levels
AXIS T8415 Wireless Installation Tool Safety information Hazard levels DANGER Indicates a hazardous situation which, if not avoided, will result in death or serious injury. WARNING Indicates a hazardous situation which, if not avoided, could result in death or serious injury. -
Page 6: Lead-Acid Battery
Axis or a third party. Axis recommends using Axis power source equipment compatible with your product. • Use only spare parts provided by or recommended by Axis. • Do not attempt to repair the product yourself. Contact Axis support or your Axis reseller for service matters. Lead-Acid Battery The Axis product uses a Lead-Acid battery as the power supply. - Page 7 AXIS T8415 Wireless Installation Tool CAUTION • Never dispose of the battery in a fire as it may cause them to explode or generate a toxic gas. • Do not attempt to disassemble the battery as it could cause leakage of sulfuric acid that could cause injury.
-
Page 9: Package Contents
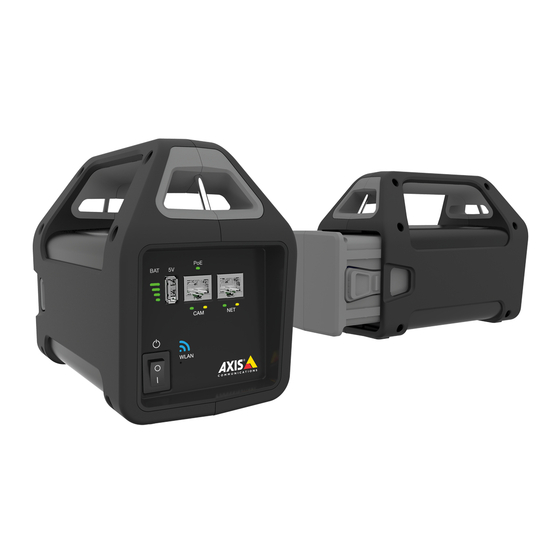
AXIS T8415 Wireless Installation Tool Installation Guide This Installation Guide provides instructions for AXIS T8415 Wireless Installation Tool . This installation tool support both the use of a laptop or an app for installation of cameras. For best performance and experience it is recommended to use the app. - Page 10 AXIS T8415 Wireless Installation Tool WLAN indicator Reset button Main Unit Battery Charger connector 10 Battery 11 Label (network settings) Charger Charger male connector Charger LED Power cord plug (EU) Power cord plug (US) Power cord plug (UK) Power cord plug (AU) Network connector RJ45 Ethernet connector.
-
Page 11: Axis T8415 Web Interface
AXIS T8415 Wireless Installation Tool USB Connector AXIS T8415 is equipped with a USB connector (non-data). This connector can be used for charging any compatible handheld device (5V, 2.1A). Note • AXIS T8415 must be powered on when charging a handheld device. - Page 12 • Default SSID and password can be found on the label, located on the main unit. If changed in the web interface the label is no longer valid. • AXIS T8415 supports both 2.4GHz and 5GHz. • Channels might vary depending on country.
- Page 13 Interface Configuration: Set IP-address manually or get IP-address from a DHCP server. • Address: The IP-address for the unit. • Subnet mask: The subnet-mask for the unit. • Gateway: Default gateway for the unit. Maintenance Upgrade the firmware for AXIS T8415.
-
Page 14: Charge The Battery
AXIS T8415 Wireless Installation Tool Note The latest firmware can be found at www.axis.com Charge the Battery Attach the country specific power cord plug to the charger. See below image. Connect the battery charger to the battery (see below image) and to the power outlet. -
Page 15: Change The Battery
AXIS T8415 Wireless Installation Tool NO TICE TICE TICE • Due to the self-discharge characteristics of this type of battery, it is imperative that they be charged within 6 months of storage, otherwise permanent loss of capacity might occur as a result of sulfation. -
Page 16: Installation Preparations
Camera Installation - AXIS Wireless Installation Tool app 1. Connect the camera to the CAM port (PoE) on the main unit. 2. Verify that the PoE indicator is lit. 3. Connect to AXIS T8415 WiFi, see Connect to AXIS T8415 WiFi on page 16... - Page 17 AXIS T8415 Wireless Installation Tool 4. Start the app AXIS Wireless Installation Tool Note The start-up time for cameras varies for different products. It may take a few minutes before the camera is visible in the camera list in the app.
-
Page 18: Camera Installation - Laptop
Select 6 Snapshot to take a snapshot of the video image. Select 3 Settings to edit network settings for the product. Number 7 Wizard. This wizard starts the first time an Axis product is accessed or after a reset to factory default. -
Page 19: Troubleshooting
Make sure the camera do not have an IP-address in the range 10.252.252.X • Cannot login to AXIS T8415 web interface when using network cable and a PC. Make sure the network cable is connected to the correct port (NET). -
Page 20: Reset To Factory Default
To reset the product to the factory default settings: 1. Press and hold the Reset button for 10 seconds. 2. AXIS T8415 now re-starts with all values reset to factory default. Note See Hardware overview on page 9 for location of the Reset button. - Page 22 Installation Guide Ver. M3.6 AXIS T8415 Wireless Installation Tool Date: March 2019 © Axis Communications AB, 2015 - 2019 Part No. 1980191...