Table of Contents
Advertisement
We advise you to read this manual carefully, which contains all the instructions for
maintaining the appliance's aesthetic and functional qualities.
For further information on the product: www.smeg.com
Contents
32
32
33
33
33
34
34
34
35
35
36
37
37
38
38
51
51
51
51
51
52
53
53
55
55
56
31
Advertisement
Table of Contents

Related Manuals for Smeg Dolce Stil Novo Series


Summary of Contents for Smeg Dolce Stil Novo Series
-
Page 1: Table Of Contents
5.1 Electrical connection 5.2 Safety instructions 5.3 Section cut from the countertop 5.4 Mounting We advise you to read this manual carefully, which contains all the instructions for maintaining the appliance’s aesthetic and functional qualities. For further information on the product: www.smeg.com... -
Page 2: Instructions
Instructions 1 Instructions • Do not modify this appliance. • Do not insert pointed metal objects 1.1 General safety instructions (cutlery or utensils) into the slots in the appliance. Risk of personal injury • Do not try to repair the appliance •... -
Page 3: Manufacturer Liability
Instructions For this appliance 1.3 Appliance purpose • This appliance is intended for cooking • If your hob has a cookware detector, do food in the home environment. Every not rely on it exclusively. other use is considered improper. • Remove any traces of liquid from the lid •... -
Page 4: Identification Plate
Instructions 1.7 How to read the user manual • Deliver the appliance to the appropriate recycling centre for electrical and This user manual uses the following reading electronic equipment waste, or return it to conventions: the retailer when purchasing an Instructions equivalent product, on a one for one basis. -
Page 5: Description
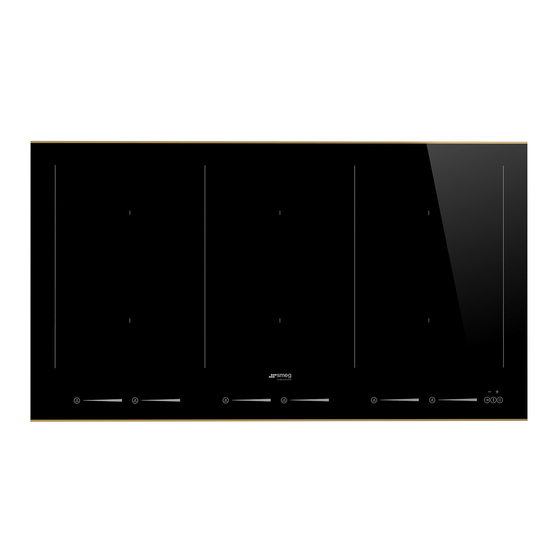
Description 2 Description 2.1 General Description 38 cm 60 cm 90 cm... -
Page 6: Available Accessories
Description = Left cooking zone = Front plate controls = Centre cooking zone = Rear plate controls = Right cooking zone = Paella plate control = General controls zone Table of power draws Plate measurements Max. power absorbed Power absorbed in Large (mm) (W)*... -
Page 7: Use
3 Use High temperature Danger of fire or explosion 3.1 Instructions High temperature • Do not use or leave flammable materials near the appliance or directly Danger of burns underneath the hob. • Do not cook using closed tins or •... -
Page 8: Preliminary Operations
3.2 Preliminary operations List of symbols In order to remove any moisture that could On/Off key: turns the hob on or off. have accumulated during the manufacturing process and for the electronic circuits and Pause key: pauses cooking. control keypad to work properly: Control lock key: prevents accidental 1. - Page 9 To see whether the pan is suitable, bring a Limiting the cooking duration magnet close to the bottom: if it is attracted, The hob has an automatic device which the pan is suitable for induction cooking. limits the duration of use. If you do not have a magnet, you can put a If the cooking zone settings are not small amount of water in the pan, place it...
- Page 10 Advice on energy-saving Power levels The power in the cooking zone can be • The diameter of the base of the pan must not exceed the width of the printed adjusted to various levels. The table shows cooking zone. the levels suitable for various types of cooking.
- Page 11 Switching on the cooking zone 2. Move your finger to the left or right on the automatically scroll bar to select the cooking power, After switching on the hob: between , or else activate • Position a pan (suitable for induction cooking and not empty) on the cooking the Power function (see “...
- Page 12 The display of the cooking zone used will Quick selection turn on: the power value indicated is This function allows you to quickly set the cooking zones to the 2. Move your finger all the way to the right required power. of the scroll bar to select the Power function.
- Page 13 The same parameters are set on both Multizone function cooking zones. This function allows you to run two cooking zones (front and rear) in It is only possible to use the parallel at the same time. Multizone function on vertically connected zones (F and R).
- Page 14 If a large pan is used, oval or oblong, Cooking guidelines ensure that it is positioned at the centre of The table below shows the power values the cooking zone. which can be set, together with the corresponding type of food. Settings may vary depending on the amount of food and consumer taste.
- Page 15 Residual heat Keep Warm Function Improper use The Keep warm function allows Danger of burns you to keep cooked food hot. • Supervise children carefully as they To activate the Keep Warm function, first cannot readily see the residual heat turn on the hob, then: indicator.
- Page 16 Pause function Control lock This function disables all keys of This function pauses the operation the display to prevent against of all cooking zones. operation by children or accidental selection. The Pause function can be activated when at least one cooking zone is switched on: To activate the Control lock, first turn on the hob, then: •...
- Page 17 Timer If the setting exceeds 9 minutes the message will be shown under This function is used to set a timer which will sound a buzzer at the the time indicator and the display will be set end of the preset time. to “hours.minutes”...
- Page 18 Timed cooking This function can be activated on This function is used to program the multiple cooking zones at the same automatic switch-off of each time. The flashing LED and time cooking zone at the end of a indicator refer to the next cooking period of time.
- Page 19 Demo mode (for exhibitors only) 5. Press the pause button until This mode allows the appliance to is displayed above the deactivate all heating elements, general control zone. The slider on the while keeping the control panel active. left will show 6.
- Page 20 To deactivate the demo mode: 5. Press the pause button until 1. Ensure that the device was disconnected is displayed above the from the electrical mains at least 10-15 seconds before. general control zone. The control slider 2. Connect the device to the electrical on the left will show mains.
-
Page 21: Cleaning And Maintenance
Cleaning and maintenance 4 Cleaning and maintenance 4.3 Ordinary weekly cleaning Clean and maintain the hob once a week 4.1 Instructions using an ordinary glass cleaning product. Always follow the manufacturer’s Improper use instructions. The silicon in these products Risk of damage to surfaces creates a protective, water-repellent membrane which also resists dirt. -
Page 22: What To Do If
Cleaning and maintenance 4.5 What to do if... Changes in colour do not affect the operation and stability of the glass. These The hob does not work: are not alterations to the material of the hob • Make sure that the hob is connected but just residues which have not been and that the main switch is turned on. -
Page 23: Installation
Installation 5 Installation 90 cm models: • 380-415 V 3N~ (default) 5.1 Electrical connection Power voltage Danger of electrocution 5 x 2.5 mm² five-core cable. • Have the electrical connection If the cable is replaced, the appliance can performed by authorised technical also function in the following modes: personnel. - Page 24 Installation 60 cm models: 38 cm models: • 220-240 V 3N~ (default) • 220-240 V 1N~ (default) 6 x 1.5 mm² six-core cable. 3 x 1.5 mm² three-core cable. If the cable is replaced, the appliance can Fixed connection also function in the following modes: Fit the power line with an omnipolar circuit *use the jumpers provided breaker in compliance with installation...
-
Page 25: Safety Instructions
Installation Testing 5.3 Section cut from the countertop At the end of installation, carry out a brief The following operation requires inspection test. If the hob fails to operate, building and/or carpentry work after checking that you have carried out the and must therefore be carried out instructions correctly, unplug the appliance by a competent tradesman. -
Page 26: Mounting
Installation 5.4 Mounting Over empty kitchen unit or drawers If there are other pieces of furniture (lateral Over built-in oven walls, drawers, etc.), dishwashers or fridges The clearance between the hob and the under the hob, a double-layer wooden kitchen furniture or other installed base must be installed at least 20 mm from appliances must be enough to ensure the bottom of the hob to avoid any... - Page 27 Installation Ventilation Hob seal The illustrations below show two examples To prevent leakage of liquid between the of installation suitable for proper ventilation frame of the hob and the countertop, place and one example of incorrect installation to the adhesive seal provided along the entire be avoided.
- Page 28 Installation Spring clips Position of slot for clips To ensure the hob is fixed and centred as accurately as possible, the clips provided must be positioned as described below: 1. Fit the clips by gently pressing them horizontally into the appropriate space. 2.