Table of Contents
Advertisement
Quick Links
®
AD-9 AIR DRYER
END COVER
CHECK
VALVE
DELIVERY PORT
ASSEMBLY
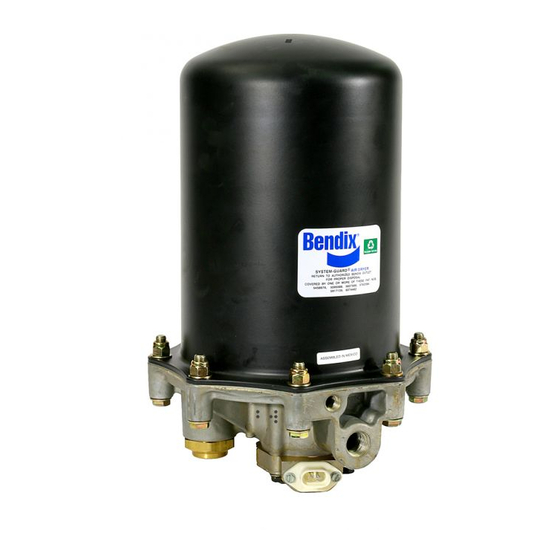
EXTENDED PURGE AD-9 AIR DRYER
FIGURE 1 - AD-9 AIR DRYER MODELS
DESCRIPTION
The function of the AD-9 Air Dryer is to collect and remove
air system contaminants in solid, liquid and vapor form be-
fore they enter the brake system. It provides clean, dry air
to the components of the brake system which increases
the life of the system and reduces maintenance costs. Daily
manual draining of the reservoirs is eliminated.
The AD-9 Air Dryer consists of a desiccant cartridge and a
die cast aluminum end cover secured to a cylindrical steel
outer shell with eight cap screws and nuts. The end cover
contains a check valve assembly, a safety valve, three
threaded air connections and the purge valve housing
assembly. The removable purge valve housing assembly
incorporates a purge valve mechanism and a turbo charger
cut-off feature that is designed to prevent loss of engine
“turbo” boost pressure during the purge cycle of the AD-9 air
UPPER
BRACKET
OUTER
SHELL
LOWER
BRACKET
PORT
CONTROL
SUPPLY
PORT
WIRING HARNESS
CONNECTION
END COVER
CHECK
VALVE
ASSEMBLY
DELIVERY PORT
STANDARD AD-9 AIR DRYER
dryer. For ease of serviceability, the desiccant cartridge and
discharge check valve assembly are screw in type. The purge
valve housing assembly, which includes the heater and
thermostat assembly, and the discharge check valve
assembly, is serviceable from the exterior of the air dryer,
while servicing the screw-in desiccant cartridge requires
removal of the air dryer assembly from the vehicle.
The AD-9 has three female pipe thread air connections and
each is identified as follows:
Port l.D.
Function/Connection
CON 4 ............... Control Port
(purge valve control and turbo cut-off).
SUP 11 ............. Supply Port (air in).
DEL 2 ............... Delivery Port (air out).
UPPER
BRACKET
LOWER
BRACKET
CONTROL
WIRING HARNESS
CONNECTION
OUTER
SHELL
PORT
SUPPLY
PORT
1
Advertisement
Table of Contents

Related Manuals for BENDIX AD-9


Summary of Contents for BENDIX AD-9
- Page 1 DESCRIPTION dryer. For ease of serviceability, the desiccant cartridge and The function of the AD-9 Air Dryer is to collect and remove air system contaminants in solid, liquid and vapor form be- discharge check valve assembly are screw in type. The purge fore they enter the brake system.
- Page 2 “adsorption”. The desiccant The AD-9 air dryer alternates between two operational modes cartridge using the adsorption process typically removes or “cycles” during operation: the charge cycle and the purge 95% of the water vapor from the pressurized air.
- Page 3 Generally 15-30 seconds are required governor unloader port to the AD-9 end cover control port. for the entire purge volume of a standard AD-9 to flow through The purge piston moves in response to air pressure causing the desiccant drying bed.
-
Page 4: Preventive Maintenance
FIGURE 5 - AD-9 AIR DRYER SECTIONAL VIEW the purge valve housing. With the turbo cut-off valve seated (closed position), air in the discharge line and AD-9 inlet port is restricted from entering the air dryer. While the turbo B. Air usage is exceptionally high and not normal for a cut-off effectively prevents loss of turbo charger boost highway vehicle. - Page 5 3. Close all reservoir drain cocks. Build up system pressure With the ignition or engine kill switch in the ON posi- to governor cut-out and note that AD-9 purges with an tion, check for voltage to the heater and thermostat audible escape of air.
- Page 6 When rebuilding or replacing components of the air dryer parking brakes, and always block the wheels. use only genuine Bendix parts. For ease in servicing the 2. Stop the engine when working around the vehicle. AD-9 desiccant cartridge assembly, it is recommended that 3.
- Page 7 DESICCANT CARTRIDGE COMPLETE O-RING HOUSING 5/16" X 4-1/2" UPPER BRACKET CAP SCREW UPPER BRACKET STRAP UPPER MOUNTING BRACKET 5/16" LOCK WASHER 5/16" LOCK NUT EXHAUST COVER TORX HEAD BOLT EXHAUST DIAPHRAGM WASHER PURGE PISTON FIGURE 7 - AD-9 AIR DRYER ASSEMBLY...
- Page 8 Caution: Do not attempt to remove this assembly, than the other 6 bolts.) as it will be damaged during the removal process 7. Remove the AD-9 air dryer from its mounting brackets and is not available as a service part. If the heater on the vehicle.
-
Page 9: Cleaning And Inspection
8. Remove the desiccant cartridge o-ring (21) from the end sembly, install it on the purge valve housing assem- cover. bly making certain the “bubble” portion is positioned over the thermostat. Install the assembled purge valve CLEANING & INSPECTION housing in the end cover making certain to orient both parts such that the connector is approximately 1. -
Page 10: Installation
The two longer this manual may require modification to assure proper 3/8" cap screws (18) will be used to secure the AD-9 to operation and service life. Consult your local authorized its mounting bracket. Tighten the six cap screws and Bendix parts outlet or sales representative for additional nuts in a star pattern in a fashion similar to Figure 8;... -
Page 11: Vehicle Preparation
1. The AD-9 air dryer must be mounted vertically (purge to install the AD-9 air dryer and use those that will best exhaust toward road surface) outside the engine position the unit for ease of installation. Locate the... -
Page 12: Discharge Line
Where minimum diameter are specified, larger line diameters generally improve performance and life and reduce 5. Mount the AD-9 air dryer on the vehicle using 3/8" bolts temperatures, particularly in severe applications. (grade 5 min.) and washers. Torque to 25 ft. Ibs. (300 inch pounds.) After positioning and mounting the upper... -
Page 13: Exhaust Line
Note that the system once again builds 1. If it is necessary to direct AD-9 air dryer discharge to full pressure and is followed by a purge at the AD-9 air contaminants away from vehicle components it may be dryer exhaust. - Page 14 With compressor unloaded, check excessively. for unloader piston leakage. Slight leakage permissible. G. Holset “E” type G. Test Air Dryer system using Bendix Product compressor. Bulletin PRO-08-19 entitled “Troubleshooting The Holset E compressor system With Bendix Air Dryer.”...
- Page 15 (see causes for Symptom #1). F. Excessive air usage - Air F. Charge Cycle Time - The AD-9 is designed to dryer/vehicle application provide clean, dry air for the brake system. requires additional purge When a vehicle’s air system is used to operate volume.
- Page 16 Consult your local authorized Bendix parts outlet or sales representative for additional information. Air Compressor Size - Although the AD-9 can be used in conjunction with larger compressors, it was designed primarily for units rated for up to 17 CFM. It is...
- Page 17 AD-9 AIR DRYER TROUBLESHOOTING CHART (Continued) REMEDY SYMPTOMS CAUSE 4. Constant exhaust of air A. Air dryer purge valve A. With compressor loaded, apply soap solution at air dryer purge valve leaking excessively. on purge valve exhaust, to test for excessive exhaust or unable to leakage.
- Page 18 A. Inlet of air compressor A. Some leakage of pressure past the metal seat at air dryer purge valve pressurized by of the turbo cutoff feature of the AD-9 is to be exhaust (non-charging turbocharger from expected also may be audible. This slight loss mode.)
- Page 20 BW1627 © 2002 Bendix Commercial Vehicle Systems LLC All rights reserved. 3/2002 Printed in U.S.A.