Table of Contents
Advertisement
Available languages
Available languages
Quick Links
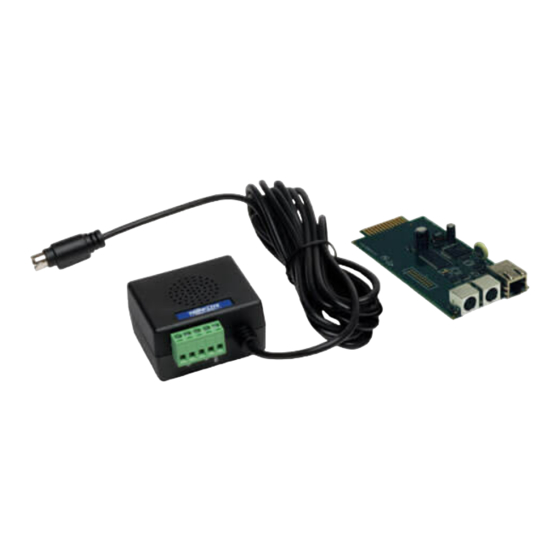
SNMP/Web Management Accessory
Read this manual carefully before installation. A separate User's Guide (PDF
format) is available for download at www.tripplite.com. Refer to the User's
Guide for additional information about configuration and operation.
Register your product for quicker service and ultimate peace of mind.
You could also win an ISOBAR6ULTRA surge protector-a $50 value!
1111 W. 35th Street, Chicago, IL 60609 USA • www.tripplite.com/support
15-02-247-93342E.indb 1
Installation and
Quick Start Guide
Model: SRCOOLNET2
Español
PROTECT YOUR INVESTMENT!
www.tripplite.com/warranty
Copyright © 2015 Tripp Lite. All rights reserved.
2
13
14
14
15
16
31
46
4/9/2015 9:52:07 AM
Advertisement
Chapters
Table of Contents

Related Manuals for Tripp Lite SRCOOLNET2


Summary of Contents for Tripp Lite SRCOOLNET2
-
Page 1: Table Of Contents
Installation and Quick Start Guide SNMP/Web Management Accessory Model: SRCOOLNET2 Installation Features Tech Support Warranty Product Registration and Regulatory Compliance Español Français Русский Read this manual carefully before installation. A separate User's Guide (PDF format) is available for download at www.tripplite.com. Refer to the User's Guide for additional information about configuration and operation. -
Page 2: Installation
SRCOOL7KRM or SRCOOL18K (Figure 1 in section Connect SRCOOLNET2 to Network: Connect a standard Ethernet patch cable to the RJ45 Ethernet port on the SRCOOLNET2. Note: This port does not support PoE (Power over Ethernet) applications. Determine Network Installation Method: If your network's DHCP server will assign a dynamic IP address to the SRCOOLNET2 automatically, proceed to 3 - Dynamic IP Address Assignment. - Page 3 Discover IP Address: Contact your network administrator to determine which IP address has been assigned to the SRCOOLNET2 by the DHCP server. The card can be identified on the DHCP server by referring to its MAC address (see Step ).
- Page 4 Connect SRCOOLNET2 to Computer: Use the included mini-DIN to DB9 configuration cable (part number 73-1025) to connect the SRCOOLNET2 to the computer. The circular connector at one end of the cable attaches to the...
- Page 5 Installation Configure Terminal Emulation Program: Open a VT100-compatible terminal emulation program (such as Tera Term) on a computer with an available DB9 serial port. The example below illustrates the use of a Tripp Lite USB-to-Serial converter. Set the terminal emulation program to use the COM port that corresponds to the 4-3.1 DB9 serial port.
- Page 6 Installation Specify the parameters required to communicate with the SRCOOLNET2 terminal 4-3.2 interface. Click Setup, then select Serial Port. 15-02-247-93342E.indb 6 4/9/2015 9:52:08 AM...
- Page 7 Configure SRCOOLNET2 in Terminal Mode: Note: The SRCOOLNET2 must be reinitialized by pressing the reset button (located between the "Link" and "Status" descriptions under the RJ45 port on the SRCOOLNET2), for 3 seconds. After the reset, an initialization page should appear in the terminal emulation program.
- Page 8 After you have finished entering settings, the SRCOOLNET2 will save changes to NV memory and reboot (this may take several minutes). Saving the changes in NV memory...Done.
- Page 9 5 - Test and Configure Test Network Connection: After an IP address has been assigned to the SRCOOLNET2, try to access it with a Web browser that supports Java™. Open a Web browser on a computer connected to the LAN and enter the SRCOOLNET2’s IP address.
- Page 10 ® Setpoint Control SRCOOLNET2 supports the use of the ENVIROSENSE environmental sensor (included) to control the unit instead of the default temperature sensor in the AC unit’s return airstream. The ENVIROSENSE sensor can be located in the area you wish to control to the specific setpoint.
- Page 11 Installation Turn the unit on. From the SRCOOLNET2 user interface, make sure that the ENVIROSENSE has been discovered/discover it. Click the 'Remote' checkbox to override the setpoint control on the device display panel . Type in the remote setpoint you wish to target and press ENTER. The setpoint control on the device display panel will be overridden.
- Page 12 (when cooling) or maximum (when not cooling) setpoint permissible by the cooling unit. If the SRCOOLNET2 fan control is set to “always on” and the temperature at the return air intake of the cooling device is outside the limits of the cooling device, the ENVIROSENSE reading and remote setpoint will be overridden.
-
Page 13: Features
A configuration cable (part number 73-1025) is included with the SRCOOLNET2. If you need to order a replacement cable, visit www.tripplite.com/support. RJ45 Ethernet Network Port: Use this RJ45 jack to connect the SRCOOLNET2 to the network with a standard Ethernet patch cable. -
Page 14: Tech Support
Technical Support Technical Support can be found at: www.tripplite.com/support Warranty LIMITED WARRANTY Seller warrants this product, if used in accordance with all applicable instructions, to be free from original defects in material and workmanship for a period of 2 years (except internal UPS system batteries outside USA and Canada, 1 year) from the date of initial purchase. -
Page 15: Product Registration And
Product Registration and Regulatory Compliance PRODUCT REGISTRATION Visit www.tripplite.com/warranty today to register your new Tripp Lite product. You'll be automatically entered into a drawing for a chance to win a FREE Tripp Lite product!* * No purchase necessary. Void where prohibited. Some restrictions apply. See website for details. CAUTION: Use of this equipment in life support applications where failure of this equipment can reasonably be expected to cause the failure of the life support equipment or to significantly affect its safety or effectiveness is not recommended. -
Page 16: Español
Guía de Instalación e Inicio Rápido Accesorio para administración SNMP/Web Modelo: SRCOOLNET2 Instalación Características Soporte Técnico Garantía Cumplimiento de las Normas English Français Русский Antes de la instalación, lea cuidadosamente este manual. Está disponible una Guía del Usuario (Formato PDF) independiente para descarga en www. -
Page 17: Instalación
IP dinámica al SRCOOLNET2, proceda a 3 - Asignación de Dirección IP Dinámica. Si usted asignará manualmente una dirección IP estática a la SRCOOLNET2 proceda a 4 - Asignación de Dirección IP Estática. Si no está seguro de cuál método usar, póngase en contacto con su administrador de red para asistencia antes de continuar el proceso de instalación. - Page 18 Averigüe la dirección IP: Póngase en contacto con su administrador de red para determinar qué dirección IP asignó el servidor DHCP al SRCOOLNET2. La tarjeta puede identificarse en el servidor DHCP refiriéndose a su dirección MAC (ver Paso 1-2).
- Page 19 Conecte el SRCOOLNET2 a la Computadora: Use el cable de configuración de mini DIN a DB9 (número de parte 73-1025) incluido para conectar el SRCOOLNET2 a la computadora. El conector circular...
- Page 20 Instalación Configure el Programa de Emulación de Terminal: Abra un programa de emulación compatible con VT100 (como el Tera Term) en una computadora con un puerto serial DB9 disponible. El siguiente ejemplo ilustra el uso de un convertidor USB a Serial de Tripp Lite. Configure el programa de emulación de terminal para usar el puerto COM que 4-3.1 corresponde al puerto serial DB9.
- Page 21 Instalación Especifique los parámetros requeridos para comunicarse con la interfaz de la 4-3.2 terminal del SRCOOLNET2. Haga click en Setup, después seleccione Puerto Serial. 15-02-247-93342E.indb 21 4/9/2015 9:52:11 AM...
- Page 22 Configure el SRCOOLNET2 en Modo de Terminal: Nota: El SRCOOLNET2 debe ser reinicializado oprimiendo el botón de restaurar (ubicado entre las descripciones "Link" y "Status" bajo el puerto RJ45 en el SRCOOLNET2), por 3 segundos. Después de restaurado, aparecerá la página de inicialización en el programa de emulación de terminal.
- Page 23 NV y se reiniciará (esto puede tardar algunos minutos). Saving the changes in NV memory...Done. Una vez que el SRCOOLNET2 se reinicie, la página de inicio debe mostrar los nuevos parámetros de la IP estática. PLATFORM: trippliteSnmpCard9210_H_16_32 16M/32M...
- Page 24 Para más información acerca de la configuración y operación del dispositivo administrado, consulte el Manual del Propietario, disponible para descarga en www.tripplite.com. Nota: Al usar el SRCOOLNET2 con el SRCOOL7KRM o SRCOOL18K, no use el panel de control manual de la unidad de enfriamiento. 15-02-247-93342E.indb 24...
- Page 25 ® de ajuste de Temperatura SRCOOLNET2 soporta el uso del sensor ambiental ENVIROSENSE (incluido) para controlar la unidad en vez del sensor de temperatura predeterminado en la corriente de aire de retorno de la unidad de aire acondicionado. El sensor ENVIROSENSE puede localizarse en el área que desea controlar en el Punto de Ajuste específico.
- Page 26 ENVIROSENSE vuelva a estar por debajo del Punto de Ajuste. Este ciclo continuará indefinidamente asta que usted seleccione STOP en la interfaz de usuario SRCOOLNET2 o apague la unidad SRCOOL mediante el panel de pantalla del dispositivo.
- Page 27 (al enfriar) o máximo (cuando no enfría) permisible por la unidad de enfriamiento. Si el control del ventilador de SRCOOLNET2 está colocado en “always on” y la temperatura en la entrada del aire de retorno del dispositivo de enfriamiento está fuera de los límites del dispositivo de enfriamiento, la lectura del ENVIROSENSE y el Punto de Ajuste remoto serán anulados.
-
Page 28: Características
(número de parte 73-1025). Si necesita ordenar un cable de repuesto, visite www.tripplite.com/support. Puerto de Red Ethernet RJ45: Use este enchufe RJ45 para conectar el SRCOOLNET2 a la red con un cable patch estándar de Ethernet. El LED de Liga y el LED de Estado indican algunas condiciones de operación, como se muestra en la siguiente... -
Page 29: Soporte Técnico
Soporte Técnico El Soporte Técnico puede localizarse en: www.tripplite.com/support Garantía El vendedor garantiza este producto, si se usa de acuerdo con todas las instrucciones aplicables, de que está libre de defectos en material y mano de obra por un período de 2 años a partir de la fecha de compra inicial. Si el producto resulta defectuoso en material o mano de obra dentro de ese período, el vendedor reparará... -
Page 30: Cumplimiento De Las Normas
Cumplimiento de las Normas Información de sobre Cumplimiento de la WEEE para Clientes de Tripp Lite y Recicladores (Unión Europea) Según la Directiva de Residuos de Aparatos Eléctricos y Electrónicos (Waste Electrical and Electronic Equipment, WEEE) y sus reglamentos, cuando los clientes compran nuevos equipos eléctricos y electrónicos a Tripp Lite, tienen derecho a: •... -
Page 31: Français
Installation et guide de démarrage rapide Carte auxiliaire de gestion SNMP/Web Modèle : SRCOOLNET2 Installation Caractéristiques Soutien technique Garantie Conformité réglementaire English Español Русский Lire attentivement ce manuel avant l'installation. Un guide de l'utilisateur indépendant (format PDF) peut être téléchargé à www.tripplite.com. Consulter le guide de l'utilisateur pour des renseignements supplémentaires au sujet de... -
Page 32: Installation
Installation Le SRCOOLNET2 permet à l'utilisateur de communiquer avec, et de contrôler, les refroidisseurs localisés SRCOOL7KRM et SRCOOL18K de Tripp Lite en tant que dispositifs gérables sur un réseau accessible via un navigateur Web, une station de gestion de réseau ou Telnet. - Page 33 Trouver l'adresse IP : Contacter l'administrateur du réseau pour déterminer quelle adresse IP a été assignée au SRCOOLNET2 par le serveur DHCP . La carte peut être identifiée sur le serveur DHCP en se référant à son adresse MAC (voir Étape...
- Page 34 Si vous n'avez pas ces informations, contactez votre administrateur de réseau pour obtenir de l'aide. Connecter le SRCOOLNET2 à un ordinateur : Utiliser le câble de configuration inclus de mini-DIN à DB9 (numéro de pièce 73-1025) pour connecter le SRCOOLNET2 à...
- Page 35 Installation Configurer l'émulateur de terminal : Ouvrir un émulateur de terminal compatible VT100 (comme Tera Term) sur un ordinateur doté d'un port sériel DB9. L'exemple ci-dessous illustre l'utilisation d'un convertisseur de USB à sériel Tripp Lite. Configurer l'émulateur de terminal pour utiliser le port COM qui correspond au 4-3.1 port sériel DB9.
- Page 36 Installation Spécifier les paramètres requis pour communiquer avec l'interface du terminal 4-3.2 du SRCOOLNET2. Cliquer sur Setup (configuration), puis sélectionner Serial Port (port sériel). 15-02-247-93342E.indb 36 4/9/2015 9:52:16 AM...
- Page 37 Installation Configurer le SRCOOLNET2 en mode terminal : Remarque : Le SRCOOLNET2 doit être réinitialisé en appuyant sur le bouton de réinitialisation (situé entre les descriptions « Link » (liaison) et « Status » (état) sous le port RJ45 sur le SRCOOLNET2), pendant 3 secondes.
- Page 38 Lite recommande de ne pas changer les paramètres par défaut à moins d'être un utilisateur averti avec un but précis. Une fois les paramètres saisis, le SRCOOLNET2 va sauvegarder les changements en mémoire NV et redémarrer (cela peut prendre plusieurs minutes).
- Page 39 Java™. Ouvrir un navigateur Web sur un ordinateur connecté au réseau local et saisir l'adresse IP du SRCOOLNET2. Le nom d'utilisateur est « localadmin » et le mot de passe par défaut est « localadmin ». Après avoir saisi le nom d'utilisateur et le mot de passe, la page de statut de PowerAlert va s'afficher dans la fenêtre...
- Page 40 à distance SRCOOLNET2 prend en charge l'utilisation du capteur environnemental ENVIROSENSE (inclus) pour contrôler l'appareil plutôt que la sonde de température dans le courant d'air de retour du climatiseur. Le capteur ENVIROSENSE peut être placé à un endroit à...
- Page 41 ENVIROSENSE revienne sous le point de consigne. Ce cycle se poursuit indéfiniment jusqu'à ce que STOP soit sélectionné à partir de l'interface utilisateur de SRCOOLNET2 ou en mettant l'appareil SRCOOL hors tension via le panneau d'affichage de l'appareil. 15-02-247-93342E.indb 41...
- Page 42 (lors du refroidissement) ou maximum (en l'absence de refroidissement) permis par l'appareil de refroidissement. Si la commande du ventilateur de SRCOOLNET2 est configuré à « always on » (toujours sous tension) que la température de l'air de reprise au niveau de l'entrée d'air du dispositif de refroidissement se situe à...
-
Page 43: Caractéristiques
SRCOOLNET2. Pour commander un câble de remplacement, visiter www.tripplite.com. Port de réseau Ethernet RJ45 : Utiliser cette prise RJ45 pour connecter le SRCOOLNET2 au réseau avec un cordon de raccordement Ethernet standard. Le voyant à DEL Link (lien) le voyant à DEL Status (état) indiquent plusieurs conditions de fonctionnement telles qu'indiquées dans le tableau ci-dessous. -
Page 44: Soutien Technique
Bouton de réinitialisation SNMP : Appuyer sur le bouton de RESET réinitialisation pendant 3 secondes pour redémarrer le SRCOOLNET2. Le fait de redémarrer le SRCOOLNET2 n'effacera pas les paramètres de configuration du réseau et ne va pas interrompre l'alimentation CA. Remarque : Le bouton encastré se trouve juste en dessous du port Ethernet. -
Page 45: Conformité Réglementaire
Conformité réglementaire L ’information de conformité WEEE pour les clients de Tripp Lite et recycleurs (Union européenne) Sous les directives et règlements de déchet d’équipements électrique et électronique (Waste Electrical and Electronic Equipment, WEEE), lorsque les clients achètent le matériel électrique et électronique neuf de Tripp Lite ils sont autorisés à... -
Page 46: Русский
Руководство по установке и началу работы Сетевая карта для управления по SNMP-протоколу / через Интернет Модель: SRCOOLNET2 Установка Возможности (свойства) Техническая поддержка Гарантийные обязательства Соблюдение установленных норм English Español Français Перед установкой внимательно изучите настоящее руководство. Отдельное Руководство пользователя (в формате PDF) доступно для скачивания на сайте... -
Page 47: Установка
Нахождение MAC-адреса: 12-значный MAC-адрес (000667xxxxxx) указан на корпусе устройства SRCOOLNET2. 2 – Установка Вставьте карту SRCOOLNET2 в разъем для аксессуаров SNMP на передней панели устройства SRCOOL7KRM или SRCOOL18K (рис. 1, раздел Подключение SRCOOLNET2 к сети: подключите стандартный соединительный кабель типа Ethernet к Ethernet-порту RJ45 сетевой карты SRCOOLNET2. - Page 48 переходите к п. 5 - Тестирование и настройка. Примечание. При желании вы можете определить DHCP-адрес в процессе начальной загрузки. Подключите компьютер с выполняемой программой эмуляции терминала к сетевой карте SRCOOLNET2 с помощью кабеля для конфигурирования и перезапустите карту SRCOOLNET2. 15-02-247-93342E.indb 48...
- Page 49 будут вами использоваться. При отсутствии у вас данной информации обратитесь за помощью к администратору своей сети. Подключение SRCOOLNET2 к компьютеру: для подключения сетевой карты SRCOOLNET2 к компьютеру используйте поставляемый в комплекте кабель для конфигурирования с разъемами mini-DIN и DB9. Круглый разъем на одном...
- Page 50 Установка Настройка программы эмуляции терминала: откройте одну из совместимых с VT100 программ эмуляции терминала (например, Tera Term) на компьютере со свободным последовательным портом DB9. Ниже представлен пример использования преобразователя Tripp Lite "USB-последовательный порт". Настройте программу эмуляции терминала на использование COM-порта, 4-3.1 соответствующего...
- Page 51 Установка Укажите параметры, необходимые для обеспечения связи с терминальным 4-3.2 интерфейсом SRCOOLNET2. Нажмите Начальная установка, затем выберите Последовательный порт. 15-02-247-93342E.indb 51 4/9/2015 9:52:20 AM...
- Page 52 приведенной ниже последовательности. Исходный пароль по умолчанию: TrippLite. На экран выводятся эталонные IP-настройки — при конфигурировании своей карты SRCOOLNET2 введите свою собственную информацию по адресам IPv4 или IPv6. При появлении указанного ниже сообщения введите "m" для изменения настроек карты SRCOOLNET2.
- Page 53 не рекомендует менять установленные по умолчанию настройки за исключением тех случаев, когда вы являетесь опытным пользователем и осуществляете это с какой-либо конкретной целью. После завершения ввода настроек устройство SRCOOLNET2 сохранит изменения в энергонезависимой памяти и перезагрузится (это может занять несколько минут). Saving the changes in NV memory...Done.
- Page 54 5 - Тестирование и настройка Тестирование сетевого подключения: после присвоения IP-адреса карте SRCOOLNET2 попробуйте обратиться к ней через веб-браузер с поддержкой фреймов, форм и Java™. Откройте веб-браузер на компьютере, подключенном к локальной сети, и введите IP-адрес карты SRCOOLNET2. Имя пользователя: localadmin, пароль...
- Page 55 6 - Использование устройства ENVIROSENSE и ® дистанционная установка температуры Устройство SRCOOLNET2 поддерживает возможность использования входящего в комплект поставки датчика состояния окружающей среды ENVIROSENSE для управления температурой на выходе указанного устройства вместо датчика температуры в потоке возвратного воздуха в устройстве переменного тока. Датчик...
- Page 56 Установка Включите устройство. Проверьте из пользовательского интерфейса SRCOOLNET2, распознан ли датчик ENVIROSENSE / распознайте его. Нажмите мышью на поле “Remote” (Дист.упр.) для перевода управления установкой температуры в ручной режим на дисплее устройства . Введите заданное значение для дистанционной установки и нажмите ENTER. Управление...
- Page 57 является показание датчика ENVIROSENSE, а НЕ температура возвратного воздуха. Температура возвратного воздуха может быть выше или ниже температуры, фиксируемой датчиком ENVIROSENSE. При переводе устройства SRCOOLNET2 в режим дистанционной установки температуры в программе PowerAlert установленное значение температуры, выводимое на дисплей устройства охлаждения, следует игнорировать.
-
Page 58: Возможности (Свойства)
конфигурирования (кат. № 73-1025) входит в комплект поставки сетевой карты SRCOOLNET2. В случае необходимости заказа запасного кабеля посетите страницу www.tripplite.com/support. Сетевой Ethernet-порт RJ45: используйте этот разъем типа RJ-45 для подключения SRCOOLNET2 к сети с помощью стандартного соединительного кабеля типа Ethernet. СИД Link (Связь) и СИД Status (Статус) используются... -
Page 59: Техническая Поддержка
Возможности (свойства) Кнопка перезапуска SNMP: для перезагрузки устройства RESET SRCOOLNET2 нажмите кнопку перезапуска и удерживайте ее в течение 3 секунд. При перезагрузке устройства SRCOOLNET2 не происходит стирания сетевых настроек или прерывания электропитания. Примечание. Утопленная кнопка располагается под портом Ethernet. Для нажатия этой кнопки воспользуйтесь... -
Page 60: Соблюдение Установленных Норм
Гарантийные обязательства ВНИМАНИЕ! До начала использования данного устройства пользователь должен убедиться в том, что оно является пригодным, соответствующим или безопасным для предполагаемого применения. В связи с большим разнообразием конкретных применений производитель не дает каких-либо заверений или гарантий относительно пригодности данных изделий для какого-либо конкретного применения или их соответствия каким-либо конкретным требованиям.