Table of Contents

Related Manuals for Sony DSR-400L


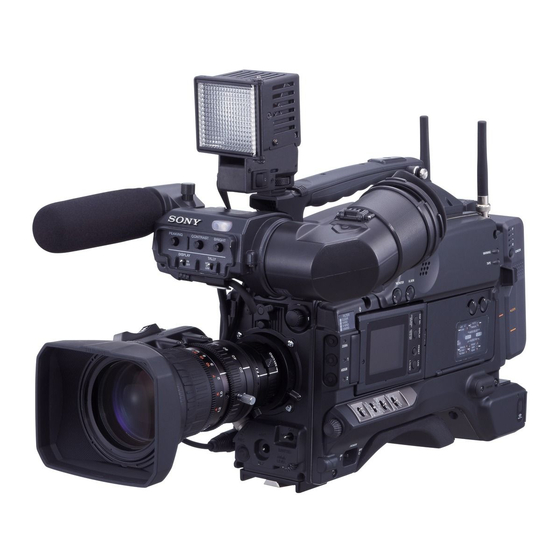
Summary of Contents for Sony DSR-400L
- Page 1 Digital Camcorder Operating Instructions Before operating the unit, please read this manual thoroughly and retain it for future reference. DSR-400L/400PL DSR-400K/400PK DSR-450WSL/450WSPL © 2005 Sony Corporation 3-868-500-03 (1)
- Page 2 Owner’s Record The model and serial numbers are located on the top. Record these numbers in the spaces provided below. Refer to them whenever you call upon your Sony dealer regarding this product. Model No. Serial No. WARNING To prevent fire or shock hazard, do not expose the unit to rain or moisture.
- Page 3 Sie die Batterien einzeln in einen Plastikbeutel. Note about laser beams Laser beams can damage the CCDs of this camcorder. In environments where laser beams are used, be careful to prevent the laser beams from striking the surfaces of the...
-
Page 4: Table Of Contents
Settings required for an i.LINK connection ... 41 Making a backup of the images being recorded... 41 Using the camcorder as a feeder ... 42 Other Connections ... 44 Connecting a number of camcorders ... 44 Chapter 4 Recording and Playback Inserting a Cassette ... - Page 5 Saving and Loading Scene Files ... 113 Saving a scene file ... 113 Loading scene files ... 115 Resetting the settings of the camcorder to the standard settings ... 116 Displaying a File-Related Menu Page When Inserting a “Memory Stick” . 117 Chapter 7 Appendix Important Notes on Operation ...
-
Page 6: Chapter 1 Overview
Overview Product Configurations The DSR-400/450WS Digital Camcorder series is made up of the DSR-400K/400PK, DSR-400L/400PL, and DSR-450WSL/450WSPL models depending on the product configuration, as shown in the figure below. The camcorders comprise both NTSC and PAL versions. The operation of the basic camcorder is the same in all cases. -
Page 7: Features
16:9. In addition to the same main features, functions, and operation method of previous models, these new camcorders provide superior camera functionality. * “DVCAM” and “Power HAD” are registered trademarks of Sony Corporation. Camera features 2/3-inch Power HAD EX CCDs... -
Page 8: Vtr Features
Features VTR features Standard-size and mini-size DVCAM cassettes Equipped with a tape drive with an original Sony mechanism, this camcorder can use both standard-size DVCAM cassettes (a standard cassette that can record a maximum of 180 minutes in DVCAM mode) and mini- size DVCAM cassettes (a small cassette that is convenient to carry and store). -
Page 9: Location And Function Of Parts
When no lens is mounted, keep this cap fitted for protection from dust. b LENS connector (12-pin) Connect the lens cable. Contact your Sony representative for more information about the lens you can use. c REC (recording start) button Press to start recording. Press it again to stop recording. -
Page 10: Right Side View
AUTO: When the POWER switch of the video light is in the on position, the video light is turned on automatically while the camcorder is recording. MAN: You can turn the video light on or off manually, using its own switch. -
Page 11: Lcd Monitor
MAN. However, when using the interval recording mode, the video light is automatically turned on immediately before recording starts. • To ensure proper operation of the video light, Sony recommends the use of the battery pack BP-GL65, BP-GL95, or BP-L60S with the camcorder. - Page 12 CHAR: Displays video with superimposed text. With the MENU switch set to STATUS, also display camcorder status indications similar to those displayed in the viewfinder. MONI: Displays video without superimposed text. STATUS: Displays counter, warnings, audio levels, etc.
-
Page 13: Rear Section
* E-E: Abbreviation of “Electric-to-Electric.” In E-E mode, video and audio signals input to the camcorder are output after passing through internal electric circuits only. This can be used to check input signals. For information about alarms, see “Operation Warnings”... - Page 14 R-RUN mode. CLOCK: Records time code synchronized to the internal clock. Regardless of the setting of the F-RUN/SET/R- RUN switch, the camcorder operates in F-RUN mode. d Lithium battery compartment Attach the supplied CR2032 Lithium Battery. Details on how to attach the lithium battery, see “Attaching and Replacing the Lithium Battery”...
-
Page 15: Left And Upper View
• Audio fade-in/fade-out Select either ON or OFF. j REC TRIGGER (external VTR trigger) switch Sets the function of the REC button on the camcorder or the VTR button on the lens when an external VTR is connected to the (i.LINK) DV OUT connector (page... - Page 16 Blinking: While the cassette is loading or ejecting. Lights-out: When the cassette is not in the camcorder. e Cassette lid Slide the OPEN lever on the top of the camcorder to open the lid. Press the side of the lid to close it.
-
Page 17: Rear View
“Using a wireless microphone system” on page 35. Note For your safety, and to ensure proper operation of the camcorder, Sony recommends the use of the following battery packs: BP-GL65, BP-GL95, and BP-L60S. d DC IN connector (XLR type, 4-pin, male) - Page 18 VTR. When synchronizing the time code of an external VTR with that of the camcorder, connect this connector to the GEN LOCK IN connector of the external VTR.
-
Page 19: Lens
Lens VCL-917BY Zoom Lens (DSR-400K/400PK only) 1 F.f adjustment ring and F.f fixing knob 2 MACRO selector 3 Zoom ring 4 Focus ring 5 ZOOM selector 6 Focal servo module connector 7 Zoom remote control connector a F.f (flange focal length) adjustment ring and F.f fixing knob F.f adjustment ring: To adjust the flange focal length, loosen the F.f fixing knob, then turn the ring (page... -
Page 20: Dxf-801 Viewfinder
This button starts and stops recording on the VTR. Press it once to start recording, and once more to stop. In the recording pause state, the camcorder waits for a certain period of time in the standby-on mode and then automatically switches to standby-off mode. -
Page 21: Status Display On The Viewfinder Screen
REC/TALLY (recording/tally) indicators (red) Functions as follows. • Flashes from the time when you press the REC button on the camcorder or the VTR button on the lens until recording starts, then stay on continuously during recording. • Indicates a fault (page 125). -
Page 22: Trigger Mode
b Trigger mode PARA: Operates both internal and external VTRs. INT: Operates the internal VTR only. EXT: Operates the external VTR only. c Extender “EX” is displayed when a lens extender is used. d Color temperature Indicates the currently selected color temperature. e DC IN / battery voltage / remaining capacity Indicates the battery voltage or the remaining capacity of an attached internal battery pack, an AC adaptor, or an... -
Page 23: Status Display On The Lcd Monitor
Model name and serial number Indicates the model name and serial number of the camcorder when the color bars are displayed, which are recorded together with the color bars. x 16:9/4:3 mode “16:9” or “4:3” is displayed depending on the currently selected aspect ratio. - Page 24 32k: 12 bit Fs32K (4ch mode) 44.1k: 16 bit Fs44.1K (2ch mode) 48k: 16 bit Fs48K (2ch mode) Note Recording in 16 bit Fs32K and 16 bit Fs44.1K are not possible on the camcorder. j Battery capacity indicator Indication Battery voltage BP-L60S/L90A/L60A/L90/L60 BP-90A/NP-1B BATT E [ ■■■■■■■...
-
Page 25: Using The Cd-Rom Manual
l Warning indicators Displays warnings when trouble with recording or moisture condensation occurs. For details, see “Operation Warnings” on page 125. m Time counter indicator Each press of the DISPLAY button switches displays of time code, user bit, and counter. You can display the date or time using the arrow key under the AUDIO adjustment cover. - Page 26 If you lose the CD-ROM disc or become unable to read its content, for example because of a hardware failure, you can purchase a new CD-ROM disc to replace one that has been lost or damaged. Contact your Sony service representative. • Intel and Pentium are registered trademarks of Intel Corporation or its subsidiaries in the United States and other countries.
-
Page 27: Chapter 2 Preparation
Attaching and Replacing the Lithium Battery This camcorder uses a lithium battery to retain stored data. When using the camcorder for the first time, be sure to attach the supplied lithium battery (CR2032). The camcorder will not operate correctly without this lithium battery. -
Page 28: Preparing The Lens
Note If the lens is not firmly locked, it may come off while the camcorder is being used. This could cause a serious accident. Make sure the lens is firmly locked. It is recommended that the lens mount securing rubber be put on the lens-locking lever as illustrated above. -
Page 29: Preparing A Power Supply
• During recording, playback, and loading/unloading a tape, be careful never to remove the battery pack. • Make sure to turn the camcorder off before changing the battery (except when using an AC-550 and an AC-DN2/ DN10 AC adaptor together). -
Page 30: Avoiding Breaks In Operation Due To An Exhausted Battery
To use the AC-DN10 AC adaptor Mount an AC-DN10 on the camcorder in the same way as a battery pack, then connect to the AC power supply. The AC-DN10 can supply up to 100 W of power. Avoiding breaks in operation due to... -
Page 31: Adjusting The Viewfinder Position
Note You cannot stow the camcorder in the carrying case with the left-eye adaptor attached. For details, consult your Sony dealer. Adjusting the viewfinder position To adjust the viewfinder left-to-right position, loosen the left-to-right fixing ring, and to adjust the front-to-back position, loosen the front-to-back position locking knob. -
Page 32: Using The Shoulder Strap
Adjusting the Shoulder Pad Position You can shift the shoulder pad backward or forward by up to 35 mm (1 best balance for shooting with the camcorder on your shoulder. Pull up the strap to lock the fitting. Raise the lever in the center of the shoulder pad to unlock the shoulder pad. -
Page 33: Fitting To A Tripod
Using a Video Light You can use the Anton Bauer Ultralight 2 or equivalent for this camcorder. Use a video light powered by 12 V with maximum power consumption of 50 W. • If you connect the video light to the LIGHT connector on... -
Page 34: Preparing Audio Input System
AUDIO IN (CH-1/CH-2) switch for the desired recording channel to FRONT. Connect to the MIC IN connector. Preparing Audio Input System To use the microphone detached from the camcorder You can use the supplied microphone detached from the camcorder. Connect to the MIC IN connector. -
Page 35: Using A Wireless Microphone System
• In order for the AUDIO IN CH-1 and CH-2 connectors on the camcorder to be able to provide a phantom 48 V power supply, female XLR connectors (3-pin) are fitted. If the microphone cable has a female connector, use an adaptor. - Page 36 For details about attaching the battery pack, see “Using a battery pack” on page 29. Mount the tuner on the WRR tuner fitting. CA-WR855 For details about the WRR tuner fitting (part number A-8278-057-A), contact your Sony service representatives. BP-GL65/GL95/L60S Mount plate (supplied Adjustment...
-
Page 37: Connecting Line Input Audio Equipment
Connect the tuner power cord to the DC OUT connector of the camcorder, and the audio output cable to the AUDIO IN CH-1 or CH-2 connector. Set the switches as below. • Set the AUDIO IN input selection switch to MIC for the channel to which the audio out cable is connected. - Page 38 RM REC START to RM. If the REC SWITCH function is assigned to the ASSIGN switch, this setting also disables these controls. To enable the camcorder REC button and the lens VTR button On the FUNCTION 3 page of the MAINTENANCE menu, set RM REC START to CAM.
- Page 39 However, if the switch position on the remote control unit differs from the one on the camcorder, the switch position on the camcorder takes precedence over that on the remote control unit. For details on menu operations, see “Basic menu operations”...
-
Page 40: Chapter 3 Connections
The camera display image is output to the CBK-SD01 SDI Output Board even when playing a recorded image. Notes • Playing the tape on the camcorder mutes the audio signal portion of the SDI output. • You can select either VBS or SDI for the output signal of the VIDEO OUT connector, depending on the input connector used on the monitor. -
Page 41: Using An I.link Connection
DV format are explained. Note Depending on the equipment connected, you may be able to record in a format different from that of the camcorder. However, the recording function using different formats is limited. For details, see “Usable cassettes” on page 47. -
Page 42: Using The Camcorder As A Feeder
• In order to check the video image when a DSR-1500A/ 1800A/2000A or similar equipment is connected to the camcorder, it is necessary to set the input to a setting other than i.LINK. When the input is set to i.LINK, i.LINK is only used for input and no signal is output via... - Page 43 Note To use the automatic copying function of DSR-2000A, it is necessary to set the recording format of the camcorder to DVCAM on the VTR MODE page of the MAINTENANCE menu. For details on the external VTR, see the instruction manual supplied with the external VTR.
-
Page 44: Other Connections
When using two or more synchronized camcorders, connect an external sync signal to the GENLOCK IN connector, supplying a VBS or BS signal. The camcorder will then operate synchronized to this signal. You can adjust the synchronization using the GENLOCK page of the MAINTENANCE menu. -
Page 45: Chapter 4 Recording And Playback
Inserting two of the cassette. cassettes by mistake may cause a malfunction. • Internal parts of the camcorder may become bent or otherwise damaged if you attempt to insert a mini-size cassette in the wrong direction (such as with the cassette... -
Page 46: Basic Procedure For Shooting
Holding the side of the cassette may cause it to be inserted incorrectly. • When inserting a cassette, put the camcorder on a horizontal and stable surface. Basic Procedure for Shooting Basic Procedure for... -
Page 47: Recording
• You can use the AUDIO LEVEL knob on the front of the camcorder to manually adjust the channel 1 audio level. To do this, you must first set up the VTR section to enable manual adjustment of the audio recording level (page 57). -
Page 48: Compatibility Of Dvcam And Dv Formats
For instructions on removing tape slack, see next page. • Follow the instructions in “Inserting a Cassette” on page 45 to insert a cassette, or the camcorder may be damaged. To prevent accidental erasure Set the REC/SAVE switch to SAVE to prevent accidental erasure of recorded contents. -
Page 49: Selecting The Recording Format
Compatibility on editing using DV connectors When this digital camcorder is connected to other DVCAM or DV video equipment using DV cable (i.LINK cable), the recording format of edited tapes is defined according to recorder’s format as described below. Read through “Limitations on editing”... -
Page 50: Adjusting The Black Balance/White Balance
The black balance will require adjustment in the following cases. • When the camcorder is used for the first time • When the camcorder has not been used for a long time • When the camcorder is used under conditions in which the surrounding temperature has changed greatly •... - Page 51 To adjust the white balance It is necessary to adjust the white balance each time the principal lighting source changes. Set the switches and selectors as shown in the figure below. FILTER selector OUTPUT/DCC switch: WHITE BAL switch: A or B* GAIN switch: Set as low as possible.
-
Page 52: Setting The Electronic Shutter
Adjust the white balance again. Contact your Sony representative if this message continues to appear even after the white balance have been adjusted again. - Page 53 Once the shutter speed is selected, it is retained even when low level the camcorder is turned off. lighting conditions. Set VF DISP MODE to 2 or 3 on the VF DISP 1 page of the OPERATION menu.
- Page 54 Note The settings selected on the SHT ENABLE page of the OPERATION menu become invalid when the RM-B150 Remote Control Unit is connected to the camcorder. Display the SHT ENABLE page of the OPERATION menu. For details on menu operations, see “Basic menu operations”...
-
Page 55: Adjusting The Iris
ECS or SLS, the setting of shutter speed takes priority (page 53). To change the reference value, make sure the camcorder is not in a process of setting the shutter speed. To open the iris by 0.5 stop Turn the MENU knob counterclockwise as seen from the front of the camcorder. - Page 56 To stop down the iris by 0.5 stop Turn the MENU knob clockwise as seen from the front of the camcorder. One bar (s) appears in the lower part to the left of the F number in the iris indication.
-
Page 57: Adjusting The Audio Level
With the AUDIO LEVEL control on the side of the camcorder and the AUDIO LEVEL control on the front of the camcorder, adjust so that the audio level meter shows up to –20 dB for a normal input volume. The input level value of the audio channel 1 is the... - Page 58 R-RUN: Recording run. The time code generator runs only while recording. To synchronize the time code You can synchronize the internal time code generator of this camcorder with an external generator for the regeneration of an external time code. You can also F-RUN R-RUN...
- Page 59 * Set GENLOCK to ON on the GENLOCK page of the MAINTENANCE menu, if GENLOCK is set to OFF. Example 2: Interconnecting a number of camcorders and using one of them as the reference camcorder for time code synchronization Notes •...
-
Page 60: Setting For Special Shooting Cases
POWER switch off and on or keep the camcorder turned off for a long time. • When the GENLOCK item is set to OFF on the GENLOCK page of the MAINTENANCE menu, the time code cannot be synchronized with the reference video signal. -
Page 61: Back Space Editing
For details of time codes, see “Setting the time data” on page 57. When you have finished recording a scene, press the REC button on the camcorder or the VTR button on the lens. This pauses the recording operation. Note... -
Page 62: Using The Edit Search Function While Back Space Editing
Note also that the recording continuity is lost in the following cases. - If the POWER switch is set to on and off repeatedly. - If the camcorder is left powered off for several hours. - If the camcorder is subject to severe vibration while powered off. -
Page 63: Time-Lapse Video (Interval Rec)
OPERATION menu. You can select either OFF, 2S, 5S, or 10S. Notes • Set the LIGHT switch on the camcorder to AUTO to turn on the light before recording. The light switch must also be set to ON. With these settings, the light turns on and off automatically. -
Page 64: Recording Analog Composite Signals (With A Cbk-Sc01 Installed-Dsr-450Ws/450Wsp Only)
GENLOCK IN connector in EXT mode. When the setting is switched to CAM mode, or when no signals are input even in EXT mode, the camcorder is reset to the original setting. To use setup remove (DSR-450WS only) Setup remove is a function that removes a setup that has been added to a video signal when recording. -
Page 65: Playing And Checking Recorded Contents
For details, see “Assigning functions to ASSIGN switches” on page 106. Notes • During recording review, do not set the POWER switch to off. The camcorder may not be able to find the continue point. • You cannot start recording until the recording review has finished. -
Page 66: Detailed Settings
Detailed Settings Menu Organization and Operation The following shows the organization of menus in this camcorder. The USER menu consisting of items and pages registered at the factory is used. The number in parenthesis is the page number that setting is displayed on. - Page 67 Menu selection 1st hierarchy USER MENU CUSTOMIZE OPERATION (Continued) 1) Only for the DSR-450WS/450WSP 2) Only when a CBK-SD01 SDI Output Board is installed in the DSR- 450WS/450WSP 3) Only for the DSR-400/450WS 2nd hierarchy Page 8 OUTPUT MONITOR OUT FUNCTION 1 FUNCTION 2 VF DISP 1...
- Page 68 Menu selection 1st hierarchy (Continued) 1) Only for the DSR-450WS/450WSP 2) Only for 24P mode 3) Only for PsF (progressive scan) mode and a video output signal set to PAL 4) Only for PsF (progressive scan) mode and a video output signal set to NTSC 5) Only for I (interlace scan) mode and a video output signal set to PAL, or for PsF (progressive scan) mode and a video output signal set to NTSC...
- Page 69 Menu selection 1st hierarchy PAINT (Continued) 1) Only when a CBK-SC01 Composite Input Board is installed in the DSR- 450WS/450WSP 2) Only for the DSR-450WS/450WSP 3) Only for the DSR-450WS 2nd hierarchy LENS FILE FORMAT SOURCE SEL SW STATUS WHITE BLACK/FLARE GAMMA BLACK GAMMA...
- Page 70 Menu selection 1st hierarchy MAINTENANCE (Continued) Menu Organization and Operation 2nd hierarchy DETAIL 2 DETAIL 3 SKIN DETAIL MTX LINEAR MTX MULTI V MODULATION LOW KEY SAT SCENE FILE WHITE SHADING (Continued) 3rd hierarchy KNEE APERTURE KNEE APT LVL DETAIL COMB CROSS COLOR CROSS COLOR LVL DETAIL LIMIT...
- Page 71 BLACK SHADING R/G/B BLK H SAW R/G/B BLK H PARA R/G/B BLK V SAW R/G/B BLK V PARA BLACK SAW/PARA MASTER BLACK MASTER GAIN(TMP) <Sony Info> BATTERY BEFORE END 1 END1 <Sony> BEFORE END 2 END 2 <Others, EXT DC>...
- Page 72 Menu selection 1st hierarchy FILE (Continued) Menu Organization and Operation 2nd hierarchy USER FILE LOAD USER FILE USER FILE SAVE F. ID USER PRESET STORE USR PRESET USER FILE 2 CLEAR USR PRESET CUSTOMIZE RESET LOAD CUSTOM DATA LOAD OUT OF USER BEFORE FILE PAGE USER LOAD WHITE ALL FILE LOAD...
-
Page 73: The Top Menu
Menu selection 1st hierarchy DIAGNOSIS 1) Only for the DSR-450WS/450WSP The TOP menu The TOP menu consists of the following submenus. <TOP MENU> USER USER MENU CUSTOMIZE OPERATION PAINT MAINTENANCE FILE DIAGNOSIS When you select an item in the TOP menu, this displays the most recently shown page of the corresponding submenu. -
Page 74: The File Menu
You can save up to 16 lens files in the camcorder memory and up to 100 lens files in a “Memory Stick”. Items included in the lens file are marked with an “L” in the “File”... -
Page 75: Menu List
Menu list The pages of the menu that have been registered in the USER menu at the factory are indicated by the page (Page1 to 8) in the “USER menu” column. The USER MENU CUSTOMIZE menu allows you to add and delete pages in the USER menu to suit your requirements. - Page 76 Page Item FUNCTION 1 ASSIGN SW <1> ASSIGN SW <2> ASSIGN SW <3> ASSIGN SW <4> DF/NDF INTERVAL REC REC TIME INTERVAL TIME PRE–LIGHTING FUNCTION 2 D5600 WIDE AWB WHITE SWTCH <B> MEM/ATW SHOCKLESS WHITE ATW SPEED LOW LIGHT LOW LIGHT LEVEL VF BATT WARNING VF DISP 1 VF DISP...
- Page 77 Page Item Settings VF DISP 2 DISP COLOR TEMP OFF/ON DISP BATT REMAIN AUTO/VOLT/ DISP DC IN OFF/ON DISP 16:9/4:3 ID DISP VTR STATUS OFF/ON DISP VTR TRIGGER DISP TIME CODE OFF/ON DISP REC FORMAT MARKER 1 MARKER OFF/ON CENTER SAFETY ZONE SAFETY AREA 80% / 90% /...
- Page 78 Page Item AUTO IRIS IRIS OVERRIDE IRIS SPEED CLIP HIGH LIGHT IRIS WINDOW IRIS WINDOW IND IRIS VAR WIDTH IRIS VAR HEIGHT IRIS VAR H POS IRIS VAR V POS SHOT ID ID-1 ID-2 ID-3 ID-4 SHOT DISP SHOT DATE SHOT TIME SHOT MODEL NAME...
- Page 79 Page Item Settings SHT ENABLE SHUTTER SLS OFF/ON SHUTTER ECS SHUTTER 1/32 SHUTTER 1/33 SHUTTER 1/40 SHUTTER 1/48 SHUTTER 1/50 SHUTTER 1/60 SHUTTER 1/96 SHUTTER 1/100 SHUTTER 1/120 SHUTTER 1/125 SHUTTER 1/250 SHUTTER 1/500 SHUTTER 1/1000 SHUTTER 1/2000 LENS FILE LENS FILE SELECT 1 to 17 (17 only when serial lens...
- Page 80 The PAINT menu Page Item SW STATUS GAMMA CHROMA MATRIX KNEE WHITE CLIP DETAIL APERTURE FLARE TEST SAW WHITE COLOR TEMP <A> COLOR FINE <A> R GAIN <A> B GAIN <A> D5600K <A> COLOR TEMP <B> COLOR FINE <B> R GAIN <B> B GAIN <B>...
- Page 81 Page Item Settings GAMMA GAMMA OFF/ON STEP GAMMA 0.35 to 0.90 (in 0.05 steps) MASTER GAMMA (–99 to 99) R GAMMA G GAMMA B GAMMA GAMMA SELECT STD/FILM GAM SEL (STD) 1 to 6 GAM SEL (FILM) 1 to 5 BLACK BLACK GAMMA OFF/ON...
- Page 82 Page Item DETAIL 1 DETAIL APERTURE DETAIL LEVEL APERTURE LEVEL DTL H/V RATIO CRISPENING LEVEL DEPEND LEVEL DEPEND LVL (–99 to 99) DETAIL FREQUENCY DETAIL 2 KNEE APERTURE KNEE APT LVL DETAIL COMB CROSS COLOR CROSS COLOR LVL 0 to 99 DETAIL LIMIT DTL WHT LMT DTL BLK LMT...
- Page 83 Page Item Settings MTX LINEAR MATRIX OFF/ON MATRIX (USER) MATRIX (PRESET) MATRIX R-G (–99 to 99) MATRIX R-B MATRIX G-R MATRIX G-B MATRIX B-R MATRIX B-G MTX MULTI MATRIX OFF/ON MATRIX (MULTI) MATRIX AREA IND OFF/ON MATRIX COLOR Moves to color detection page.
- Page 84 Displays the EXEC – Recalls the scene file from the SCENE FILE memory of the camcorder or the selection “Memory Stick”. screen. Displays the EXEC Stores the scene file in the memory of SCENE FILE the camcorder or the “Memory Stick”.
- Page 85 OFF/ON MASTER BLACK (–99 to 99) MASTER GAIN –3dB/0dB/3dB/ (TMP) 6dB/9dB/12dB/ 18dB/24dB/ 30dB/36dB BATTERY <Sony Info> BEFORE END 1 5 to 100% (in 5% steps) END 1 0 to 5% (in 1% steps) <Sony> BEFORE END 2 11.5 to 17.0V (in 0.1V steps)
- Page 86 ENABL/DSABL ENABL Sets the validity of the AUDIO LEVEL knob on the front of the camcorder (page 10). (When setting to ENABL, the level of CH-1 is set to the value of AUDIO LEVEL knob on the front of...
- Page 87 When a remote control unit is connected, selects which REC buttons are enabled (Remote control only, the camcorder only, or both). REC/P Sets the control command output from the i.LINK DV OUT connector. See “Settings required for an i.LINK connection”...
- Page 88 Page Item GENLOCK GENLOCK GL H PHASE GL SC PHASE GL SC 0/180 SEL ND COMP ND OFFSET ADJUST CLEAR ND OFFSET After asking AUTO AUTO BLK SHADING SHADING RESET BLK SHD MASTER GAIN (TEMP) The FILE menu Page Item USER FILE USER FILE LOAD USER FILE SAVE...
- Page 89 Page Item Settings ALL FILE ALL FILE LOAD Displays the FILE selection ALL FILE SAVE screen. F.ID Displays character input mode (up to 16 character). ALL PRESET After asking YES/NO, executes the STORE ALL function. PRESET CLEAR ALL PRESET SCENE FILE –...
- Page 90 Page Item LENS FILE 1 LENS FILE RECALL Displays the LENS FILE STORE F. ID LENS NO OFFSET SOURCE IRIS GAIN LENS FILE 2 LENS M VMOD* LENS CENTER H* LENS CENTER V* LENS R FLARE* LENS G FLARE* LENS B FLARE* LENS W-R OFST* LENS W-B OFST* LENS FILE 3...
- Page 91 The DIAGNOSIS menu Page Item HOURS RESET METER METER DRUM RUNNING TAPE RUNNING OPERATION THREADING DRUM RUNNING–2 000000H to TAPE RUNNING–2 OPERATION–2 THREADING–2 TIME/DATE CLOCK ADJUST HOUR YEAR MONTH DEV STATUS FRAM EEPROM DCP1 DCP2 Settings Default USER Description menu Displays the EXEC –...
- Page 92 Page Item DEV STATUS AUTO CHECK HUMID TIMER RESET OPTION SDI OUTPUT BOARD COMPOSITE VIDEO INPUT Menu Organization and Operation Settings Default USER Description menu After asking EXEC – See “Using the auto-check function” YES/NO, on page 120. executes the Resets the humid alarm.
-
Page 93: Displaying Menus
Viewfinder LCD monitor MENU knob When the camcorder is powered on, flick the MENU switch to the ON position to display the menu on the viewfinder screen and the LCD monitor of the camcorder. If this is the first time the menu has been used after the camcorder has been powered on, the USER menu is displayed. -
Page 94: Using The User Menu (Example Of The Menu Operation)
Note If the TOP menu has not been displayed since the camcorder is turned on, TOP does not appear on the upper right in the above screens, and you cannot go to the TOP menu. In this case, follow the procedure in “To display the TOP menu”... -
Page 95: Editing The User Menu
To end the menu operation, flick the MENU switch to OFF. The menu disappears from the screen, and the display indicating the current status of the camcorder appears along the top and bottom of the screen. To cancel setting Before pressing the MENU knob in step 6 of the above procedure, flick the MENU switch to CANCEL. - Page 96 ?E00 CONTENTS 01.EDIT PAGE 02.USER 1 EDIT 03.USER 2 EDIT 04.USER 3 EDIT 05.USER 4 EDIT 06.USER 5 EDIT 07.USER 6 EDIT 08.USER 7 EDIT 09.USER 8 EDIT 10.USER 9 EDIT If the USER MENU CUSTOMIZE menu has been used before, the last accessed page appears. If the CONTENTS page is displayed, press the MENU knob.
- Page 97 To insert a blank line Follow steps 1 to 3 of “To add a new page” on page Press the MENU knob. Then turn the MENU knob to move b to the item above which you want to insert a blank line.
-
Page 98: Resetting User Menu Settings To The Standard Settings
The previous screen appears again. Turn the MENU knob to move b to the position to where you want to move the page selected in step 2, and press the MENU knob. The page selected in step 2 is moved to the position selected in step 4. -
Page 99: Display Modes And Setting Change Confirmation/Adjustment Progress Messages
VF DISP 2 page Item Description DISP COLOR Displays the color temperature. TEMP DISP BATT Displays the battery voltage and remaining capacity of an internal REMAIN battery pack or an external battery connected to the DC IN connector. DISP DC IN Displayed when the power is supplied from an external battery connected to the DC IN... -
Page 100: Setting The Marker Display
Setting the marker display You can switch the display of the center and safety zone markers on or off and select whether the area indicated by the safety zone marker is 80%, 90%, 92%, or 95% of the screen area. Display the MARKER 1 page of the OPERATION menu. -
Page 101: Recording Shot Data Superimposed On The Color Bars
Recording shot data superimposed on the color bars In the SHOT DISP page of the OPERATION menu, you can select which shot data is recorded superimposed on the color bars. You can also select which of the shot IDs (1 to 4) set in the SHOT ID page is recorded superimposed on the picture. -
Page 102: Displaying The Status Confirmation Windows
Setting the Status Display on the Viewfinder Screen and the LCD Monitor Displaying the status confirmation windows You can confirm the settings or status of the camcorder on the screen by displaying the following two windows. • CAMERA STATUS window •... -
Page 103: Adjustments And Settings From Menus
• REC FORMAT: Recording format • AUDIO MODE: Audio bit rate • DF/NDF (DSR-400/450WS only): Setting condition of DF/NDF • INTERVAL REC: Condition of Interval Rec • VTR TRIGGER MODE: Trigger mode • STANDBY OFF TIMER: Standby-off timer setting To display the status confirmation windows Flick the MENU switch to STATUS when the menu is not displayed. -
Page 104: Selecting The Output Signals (Dsr-450Ws/450Wsp Only)
Selecting the output signals (DSR-450WS/450WSP only) When the CBK-SD01 SDI Output Board is installed, you can select the type of video signals from the VIDEO OUT connector on the OUTPUT page. You can select either VBS or SDI. Please note that only the picture obtained during recording is displayed on a CBK-SD01 SDI Output Board. -
Page 105: Specifying An Offset For The Auto White Balance Setting
Specifying an offset for the auto white balance setting By setting an offset for the value of auto white balance, you can make the picture warmer or colder. Display the OFFSET WHT page of the OPERATION menu. For details on menu operations, see “Basic menu operations”... -
Page 106: Assigning Functions To Assign Switches
Assigning functions to ASSIGN switches You can assign the desired function to any of the ASSIGN switches. Display the FUNCTION 1 page on the OPERATION menu. For details on menu operations, see “Basic menu operations” on page 93. You can assign functions to each ASSIGN switch as follows. -
Page 107: The Viewfinder
To display the aspect ratio of 16:9 or 4:3 on the viewfinder By setting the DISP 16:9/4:3 ID item to ON on the VF DISP 2 page of the OPERATION menu, “16:9” or “4:3” appears on the viewfinder screen according to the setting of the procedure above. - Page 108 24P PULLDWN DF/NDF MODE (2-3 pulldown) 2.3.3.2 (NDF only) (2-3-3-2 pulldown) 2-3 pulldown in 24P mode 1/23.98 seconds CCD output A ( O + E ) Video output signal O: Odd E: Even 2-3-3-2 pulldown in 24P mode 1/23.98 seconds CCD output A ( O + E ) Video output signal...
-
Page 109: Chapter 6 Saving And Loading The User Setting Data
ALL files in a “Memory Stick”. When a menu is displayed, you can set up the camcorder so that inserting a “Memory Stick” automatically jumps to the appropriate file-related menu page. -
Page 110: Saving User Menu Data (User File) To The "Memory Stick
Saving and Loading User Files Saving USER menu data (user file) to the “Memory Stick” You can save USER menu settings held in the camcorder as user files in the “Memory Stick”. You can save up to 100 user files in the “Memory Stick”. - Page 111 The message “SAVE OK? YES b NO” appears. P00 USER SAVE When a file number is SAVE OK? YES NO shown as NEW FILE, this DISPLAY MODE means that the file is 001.NEW FILE empty. When data is 002.NEW FILE 003.NEW FILE stored in a file number, the 004.NEW FILE...
-
Page 112: Loading Saved Data From A "Memory Stick
ERROR (flashing) Stick” fault. FILE ERROR The “Memory (flashing) Stick” contains data that cannot be loaded into this camcorder. Action Insert or reinsert the “Memory Stick”. Recheck, and consult your Sony representative. You cannot load data saved from another camcorder. -
Page 113: Saving And Loading Scene Files
Loading the scene file, you can quickly recreate setup conditions suitable for the scene. You can save up to five scene files in the camcorder memory and up to 100 scene files in a “Memory Stick”. - Page 114 The white balance setting data is not loaded. To save scene files from the camcorder memory to the “Memory Stick” You can save five scene files from the camcorder to the “Memory Stick” in a single operation. Display the SCENE FILE page of the FILE menu.
-
Page 115: Loading Scene Files
For details on menu operations, see “Basic menu operations” on page 93. To load the scene file stored in the camcorder, press the MENU knob. Then turn the MENU knob to move b to the desired file number, and press the MENU knob again. -
Page 116: Resetting The Settings Of The Camcorder To The Standard Settings
• The scene files loaded from the “Memory Stick” overwrite data saved in the camcorder memory. • To load the scene file saved in the camcorder memory when the “Memory Stick” is inserted, return to the P00 SCENE RECALL page and load the desired scene file in the camcorder memory. -
Page 117: Displaying A File-Related Menu Page When Inserting A "Memory Stick
A “Memory Stick” enables you to save user files, scene files, lens files, reference files and ALL files. The camcorder menu system allows you to make a setting so that when a “Memory Stick” holding these files is inserted while in menu operating mode, a menu page relating to the desired file is automatically displayed on the screen. -
Page 118: Chapter 7 Appendix
Putting a cloth, for example, over the unit can cause excessive internal heat build-up. After use Always turn off the power. Before storing the camcorder for a long period Remove the battery pack. Shipping • Remove the cassette before transporting the unit. -
Page 119: Characteristics Of Ccd Sensors
When patterns of stripes or lines are shot, they may appear jagged. Condensation If you move the camcorder from a very cold place to a warm place, or use it in a damp location, condensation may form on the drum. Then, if the camcorder is operated in this state, recording and playback may not be performed properly. -
Page 120: Maintenance
Keep a check of the hours of head drum operation: with normal use, the heads should need replacing after about 2,000 hours of use. When the heads need replacement, contact your Sony dealer. Check the hours of head drum operation in the DRUM RUNNING item on the HOURS METER page of the DIAGNOSIS menu. - Page 121 If a problem is indicated in the results, follow the instructions in the table below to check the camcorder and cassette. If no errors can be found, contact your Sony dealer. Also, be sure to check the quality of the playback video and audio (see step 7).
-
Page 122: About I.link
IEEE 1394 that Sony proposed, is a trademark supported by a majority of companies worldwide. -
Page 123: About A "Memory Stick
About a “Memory Stick” What is “Memory Stick”? “Memory Stick” is a new compact, portable and versatile IC (Integrated Circuit) recording medium with a data capacity that exceeds a floppy disk. “Memory Stick” is specially designed for exchanging and sharing digital data among “Memory Stick”... - Page 124 Precautions • To prevent data loss, make backups of data frequently. In no event will Sony be liable for any loss of data. • Unauthorized recording may be contrary to the provisions of copyright law. When you use a “Memory Stick”...
-
Page 125: Operation Warnings
If recording clogging of the still fails after head is cleaning the head, detected. turn off the power Recording may and consult your fail. Sony representative. Recording Turn off the power continues but and consult your may be Sony substandard. representative. - Page 126 OPEN 1) During recording 2) During recording and playback 3) Note that a tape is damaged if the camcorder is operated while “SLACK” is displayed. For details about the warning displays and error messages on the viewfinder, see page 127.
-
Page 127: Error Code List
Turn off the power and consult your Sony representative. Er92-*** When the error code other than the ones listed above is displayed, turn off the power and consult your Sony representatives. Operation/error messages An operation or error message is displayed in the operation/error message display area (page 22) in the viewfinder. -
Page 128: Troubleshooting
Troubleshooting You can use this chart to establish possible causes of an apparent problem; always double-check before sending the camcorder for repair. If a problem persists, contact your Sony dealer. Symptoms The camcorder does not power on when you turn the POWER switch The tape transport does not operate when you press either VTR button. - Page 129 Symptoms Cause The equipment connected to the It sometimes takes time for the connected camcorder via an i.LINK connection equipment to recognize the operation. does not react as expected, for example, the video image does not appear on its screen.
-
Page 130: Specifications
Specifications General Power voltage 12 V DC +5.0/–1.0 V Power consumption Approx. 17 W (with 12 V DC supply, when recording with the LCD monitor off) Operating temperature °C to +40°C (32°F to 104°F) Storage temperature – 20°C to +60°C (–4°F to +140°F) Recording format DVCAM, DV-SP Continuous operating time... - Page 131 Microphone Type Black electret condenser microphone Directivity Super cardioid Frequency response 100 Hz to 20 kHz Output impedance 100 Ω Power voltage 48 V DC Mass Approx. 115 g (4 oz) 162 × 21 mm (6 × Dimensions × diameter) (excluding cable) Tape section General Video recording system...
- Page 132 MIC IN (G) MIC IN (X) MIC IN (Y) Related Products There is a range of Sony products available to meet every conceivable video shooting requirement. For details, consult your Sony sales representative or supplier. Power supply and related equipment...
-
Page 133: Chart Of Optional Components And Accessories
Tripod Adaptor Tripod LC-DS300SFT Soft Carrying Case LC-H300 Carrying Case LCR-1 Rain cover * Optional accessory shoe kit is required for fitting. For details, consult your Sony dealer. LMD series LCD Monitor DSR-50/50P Digital Videocassette Recorder DSR-1500A/1600A/1800A/2000A Digital Videocassette Recorder BP-GL65/GL95/L60S... - Page 134 LC-DS300SFT Soft Carrying Case LC-H300 Carrying Case LCR-1 Rain cover * Optional accessory shoe kit is required for fitting. For details, consult your Sony dealer. Chart of Optional Components and Accessories LMD series LCD Monitor DSR-50/50P Digital Videocassette Recorder DSR-1500A/1600A/1800A/2000A...
-
Page 135: Glossary
Glossary Auto Tracing White balance. The white balance is automatically adjusted for the lighting conditions during shooting. Bayonet type A type of lens mount. The lens can be inserted into the lens mount and fixed in place by rotating a ring. Black balance To balance the black level of the R, G, and B signals so that black has no... - Page 136 code. Using this mode produces a difference of approximately 86 seconds per day between real time and time code, which causes problems when editing programs in units of seconds using the number of frames as a reference. NTSC Abbreviation for National Television System Committee.
-
Page 137: Index
Indicator 22 Setting 104 Compatibility of DVCAM and DV formats 48 Connecting line input audio equipment 37 CONTRAST control 20 Controlling the camcorder from a non-linear editing system 43 Correcting skin detail 60 DAT 25 Date/time Indicator 23 Setting 105... - Page 138 Connecting 41 Making backup of recording image 41 Settings required for an i.LINK connection 41 Using the camcorder as a feeder 42 i.LINK CTL setting 41 i.LINK DV OUT connector 8, 18, 41 ID number 23 Instant automatic iris adjustment...
- Page 139 Scan mode 107 Scene file Loading 115 Loading scene files from a “Memory Stick” into the camcorder memory 116 Saving 113 Setting the file ID 114 SCENE FILE page 84, 89 Selecting the aspect ratio 106 Selecting the display items 98...
- Page 140 Sony Corporation...