Table of Contents
Advertisement
NOTE: Specifications are correct at time of printing and are subject to change without notice.
* Actual sustained engine power will likely be lower due to operating limitations and environmental factors. Please refer to 'Engine Power Rating Information' for
further details.
Safety Instructions & Operator's Manual for
21" STEEL DECK
WALK MOWERS
SERIES 20
Models
RP217020BDV (7800424)
RP2187520BV (7800425)
RP2187520BVE (7800427)
2167520B (7800428)
P2167520B (7800429)
P2187520BV (7800430)
P2187520BVE (7800432)
N2167520B (7800437)
NP2167520B (7800438)
NP2187520BV (7800439)
Manual No. 7102713 (Rev. '-', 10/13/2008)
TP10009112
Advertisement
Table of Contents

Related Manuals for Snapper 2167520B (7800428)


Summary of Contents for Snapper 2167520B (7800428)
- Page 1 NOTE: Specifications are correct at time of printing and are subject to change without notice. * Actual sustained engine power will likely be lower due to operating limitations and environmental factors. Please refer to ‘Engine Power Rating Information’ for further details. Safety Instructions &...
- Page 2 Snapper at P.O. Box 1379, McDonough, Georgia 30253. You can contact us at our website (www.snapper.com), or if you would like to speak with a Customer Service Representative, call us at the Snapper Customer Relations Center at 1-800-935-2967. For faster service please have your Serial Number and Model Number available.
-
Page 3: Table Of Contents
Table of Contents Operator Safety ..........2 Important Operator Safety Instructions . -
Page 4: Operator Safety
If you have any questions pertaining to your machine which your dealer cannot answer to your satisfaction, call or write the Customer Service Department at SNAPPER, McDonough, Georgia 30253. Phone: (1-800-935-2967). Protection for Children Tragic accidents can occur if the operator is not alert to the presence of children. - Page 5 10. DO NOT test for spark by grounding spark plug next to spark plug hole; spark plug could ignite gas exiting engine. 11. Have machine serviced by an authorized SNAPPER dealer at least once a year and have the dealer install any new safety devices.
-
Page 6: Features And Controls
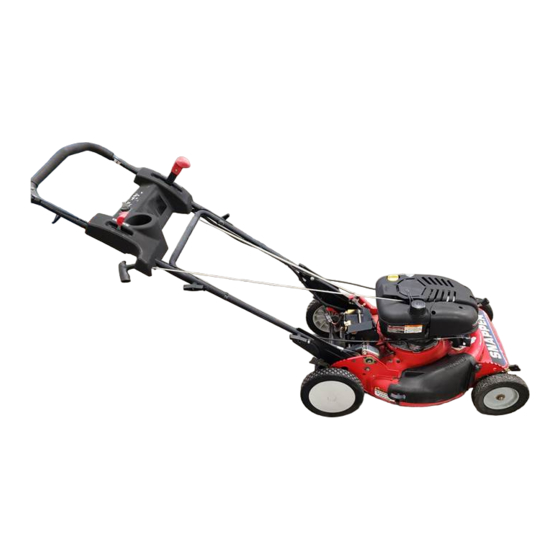
Features and Controls IMPORTANT The figures and illustrations in this manual are provided for reference only and may differ from your specific model. Contact your Snapper dealer if you have questions. Features and Controls Oil Fill Cap and Dipstick Fuel Filler Cap... -
Page 7: Operation
Operation Pre-Start Check List Make the following checks and perform the service required before each start-up. 1. Check the guards, deflectors, grass bag, adapter, and covers to make sure all are in place and securely tightened. 2. Check the blade control (A, Figure 1), wheel drive control (B), and ground speed control (C) to insure they work freely. -
Page 8: Propelling Mower
DO NOT attempt any maintenance, adjustments or service with engine and blade running. STOP engine and blade. Disconnect spark plug wire and secure away from spark plug. Engine and components are HOT. Avoid serious burns, allow sufficient time for all components to cool. www.snapper.com... -
Page 9: Cutting Height Adjustment
Operation (Continued) WARNING DO NOT attempt any maintenance, adjustments or service with engine and blade running. STOP engine and blade. Disconnect spark plug wire and secure away from spark plug. Engine and components are HOT. Avoid serious burns, allow sufficient time for all components to cool. Cutting Height Adjustment 1. -
Page 10: Installing The Discharge Deflector
“Handle Assembly”. Figure 11: Installing the grass bag adapter WARNING DO NOT operate without entire Grass Catcher or guard in place. Grass Catcher components are subject to deterioration during normal use. Inspect frequently and replace worn or damaged components immediately. www.snapper.com... -
Page 11: Installing The Grass Bag
Figure 13: Installing the grass bag WARNING Grass Catcher bags used on SNAPPER products are made of woven fabric, and are subject to deterioration and wear during normal usage. Check condition of bag before each use. Immediately replace worn or damaged catcher bags with only bags recommended by SNAPPER. -
Page 12: Maintenance
Maintenance Maintenance - Introduction To retain the quality of the mower, use genuine SNAPPER replacement parts only. Contact a local SNAPPER dealer for parts and service assistance. For the correct part or information for a particular mower, always mention the model and serial number. -
Page 13: Check Mower Blade
Maintenance (Continued) WARNING DO NOT attempt any maintenance, adjustments or service with engine and blade running. STOP engine and blade. Disconnect spark plug wire and secure away from spark plug. Engine and components are HOT. Avoid serious burns, allow sufficient time for all components to cool. Wear heavy leather gloves when handling or working around cutting blades. -
Page 14: Mower Blade Replacement
If contamination does occur, the air filter will have to be replaced. 3. Remove the blade (B, Figure 20). Figure 20: Removing the mower blade Make sure that blade hub is seated between flanges www.snapper.com... -
Page 15: Wheel Drive Control Adjustment
Maintenance (Continued) WARNING DO NOT attempt any maintenance, adjustments or service with engine and blade running. STOP engine and blade. Disconnect spark plug wire and secure away from spark plug. Engine and components are HOT. Avoid serious burns, allow sufficient time for all components to cool. Blade Sharpening (Continued) 4. -
Page 16: Driven And Drive Disc Service
If the drive disc and driven disc are clean and the mower drive is still slipping, adjust the driven disc as follows: 1. Move the ground speed control (A, Figure 25) into the ‘fast’ position. Figure 25: The ground speed control www.snapper.com... - Page 17 Maintenance (Continued) WARNING DO NOT attempt any maintenance, adjustments or service with engine and blade running. STOP engine and blade. Disconnect spark plug wire and secure away from spark plug. Engine and components are HOT. Avoid serious burns, allow sufficient time for all components to cool. Driven Disc Adjustment (Continued) 2.
- Page 18 5. Install a new bearing and secure to the thrust plate with four retaining screws. Tighten the screws securely. 6. Reassemble the components in reverse order. NOTE: Be sure to replace the shim washer (D) when reassembling the driven disc assembly. Figure 30: Replacing the driven disc www.snapper.com...
-
Page 19: Belt Service
Maintenance (Continued) WARNING DO NOT attempt any maintenance, adjustments or service with engine and blade running. STOP engine and blade. Disconnect spark plug wire and secure away from spark plug. Engine and components are HOT. Avoid serious burns, allow sufficient time for all components to cool. Replacing the Bearing On the Pulley End Of the Hex Shaft To replace the bearing on the pulley end of the hex shaft,... -
Page 20: Transmission Belt Replacement
5. Twist the belt sideways and pull it upward between the differential bracket (E) and driven pulley (F) and then down into the pulley groove. Make sure the Poly-V Belt is above the belt guide (G). Figure 34: Poly-v belt routing www.snapper.com... -
Page 21: Battery Service
Maintenance (Continued) Battery Service New Battery Preparation 1. Remove the battery from the carton. 2. Place the battery in a well ventilated area on a level non- concrete surface. 3. Remove the battery cell caps. Fill the cells as required with electrolyte (supplied with battery) to the proper level. -
Page 22: Service Schedule
Page 10 Page 11 Engine Manual Engine Manual Engine Manual Engine Manual Page 11, 17 Page 12 Page 5 Page 10 Page 10 Page 13-16 EACH SEASON 7074460 7034608 7034604 7019795 7017168 7026691 7026407 7012354 7046784 7073528 7041855 7006477 www.snapper.com... -
Page 23: Troubleshooting
4. Replace belt. 1. Clean debris. 2. Clean or replace driven disc. 3. Replace drive belt. 4. Contact authorized SNAPPER dealer. 1. Adjust cutting height. 2. Move engine speed control to ‘Fast’ position. 3. Move ground speed control to a slower speed. -
Page 24: Warranty
For ninety (90) days from purchase date for the original purchaser’s commercial, rental, or other non-residential use, SNAP- PER, through any authorized SNAPPER dealer will replace, free of charge, any part or parts found upon examination by the factory at McDonough, Georgia, to be defective in material or workmanship or both. - Page 26 Notes www.snapper.com...
- Page 27 Notes...
- Page 28 (temperature, humidity, altitude), and engine-to-engine variability. Due to manufacturing and capacity limitations, Briggs & Stratton may substitute an engine of higher rated power for this Series engine. Snapper Products 535 Macon Street McDonough, GA 30253...